图是一种包括节点和边的数据结构,本文对图的构建、图的遍历给出详细的代码。其中,
图的表示方法有:
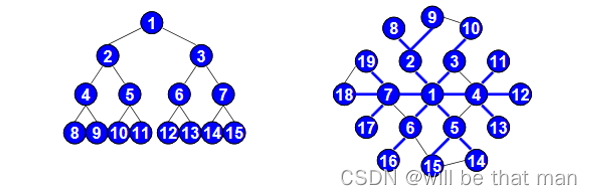
图的遍历方法有:
1. 图的表示
1.1 邻接矩阵
#include <iostream>
#include <vector>
using namespace std;

#define maxNodeNum 100 //最大顶点数

//定义图
struct GraphNode{
    int nodeNum; //顶点数
    int edgeNum; //边数
    vector<vector<int>> graph;
    /*vector<int> data; //多数情况下顶点无数据*/
    GraphNode(): nodeNum(0),edgeNum(0),graph(maxNodeNum,vector<int>(maxNodeNum,0)){}
    GraphNode(int n,int m): nodeNum(n),edgeNum(m),graph(maxNodeNum,vector<int>(maxNodeNum,0)){}
};

class Solution{
public:
    GraphNode* buildGraph(){
        GraphNode* g = new GraphNode();
        cin>>g->nodeNum; //输入顶点数
        cin>>g->edgeNum; //输入边数
        if(g->edgeNum!=0){ //如果有边
            //输入边,建图
            for(int i=0;i<g->edgeNum;i++){
                int node1,node2; //边连接的两个节点
                int weight; //边权重,可以设为1,表示有连接,0表示无连接
                cin>>node1>>node2>>weight;
                g->graph[node1][node2] = weight; //插入边
                g->graph[node2][node1] = weight; //此处模拟无向图
            }
        }
        /*//如果有顶点数据的话,读入数据
        for(int i=0;i<g->nodeNum;i++){
            cin>>g->data[i];
        }*/
        return g;
    }

    //遍历图
    void printGraph(GraphNode* g){
        for(int i=0;i<g->nodeNum;i++){
            for(int j=0;j<g->nodeNum;j++){
                cout<<g->graph[i][j]<<" ";
            }
            cout<<endl;
        }
    }
};

int main(){
    Solution s;
    GraphNode* g = s.buildGraph();
    s.printGraph(g);
    return 0;
}

/**
输入:
    0 17
    0 1 1
    0 3 1
    1 2 1
    1 3 1
    1 5 1
    2 4 1
    2 5 1
    3 6 1
    3 7 1
    4 5 1
    4 9 1
    5 6 1
    5 8 1
    5 9 1
    6 7 1
    6 8 1
    8 9 1
输出:
    0 1 0 1 0 0 0 0 0 0
    1 0 1 1 0 1 0 0 0 0
    0 1 0 0 1 1 0 0 0 0
    1 1 0 0 0 0 1 1 0 0
    0 0 1 0 0 1 0 0 0 1
    0 1 1 0 1 0 1 0 1 1
    0 0 0 1 0 1 0 1 1 0
    0 0 0 1 0 0 1 0 0 0
    0 0 0 0 0 1 1 0 0 1
    0 0 0 0 1 1 0 0 1 0
*/
1.2 邻接表
#include <iostream>
#include <vector>
using namespace std;

#define maxNodeNum 100 //最大顶点数

//图节点定义
struct VNode{
    int nodeVal; //邻接点下标
    int weight; //边权重
    /*int data; //存顶点数据,这里省略*/
    VNode* next; //指向下一个邻接点的指针

    VNode():nodeVal(-1),weight(0),next(NULL){} // 这里的-1是随便设的
    VNode(int node,int w,VNode* ptr):nodeVal(node),weight(w),next(ptr){}
};

//图定义
struct GraphNode{
    int nodeNum;  //顶点数
    int edgeNum; //边数
    vector<VNode*> graph; //邻接表
    //下面的初始化逻辑是错误的,graph(maxNodeNum,new VNode())的意思是maxNodeNum个指针全都指向new Node()开辟的一个空间
    //导致插入节点时都是在一个头节点上进行插入
    GraphNode(): nodeNum(0),edgeNum(0){
        for(int i=0;i<maxNodeNum;i++){
            VNode* init = new VNode();
            graph.push_back(init);
        }
    }
    GraphNode(int n,int m): nodeNum(n),edgeNum(m),graph(maxNodeNum){
        for(int i=0;i<maxNodeNum;i++){
            VNode* init = new VNode();
            graph.push_back(init);
        }
    }
};

class Solution{
public:
    //插入边
    void insertEdge(GraphNode* g,int node1,int node2,int weight){
        VNode* newNode1 = new VNode();
        /*插入边<node1,node2>*/
        newNode1->nodeVal = node2;
        newNode1->weight = weight;
        //将node2插入node1的头节点
        newNode1->next = g->graph[node1]->next;
        g->graph[node1]->next = newNode1;

        /*若是无向图,插入边<node2,node1>*/
        VNode* newNode2 = new VNode();
        newNode2->nodeVal = node1;
        newNode2->weight = weight;
        //将node1插入node2的头节点
        newNode2->next = g->graph[node2]->next;
        g->graph[node2]->next = newNode2;
    }
    //构建图
    GraphNode* buildGraph(){
        GraphNode* g = new GraphNode();
        cin>>g->nodeNum;
        cin>>g->edgeNum;
        if(g->edgeNum!=0){ //边数不为零时
            for(int i=0;i<g->edgeNum;i++){
                int node1,node2; //边节点
                int weight; //边权重
                cin>>node1>>node2>>weight;
                insertEdge(g,node1,node2,weight);
            }
        }
        // 如果顶点有数据的话,读入数据

        return g;
    }
    void printGraph(GraphNode* g){
        VNode* cur;
        for(int i=0;i<g->nodeNum;i++){
            cout<<i<<" ";
            cur = g->graph[i]->next;
            while(cur){
                cout<<cur->nodeVal<<" ";
                cur = cur->next;
            }
            cout<<endl;
        }
    }
};

int main(){
    Solution s;
    GraphNode* g = s.buildGraph();
    s.printGraph(g);
    return 0;
}

/*
输入:
    10 17
    0 1 1
    0 3 1
    1 2 1
    1 3 1
    1 5 1
    2 4 1
    2 5 1
    3 6 1
    3 7 1
    4 5 1
    4 9 1
    5 6 1
    5 8 1
    5 9 1
    6 7 1
    6 8 1
    8 9 1
输出:
    0 3 1
    1 5 3 2 0
    2 5 4 1
    3 7 6 1 0
    4 9 5 2
    5 9 8 6 4 2 1
    6 8 7 5 3
    7 6 3
    8 9 6 5
    9 8 5 4
 */
2. 图的遍历
2.1 深度优先搜索
深度优先遍历图的方法是,从图中某顶点v出发:
- 访问顶点v;
- 依次从v的未被访问的邻接点出发,对图进行深度优先遍历,直至图中和v有路径相通的顶点都被访问;
- 若此时图中尚有顶点未被访问,则从一个未被访问的顶点出发,重新进行深度优先遍历,直到图中所有顶点均被访问过为止。
深度优先搜系类似于树的先序遍历,伪代码如下所示:
void DFS(Vertex V)
{
    visited[V] = true;
    for(V的每个邻接点W)
        if (!visited[W])
            DFS(W) ;
}
若有N个顶点、E条边,时间复杂度:
- 用邻接表存储图,为
O
(
N
+
E
)
O (N+E)
O(N+E)
- 用邻接矩阵存储图,为
O
(
N
2
)
O ( N^2 )
O(N2)
2.2 广度优先搜索
广度优先搜索的基本过程:BFS是从根节点开始,沿着树(图)的宽度遍历树(图)的节点。如果所有节点均被访问,则算法中止。一般用队列数据结构来辅助实现BFS算法。
广度优先搜索类似于树的层序遍历,伪代码如下所示:
void BFS(Vertex V)
{
    visited[V] = true;
    Enqueue(V, Q);
    while(!IsEmpty (Q)){
        V = Dequeue(Q);
        for (V的每个邻接点W){
			if(!visited[W]){
                visited[W]= true;
                Enqueue (W, Q);
            }
		}
    }
}
若有N个顶点、E条边,时间复杂度:
- 用邻接表存储图,为
O
(
N
+
E
)
O (N+E)
O(N+E)
- 用邻接矩阵存储图,为
O
(
N
2
)
O ( N^2 )
O(N2)
3. 图的遍历代码
3.1 邻接矩阵的遍历
#include <iostream>
#include <vector>
#include <queue>
using namespace std;

#define maxNodeNum 100 //最大顶点数

//定义图
struct GraphNode{
    int nodeNum; //顶点数
    int edgeNum; //边数
    vector<vector<int>> graph;
    /*vector<int> data; //多数情况下顶点无数据*/
    GraphNode(): nodeNum(0),edgeNum(0),graph(maxNodeNum,vector<int>(maxNodeNum,0)){}
    GraphNode(int n,int m): nodeNum(n),edgeNum(m),graph(maxNodeNum,vector<int>(maxNodeNum,0)){}
};

class Solution{
public:
    GraphNode* buildGraph(){
        GraphNode* g = new GraphNode();
        cin>>g->nodeNum; //输入顶点数
        cin>>g->edgeNum; //输入边数
        if(g->edgeNum!=0){ //如果有边
            //输入边,建图
            for(int i=0;i<g->edgeNum;i++){
                int node1,node2; //边连接的两个节点
                int weight; //边权重,可以设为1,表示有连接,0表示无连接
                cin>>node1>>node2>>weight;
                g->graph[node1][node2] = weight; //插入边
                g->graph[node2][node1] = weight; //此处模拟无向图
            }
        }
        /*//如果有顶点数据的话,读入数据
        for(int i=0;i<g->nodeNum;i++){
            cin>>g->data[i];
        }*/
        return g;
    }
};

vector<bool> visit(maxNodeNum,false);
//深搜,类似于二叉树的递归遍历
void dfs(GraphNode* g,int val){
    visit[val] = true;
    cout<<"正在访问节点"<<val<<endl;
    for(int i=0;i<g->nodeNum;i++){
        if(!visit[i] && g->graph[val][i]){
            dfs(g,i);
        }
    }
}

//广搜,类似于二叉树的层序遍历
void bfs(GraphNode* g,int val){
    queue<int> que;
    que.push(val);
    visit[val] = true;
    cout<<"正在访问节点"<<val<<endl;
    while(!que.empty()){
        int curVal = que.front();
        que.pop();
        for(int i=0;i<g->nodeNum;i++){
            if(!visit[i] && g->graph[curVal][i]){
                que.push(i);
                visit[i] = true;
                cout<<"正在访问节点"<<i<<endl;
            }
        }
    }
}

int main(){
    Solution s;
    GraphNode* g = s.buildGraph();
    dfs(g,0);
    for(int i=0;i<maxNodeNum;i++){
        visit[i] = false;
    }
    bfs(g,0);
    return 0;
}

/*
输入:
    10 17
    0 1 1
    0 3 1
    1 2 1
    1 3 1
    1 5 1
    2 4 1
    2 5 1
    3 6 1
    3 7 1
    4 5 1
    4 9 1
    5 6 1
    5 8 1
    5 9 1
    6 7 1
    6 8 1
    8 9 1
输出:
    正在访问节点0
    正在访问节点1
    正在访问节点2
    正在访问节点4
    正在访问节点5
    正在访问节点6
    正在访问节点3
    正在访问节点7
    正在访问节点8
    正在访问节点9
    正在访问节点0
    正在访问节点1
    正在访问节点3
    正在访问节点2
    正在访问节点5
    正在访问节点6
    正在访问节点7
    正在访问节点4
    正在访问节点8
    正在访问节点9
 */
3.2 邻接表的遍历
#include <iostream>
#include <vector>
#include <queue>
using namespace std;

#define maxNodeNum 100 //最大顶点数

//图节点定义
struct VNode{
    int nodeVal; //邻接点下标
    int weight; //边权重
    /*int data; //存顶点数据,这里省略*/
    VNode* next; //指向下一个邻接点的指针

    VNode():nodeVal(-1),weight(0),next(NULL){} // 这里的-1是随便设的
    VNode(int node,int w,VNode* ptr):nodeVal(node),weight(w),next(ptr){}
};

//图定义
struct GraphNode{
    int nodeNum;  //顶点数
    int edgeNum; //边数
    vector<VNode*> graph; //邻接表
    //下面的初始化逻辑是错误的,graph(maxNodeNum,new VNode())的意思是maxNodeNum个指针全都指向new Node()开辟的一个空间
    //导致插入节点时都是在一个头节点上进行插入
    GraphNode(): nodeNum(0),edgeNum(0){
        for(int i=0;i<maxNodeNum;i++){
            VNode* init = new VNode(i,0,NULL);
            graph.push_back(init);
        }
    }
    GraphNode(int n,int m): nodeNum(n),edgeNum(m),graph(maxNodeNum){
        for(int i=0;i<maxNodeNum;i++){
            VNode* init = new VNode();
            graph.push_back(init);
        }
    }
};

class Solution{
public:
    //插入边
    void insertEdge(GraphNode* g,int node1,int node2,int weight){
        VNode* newNode1 = new VNode();
        /*插入边<node1,node2>*/
        newNode1->nodeVal = node2;
        newNode1->weight = weight;
        //将node2插入node1的头节点
        newNode1->next = g->graph[node1]->next;
        g->graph[node1]->next = newNode1;

        /*若是无向图,插入边<node2,node1>*/
        VNode* newNode2 = new VNode();
        newNode2->nodeVal = node1;
        newNode2->weight = weight;
        //将node1插入node2的头节点
        newNode2->next = g->graph[node2]->next;
        g->graph[node2]->next = newNode2;
    }
    //构建图
    GraphNode* buildGraph(){
        GraphNode* g = new GraphNode();
        cin>>g->nodeNum;
        cin>>g->edgeNum;
        if(g->edgeNum!=0){ //边数不为零时
            for(int i=0;i<g->edgeNum;i++){
                int node1,node2; //边节点
                int weight; //边权重
                cin>>node1>>node2>>weight;
                insertEdge(g,node1,node2,weight);
            }
        }
        // 如果顶点有数据的话,读入数据

        return g;
    }
    void printGraph(GraphNode* g){
        VNode* cur;
        for(int i=0;i<g->nodeNum;i++){
            cout<<i<<" ";
            cur = g->graph[i]->next;
            while(cur){
                cout<<cur->nodeVal<<" ";
                cur = cur->next;
            }
            cout<<endl;
        }
    }
};

vector<bool> visit(maxNodeNum,false);
//深搜,类似于二叉树的递归遍历
void dfs(GraphNode* g,int val){
    cout<<"正在访问顶点"<<val<<endl;
    visit[val] = true;
    VNode* curNode = g->graph[val]->next;
    while(curNode){
        if(!visit[curNode->nodeVal]){
            dfs(g,curNode->nodeVal);
        }
        curNode = curNode->next;
    }
}

//广搜,类似于二叉树的层序遍历
void bfs(GraphNode* g,int val){
    queue<VNode*> que;
    que.push(g->graph[val]);
    cout<<"正在访问节点"<<val<<endl;
    visit[val] = true;
    while(!que.empty()){
        VNode* curNode = que.front();
        que.pop();
        VNode* nextNode = curNode->next;
        while(nextNode){
            if(!visit[nextNode->nodeVal]){
                que.push(g->graph[nextNode->nodeVal]);
                cout<<"正在访问节点"<<nextNode->nodeVal<<endl;
                visit[nextNode->nodeVal] = true;
            }
            nextNode = nextNode->next;
        }
    }
}


int main(){
    Solution s;
    GraphNode* g = s.buildGraph();
    dfs(g,0);
    cout<<"=============="<<endl;
    for(int i=0;i<maxNodeNum;i++){
        visit[i] = false;
    }
    bfs(g,0);
    return 0;
}

/**
输入:
    10 17
    0 1 1
    0 3 1
    1 2 1
    1 3 1
    1 5 1
    2 4 1
    2 5 1
    3 6 1
    3 7 1
    4 5 1
    4 9 1
    5 6 1
    5 8 1
    5 9 1
    6 7 1
    6 8 1
    8 9 1
输出:
    正在访问顶点0
    正在访问顶点3
    正在访问顶点7
    正在访问顶点6
    正在访问顶点8
    正在访问顶点9
    正在访问顶点5
    正在访问顶点4
    正在访问顶点2
    正在访问顶点1
    ==============
    正在访问节点0
    正在访问节点3
    正在访问节点1
    正在访问节点7
    正在访问节点6
    正在访问节点5
    正在访问节点2
    正在访问节点8
    正在访问节点9
    正在访问节点4
 */
参考
- 数据结构(四)—— 图(1):什么是图
- 数据结构(四)—— 图(2):图的遍历