1.安装ansible
1.下载并安装ansible
# 所有节点安装依赖
yum install python -y
# 添加源
yum -y install epel-release
# 查看可安装的版本
yum list | grep ansible
# 下载安装
yum install ansible.noarch -y
# 查看ansible版本
ansible --version
2.配置hosts文件,添加被管控主机
# 路径:/etc/ansible/hosts
vim /etc/ansible/hosts

[host]
192.168.5.117
192.168.5.233

[ansible]
192.168.5.165
3.配置ansible主机和被管理主机机器互信(ssh免密登录)
# 需要实现ansible主机(192.168.5.165)向其他主机的单项ssh免密登录

# 下载sshpass工具
yum install sshpass -y
# 免交互
ssh-keygen -t dsa -f ~/.ssh/id_dsa -P ''
# 免交互分发密钥
sshpass -p{密码} ssh-copy-id -o StrictHostKeyChecking=no {主机ip}


# for循环多台分发密钥
for i in {165,233,117};do sshpass -pCloudEasy@2020 ssh-copy-id -o StrictHostKeyChecking=no 192.168.5.$i;done


# 讲解
为了使用ansible进行自动化运维,我们需要实现192.168.5.165向其他其他主机的单向ssh免密登录。为了实现此功能,我们需要在ansible服务器192.168.5.165上,生成密钥对(公钥id_rsa.pub,私钥id_rsa),然后将公钥追加到ansible管控端和被管控端的授权文件authorized_keys中
这里有个坑:
authorized_keys 这个文件的权限必须是600(,就算是644 也不行),否则无法由133免密登录到被管控端服务器上。

[root@test ~]# cd .ssh    //系统默认不带 .ssh文件
bash: cd: .ssh: No such file or directory
// 生成密钥对
[root@test ~]# ssh-keygen -t rsa        // 如果之前生成过密钥对,那可以直接用,不需要再生成
Generating public/private rsa key pair.
Enter file in which to save the key (/root/.ssh/id_rsa):
Created directory '/root/.ssh'.         // 自动生成 /root/.ssh 文件夹
Enter passphrase (empty for no passphrase):   // 直接回车,也可以设置密码
Enter same passphrase again:                  // 直接回车
Your identification has been saved in /root/.ssh/id_rsa.
Your public key has been saved in /root/.ssh/id_rsa.pub.
The key fingerprint is:
SHA256:uYpPQZBJkXb5uRw5Ugxs4GFG/qGuVALRZyecHqmwxJc root@test
The key's randomart image is:
+---[RSA 2048]----+
|o. +@X.+         |
|.+.E&o* o        |
|oo.*o*oo o       |
|... .+..*.       |
|  . o ooS+       |
|   +   .o.       |
|  . . . .        |
| . . o .         |
|  . ..o          |
+----[SHA256]-----+

然后到被管控主机上执行操作
mkdir -p /root/.ssh
cd /root/.ssh && touch authorized_keys
再将ansible主机上的公钥信息拷贝至被管控主机的authorized_keys文件中即可


# 最简单的方法
#1.生成私钥
ssh-keygen
#2.向主机分发私钥
ssh-copy-id root@192.168.5.233
ssh-copy-id root@192.168.5.117
ssh-copy-id root@192.168.5.165
注意:若出现以下错误
-bash: ssh-copy-id: command not found
则安装一个包即可
yum -y install openssh-clientsansible
4.验证
# 查看所有主机列表
[root@g42k8snode-0002 ansible]# ansible all --list
  hosts (3):
    192.168.5.165
    192.168.5.117
    192.168.5.233

# 查看[host]组下的主机列表
[root@g42k8snode-0002 ansible]# ansible "host" --list
  hosts (2):
    192.168.5.117
    192.168.5.233

# 尝试访问所有ip
[root@g42k8snode-0002 ansible]# ansible all -m ping
192.168.5.117 | SUCCESS => {
    "ansible_facts": {
        "discovered_interpreter_python": "/usr/bin/python"
    },
    "changed": false,
    "ping": "pong"
}
192.168.5.165 | SUCCESS => {
    "ansible_facts": {
        "discovered_interpreter_python": "/usr/bin/python"
    },
    "changed": false,
    "ping": "pong"
}
192.168.5.233 | SUCCESS => {
    "ansible_facts": {
        "discovered_interpreter_python": "/usr/bin/python"
    },
    "changed": false,
    "ping": "pong"
}
2.配置文件
1.ansible配置文件
# 配置文件为 /etc/ansible/ansible.cfg
# 以下为部分配置参数
	inventory = /etc/ansible/hosts		#这个参数表示资源清单inventory文件的位置
	library = /usr/share/ansible		#指向存放Ansible模块的目录,支持多个目录方式,只要用冒号(:)隔开就可以
	forks = 5		#并发连接数,默认为5
	sudo_user = root		#设置默认执行命令的用户
	remote_port = 22		#指定连接被管节点的管理端口,默认为22端口,建议修改,能够更加安全
	host_key_checking = False		#设置是否检查SSH主机的密钥,值为True/False。关闭后第一次连接不会提示配置实例
	timeout = 60		#设置SSH连接的超时时间,单位为秒
	log_path = /var/log/ansible.log		#指定一个存储ansible日志的文件(默认不记录日志)
2.ansible配置文件查找顺序
1. 检查环境变量ANSIBLE_CONFIG指向的路径文件(export ANSIBLE_CONFIG=/etc/ansible.cfg);
2. ~/.ansible.cfg,检查当前目录下的ansible.cfg配置文件;
3. /etc/ansible.cfg检查etc目录的配置文件。
3.ansible常用模块
(1)command模块
此模块功能与shell模块类似,已逐渐被shell模块取代
# chdir	在执行命令前,前切换至该目录
[root@g42k8snode-0002 ansible]# ansible host -m command -a 'chdir=/data/ ls'
192.168.5.117 | CHANGED | rc=0 >>

192.168.5.233 | CHANGED | rc=0 >>
ca_download
config
database
docker
jenkins_home
job_logs
m2
nfs
registry
secretkey

·················································································

# creates	用于判断文件是否存在。若存在,则不执行后面的命令(若不存在,则执行后面的命令)
	# 存在
[root@g42k8snode-0002 ansible]# ansible ansible -m command -a 'creates=/etc/ansible/hosts ls /etc/ansible/'
192.168.5.165 | SUCCESS | rc=0 >>
skipped, since /etc/ansible/hosts exists

·······················································································

# removes	用于判断文件是否存在。若不存在,则不执行后面的命令(若存在,则执行后面的命令)
	# 不存在
[root@g42k8snode-0002 ansible]# ansible ansible -m command -a 'removes=/etc/ansible/a.txt ls /etc/ansible/'
192.168.5.165 | SUCCESS | rc=0 >>
skipped, since /etc/ansible/a.txt does not exist
	# 存在
[root@g42k8snode-0002 ansible]# ansible ansible -m command -a 'removes=/etc/ansible/hosts ls /etc/ansible/'
192.168.5.165 | CHANGED | rc=0 >>
ansible.cfg
hosts
roles
(2)copy模块
该模块用于将本机文件复制到远程主机,同时支持给定内容生成文件和修改权限等
# src	将ansible本地文件复制到远程主机上。本地文件的指定可以是绝对路径,也可以是相对路径,但远端主机的路径必须是绝对路径。如果路径是目录,则会递归复制
	$ 绝对路径
[root@g42k8snode-0002 ansible]# ansible host -m copy -a 'src=/etc/ansible/hosts dest=/root/test/'
192.168.5.117 | CHANGED => {
    "ansible_facts": {
        "discovered_interpreter_python": "/usr/bin/python"
    },
    "changed": true,
    "checksum": "c1920ad05c2daa80856bb3eae9b7b7d6b8a2c5e2",
    "dest": "/root/test/hosts",
    "gid": 0,
    "group": "root",
    "md5sum": "009c4e34fc719cc02d417be09af095ae",
    "mode": "0644",
    "owner": "root",
    "size": 1075,
    "src": "/root/.ansible/tmp/ansible-tmp-1614849313.77-27470-211102900060561/source",
    "state": "file",
    "uid": 0
}
192.168.5.233 | CHANGED => {
    "ansible_facts": {
        "discovered_interpreter_python": "/usr/bin/python"
    },
    "changed": true,
    "checksum": "c1920ad05c2daa80856bb3eae9b7b7d6b8a2c5e2",
    "dest": "/root/test/hosts",
    "gid": 0,
    "group": "root",
    "md5sum": "009c4e34fc719cc02d417be09af095ae",
    "mode": "0644",
    "owner": "root",
    "size": 1075,
    "src": "/root/.ansible/tmp/ansible-tmp-1614849313.78-27472-203988361199867/source",
    "state": "file",
    "uid": 0
}
	$ 相对路径
[root@g42k8snode-0002 ansible]# ansible host -m copy -a 'src=./hosts dest=/root/test/'
192.168.5.233 | SUCCESS => {
    "ansible_facts": {
        "discovered_interpreter_python": "/usr/bin/python"
    },
    "changed": false,
    "checksum": "c1920ad05c2daa80856bb3eae9b7b7d6b8a2c5e2",
    "dest": "/root/test/hosts",
    "gid": 0,
    "group": "root",
    "mode": "0644",
    "owner": "root",
    "path": "/root/test/hosts",
    "size": 1075,
    "state": "file",
    "uid": 0
}
192.168.5.117 | CHANGED => {
    "ansible_facts": {
        "discovered_interpreter_python": "/usr/bin/python"
    },
    "changed": true,
    "checksum": "c1920ad05c2daa80856bb3eae9b7b7d6b8a2c5e2",
    "dest": "/root/test/hosts",
    "gid": 0,
    "group": "root",
    "md5sum": "009c4e34fc719cc02d417be09af095ae",
    "mode": "0644",
    "owner": "root",
    "size": 1075,
    "src": "/root/.ansible/tmp/ansible-tmp-1614849406.71-29423-152125754614573/source",
    "state": "file",
    "uid": 0
}

················································································

# content	用于替换“src”,可以直接将给定内容生成文件,并制定权限
[root@g42k8snode-0002 ansible]# ansible host -m copy -a 'content="hello\n" dest=/root/test/a.txt mode=666'
[root@g42k8snode-0003 test]# ls
hosts
[root@g42k8snode-0003 test]# ls
a.txt  hosts
[root@g42k8snode-0003 test]# cat a.txt
hello
[root@g42k8snode-0003 test]# ll
total 8
-rw-rw-rw- 1 root root    6 Mar  4 17:29 a.txt
-rw-r--r-- 1 root root 1075 Mar  4 17:16 hosts


················································································

# 关于覆盖:buckup=yes	将源文件改名作为备份(源文件名称格式:oldname.xxxx.日期),新文件用源文件的名字
[root@g42k8snode-0002 ansible]# ansible host -m copy -a 'content="hellohellohellohelloooooooooooooooooooooooooo\n" backup=yes dest=/root/test/a.txt mode=666'
[root@g42k8snode-0003 test]# ll
total 12
-rw-rw-rw- 1 root root   46 Mar  4 17:37 a.txt
-rw-rw-rw- 1 root root   21 Mar  4 17:35 a.txt.5298.2021-03-04@17:37:56~
-rw-r--r-- 1 root root 1075 Mar  4 17:16 hosts

·················································································
# directory_mode	递归设定目录的权限,默认为系统默认权限
# force				当远程主机文件已存在,但里面的内容不同时,设为“force=yes”表示强制覆盖;设为“force=no”表示远程主机的目标位置不存在该文件才复制。默认为“yes”
# others			所有的 file 模块中的选项都可以在这里使用
(3)file模块
该模块主要用于设置文件的属性,比如创建文件、创建链接文件、删除文件等
force #需要在两种情况下强制创建软链接,一种是源文件不存在,但之后会建立的情况下;另一种是目标软链接已存在,需要先取消之前的软链,然后创建新的软链,有两个选项:yes|no
group #定义文件/目录的属组。后面可以加上mode:定义文件/目录的权限
owner #定义文件/目录的属主。后面必须跟上path:定义文件/目录的路径
recurse #递归设置文件的属性,只对目录有效,后面跟上src:被链接的源文件路径,只应用于state=link的情况
dest #被链接到的路径,只应用于state=link的情况
# 创建目录
[root@g42k8snode-0002 ansible]# ansible host -m file -a 'path=/root/test1 state=directory'
	# 注释:
		path	指定路径
		state	说明状态
	# state 有以下选项
		directory:如果目录不存在,就创建目录
		file:即使文件不存在,也不会被创建
		link:创建软链接
		hard:创建硬链接
		touch:如果文件不存在,则会创建一个新的文件,如果文件或目录已存在,则更新其最后修改时间
		absent:删除目录、文件或者取消链接文件

··················································································

# 创建链接文件
[root@g42k8snode-0002 ansible]# ansible host -m file -a 'path=/root/test/a.tex src=/root/test1/b.txt state=link'
192.168.5.117 | CHANGED => {
    "ansible_facts": {
        "discovered_interpreter_python": "/usr/bin/python"
    },
    "changed": true,
    "dest": "/root/test/a.tex",
    "gid": 0,
    "group": "root",
    "mode": "0777",
    "owner": "root",
    "size": 17,
    "src": "/root/test1/b.txt",
    "state": "link",
    "uid": 0
}

[root@g42k8snode-0003 test]# ll
total 12
lrwxrwxrwx 1 root root   17 Mar  4 18:01 a.tex -> /root/test1/b.txt
-rw-rw-rw- 1 root root   46 Mar  4 17:37 a.txt
-rw-rw-rw- 1 root root   21 Mar  4 17:35 a.txt.5298.2021-03-04@17:37:56~
-rw-r--r-- 1 root root 1075 Mar  4 17:16 hosts

·······················································································

# 删除文件
root@g42k8snode-0002 ansible]# ansible host -m file -a 'path=/root/test/a.txt state=absent'
[root@g42k8snode-0003 test]# ll
total 8
lrwxrwxrwx 1 root root   17 Mar  4 18:01 a.tex -> /root/test1/b.txt
-rw-rw-rw- 1 root root   21 Mar  4 17:35 a.txt.5298.2021-03-04@17:37:56~
-rw-r--r-- 1 root root 1075 Mar  4 17:16 hosts
(4)fetch模块
该模块用于从远程主机复制文件到ansible本地(注意:远程的目录结构同样会复制过来)
dest:用来存放文件的目录
src:在远程拉取的文件,并且必须是一个file,不能是目录
[root@g42k8snode-0002 ansible]# ansible host -m fetch -a 'src=/root/test1/b.txt dest=/etc/ansible'
192.168.5.117 | CHANGED => {
    "changed": true,
    "checksum": "da39a3ee5e6b4b0d3255bfef95601890afd80709",
    "dest": "/etc/ansible/192.168.5.117/root/test1/b.txt",
    "md5sum": "d41d8cd98f00b204e9800998ecf8427e",
    "remote_checksum": "da39a3ee5e6b4b0d3255bfef95601890afd80709",
    "remote_md5sum": null
}
[root@g42k8snode-0002 ansible]# ls
192.168.5.117  ansible.cfg  hosts  roles
[root@g42k8snode-0002 ansible]# cd 192.168.5.117/
[root@g42k8snode-0002 192.168.5.117]# ls
root
[root@g42k8snode-0002 192.168.5.117]# cd root/
[root@g42k8snode-0002 root]# ls
test1
[root@g42k8snode-0002 root]# cd test1/
[root@g42k8snode-0002 test1]# ls
b.txt
(5)cron模块
该模块适用于管理计划任务
day= #日应该运行的工作( 1-31, *, */2, )
hour= # 小时 ( 0-23, *, */2, )
minute= #分钟( 0-59, *, */2, )
month= # 月( 1-12, *, /2, )
weekday= # 周 ( 0-6 for Sunday-Saturday, )
job= #指明运行的命令是什么
name= #定时任务描述
reboot # 任务在重启时运行,不建议使用,建议使用special_time
special_time #特殊的时间范围,参数:reboot(重启时),annually(每年),monthly(每月),weekly(每周),daily(每天),hourly(每小时)
state #指定状态,present表示添加定时任务,也是默认设置,absent表示删除定时任务
user # 以哪个用户的身份执行
# 创建计划任务
[root@g42k8snode-0002 ansible]# ansible host -m cron -a 'name="a" month=*/5 job="ls /etc/ansible"'
192.168.5.117 | CHANGED => {
    "ansible_facts": {
        "discovered_interpreter_python": "/usr/bin/python"
    },
    "changed": true,
    "envs": [],
    "jobs": [
        "ntpdate time",
        "a"
    ]
}
192.168.5.233 | CHANGED => {
    "ansible_facts": {
        "discovered_interpreter_python": "/usr/bin/python"
    },
    "changed": true,
    "envs": [],
    "jobs": [
        "ntpdate time",
        "a"
    ]
}

[root@g42k8snode-0002 ansible]# ansible host -m shell -a 'crontab -l'
192.168.5.117 | CHANGED | rc=0 >>
#Ansible: ntpdate time
0 1 * * * /usr/sbin/ntpdate ntp.myhuaweicloud.com > /dev/null 2>&1
#Ansible: a
* * * */5 * ls /etc/ansible
192.168.5.233 | CHANGED | rc=0 >>
#Ansible: ntpdate time
0 1 * * * /usr/sbin/ntpdate ntp.myhuaweicloud.com > /dev/null 2>&1
#Ansible: a
* * * */5 * ls /etc/ansible

····················································································

# 删除计划任务
[root@g42k8snode-0002 ansible]# ansible host -m cron -a 'name="a" month=*/5 job="ls /etc/ansible" state=absent'
192.168.5.117 | CHANGED => {
    "ansible_facts": {
        "discovered_interpreter_python": "/usr/bin/python"
    },
    "changed": true,
    "envs": [],
    "jobs": [
        "ntpdate time"
    ]
}
192.168.5.233 | CHANGED => {
    "ansible_facts": {
        "discovered_interpreter_python": "/usr/bin/python"
    },
    "changed": true,
    "envs": [],
    "jobs": [
        "ntpdate time"
    ]
}


[root@g42k8snode-0002 ansible]# ansible host -m shell -a 'crontab -l'                                 192.168.5.117 | CHANGED | rc=0 >>
#Ansible: ntpdate time
0 1 * * * /usr/sbin/ntpdate ntp.myhuaweicloud.com > /dev/null 2>&1
192.168.5.233 | CHANGED | rc=0 >>
#Ansible: ntpdate time
0 1 * * * /usr/sbin/ntpdate ntp.myhuaweicloud.com > /dev/null 2>&1
(6)yum模块
该模块用于软件的安装、卸载
name= #所安装的包的名称
state= #present—>安装, latest—>安装最新的, absent—> 卸载软件。
update_cache #强制更新yum的缓存
conf_file #指定远程yum安装时所依赖的配置文件(安装本地已有的包)。
disable_pgp_check #是否禁止GPG checking,只用于presentor latest。
disablerepo #临时禁止使用yum库。 只用于安装或更新时。
enablerepo #临时使用的yum库。只用于安装或更新时。
# 下载安装
[root@g42k8snode-0002 ansible]# ansible host -m yum -a 'name=htop state=present'


# 卸载
[root@g42k8snode-0002 ansible]# ansible host -m yum -a 'name=htop state=absent'
(7)service模块
该模块用于服务程序的管理
arguments #命令行提供额外的参数
enabled #设置开机启动。
name= #服务名称
runlevel #开机启动的级别,一般不用指定。
sleep #在重启服务的过程中,是否等待。如在服务关闭以后等待2秒再启动。(定义在剧本中。)
state #有四种状态,分别为:started—>启动服务, stopped—>停止服务, restarted—>重启服务, reloaded—>重载配置
# 开启nginx服务,并设置开机自启
[root@g42k8snode-0002 ansible]# ansible host -m service -a 'name=nginx state=started enabled=true'

# 关闭服务
[root@g42k8snode-0002 ansible]# ansible host -m service -a 'name=nginx state=stopped'
(8)user模块
该模块主要是用来管理用户账号
comment # 用户的描述信息
createhome # 是否创建家目录
force # 在使用state=absent时, 行为与userdel –force一致.
group # 指定基本组
groups # 指定附加组,如果指定为(groups=)表示删除所有组
home # 指定用户家目录
move_home # 如果设置为home=时, 试图将用户主目录移动到指定的目录
name # 指定用户名
non_unique # 该选项允许改变非唯一的用户ID值
password # 指定用户密码
remove # 在使用state=absent时, 行为是与userdel –remove一致
shell # 指定默认shell执行路径(如:shell=/sbin/nologin)
state # 设置帐号状态,不指定为创建,指定值为absent表示删除
system # 当创建一个用户,设置这个用户是系统用户:system=yes。这个设置不能更改现有用户
uid # 指定用户的uid
# 添加一个用户并指定其uid
[root@g42k8snode-0002 ansible]# ansible host -m user -a 'name=mao uid=11111'
[root@g42k8snode-0002 ansible]# ansible host -m shell -a 'cat /etc/passwd | grep mao'
192.168.5.117 | CHANGED | rc=0 >>
mao:x:11111:11111::/home/mao:/bin/bash
192.168.5.233 | CHANGED | rc=0 >>
mao:x:11111:11111::/home/mao:/bin/bash


# 删除用户
[root@g42k8snode-0002 ansible]# ansible host -m user -a 'name=mao state=absent'
root@g42k8snode-0002 ansible]# ansible host -m shell -a 'cat /etc/passwd | grep mao'
192.168.5.117 | FAILED | rc=1 >>
non-zero return code
192.168.5.233 | FAILED | rc=1 >>
non-zero return code
(9)group模块
该模块用于添加或删除组
gid= #设置组的GID号
name= #指定组的名称
state= #指定组的状态,默认为创建,设置值为absent为删除
system= #设置值为yes,表示创建为系统组
# 创建组并指定gid
[root@g42k8snode-0002 ansible]# ansible host -m group -a 'name=mao gid=122'
[root@g42k8snode-0002 ansible]# ansible host -m shell -a 'cat /etc/group | grep 122'
192.168.5.117 | CHANGED | rc=0 >>
mao:x:122:
192.168.5.233 | CHANGED | rc=0 >>
mao:x:122:


# 删除组
[root@g42k8snode-0002 ansible]# ansible host -m group -a 'name=mao state=absent'
[root@g42k8snode-0002 ansible]# ansible host -m shell -a 'cat /etc/group | grep mao'
192.168.5.117 | FAILED | rc=1 >>
non-zero return code
192.168.5.233 | FAILED | rc=1 >>
non-zero return code
(10)script模块
该模块用于将本机的脚本在被管理端的机器上运行
本地创建脚本
[root@g42k8snode-0002 ansible]# cat test.sh
#!/bin/bash
echo "hello !"
给脚本可执行权限
[root@g42k8snode-0002 ansible]# chmod +x test.sh
在被管理机器上运行该脚本
[root@g42k8snode-0002 ansible]# ansible host -m script -a '/etc/ansible/test.sh'
192.168.5.117 | CHANGED => {
    "changed": true,
    "rc": 0,
    "stderr": "Shared connection to 192.168.5.117 closed.\r\n",
    "stderr_lines": [
        "Shared connection to 192.168.5.117 closed."
    ],
    "stdout": "hello !\r\n",
    "stdout_lines": [
        "hello !"
    ]
}
192.168.5.233 | CHANGED => {
    "changed": true,
    "rc": 0,
    "stderr": "Shared connection to 192.168.5.233 closed.\r\n",
    "stderr_lines": [
        "Shared connection to 192.168.5.233 closed."
    ],
    "stdout": "hello !\r\n",
    "stdout_lines": [
        "hello !"
    ]
}
(11)setup模块
该模块主要用于收集信息,是通过调用facts组件来实现的。
facts组件是Ansible用于采集被管机器设备信息的一个功能,我们可以使用setup模块查机器的所有facts信息,可以使用filter来查看指定信息。整个facts信息被包装在一个JSON格式的数据结构中,ansible_facts是最上层的值。
facts就是变量,内建变量 。每个主机的各种信息,cpu颗数、内存大小等。会存在facts中的某个变量中。调用后返回很多对应主机的信息,在后面的操作中可以根据不同的信息来做不同的操作。如redhat系列用yum安装,而debian系列用apt来安装软件。
# 查看内存信息:直接使用命令获取变量的值
[root@g42k8snode-0002 ansible]# ansible host -m setup -a 'filter="*mem*"'
192.168.5.117 | SUCCESS => {
    "ansible_facts": {
        "ansible_memfree_mb": 1879,
        "ansible_memory_mb": {
            "nocache": {
                "free": 5662,
                "used": 2158
            },
            "real": {
                "free": 1879,
                "total": 7820,
                "used": 5941
            },
            "swap": {
                "cached": 0,
                "free": 0,
                "total": 0,
                "used": 0
            }
        },
        "ansible_memtotal_mb": 7820,
        "discovered_interpreter_python": "/usr/bin/python"
    },
    "changed": false
}
192.168.5.233 | SUCCESS => {
    "ansible_facts": {
        "ansible_memfree_mb": 985,
        "ansible_memory_mb": {
            "nocache": {
                "free": 12226,
                "used": 3657
            },
            "real": {
                "free": 985,
                "total": 15883,
                "used": 14898
            },
            "swap": {
                "cached": 0,
                "free": 0,
                "total": 0,
                "used": 0
            }
        },
        "ansible_memtotal_mb": 15883,
        "discovered_interpreter_python": "/usr/bin/python"
    },
    "changed": falses
}


[root@g42k8snode-0002 ansible]# ansible host -m shell -a 'free -m'
192.168.5.117 | CHANGED | rc=0 >>
              total        used        free      shared  buff/cache   available
Mem:           7820        1861        1884          81        4074        5578
Swap:             0           0           0
192.168.5.233 | CHANGED | rc=0 >>
              total        used        free      shared  buff/cache   available
Mem:          15883        2937         990         776       11956       11839
Swap:             0           0           0


···················································································

# 保存信息:--tree 保存路径				(setup模块还有一个很好用的功能就是可以保存我们所筛选的信息至我们的主机上,同时,文件名为我们被管制的主机的IP,这样方便我们知道是哪台机器出的问题)
[root@g42k8snode-0002 ansible]# ansible host -m setup -a 'filter="*mem*"' --tree /etc/ansible/
192.168.5.117 | SUCCESS => {
    "ansible_facts": {
        "ansible_memfree_mb": 1881,
        "ansible_memory_mb": {
            "nocache": {
                "free": 5664,
                "used": 2156
            },
            "real": {
                "free": 1881,
                "total": 7820,
                "used": 5939
            },
            "swap": {
                "cached": 0,
                "free": 0,
                "total": 0,
                "used": 0
            }
        },
        "ansible_memtotal_mb": 7820,
        "discovered_interpreter_python": "/usr/bin/python"
    },
    "changed": false
}
192.168.5.233 | SUCCESS => {
    "ansible_facts": {
        "ansible_memfree_mb": 984,
        "ansible_memory_mb": {
            "nocache": {
                "free": 12225,
                "used": 3658
            },
            "real": {
                "free": 984,
                "total": 15883,
                "used": 14899
            },
            "swap": {
                "cached": 0,
                "free": 0,
                "total": 0,
                "used": 0
            }
        },
        "ansible_memtotal_mb": 15883,
        "discovered_interpreter_python": "/usr/bin/python"
    },
    "changed": false
}
[root@g42k8snode-0002 ansible]# ls
192.168.5.117  192.168.5.233  ansible.cfg  hosts  roles  test.sh
(12)template模块
在实际应用中,我们的配置文件有些地方可能会根据远程主机的配置的不同而有稍许的不同,template可以使用变量来接收远程主机上setup收集到的facts信息,针对不同配置的主机,定制配置文件。用法大致与copy模块相同
src 源模板文件路径
dest 目标文件路径
force 是否强制覆盖,默认为yes
backup 如果原目标文件存在,则先备份目标文件
group 目标文件或目录的所属组
owner 目标文件或目录的所属主
mode 目标文件的权限
# 资产文件:
cat /etc/ansible/hosts
[webservers]
192.168.200.136 httpd_port=8088

# 配置文件:
grep ^Listen httpd.conf
Listen {{ httpd_port }}

# palybook文件:
cat httpd02.yml
---
- hosts: 192.168.200.136
  remote_user: root
  tasks:
    - name: install httpd
      yum: name=httpd state=present
    - name: install configure file
      template: src=httpd.conf dest=/etc/httpd/conf/httpd.conf
      notify: restart httpd service
    - name: start httpd service
      service: name=httpd state=started
  handlers:
    - name: restart httpd servcie
      service: name=httpd state=restarted
(13)authorized_key模块
为远程服务器添加authorized_keys文件内容
#  新增公钥内容到服务器用户家目录的.ssh目录的authorized_keys文件 没有则创建authorized_keys文件 state: (1) present 添加 (2) absent 删除
---
- hosts: test
  gather_facts: false
  tasks:
  - name: deliver authorized_keys
    authorized_key:
        user: root
        key: "{{ lookup('file', '/etc/ansible/roles/authorized_keys') }}"  # 从本地authorized_keys文件读取公钥内容
        state: present
        exclusive: no

-----------------------------------------------------------------

# 实际可以直接指定公钥文件,如

- name: add user softadm
  user:
    name: softadm

- name: Set authorized key taken from file
  authorized_key:
    user: softadm
    state: present
    key: "{{ lookup('file', '/etc/ansible/roles/init/files/softadm_id_rsa.pub') }}"

- name: Set authorized key taken from file
  authorized_key:
    user: root
    state: present
    key: "{{ lookup('file', '/etc/ansible/roles/init/files/root_id_rsa.pub') }}"
(14)unarchive模块
该模块用于解压缩
copy 在解压缩之前,是否将文件复制到远程主机。默认为yes,若为no,则要求远端主机上压缩包必须存在
src 如果copy为yes,则需要指定压缩文件的源路径
dest 远程主机上的一个路径,即文件解压的路径
mode 解压后文件的权限(默认权限:500)
owner 解压后文件或目录的属主
group 解压后文件或目录的属组
creates 指定一个文件名,当该文件存在时,则解压指令不执行
list_files 如果为yes,则会列出压缩包里的文件;默认为no(2.0版本新增的选项)
- unarchive: src=foo.tgz dest=/var/lib/foo
- unarchive: src=/tmp/foo.zip dest=/usr/local/bin copy=no
- unarchive: src=https://example.com/example.zip dest=/usr/local/bin copy=no
(15)wait_for模块
该模块用于设置等待时间,例如等待数据库启动、web 容器启动等等
port 等待端指定口号必须启动
path 等待某文件必须创建
host 默认是127.0.0.1,为了满足等待其他远程服务器的场景
timeout 等待时间,单位是“秒”
state 默认是started,
4.ansible-playbook
1.介绍
playbook是由一个或多个play组成的列表,play的主要功能在于将事先归并为一组的主机装扮成事先通过ansible中的task定义好的角色。从根本上来讲,所谓的task无非是调用ansible的一个module。将多个play组织在一个playbook中,即可以让它们联合起来按事先编排的机制完成某一任务
2.核心元素
- Hosts 执行的远程主机列表
- Tasks 任务集
- Varniables 内置变量或自定义变量在playbook中调用
- Templates 模板,即使用模板语法的文件,比如配置文件等
- Handlers 和notity结合使用,由特定条件触发的操作,满足条件方才执行,否则不执行
- tags 标签,指定某条任务执行,用于选择运行playbook中的部分代码
3.playbook语法
- 在单一一个
playbook文件中,可以连续三个连子号(---)区分多个play。还有选择性的连续三个点(...)好用来表示play的结尾,也可省略。
- 次行开始正常写
playbook的内容,一般都会写上描述该playbook的功能。
- 使用#号注释代码。
- 缩进必须统一,不能空格和
tab混用。
- 缩进的级别也必须是一致的,同样的缩进代表同样的级别,程序判别配置的级别是通过缩进结合换行实现的。
-
YAML文件内容和Linux系统大小写判断方式保持一致,是区分大小写的,k/v的值均需大小写敏感
-
k/v的值可同行写也可以换行写。同行使用:分隔。
-
v可以是个字符串,也可以是一个列表
- 一个完整的代码块功能需要最少元素包括
name: task
4.playbook中元素属性
(1)主机与用户
在一个playbook开始时,最先定义的一定是要操作的主机和用户
---
- hosts: 192.168.5.117
  remote_user: root
除了上面的定义外,还可以在某一个 tasks 中定义要执行该任务的远程用户
tasks:
  - name: run "df -h"
    remote_user: root
    shell: name=df -h
还可以定义使用 sudo 授权用户执行该任务
tasks:
  - name: run "df -h"
    sudo_user: root
    sudo: yes
    shell: name=df -h
(2)tasks任务列表
每一个task必须有一个名称name,这样在运行playbook时,从其输出的任务执行信息中可以很清楚的辨别是属于哪一个task的,如果没有定义 name,action的值将会用作输出信息中标记特定的task。
每一个playbook中可以包含一个或者多个tasks任务列表,每一个tasks完成具体的一件事,(任务模块)比如创建一个用户或者安装一个软件等,在hosts中定义的主机或者主机组都将会执行这个被定义的tasks。
tasks:
  - name: create new file
    file: path=/tmp/test01.txt state=touch
  - name: create new user
    user: name=test001 state=present
(3)handlers 与 notify
很多时候当我们某一个配置发生改变,我们需要重启服务,(比如httpd配置文件文件发生改变了)这时候就可以用到handlers和notify了;
(当发生改动时)notify actions会在playbook的每一个task结束时被触发,而且即使有多个不同task通知改动的发生,notify actions知会被触发一次;比如多个resources指出因为一个配置文件被改动,所以apache需要重启,但是重新启动的操作只会被执行一次。
[root@ansible ~]# cat httpd.yml
#用于安装httpd并配置启动
---
- hosts: 192.168.1.31
  remote_user: root

  tasks:
  - name: install httpd
    yum: name=httpd state=installed
  - name: config httpd
    template: src=/root/httpd.conf dest=/etc/httpd/conf/httpd.conf
    notify:
      - restart httpd
  - name: start httpd
    service: name=httpd state=started

  handlers:
    - name: restart httpd
      service: name=httpd state=restarted

#这里只要对httpd.conf配置文件作出了修改,修改后需要重启生效,在tasks中定义了restart httpd这个action,然后在handlers中引用上面tasks中定义的notify。
(4)playbook中变量的使用(5种方式)
环境说明:在 hosts 文件中定义两个组:apache、nginx
[root@ansible PlayBook]# cat /etc/ansible/hosts
[apache]
192.168.1.36
192.168.1.33

[nginx]
192.168.1.3[1:2]
a. 命令行指定变量
执行playbook时候通过参数-e传入变量,这样传入的变量在整个playbook中都可以被调用,属于全局变量
[root@ansible PlayBook]# cat variables.yml
---
- hosts: all
  remote_user: root

  tasks:
    - name: install pkg
      yum: name={{ pkg }}

#执行playbook 指定pkg
[root@ansible PlayBook]# ansible-playbook -e "pkg=httpd" variables.yml
b. hosts 文件中定义变量
在/etc/ansible/hosts文件中定义变量,可以针对每个主机定义不同的变量,也可以定义一个组的变量,然后直接在playbook中直接调用。注意,组中定义的变量没有单个主机中的优先级高。
# 编辑hosts文件定义变量
[root@ansible PlayBook]# vim /etc/ansible/hosts
[apache]
192.168.1.36 webdir=/opt/test     #定义单个主机的变量
192.168.1.33
[apache:vars]      #定义整个组的统一变量
webdir=/web/test

[nginx]
192.168.1.3[1:2]
[nginx:vars]
webdir=/opt/web


# 编辑playbook文件
[root@ansible PlayBook]# cat variables.yml
---
- hosts: all
  remote_user: root

  tasks:
    - name: create webdir
      file: name={{ webdir }} state=directory   #引用变量


# 执行playbook
[root@ansible PlayBook]# ansible-playbook variables.yml
c. palybook 文件中定义变量
编写playbook时,直接在里面定义变量,然后直接引用,可以定义多个变量;注意:如果在执行playbook时,又通过-e参数指定变量的值,那么会以-e参数指定的为准
# 编辑playbook
[root@ansible PlayBook]# cat variables.yml
---
- hosts: all
  remote_user: root
  vars:                #定义变量
    pkg: nginx         #变量1
    dir: /tmp/test1    #变量2

  tasks:
    - name: install pkg
      yum: name={{ pkg }} state=installed    #引用变量
    - name: create new dir
      file: name={{ dir }} state=directory   #引用变量


# 执行playbook
[root@ansible PlayBook]# ansible-playbook variables.yml

# 如果执行时候又重新指定了变量的值,那么会已重新指定的为准
[root@ansible PlayBook]# ansible-playbook -e "dir=/tmp/test2" variables.yml
d. 调用setup模块获取变量
setup模块默认是获取主机信息的,有时候在playbook中需要用到,所以可以直接调用。常用的参数
# 编辑playbook文件
[root@ansible PlayBook]# cat variables.yml
---
- hosts: all
  remote_user: root

  tasks:
    - name: create file
      file: name={{ ansible_fqdn }}.log state=touch   #引用setup中的ansible_fqdn(主机的域名)


# 执行playbook
[root@ansible PlayBook]# ansible-playbook variables.yml
e. 独立的变量 yaml 文件中定义
为了方便管理将所有的变量统一放在一个独立的变量YAML文件中,laybook文件直接引用文件调用变量即可
# 定义存放变量的文件
[root@ansible PlayBook]# cat var.yml
var1: vsftpd
var2: httpd

# 编写playbook
[root@ansible PlayBook]# cat variables.yml
---
- hosts: all
  remote_user: root
  vars_files:    #引用变量文件
    - ./var.yml   #指定变量文件的path(这里可以是绝对路径,也可以是相对路径)

  tasks:
    - name: install package
      yum: name={{ var1 }}   #引用变量
    - name: create file
      file: name=/tmp/{{ var2 }}.log state=touch   #引用变量


# 执行playbook
[root@ansible PlayBook]# ansible-playbook  variables.yml
(5)playbook中标签的使用
一个playbook文件中,执行时如果想执行某一个任务,那么可以给每个任务集进行打标签,这样在执行的时候可以通过-t选择指定标签执行,还可以通过--skip-tags选择除了某个标签外全部执行等
# 编辑playbook
[root@ansible PlayBook]# cat httpd.yml
---
- hosts: 192.168.1.31
  remote_user: root

  tasks:
    - name: install httpd
      yum: name=httpd state=installed
      tags: inhttpd

    - name: start httpd
      service: name=httpd state=started
      tags: sthttpd

    - name: restart httpd
      service: name=httpd state=restarted
      tags:
        - rshttpd
        - rs_httpd

# 正常执行的结果
[root@ansible PlayBook]# ansible-playbook httpd.yml

PLAY [192.168.1.31] **************************************************************************************************************************

TASK [Gathering Facts] ***********************************************************************************************************************
ok: [192.168.1.31]

TASK [install httpd] *************************************************************************************************************************
ok: [192.168.1.31]

TASK [start httpd] ***************************************************************************************************************************
ok: [192.168.1.31]

TASK [restart httpd] *************************************************************************************************************************
changed: [192.168.1.31]

PLAY RECAP ***********************************************************************************************************************************
192.168.1.31               : ok=4    changed=1    unreachable=0    failed=0    skipped=0    rescued=0    ignored=0
- 通过
-t选项指定tags进行执行
# 通过-t指定tags名称,多个tags用逗号隔开
[root@ansible PlayBook]# ansible-playbook -t rshttpd httpd.yml

PLAY [192.168.1.31] **************************************************************************************************************************

TASK [Gathering Facts] ***********************************************************************************************************************
ok: [192.168.1.31]

TASK [restart httpd] *************************************************************************************************************************
changed: [192.168.1.31]

PLAY RECAP ***********************************************************************************************************************************
192.168.1.31               : ok=2    changed=1    unreachable=0    failed=0    skipped=0    rescued=0    ignored=0
- 通过
--skip-tags选项排除不执行的tags
[root@ansible PlayBook]# ansible-playbook --skip-tags inhttpd httpd.yml

PLAY [192.168.1.31] **************************************************************************************************************************

TASK [Gathering Facts] ***********************************************************************************************************************
ok: [192.168.1.31]

TASK [start httpd] ***************************************************************************************************************************
ok: [192.168.1.31]

TASK [restart httpd] *************************************************************************************************************************
changed: [192.168.1.31]

PLAY RECAP ***********************************************************************************************************************************
192.168.1.31               : ok=3    changed=1    unreachable=0    failed=0    skipped=0    rescued=0    ignored=0
(6)playbook中模板的使用
template模板为我们提供了动态配置服务,使用jinja2语言,里面支持多种条件判断、循环、逻辑运算、比较操作等。其实说白了也就是一个文件,和之前配置文件使用copy一样,只是当使用copy时,不能根据服务器配置不一样进行不同动态的配置。这样就不利于管理。
说明:
1、多数情况下都将template文件放在和playbook文件同级的templates目录下(手动创建),这样playbook文件中可以直接引用,会自动去找这个文件。如果放在别的地方,也可以通过绝对路径去指定。
2、模板文件后缀名为.j2
循环参考
template
示例1:通过 template 安装 httpd
1)playbook文件编写
[root@ansible PlayBook]# cat testtmp.yml
#模板示例
---
- hosts: all
  remote_user: root
  vars:
    - listen_port: 88    #定义变量

  tasks:
    - name: Install Httpd
      yum: name=httpd state=installed
    - name: Config Httpd
      template: src=httpd.conf.j2 dest=/etc/httpd/conf/httpd.conf    #使用模板
      notify: Restart Httpd
    - name: Start Httpd
      service: name=httpd state=started

  handlers:
    - name: Restart Httpd
      service: name=httpd state=restarted
2)模板文件准备,http的配置文件准备(这里配置文件端口使用了变量)
[root@ansible PlayBook]# cat templates/httpd.conf.j2 |grep ^Listen
Listen {{ listen_port }}
3)查看目录结构
# 目录结构
[root@ansible PlayBook]# tree .
.
├── templates
│   └── httpd.conf.j2
└── testtmp.yml

1 directory, 2 files
4)执行playbook【由于192.168.1.36那台机器是6的系统,模板文件里面的配置文件是7上面默认的httpd配置文件,httpd版本不一样(6默认版本为2.2.15,7默认版本为2.4.6),所以拷贝过去后启动报错】
[root@ansible PlayBook]# ansible-playbook testtmp.yml

PLAY [all] ******************************************************************************************

TASK [Gathering Facts] ******************************************************************************
ok: [192.168.1.36]
ok: [192.168.1.32]
ok: [192.168.1.33]
ok: [192.168.1.31]

TASK [Install Httpd] ********************************************************************************
ok: [192.168.1.36]
ok: [192.168.1.33]
ok: [192.168.1.32]
ok: [192.168.1.31]

TASK [Config Httpd] *********************************************************************************
changed: [192.168.1.31]
changed: [192.168.1.33]
changed: [192.168.1.32]
changed: [192.168.1.36]

TASK [Start Httpd] **********************************************************************************
fatal: [192.168.1.36]: FAILED! => {"changed": false, "msg": "httpd: Syntax error on line 56 of /etc/httpd/conf/httpd.conf: Include directory '/etc/httpd/conf.modules.d' not found\n"}
changed: [192.168.1.32]
changed: [192.168.1.33]
changed: [192.168.1.31]

RUNNING HANDLER [Restart Httpd] *********************************************************************
changed: [192.168.1.31]
changed: [192.168.1.32]
changed: [192.168.1.33]

PLAY RECAP ******************************************************************************************
192.168.1.31               : ok=5    changed=3    unreachable=0    failed=0    skipped=0    rescued=0    ignored=0
192.168.1.32               : ok=5    changed=3    unreachable=0    failed=0    skipped=0    rescued=0    ignored=0
192.168.1.33               : ok=5    changed=3    unreachable=0    failed=0    skipped=0    rescued=0    ignored=0
192.168.1.36               : ok=3    changed=1    unreachable=0    failed=1    skipped=0    rescued=0    ignored=0
template之when
when语句参考
条件测试:如果需要根据变量、facts或此前任务的执行结果来做为某task执行与否的前提时要用到条件测试,通过when语句执行,在task中使用jinja2的语法格式、
when语句:
在task后添加when子句即可使用条件测试;when语句支持jinja2表达式语法
类似这样:
tasks:
  - command: /bin/false
    register: result
    ignore_errors: True
  - command: /bin/something
    when: result|failed
  - command: /bin/something_else
    when: result|success
  - command: /bin/still/something_else
    when: result|skipped
示例2:通过 when 语句完善上面的 httpd 配置
1)准备两个配置文件,一个centos6系统httpd配置文件,一个centos7系统httpd配置文件
[root@ansible PlayBook]# tree templates/
templates/
├── httpd6.conf.j2     #6系统2.2.15版本httpd配置文件
└── httpd7.conf.j2     #7系统2.4.6版本httpd配置文件

0 directories, 2 files
2)修改playbook文件,通过setup模块获取系统版本去判断
[root@ansible PlayBook]# cat testtmp.yml
#when示例
---
- hosts: all
  remote_user: root
  vars:
    - listen_port: 88

  tasks:
    - name: Install Httpd
      yum: name=httpd state=installed
    - name: Config System6 Httpd
      template: src=httpd6.conf.j2 dest=/etc/httpd/conf/httpd.conf
      when: ansible_distribution_major_version == "6"   #判断系统版本,为6便执行上面的template配置6的配置文件
      notify: Restart Httpd
    - name: Config System7 Httpd
      template: src=httpd7.conf.j2 dest=/etc/httpd/conf/httpd.conf
      when: ansible_distribution_major_version == "7"   #判断系统版本,为7便执行上面的template配置7的配置文件
      notify: Restart Httpd
    - name: Start Httpd
      service: name=httpd state=started

  handlers:
    - name: Restart Httpd
      service: name=httpd state=restarted
3)执行playbook
[root@ansible PlayBook]# ansible-playbook testtmp.yml

PLAY [all] ******************************************************************************************

TASK [Gathering Facts] ******************************************************************************
ok: [192.168.1.31]
ok: [192.168.1.32]
ok: [192.168.1.33]
ok: [192.168.1.36]

TASK [Install Httpd] ********************************************************************************
ok: [192.168.1.32]
ok: [192.168.1.33]
ok: [192.168.1.31]
ok: [192.168.1.36]

TASK [Config System6 Httpd] *************************************************************************
skipping: [192.168.1.33]
skipping: [192.168.1.31]
skipping: [192.168.1.32]
changed: [192.168.1.36]

TASK [Config System7 Httpd] *************************************************************************
skipping: [192.168.1.36]
changed: [192.168.1.33]
changed: [192.168.1.31]
changed: [192.168.1.32]

TASK [Start Httpd] **********************************************************************************
ok: [192.168.1.36]
ok: [192.168.1.31]
ok: [192.168.1.32]
ok: [192.168.1.33]

RUNNING HANDLER [Restart Httpd] *********************************************************************
changed: [192.168.1.33]
changed: [192.168.1.31]
changed: [192.168.1.32]
changed: [192.168.1.36]

PLAY RECAP ******************************************************************************************
192.168.1.31               : ok=5    changed=2    unreachable=0    failed=0    skipped=1    rescued=0    ignored=0
192.168.1.32               : ok=5    changed=2    unreachable=0    failed=0    skipped=1    rescued=0    ignored=0
192.168.1.33               : ok=5    changed=2    unreachable=0    failed=0    skipped=1    rescued=0    ignored=0
192.168.1.36               : ok=5    changed=2    unreachable=0    failed=0    skipped=1    rescued=0    ignored=0
template之with_items
with_items迭代,当有需要重复性执行的任务时,可以使用迭代机制。
对迭代项的引用,固定变量名为“item”,要在task中使用with_items给定要迭代的元素列表。
列表格式:
字符串
字典
示例3:通过with_items安装多个不同软件
1)编写playbook
[root@ansible PlayBook]# cat testwith.yml
# 示例with_items
---
- hosts: all
  remote_user: root

  tasks:
    - name: Install Package
      yum: name={{ item }} state=installed   #引用item获取值
      with_items:     #定义with_items
        - httpd
        - vsftpd
        - nginx
上面 tasks 写法等同于:
---
- hosts: all
  remote_user: root
  tasks:
    - name: Install Httpd
      yum: name=httpd state=installed
    - name: Install Vsftpd
      yum: name=vsftpd state=installed
    - name: Install Nginx
      yum: name=nginx state=installed
示例4:通过嵌套子变量创建用户并加入不同的组
1)编写playbook
[root@ansible PlayBook]# cat testwith01.yml
# 示例with_items嵌套子变量
---
- hosts: all
  remote_user: root

  tasks:
    - name: Create New Group
      group: name={{ item }} state=present
      with_items:
        - group1
        - group2
        - group3

    - name: Create New User
      user: name={{ item.name }} group={{ item.group }} state=present
      with_items:
        - { name: 'user1', group: 'group1' }
        - { name: 'user2', group: 'group2' }
        - { name: 'user3', group: 'group3' }
2)执行playbook并验证
# 执行playbook
[root@ansible PlayBook]# ansible-playbook testwith01.yml

# 验证是否成功创建用户及组
[root@ansible PlayBook]# ansible all -m shell -a 'tail -3 /etc/passwd'
192.168.1.36 | CHANGED | rc=0 >>
user1:x:500:500::/home/user1:/bin/bash
user2:x:501:501::/home/user2:/bin/bash
user3:x:502:502::/home/user3:/bin/bash

192.168.1.32 | CHANGED | rc=0 >>
user1:x:1001:1001::/home/user1:/bin/bash
user2:x:1002:1002::/home/user2:/bin/bash
user3:x:1003:1003::/home/user3:/bin/bash

192.168.1.31 | CHANGED | rc=0 >>
user1:x:1002:1003::/home/user1:/bin/bash
user2:x:1003:1004::/home/user2:/bin/bash
user3:x:1004:1005::/home/user3:/bin/bash

192.168.1.33 | CHANGED | rc=0 >>
user1:x:1001:1001::/home/user1:/bin/bash
user2:x:1002:1002::/home/user2:/bin/bash
user3:x:1003:1003::/home/user3:/bin/bash
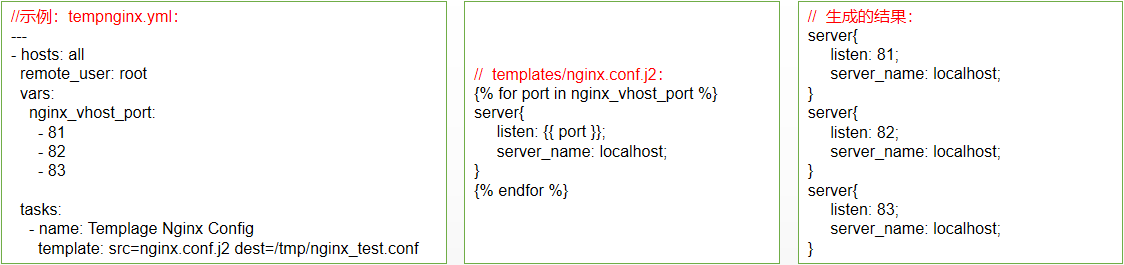
template之for if
通过使用for,if可以更加灵活的生成配置文件等需求,还可以在里面根据各种条件进行判断,然后生成不同的配置文件、或者服务器配置相关等
示例 5:
1)编写playbook
[root@ansible PlayBook]# cat testfor01.yml
# template for 示例
---
- hosts: all
  remote_user: root
  vars:
    nginx_vhost_port:
      - 81
      - 82
      - 83

  tasks:
    - name: Templage Nginx Config
      template: src=nginx.conf.j2 dest=/tmp/nginx_test.conf
2)编写模板文件
# 循环playbook文件中定义的变量,依次赋值给port
[root@ansible PlayBook]# cat templates/nginx.conf.j2
{% for port in nginx_vhost_port %}
server{
     listen: {{ port }};
     server_name: localhost;
}
{% endfor %}
3)执行playbook并查看结果
[root@ansible PlayBook]# ansible-playbook testfor01.yml

# 去到一个节点看下生成的结果发现自动生成了三个虚拟主机
[root@linux ~]# cat /tmp/nginx_test.conf
server{
     listen: 81;
     server_name: localhost;
}
server{
     listen: 82;
     server_name: localhost;
}
server{
     listen: 83;
     server_name: localhost;
}
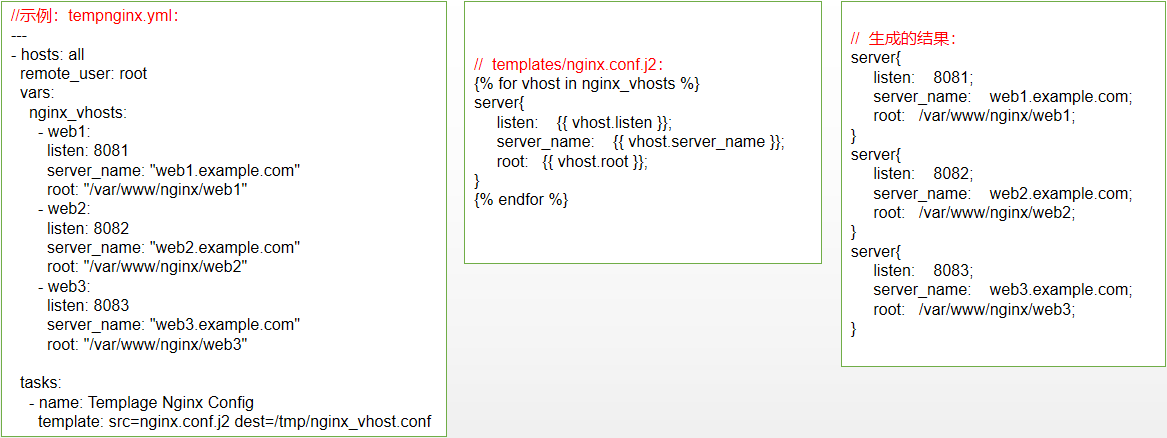
示例6:
1)编写playbook
[root@ansible PlayBook]# cat testfor02.yml
# template for 示例
---
- hosts: all
  remote_user: root
  vars:
    nginx_vhosts:
      - web1:
        listen: 8081
        server_name: "web1.example.com"
        root: "/var/www/nginx/web1"
      - web2:
        listen: 8082
        server_name: "web2.example.com"
        root: "/var/www/nginx/web2"
      - web3:
        listen: 8083
        server_name: "web3.example.com"
        root: "/var/www/nginx/web3"

  tasks:
    - name: Templage Nginx Config
      template: src=nginx.conf.j2 dest=/tmp/nginx_vhost.conf
2)编写模板文件
[root@ansible PlayBook]# cat templates/nginx.conf.j2
{% for vhost in nginx_vhosts %}
server{
     listen:    {{ vhost.listen }};
     server_name:    {{ vhost.server_name }};
     root:   {{ vhost.root }};
}
{% endfor %}
3)执行playbook并查看生成结果
[root@ansible PlayBook]# ansible-playbook testfor02.yml

# 去到一个节点看下生成的结果发现自动生成了三个虚拟主机
[root@linux ~]# cat /tmp/nginx_vhost.conf
server{
     listen:    8081;
     server_name:    web1.example.com;
     root:   /var/www/nginx/web1;
}
server{
     listen:    8082;
     server_name:    web2.example.com;
     root:   /var/www/nginx/web2;
}
server{
     listen:    8083;
     server_name:    web3.example.com;
     root:   /var/www/nginx/web3;
}
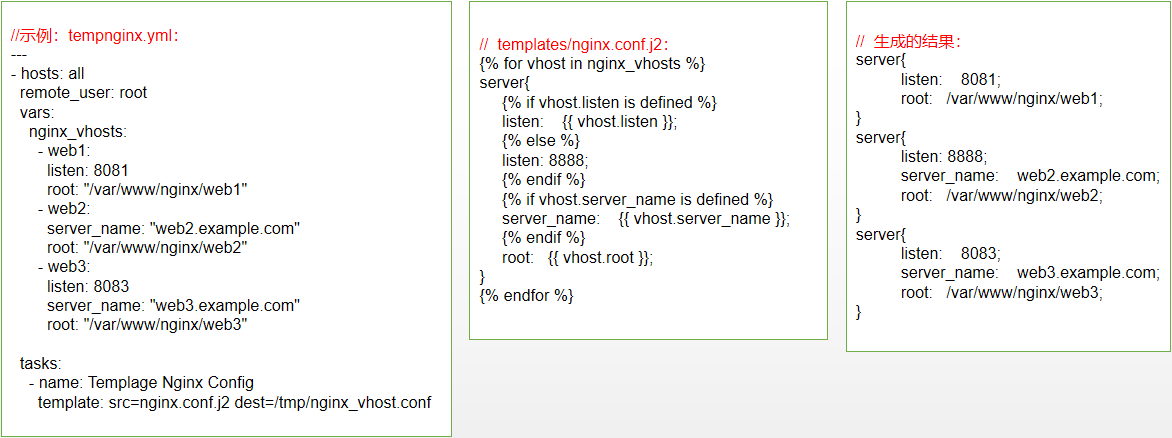
示例7:
在for循环中再嵌套if判断,让生成的配置文件更加灵活
1)编写playbook
[root@ansible PlayBook]# cat testfor03.yml
# template for 示例
---
- hosts: all
  remote_user: root
  vars:
    nginx_vhosts:
      - web1:
        listen: 8081
        root: "/var/www/nginx/web1"
      - web2:
        server_name: "web2.example.com"
        root: "/var/www/nginx/web2"
      - web3:
        listen: 8083
        server_name: "web3.example.com"
        root: "/var/www/nginx/web3"

  tasks:
    - name: Templage Nginx Config
      template: src=nginx.conf.j2 dest=/tmp/nginx_vhost.conf
2)编写模板文件
# 说明:这里添加了判断,如果listen没有定义的话,默认端口使用8888,如果server_name有定义,那么生成的配置文件中才有这一项。
[root@ansible PlayBook]# cat templates/nginx.conf.j2
{% for vhost in nginx_vhosts %}
server{
     {% if vhost.listen is defined %}
     listen:    {{ vhost.listen }};
     {% else %}
     listen: 8888;
     {% endif %}
     {% if vhost.server_name is defined %}
     server_name:    {{ vhost.server_name }};
     {% endif %}
     root:   {{ vhost.root }};
}
{% endfor %}
3)执行playbook并查看结果
[root@ansible PlayBook]# ansible-playbook testfor03.yml

# 去到一个节点看下生成的结果发现自动生成了三个虚拟主机
[root@linux ~]# cat /tmp/nginx_vhost.conf
server{
          listen:    8081;
          root:   /var/www/nginx/web1;
}
server{
          listen: 8888;
          server_name:    web2.example.com;
          root:   /var/www/nginx/web2;
}
server{
          listen:    8083;
          server_name:    web3.example.com;
          root:   /var/www/nginx/web3;
}