前言
突然反应过来, 前面一篇好像突然讲的太深了, 应该先从入门开始, 结果直接整源码分析, 导致一些不了解Spring Security的朋友不太懂用
本篇非常重要, 主要讲怎么给你的函数添加权限管理
本章内容
- 动态管理权限规则
- 怎么根据目标资源从数据库中获取权限?
- 权限表达式
- 基于方法的权限管理详解
动态管理权限规则
注意使用动态管理规则后, 角色继承将会失效, 因为你只需要修改表结构就可以达到修改角色和权限之间的关系
动态管理权限规则就是我们将URL拦截规则和访问URL所需要的权限都保存在数据库中,这样,在不改变源代码的情况下,只需要修改数据库中的数据,就可以对权限进行调整。
数据库设计
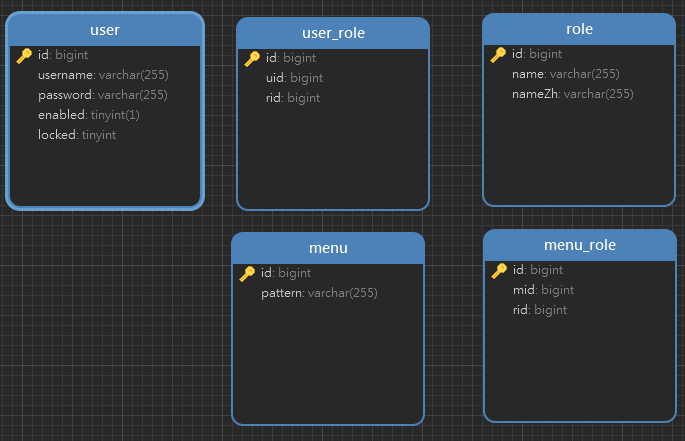
数据库表结构在这里:dynamic-permission-demo/src/main/resources/sql/menu.sql
记住这也不是企业中的使用方式, 上面的表设计少了很多张表哦, 只不过为了更好的完成学习
小白: “这样设计的话, menu 所对应的角色(权限)你要怎么让Spring Security知道从数据库中去拿呢?”
小黑: "还记得前面我说的扩展点了么? "
我们通过分析源码发现有一个地方存在需要自定义, 上一章节我说他是扩展点,其实非常简单。

回顾一下上一章节,这段代码的功能主要就是从目标资源中获取它所需要的权限。
但是有些时候目标资源就未必定义在spring security的配置文件中,而有可能定义在数据库中。
所以这里必然会有一个自定义的过程。
怎么根据目标资源从数据库中获取权限?
当投票器在投票时,需要两方面的权限:
- 其一是当前用户具备哪些权限;
- 其二是当前访问的URL或者方法需要哪些权限才能访问。
投票器所做的事情就是对这两种权限进行比较。
用户具备的权限保存在authentication中,那么当前访问的URL或者方法所需要的权限如何获取呢?
这就和 SecurityMetadataSource有关了。
从字面上来理解,SecurityMetadataSource就是安全元数据源,SecurityMetadataSource所做的事情,就是提供受保护对象所需要的权限。
例如,用户访问了一个URL地址,该URL地址需要哪些权限才能访问?
这个就由SecurityMetadataSource来提供。
SecurityMetadataSource本身只是一个接口,我们来看一下它的源码:
public interface SecurityMetadataSource extends AopInfrastructureBean {
   Collection<ConfigAttribute> getAttributes(Object object) throws IllegalArgumentException;
   Collection<ConfigAttribute> getAllConfigAttributes();
   boolean supports(Class<?> clazz);
}
这里只有三个方法:
-
getAttributes: 根据传入的安全对象参数返回其所需要的权限。如果受保护的对象是一个URL地址,那么传入的参数object 就是一个FilterInvocation对象; 如果受保护的是一个方法,那么传入的参数object 就是一个MethodInvocation对象。
-
getAllConfigAttributes: getAllConfigAttributes方法返回所有的角色/权限,以便验证是否支持。不过这个方法并不是必需的,也可以直接返回null。
-
supports: 返回当前的SecurityMetadataSource是否支持受保护的对象如FilterInvocation或者MethodInvocation。
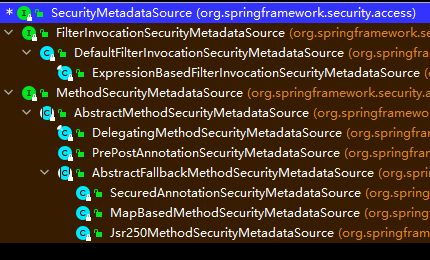
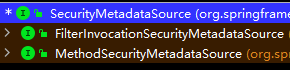
由图中可以看到,直接继承自SecurityMetadataSource的接口主要有两个:
FilterInvocationSecurityMetadataSource和 MethodSecurityMetadataSource。
-
FilterInvocationSecurityMetadataSource: 这是一个空接口,更像是一个标记。如果被保护的对象是一个URL地址,那么将由FilterInvocationSecurityMetadataSource的实现类提供访问该URL地址所需要的权限。
-
MethodSecurityMetadataSource: 这也是一个接口,如果受保护的对象是一个方法,那么将通过MethodSecurityMetadataSource的实现类来获取受保护对象所需要的权限。
FilterInvocationSecurityMetadataSource有一个子类
DefaultFilterInvocationSecurityMetadataSource,该类中定义了一个如下格式的Map集合:
private final Map<RequestMatcher,Collection<ConfigAttribute>> requestMap;
可以看到,在这个Map集合中,key是一个请求匹配器,value则是一个权限集合,也就是说requestMap中保存了请求URL和其所需权限之间的映射关系。
在 Spring Security中,如果直接在configure(HttpSecurity)方法中配置URL请求地址拦截,像下面这样:
http.authorizeRequests()
.antMatchers("/admin/**").hasRole("admin")
.antMatchers("/user/**").access("hasRole('user')").anyRequest().access("isAuthenticated()")
这段配置表示访问/admin/**格式的URL地址需要admin角色,访问/user/**格式的 URL地址需要user 角色,其余地址认证后即可访问。
这段请求和权限之间的映射关系,会经过DefaultFilterInvocationSecurityMetadataSource 的子类 ExpressionBasedFilterInvocationSecurityMetadataSource进行处理,并最终将映射关系保存到requestMap变量中,以备后续使用。
SecurityMetadataSource怎么使用?
在实际开发中,URL地址以及访问它所需要的权限可能保存在数据库中,此时我们可以自定义类实现FilterInvocationSecurityMetadataSource接口,然后重写里边的getAttributes方法,在getAttributes方法中,根据当前请求的URL地址去数据库中查询其所需要的权限,然后将查询结果封装为相应的ConfigAttribute集合返回即可。
如果是基于方法的权限管理,那么对应的 MethodSecurityMetadataSource实现类就比较多了:
-
PrePostAnnotationSecurityMetadataSource: @PreAuthorize、@PreFilter、@PostAuthorize、@PostFilter 四个注解所标记的权限规则,将由PrePostAnnotationSecurityMetadataSource负责提供。
-
SecuredAnnotationSecurityMetadataSource: @Secured注解所标记的权限规则,将由SecuredAnnotationSecurityMetadataSource负责提供。
-
MapBasedMethodSecurityMetadataSource: 基于XML文件配置的方法权限拦截规则(基于sec:protect节点),将由MapBasedMethodSecurityMetadataSource负责提供。
-
Js250MethodSecurityMetadataSource: JSR-250相关的注解(如@PermitAll、@DenyAll )所标记的权限规则,将由Jsr250MethodSecurityMetadataSource负责提供。
这就是SecurityMetadataSource的作用。总之,不同的权限拦截方式都对应了一个SecurityMetadataSource实现类,请求的 URL或者方法需要什么权限,调用SecurityMetadataSourcettgetAttributes 方法就可以获取到。
/**
 * 建立 URL 和 menu 之间的关系
 */
@Component
@Setter
public class CustomSecurityMetaSource implements FilterInvocationSecurityMetadataSource {

   @Resource
   private MenuService menuService;

   private final AntPathMatcher antPathMatcher = new AntPathMatcher();

   /**
    * 这个方法主要的目的就是从当前资源中获取需要的权限, 返回给RoleVoter#vote() 和 当前登录用户所拥有的权限做循环比较
    *
    * 这个方法就是 AbstractSecurityInterceptor 的 Collection<ConfigAttribute> attributes = this.obtainSecurityMetadataSource().getAttributes(object); 方法中调用
    *
    * @param object 该参数是受保护对象, 如果是基于 URL , 那么受保护对象就是 FilterInvocation
    * @return 受保护对象所需的权限
    * @throws IllegalArgumentException
    */
   @Override
   public Collection<ConfigAttribute> getAttributes(Object object) throws IllegalArgumentException {
      // 提取当前URL地址
      String requestURI = ((FilterInvocation) object).getRequest().getRequestURI();
      // 拿到所有菜单, 该菜单里有匹配规则 pattern, 该代码可以考虑保存到redis中, 或者使用 mybatis 缓存缓存下来
      List<Menu> allMenu = menuService.getAllMenu();
      // 做匹配
      for (Menu menu : allMenu) {
         if (antPathMatcher.match(menu.getPattern(), requestURI)) {
            // 匹配成功, 拿到 role 列表, 也就是我们的权限
            if (menu.getRoleList() == null || menu.getRoleList().isEmpty()) {
               continue;
            }
            String[] roles = menu.getRoleList().stream().map(Role::getName).toArray(String[]::new);
            return SecurityConfig.createList(roles);
         }
      }
      // 都匹配不上, 返回 null
      // 需要修改 AbstractSecurityInterceptor 对象的 rejectPublicInvocations 属性了, 默认为false , 表示当 getAttributes 返回 null 时, 允许访问受保护对象
      return null;
   }

   // 用来返回所有的权限属性, 以便在项目启动阶段做校验, 如果不需要校验, 则直接返回 null 即可
   @Override
   public Collection<ConfigAttribute> getAllConfigAttributes() {
      return null;
   }

   // 表示当前对象支持处理的受保护对象是 FilterInvocation
   @Override
   public boolean supports(Class<?> clazz) {
      return FilterInvocation.class.isAssignableFrom(clazz);
   }
}
@Configuration
@EnableGlobalMethodSecurity(prePostEnabled = true, securedEnabled = true, jsr250Enabled = true)
public class SecurityConfig {

   @Resource
   private CustomSecurityMetaSource customSecurityMetaSource;

   @Bean
   public UserService userDetailsService() {
      return new UserService();
   }

   @Bean
   public PasswordEncoder passwordEncoder() {
      return PasswordEncoderFactories.createDelegatingPasswordEncoder();
   }

   /**
    * 动态权限配置后, 角色继承失败
    *
    * @return
    */
// @Bean
// public RoleHierarchy roleHierarchy() {
//    RoleHierarchyImpl roleHierarchy = new RoleHierarchyImpl();
//    List<Role> roleList = roleMapper.listAll();
//    StringBuilder sb = new StringBuilder();
//    for (int i = 0; i < roleList.size(); i++) {
//       Role role = roleList.get(i);
//       if (i == 0) {
//          sb.append(role.getName());
//          continue;
//       }
//       sb.append(" > ").append(role.getName());
//    }
//    roleHierarchy.setHierarchy(sb.toString());
//    return roleHierarchy;
// }

   @Bean
   public SecurityFilterChain securityWebFilterChain(HttpSecurity httpSecurity) throws Exception {
      ApplicationContext applicationContext = httpSecurity.getSharedObject(ApplicationContext.class);
      return httpSecurity
            .apply(new UrlAuthorizationConfigurer<>(applicationContext))
            .withObjectPostProcessor(new ObjectPostProcessor<FilterSecurityInterceptor>() {
               @Override
               public <O extends FilterSecurityInterceptor> O postProcess(O object) {
                  object.setSecurityMetadataSource(customSecurityMetaSource);
                  // 所有的url必须在数据库中存在, 才能够访问, 否则不行
//                object.setRejectPublicInvocations(true);
                  return object;
               }
            })
            .and()
            .userDetailsService(userDetailsService())
            .authorizeRequests()
            .antMatchers("/admin/**").hasRole("ADMIN")
            .antMatchers("/user/**").hasRole("USER")
            .antMatchers("/guest/**").hasRole("GUEST")
            .antMatchers("/hello").access("authentication.name == 'zhazha'")
            .anyRequest().authenticated()
            .and()
            .formLogin()
            .and().csrf().disable()
            .build();
   }
}
小白: “这段代码明显有问题啊, 没缓存, 每次都需要重新读取”
小黑: “是的, 我们可以使用mybatis进行二级缓存, 这样就可以避免一些问题”
小黑: “当然最好的方法是使用caffeine进行缓存, 据说效率更高, 使用也非常简单”
<dependency>
    <groupId>org.springframework.boot</groupId>
    <artifactId>spring-boot-starter-cache</artifactId>
</dependency>
<dependency>
    <groupId>com.github.ben-manes.caffeine</groupId>
    <artifactId>caffeine</artifactId>
</dependency>
@Slf4j
@EnableCaching
@Configuration
public class CacheConfig {

   @Bean
   public Caffeine<Object, Object> caffeineCache() {
      return Caffeine.newBuilder()
            // 设置最后一次写入或访问后经过固定时间过期
            .expireAfterAccess(7, TimeUnit.DAYS)
            // 初始的缓存空间大小
            .initialCapacity(500)
            // 使用自定义线程池
//          .executor(cacheExecutor)
            .removalListener(((key, value, cause) -> log.info("key:{} removed, removalCause:{}.", key, cause.name())))
            // 缓存的最大条数
            .maximumSize(1000);
   }

   @Bean
   public CacheManager cacheManager() {
      CaffeineCacheManager caffeineCacheManager = new CaffeineCacheManager();
      caffeineCacheManager.setCaffeine(caffeineCache());
      // 不缓存空值, 但是这样会缓存穿透, 再正确点就是缓存击穿
//    caffeineCacheManager.setAllowNullValues(false);
      return caffeineCacheManager;
   }

}
@Service
public class MenuService {

   public static final String FIND_ALL = "'FIND_ALL'";
   @Resource
   private MenuMapper menuMapper;

   @Resource
   private CacheManager cacheManager;

   public static final String CACHE_NAME = "MENU_SERVICE";

   @Cacheable(value = CACHE_NAME, key = FIND_ALL, unless = "#result?.size() == 0")
   public List<Menu> findAll() {
      return menuMapper.getAllMenu();
   }

   public int insert(Menu menu) {
      Optional<Cache> optionalCache = Optional.ofNullable(cacheManager.getCache(CACHE_NAME));
      optionalCache.ifPresent(cache -> cache.evictIfPresent(FIND_ALL));
      return menuMapper.insert(menu);
   }

   @CacheEvict(value = CACHE_NAME, key = "'id_'+#record.id")
   public int update(Menu record) {
      Optional<Cache> optionalCache = Optional.ofNullable(cacheManager.getCache(CACHE_NAME));
      optionalCache.ifPresent(cache -> cache.evictIfPresent(FIND_ALL));
      return menuMapper.updateByPrimaryKeySelective(record);
   }

   @Cacheable(value = CACHE_NAME, key = "'id_'+#id")
   public Menu selectById(Long id) {
      return menuMapper.selectByPrimaryKey(id);
   }
   @CacheEvict(cacheNames = CACHE_NAME, key = "'id_'+#id")
   public int deleteById(Long id) {
      return menuMapper.deleteByPrimaryKey(id);
   }
}
权限表达式
Spring Security 3.0引入了SpEL表达式进行权限配置,我们可以在请求的URL或者访问的方法上,通过SpEL来配置需要的权限。
内置的权限表达式如表所示。
| 函数名 |
函数介绍 |
hasRole(String role) |
当前用户是否具备指定角色 |
hasAnyRole(String...roles) |
当前用户是否具备指定角色中的任意一个 |
hasAuthority(String authority) |
当前用户是否具备指定的权限 |
hasAnyAuthority(String...authorities) |
当前用户是否具备指定权限中的任意一个 |
principal |
代表当前登录主体 Principal
|
authentication |
这个是从SecurityContext中获取到的 Authentication对象 |
permitAll |
允许所有的请求/调用 |
denyAll |
拒绝所有的请求/调用 |
isAnonymous |
当前用户是否是一个匿名用户 |
isRememberMe |
当前用户是否是通过RememberMe自动登录 |
isAuthenticated |
当前用户是否已经认证成功 |
isFullyAuthenticated |
当前用户是否既不是匿名用户又不是通过RememberMe自动登录的 |
hasPermission(Object target, Object permission) |
当前用户是否具备指定目标的指定权限 |
hasPermission(Object targetld,String targetType, Object permission) |
当前用户是否具备指定目标的指定权限 |
hasIpAddress(String ipAddress) |
当前请求IP地址是否为指定IP
|
这是Spring Security内置的表达式,一般来说就足够使用了。如果这些内置的表达式无法满足项目需求,开发者也可以自定义表达式,后面会介绍自定义表达式的方式。
Spring Security中通过SecurityExpressionOperations 接口定义了基本的权限表达式,代码如下:
public interface SecurityExpressionOperations {
   Authentication getAuthentication();
   boolean hasAuthority(String authority);
   boolean hasAnyAuthority(String... authorities);
   boolean hasRole(String role);
   boolean hasAnyRole(String... roles);
   boolean permitAll();
   boolean denyAll();
   boolean isAnonymous();
   boolean isAuthenticated();
   boolean isRememberMe();
   boolean isFullyAuthenticated();
   boolean hasPermission(Object target, Object permission);
   boolean hasPermission(Object targetId, String targetType, Object permission);
}
返回值为boolean类型的就是权限表达式,如果返回 true,则表示权限校验通过,否则表示权限校验失败。
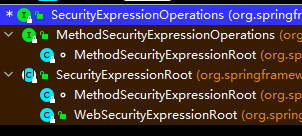
SecurityExpressionRoot
SecurityExpressionRoot对 SecurityExpressionOperations 接口做了基本的实现,并在此基础上增加了principal。
接口的实现原理都很简单,这里就不展示源码了,我们说一下实现思路。
-
hasAuthority、hasAnyAuthority、hasRole 以及 hasAnyRole 四个方法主要是将传入的参数和 authentication对象中保存的用户权限进行比对,如果用户具备相应的权限就返回true,否则返回false。
-
permitAll 方法总是返回true,而 denyAll 方法总是返回false。
-
isAnonymous、isAuthenticated、isRememberMe 以及 isFullyAuthenticated 四个方法则是根据对authentication对象的分析,然后返回 true或者false。
-
最后的 hasPermission则需要调用PermissionEvaluator中对应的方法进行计算,然后返回true或者false。
SecurityExpressionRoot中定义的表达式既可以在基于URL地址的权限管理中使用,也可以在基于方法的权限管理中使用。
WebSecurityExpressionRoot
WebSecurityExpressionRoot继承自SecurityExpressionRoot,并增加了hasIpAddress方法,用来判断请求的IP地址是否满足要求。
在Spring Security中,如果我们的权限管理是基于URL地址的,那么使用的就是WebSecurityExpressionRoot,换句话说,这时可以使用hasIpAddress表达式。
MethodSecurityExpressionOperations
MethodSecurityExpressionOperations定义了基于方法的权限管理时一些必须实现的接口,主要是参数对象的get/set、返回对象的get/set以及返回受保护的对象。
MethodSecurityExpressionRoot
MethodSecurityExpressionRoot 实现了MethodSecurityExpressionOperations接口,并对其定义的方法进行了实现。
MethodSecurityExpressionRoot虽然也继承自SecurityExpressionRoot,但是并未扩展新的表达式,换句话说,SecurityExpressionRoot中定义的权限表达式在方法上也可以使用,但是hasIpAddress不可以在方法上使用。
小白: “这些概念看的很累, 有案例么?”
小黑: “有的有的”
基于方法的权限管理
基于方法的方式存在前置和后置处理方式
基本原理使用 AOP 实现, Spring Security中通过MethodSecurityInterceptor来提供相关实现
注解介绍
目前在Spring Boot中基于方法的权限管理主要是通过注解来实现,我们需要通过@EnableGlobalMethodSecurity注解开启权限注解的使用,用法如下:
@Configuration
@EnableGlobalMethodSecurity(prePostEnabled = true, securedEnabled = true, jsr250Enabled = true)
public class SecurityConfig {
}
这个注解中我们设置了三个属性:
-
prePostEnabled:开启Spring Security提供的四个权限注解,@PostAuthorize、@PostFilter、@PreAuthorize 以及@PreFilter,这四个注解支持权限表达式,功能比较丰富。
-
securedEnabled:开启Spring Security提供的@Secured注解,该注解不支持权限表达式。
-
jsr250Enabled:开启JSR-250提供的注解,主要包括@DenyAll、@PermitAll以及@RolesAllowed三个注解,这些注解也不支持权限表达式。
这些注解的含义分别如下:
@PostAuthorize:在目标方法执行之后进行权限校验。
@PostFilter:在目标方法执行之后对方法的返回结果进行过滤。
@PreAuthorize:在目标方法执行之前进行权限校验。
@PreFilter:在目标方法执行之前对方法参数进行过滤。
@Secured:访问目标方法必须具备相应的角色。
@DenyAll:拒绝所有访问。
@PermitAll:允许所有访问。
@RolesAllowed:访问目标方法必须具备相应的角色。
这些基于方法的权限管理相关的注解,一般来说只要设置prePostEnabled=true就够用了。
注解: 访问前判断权限
在调用函数前, 判断当前登录的用户是否满足条件
配置启动注解功能
@Configuration
@EnableGlobalMethodSecurity(prePostEnabled = true, securedEnabled = true, jsr250Enabled = true)
public class SecurityConfig {
}
prePostEnabled = true注解启动了下面三个注解
`@PostAuthorize`、`@PostFilter`、`@PreAuthorize` 以及`@PreFilter`
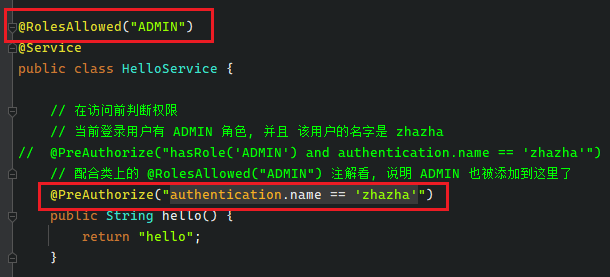
// 在访问前判断权限
@PreAuthorize("hasRole('ADMIN') and authentication.name == 'zhazha'")
public String hello() {
   return "hello";
}

@PreAuthorize("authentication.name == #name")
public String world(String name) {
   return "hello: " + name;
}
@Resource
private HelloService helloService;

@WithMockUser(roles = "ADMIN", username = "zhazha")
@Test
void hello() {
   String s = helloService.hello();
   Assert.notNull(s);
   Assert.equals("hello", s);
}

@WithMockUser(username = "zhazha")
@Test
void world() {
   String s = helloService.world("zhazha");
   Assert.notNull(s);
   Assert.equals("hello: zhazha", s);
}
WithMockUser需要导入依赖
<dependency>
 <groupId>org.springframework.security</groupId>
 <artifactId>spring-security-test</artifactId>
</dependency>
注解: 函数即将调用前过滤参数
函数调用前, 参数的过滤, 过滤后不满足条件的参数将被丢弃, 不再传递到函数中
@PreFilter(filterTarget = "users", value = "filterObject.id % 2 != 0")
public void addUser(List<User> users, Integer other) {
   System.out.println("users = " + users);
}
@Test
@WithMockUser(username = "zhazha")
void addUser() {
   ArrayList<User> users = new ArrayList<>();
   for (int i = 0; i < 10; i++) {
      users.add(new User(Integer.toUnsignedLong(i), "zhazha", "123456", true, false));
   }
   helloService.addUser(users, 99);
}
结果:
users = [User(id=1, username=zhazha, password=123456, enabled=true, locked=false), User(id=3, username=zhazha, password=123456, enabled=true, locked=false), User(id=5, username=zhazha, password=123456, enabled=true, locked=false), User(id=7, username=zhazha, password=123456, enabled=true, locked=false), User(id=9, username=zhazha, password=123456, enabled=true, locked=false)]
注解: 函数调用后权限判断
在函数调用后, 再进行权限判断, 很少用, 主要针对ACL权限模式
@PostAuthorize(value = "returnObject.password != null and @helloService.hello().equals('hello')")
public User getUserById(Long id, String passowrd) {
   return new User(id,"zhazha",passowrd, true, false);
}
这里还带着函数调用: @helloService.hello().equals('hello')
该注解主要处理点是返回值returnObject
@WithMockUser(username = "zhazha", roles = "ADMIN")
@Test
void getUserById() {
   User user = helloService.getUserById(1L, "123456");
   System.out.println(user);
}
这种在函数调用之后判断权限的方式使用的比较少, 在ACL权限模式可能会用得到, 平时很少
注解: 函数返回值过滤
过滤函数返回值的内容, 不满足过滤条件的返回值将被丢弃, 剩下的值返回
@PostFilter(value = "filterObject.id % 2 == 0")
public List<User> getAll() {
   ArrayList<User> users = new ArrayList<>();
   for (long i = 0; i < 10; i++) {
      users.add(new User(i, "zhazha" + i, "123456"));
   }
   return users;
}
@Test
@WithMockUser(roles = "ADMIN")
void getAll() {
   List<User> all = helloService.getAll();
   Assert.notNull(all);
   Assert.equals(5, all.size());
   Assert.equals(2L, all.get(1).getId());
}
注意, 很多时候, 我们使用角色, 不需要添加 ROLE_ 前缀, springsecurity会指定添加的
后面的几个注解可以不学
@Secured
// 允许两个角色访问
// 该注解不支持表达式, 很少使用, 可以不学
// 需要 securedEnabled = true 才能启动
@Secured(value = "ROLE_ADMIN ROLE_USER")
public User getUserByUsername(String username) {
   return new User(99L,username,"123456");
}
// 注意这里不需要添加 ROLE_ 前缀, @Secured 注解需要
@WithMockUser(roles = "ADMIN")
@Test
void getUserByUsername() {
   User user = helloService.getUserByUsername("zhazha");
   Assert.equals(99L, user.getId());
}
不推荐使用这种方式, 不支持表达式, 不好用
接下来是 JSR-250 添加的几个注解
注解: 拒绝所有人访问
@DenyAll
public String denyAll() {
   return "DenyAll";
}
注解: 允许所有人访问
@PermitAll
public String permitAll() {
   return "PermitAll";
}
注解: 固定角色允许访问
在方法和类上添加该注解, 表示固定角色才能访问
如果方法和类上都添加了该注解, 那么方法优先
// 符合的角色允许访问
@RolesAllowed({"ADMIN", "USER"})
public String roleAllowed() {
   return "roleAllowed";
}
不需要添加 ROLE_ 前缀
这个注解比较常用, 直接往类上一添加, 全部方法就都配置了
源码解析
配置的过程
@Import({ GlobalMethodSecuritySelector.class })
@EnableGlobalAuthentication
@Configuration
public @interface EnableGlobalMethodSecurity {
进入GlobalMethodSecuritySelector
@Override
public String[] selectImports(AnnotationMetadata importingClassMetadata) {
   // 获得注解的属性
   Class<EnableGlobalMethodSecurity> annoType = EnableGlobalMethodSecurity.class;
   Map<String, Object> annotationAttributes = importingClassMetadata.getAnnotationAttributes(annoType.getName(),
         false);
   AnnotationAttributes attributes = AnnotationAttributes.fromMap(annotationAttributes);
   Assert.notNull(attributes, () -> String.format("@%s is not present on importing class '%s' as expected",
         annoType.getSimpleName(), importingClassMetadata.getClassName()));
   // 获得配置类的 Class
   Class<?> importingClass = ClassUtils.resolveClassName(importingClassMetadata.getClassName(),
         ClassUtils.getDefaultClassLoader());
   boolean skipMethodSecurityConfiguration = GlobalMethodSecurityConfiguration.class
         .isAssignableFrom(importingClass);
   AdviceMode mode = attributes.getEnum("mode");
   boolean isProxy = AdviceMode.PROXY == mode;
   String autoProxyClassName = isProxy ? AutoProxyRegistrar.class.getName()
         : GlobalMethodSecurityAspectJAutoProxyRegistrar.class.getName();
   // 读取 jsr250 属性的值, 这里我们配置了 为 jsr250Enabled = true
   boolean jsr250Enabled = attributes.getBoolean("jsr250Enabled");
   List<String> classNames = new ArrayList<>(4);
   if (isProxy) {
      classNames.add(MethodSecurityMetadataSourceAdvisorRegistrar.class.getName());
   }
   classNames.add(autoProxyClassName);
   if (!skipMethodSecurityConfiguration) {
      classNames.add(GlobalMethodSecurityConfiguration.class.getName());
   }
   if (jsr250Enabled) {
      classNames.add(Jsr250MetadataSourceConfiguration.class.getName());
   }
   return classNames.toArray(new String[0]);
}
这段代码导入了四个类:
MethodSecurityMetadataSourceAdvisorRegistrar
org.springframework.context.annotation.AutoProxyRegistrar
GlobalMethodSecurityConfiguration
Jsr250MetadataSourceConfiguration
这四个中, 后面两个是配置类, 第一个是整理后面两个配置类中 Bean 的类
现在我们看配置类
这个类算是核心配置类吧
GlobalMethodSecurityConfiguration
首先我们分析
@Bean
@Role(BeanDefinition.ROLE_INFRASTRUCTURE)
public MethodSecurityMetadataSource methodSecurityMetadataSource() {
   List<MethodSecurityMetadataSource> sources = new ArrayList<>();
   ExpressionBasedAnnotationAttributeFactory attributeFactory = new ExpressionBasedAnnotationAttributeFactory(
         getExpressionHandler());
   // 拿到我们自定义的MethodSecurityMetadataSource接口, 这个接口返回 Collection<ConfigAttribute> 属性, 也即是我们的权限, 但是这里我们没有自定义
   MethodSecurityMetadataSource customMethodSecurityMetadataSource = customMethodSecurityMetadataSource();
   if (customMethodSecurityMetadataSource != null) {
      sources.add(customMethodSecurityMetadataSource);
   }
   // 获取我们注解的配置, 这里获得的三个配置 true
   boolean isPrePostEnabled = prePostEnabled();
   boolean isSecuredEnabled = securedEnabled();
   boolean isJsr250Enabled = jsr250Enabled();
   if (isPrePostEnabled) {
      // 配置前后置注解功能
      // 读取注解内的表达式
      // 这里读取的是这种PreFilter, PreAuthorize, PostFilter和PostAuthorize注解的内容
      sources.add(new PrePostAnnotationSecurityMetadataSource(attributeFactory));
   }
   if (isSecuredEnabled) {
      // Secured 注解
      sources.add(new SecuredAnnotationSecurityMetadataSource());
   }
   if (isJsr250Enabled) {
      GrantedAuthorityDefaults grantedAuthorityDefaults = getSingleBeanOrNull(GrantedAuthorityDefaults.class);
      // Jsr250MethodSecurityMetadataSource注解内容读取
      // Jsr250MetadataSourceConfiguration 这个配置类的Bean 在这里被读取了
      Jsr250MethodSecurityMetadataSource jsr250MethodSecurityMetadataSource = this.context
            .getBean(Jsr250MethodSecurityMetadataSource.class);
      if (grantedAuthorityDefaults != null) {
         jsr250MethodSecurityMetadataSource.setDefaultRolePrefix(grantedAuthorityDefaults.getRolePrefix());
      }
      sources.add(jsr250MethodSecurityMetadataSource);
   }
   // 把上面存储的几个注解内容读取器保存到委托读取器中, 里面存储了三个读取器了
   return new DelegatingMethodSecurityMetadataSource(sources);
}
从下图可以看的出来, 为什么jsr-250的注解不需要添加 ROLE_ 前缀了

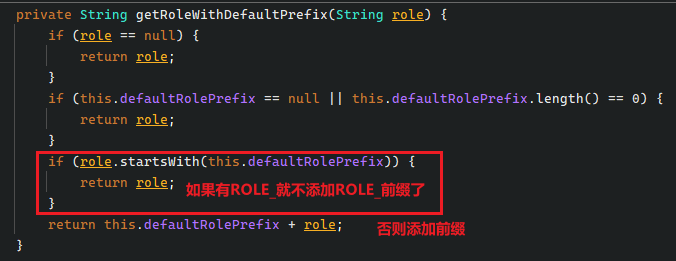
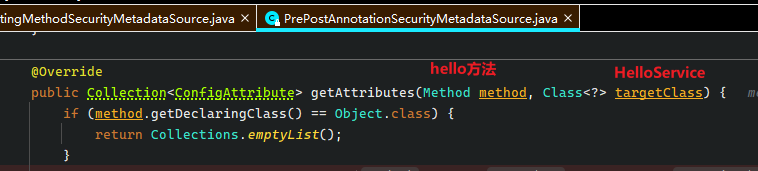
PrePostAnnotationSecurityMetadataSource
@Override
public Collection<ConfigAttribute> getAttributes(Method method, Class<?> targetClass) {
if (method.getDeclaringClass() == Object.class) {
return Collections.emptyList();
}
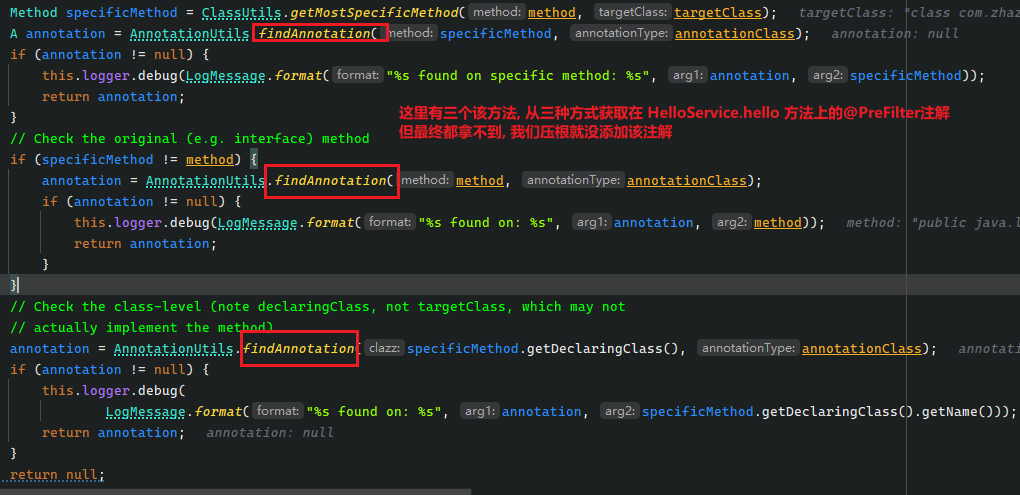
PreFilter preFilter = findAnnotation(method, targetClass, PreFilter.class);
PreAuthorize preAuthorize = findAnnotation(method, targetClass, PreAuthorize.class);
PostFilter postFilter = findAnnotation(method, targetClass, PostFilter.class);
// TODO: Can we check for void methods and throw an exception here?
PostAuthorize postAuthorize = findAnnotation(method, targetClass, PostAuthorize.class);
if (preFilter == null && preAuthorize == null && postFilter == null && postAuthorize == null) {
// There is no meta-data so return
return Collections.emptyList();
}
String preFilterAttribute = (preFilter != null) ? preFilter.value() : null;
String filterObject = (preFilter != null) ? preFilter.filterTarget() : null;
String preAuthorizeAttribute = (preAuthorize != null) ? preAuthorize.value() : null;
String postFilterAttribute = (postFilter != null) ? postFilter.value() : null;
String postAuthorizeAttribute = (postAuthorize != null) ? postAuthorize.value() : null;
ArrayList<ConfigAttribute> attrs = new ArrayList<>(2);
PreInvocationAttribute pre = this.attributeFactory.createPreInvocationAttribute(preFilterAttribute,
filterObject, preAuthorizeAttribute);
if (pre != null) {
attrs.add(pre);
}
PostInvocationAttribute post = this.attributeFactory.createPostInvocationAttribute(postFilterAttribute,
postAuthorizeAttribute);
if (post != null) {
attrs.add(post);
}
attrs.trimToSize();
return attrs;
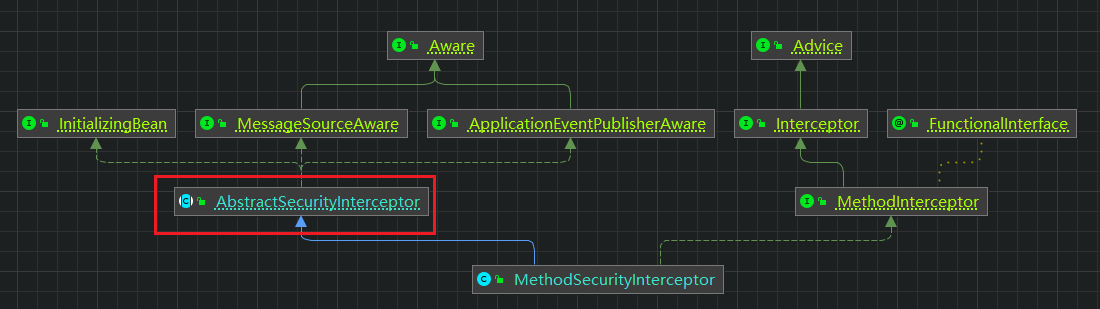
}
识别注解过程
核心类是: MethodSecurityInterceptor
核心代码是这段:
@Override
public Object invoke(MethodInvocation mi) throws Throwable {
   InterceptorStatusToken token = super.beforeInvocation(mi);
   Object result;
   try {
      result = mi.proceed();
   }
   finally {
      super.finallyInvocation(token);
   }
   return super.afterInvocation(token, result);
}
一个存储数据的对象InterceptorStatusToken, 很熟悉, 在前面分析 URL 为颗粒 方式中也是使用的这个对象, 存储了好几个数据
InterceptorStatusToken对象可以回到上一章节找 流程图
调用前, 调用后, 清除 三个步骤
所以对这个函数下条件断点: method.getName().equals("hello")
三种类型的注解处理类:

进而分析上面三个方法的功能:
我们只添加了两个注解:
在方法上我们也只添加了一个注解
返回回到上级函数PrePostAnnotationSecurityMetadataSource#getAttributes

明显这里我们能够拿到对应的注解

而且是个代理对象

除了PreAuthorize能够拿到注解外, 其他注解都能不到 等于 null
紧接着就是拿到注解的属性了
String preFilterAttribute = (preFilter != null) ? preFilter.value() : null;
String filterObject = (preFilter != null) ? preFilter.filterTarget() : null;
@Target({ ElementType.METHOD, ElementType.TYPE })
@Retention(RetentionPolicy.RUNTIME)
@Inherited
@Documented
public @interface PreFilter {
   // 这是定位后对参数的PreFilter功能
   String value();
   // 这是定位参数
   String filterTarget() default "";

}
这里拿到了表达式


上面这两个方法的内容在这里
@Override
public PreInvocationAttribute createPreInvocationAttribute(String preFilterAttribute, String filterObject,
      String preAuthorizeAttribute) {
   try {
      // TODO: Optimization of permitAll
      ExpressionParser parser = getParser();
      Expression preAuthorizeExpression = (preAuthorizeAttribute != null)
            ? parser.parseExpression(preAuthorizeAttribute) : parser.parseExpression("permitAll");
      Expression preFilterExpression = (preFilterAttribute != null) ? parser.parseExpression(preFilterAttribute)
            : null;
      return new PreInvocationExpressionAttribute(preFilterExpression, filterObject, preAuthorizeExpression);
   }
   catch (ParseException ex) {
      throw new IllegalArgumentException("Failed to parse expression '" + ex.getExpressionString() + "'", ex);
   }
}

@Override
public PostInvocationAttribute createPostInvocationAttribute(String postFilterAttribute,
      String postAuthorizeAttribute) {
   try {
      ExpressionParser parser = getParser();
      Expression postAuthorizeExpression = (postAuthorizeAttribute != null)
            ? parser.parseExpression(postAuthorizeAttribute) : null;
      Expression postFilterExpression = (postFilterAttribute != null)
            ? parser.parseExpression(postFilterAttribute) : null;
      if (postFilterExpression != null || postAuthorizeExpression != null) {
         return new PostInvocationExpressionAttribute(postFilterExpression, postAuthorizeExpression);
      }
   }
   catch (ParseException ex) {
      throw new IllegalArgumentException("Failed to parse expression '" + ex.getExpressionString() + "'", ex);
   }

   return null;
}
Expression preAuthorizeExpression = (preAuthorizeAttribute != null)
      ? parser.parseExpression(preAuthorizeAttribute) : parser.parseExpression("permitAll");
如果preAuthorizeAttribute*(也就是注解的内容)不为空, 则执行parser.parseExpression(preAuthorizeAttribute), 否则执行parser.parseExpression("permitAll")(也就是允许所有人访问)
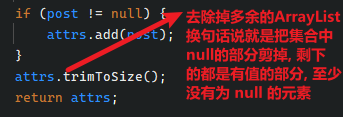
上面这个attrs的集合从 2 个变成 1 个
因为只有一个有值, 另一个为 null
至此这个方法PrePostAnnotationSecurityMetadataSource#getAttributes 基本分析完毕了
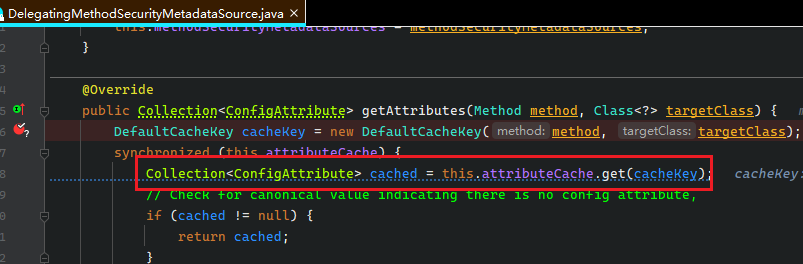
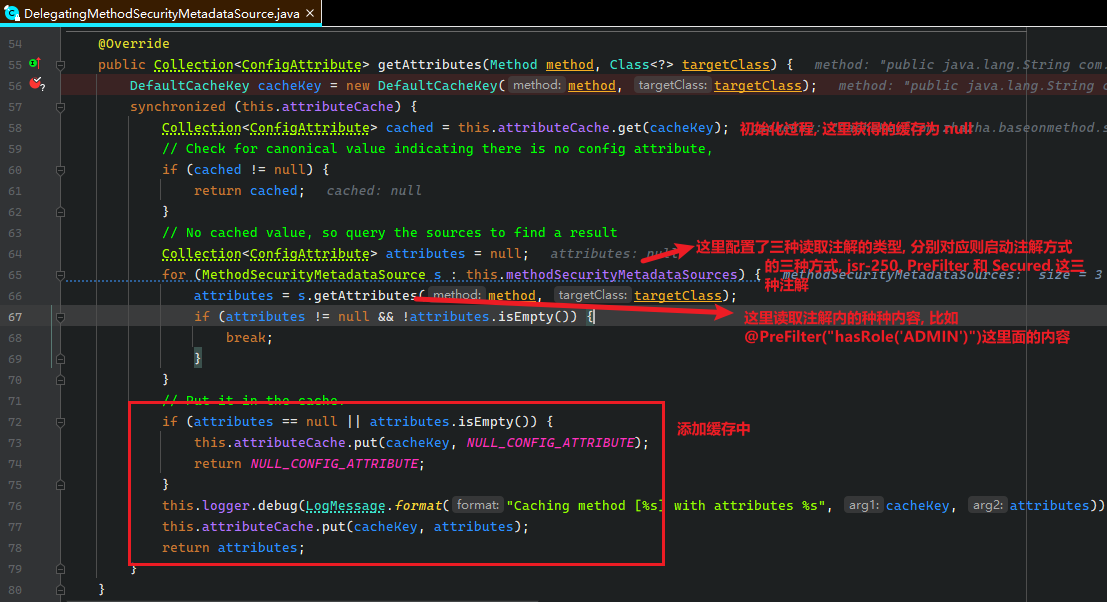
现在分析这个段源码:
GlobalMethodSecurityConfiguration#methodSecurityInterceptor
@Bean
public MethodInterceptor methodSecurityInterceptor(MethodSecurityMetadataSource methodSecurityMetadataSource) {
   this.methodSecurityInterceptor = isAspectJ() ? new AspectJMethodSecurityInterceptor()
         : new MethodSecurityInterceptor();
   this.methodSecurityInterceptor.setAccessDecisionManager(accessDecisionManager());
   this.methodSecurityInterceptor.setAfterInvocationManager(afterInvocationManager());
   this.methodSecurityInterceptor.setSecurityMetadataSource(methodSecurityMetadataSource);
   RunAsManager runAsManager = runAsManager();
   if (runAsManager != null) {
      this.methodSecurityInterceptor.setRunAsManager(runAsManager);
   }
   return this.methodSecurityInterceptor;
}
这段源码算是比较核心的代码了, 学习完这段代码, 我们能够自定义Spring Security权限管理
首先第一行就有个核心变量:

MethodSecurityInterceptor这个类可熟悉了
接着是这段代码:
this.methodSecurityInterceptor.setAccessDecisionManager(accessDecisionManager());
accessDecisionManager这个不就是决策器么?
也就是这段代码最终会创建一个决策器并返回结果
protected AccessDecisionManager accessDecisionManager() {
// 创建投票器集合
List<AccessDecisionVoter<?>> decisionVoters = new ArrayList<>();
// 获得@EnableGlobalMethodSecurity注解上的 prePostEnabled = true 属性的值
if (prePostEnabled()) {
// 这里相当于AOP 的前置调用配置
ExpressionBasedPreInvocationAdvice expressionAdvice = new ExpressionBasedPreInvocationAdvice();
// 这里set了一个MethodSecurityExpressionHandler接口的实现类, 该接口有两个函数
// filter: 只有表达式匹配函数后, 才会过滤目标集合或数据
// setReturnObject: 用于通知给定评估上下文的返回对象的表达式系统。仅适用于方法调用。
expressionAdvice.setExpressionHandler(getExpressionHandler());
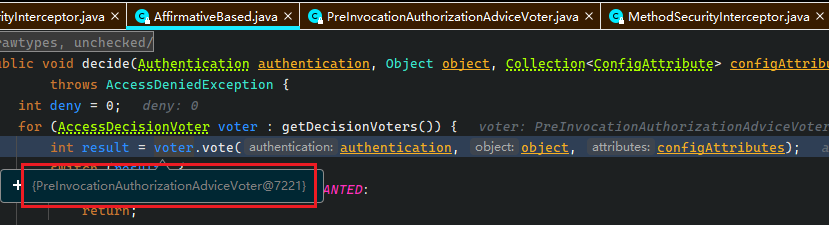
// 创建一个投票器, 该投票器最终会根据传入的参数, 进行调用
decisionVoters.add(new PreInvocationAuthorizationAdviceVoter(expressionAdvice));
}
// 紧接着又添加了 jsr 注解的投票器
if (jsr250Enabled()) {
decisionVoters.add(new Jsr250Voter());
}
// 创建角色投票器, 主要还是针对 ROLE_ 开头
RoleVoter roleVoter = new RoleVoter();
GrantedAuthorityDefaults grantedAuthorityDefaults = getSingleBeanOrNull(GrantedAuthorityDefaults.class);
if (grantedAuthorityDefaults != null) {
roleVoter.setRolePrefix(grantedAuthorityDefaults.getRolePrefix());
}
decisionVoters.add(roleVoter);
// 最后再来个认证投票器
decisionVoters.add(new AuthenticatedVoter());
// 返回默认的决策器
return new AffirmativeBased(decisionVoters);
}
一小段分析完毕
大体上分析了, 剩下的懒得分析
配置了这么多功能, 最终还是要走决策器 投票器 那个流程
MethodSecurityInterceptor#invoke
@Override
public Object invoke(MethodInvocation mi) throws Throwable {
   InterceptorStatusToken token = super.beforeInvocation(mi);
   Object result;
   try {
      result = mi.proceed();
   }
   finally {
      super.finallyInvocation(token);
   }
   return super.afterInvocation(token, result);
}
只不过这里的投票器拿到的是
最后在这里进行比较:
public class ExpressionBasedPreInvocationAdvice implements PreInvocationAuthorizationAdvice {

   private MethodSecurityExpressionHandler expressionHandler = new DefaultMethodSecurityExpressionHandler();

   @Override
   public boolean before(Authentication authentication, MethodInvocation mi, PreInvocationAttribute attr) {
      PreInvocationExpressionAttribute preAttr = (PreInvocationExpressionAttribute) attr;
      EvaluationContext ctx = this.expressionHandler.createEvaluationContext(authentication, mi);
      Expression preFilter = preAttr.getFilterExpression();
      Expression preAuthorize = preAttr.getAuthorizeExpression();
      if (preFilter != null) {
         Object filterTarget = findFilterTarget(preAttr.getFilterTarget(), ctx, mi);
         this.expressionHandler.filter(filterTarget, preFilter, ctx);
      }
      // 返回 true 完事
      return (preAuthorize != null) ? ExpressionUtils.evaluateAsBoolean(preAuthorize, ctx) : true;
   }
}
后面的代码就不再分析了, 腻了
又6000字了, 好烦