Hint
-
要访问zip文件中的 newspapers ,必须首先使用 Zipfile 库打开zip文件,然后使用 .infolist() 遍历zip文件中的对象(newspapers ),尝试编写一个简单的程序以遍历 zipfile,打印出文件名以及使用 display()。 请记住,PIL.Image 库可以打开 .open() 文件,并且 zipfile 中的 .infolist() 中的项目每个都像显示文件一样显示在Python中(these are called “file-like” objects)。
-
您可以不必花费大量时间在 PIL.Image 文件和 byte arrays 之间进行转换。 我们可以将PIL.Image对象存储在a global data structure中,比如一个列表或者按名称索引的字典? 然后,您可以通过添加诸如在页面上检测到的文本信息或faces的边框之类的信息来进一步处理此数据结构。想想看,一个字典对象的列表,其中列表中的每个元素都有PIL图像、边框和页面上发现的文本(the PIL image, the bounding boxes, and the text discovered on the page),这是存储该数据的一种方便方法。
-
快速提醒-在Python中,所有字符串就像字符列表一样,但是请记住它们是不可变的列表-更像是元组。 但这意味着您可以使用 in 关键字非常轻松地找到子字符串。 因此,如果子字符串匹配,以下语句将返回True:
if "Christopher" in my_text
-
创建 contact sheet 可能会有些麻烦。 但是,如果使用 PIL.Image.thumbnail 函数,则可以调整图像大小而不必担心纵横比。 我在创建输出图像时使用了它,也许您也应该使用它! And check out the lecture on the contact sheet, you want to be careful that you don’t “walk off” the end of the images when creating a row (or column).
The Project
使用前面的模块来深入了解如何完成功能! 您必须结合使用Pillow,OpenCV 和 Pytesseract.
The Assignment
-
输入压缩文件包(ZIP file)里的图像,并使用[内置于python的库]进行处理,以了解如何使用。 一个ZIP文件采用几个不同的文件并将其压缩,从而节省空间,成为一个文件。 我们提供的ZIP文件中的文件是报纸图像(newspaper images, 就像您在第3周看到的一样)。 您的任务是编写python代码,使您可以搜索图像以查找关键字和faces的出现。 例如。 如果您搜索"pizza",它将返回报纸页面上所有提及"pizza" 的 faces 的contact sheet。
-
这将测试您学习新的python库的能力([library](https://docs.python.org/3/library/zipfile.html)),您使用OpenCV检测面部的能力,以及使用 tesseract 进行OCR检测的能力,以及使用PIL将图像合成在一起成为contact sheets的能力。
-
报纸的每一页均作为单个PNG图像保存在名为[images.zip](https://qcmjfshijgtwgslumfrhpm.coursera-apps.org/notebooks/readonly/images.zip)的文件中。 这些报纸是英文的,包含各种故事,广告和图片。 注意:此文件很大(〜200 MB),可能需要一些时间才能使用,我鼓励您使用[small_img.zip](https://qcmjfshijgtwgslumfrhpm.coursera-apps.org/notebooks/readonly/small_img .zip)进行测试。
-
这是预期输出的示例。 使用[small_img.zip](https://qcmjfshijgtwgslumfrhpm.coursera-apps.org/notebooks/readonly/small_img.zip)文件,如果我搜索字符串“ Christopher”,则应该看到以下图像:

If I were to use the images.zip file and search for “Mark” I should see the following image (note that there are times when there are no faces on a page, but a word is found!):
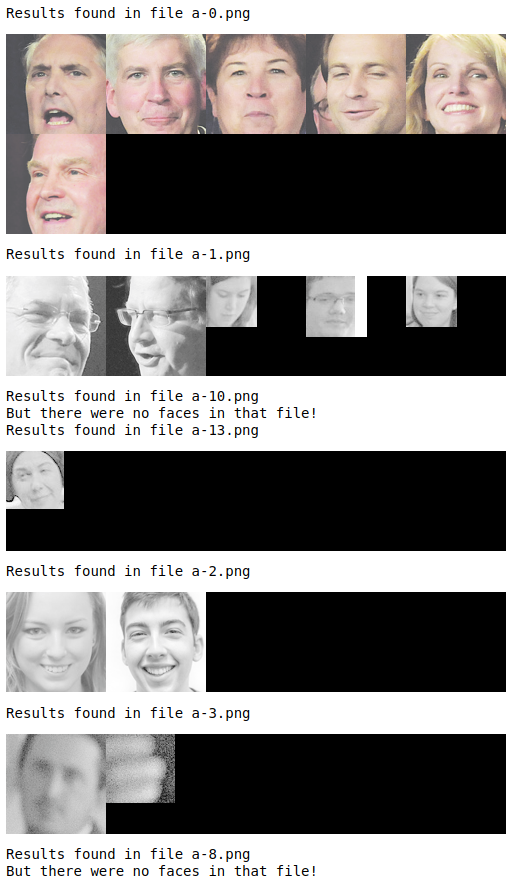
Note: That big file can take some time to process - for me it took nearly ten minutes! Use the small one for testing.
import zipfile
from PIL import Image
import pytesseract
import cv2 as cv
import numpy as np
face_cascade = cv.CascadeClassifier('readonly/haarcascade_frontalface_default.xml')
import zipfile
from PIL import Image
import pytesseract
import cv2 as cv
import numpy as np
from IPython.display import display
from PIL import ImageDraw
from PIL import ImageFont
font = ImageFont.truetype('readonly/fanwood-webfont.ttf', 20)
face_cascade = cv.CascadeClassifier('readonly/haarcascade_frontalface_default.xml')
def main():
png_dict = {}
i = 0
data_set = input('Please enter dataset(readonly/small_img.zip or readonly/images.zip)')
z = zipfile.ZipFile(data_set, "r")
for f in z.infolist():
key = 'a-'+ str(i) + '.png'
img_png = z.open(f)
img = Image.open(img_png)
png_dict[key] = img
i = i+1
string_to_srarch = input('Please enter Mark or Chris to test: ')
for png_key in png_dict:
png = png_dict[png_key]
png.save('readonly/png.png')
png_gray = png.convert('L')
text = pytesseract.image_to_string(png_gray)
print("++++++start++++++", png_key)
if string_to_srarch in text:
img_face = cv.imread('readonly/png.png')
img_face_gray = cv.cvtColor(img_face, cv.COLOR_BGR2GRAY)
img_face_bin = cv.threshold(img_face_gray, 170, 255, cv.THRESH_BINARY)[1]
faces_coord = face_cascade.detectMultiScale(img_face_bin,1.315)
face_list = []
for x,y,w,h in faces_coord:
face = png.crop((x,y,x+w,y+h))
face.thumbnail((128, 128))
face_list.append(face)
txt_back = Image.new('RGB', (128*5, 50), color="white")
write_object = ImageDraw.Draw(txt_back)
write_object.text((0,0), "Result found in file {}".format(png_key), fill="black", font=font)
image_back = Image.new('RGB', (128*5, 128), color="black")
image_back2 = Image.new('RGB', (128*5, 128), color="black")
if len(face_list) == 0:
txt_back = Image.new('RGB', (128*5, 50), color="white")
write_object = ImageDraw.Draw(txt_back)
write_object.text((0,0), "Result found in file {}\nBut there were no faces in that file".format(png_key), fill="black", font=font)
display(txt_back)
else:
x = 0
y = 0
for face in face_list[:5]:
image_back.paste(face, (x, y))
x = x + 128
contact_sheet = Image.new('RGB', (128*5, 128+50), color="black")
contact_sheet.paste(txt_back,(0,0))
contact_sheet.paste(image_back,(0,50))
if len(face_list) > 5:
x = 0
y = 0
for face in face_list[5:10]:
image_back2.paste(face, (x, y))
x = x + 128
contact_sheet = Image.new('RGB', (128*5, 128+128+50), color="black")
contact_sheet.paste(txt_back,(0,0))
contact_sheet.paste(image_back,(0,50))
contact_sheet.paste(image_back2,(0,128+50))
display(contact_sheet)
else:
print('no such string in this file, next file...')
main()
import zipfile
from PIL import Image
import pytesseract
import cv2 as cv
import numpy as np
from IPython.display import display
from PIL import ImageDraw
from PIL import ImageFont
font = ImageFont.truetype('readonly/fanwood-webfont.ttf', 40)
face_cascade = cv.CascadeClassifier('readonly/haarcascade_frontalface_default.xml')
z = zipfile.ZipFile("readonly/small_img.zip", "r")
def main():
z = zipfile.ZipFile("readonly/small_img.zip", "r")
png_dict = {}
i = 0
for f in z.infolist():
key = 'a-'+ str(i) + '.png'
img_png = z.open(f)
img = Image.open(img_png)
png_dict[key] = img
i = i+1
print('png_list keys:',list(png_dict.keys()))
png_key = 'a-0.png'
png = png_dict[png_key]
png.save('readonly/png.png')
png_gray = png.convert('L')
text = pytesseract.image_to_string(png_gray)
if "Christopher" in text:
print('Result found in file', png_key)
img_face = cv.imread('readonly/png.png')
img_face_gray = cv.cvtColor(img_face, cv.COLOR_BGR2GRAY)
img_face_bin = cv.threshold(img_face_gray, 170, 255, cv.THRESH_BINARY)[1]
faces_coord = face_cascade.detectMultiScale(img_face_bin,1.389)
face_list = []
for x,y,w,h in faces_coord:
face = png.crop((x,y,x+w,y+h))
face.thumbnail((128, 128))
face_list.append(face)
print(len(face_list))
txt_back = Image.new('RGB', (128*5, 50), color="white")
write_object = ImageDraw.Draw(txt_back)
write_object.text((0,0), "Result found in file {}".format(png_key), fill="black", font=font)
image_back = Image.new('RGB', (128*5, 128), color="black")
image_back2 = Image.new('RGB', (128*5, 128), color="black")
if len(face_list) == 0:
txt_back = Image.new('RGB', (128*5, 50), color="white")
write_object = ImageDraw.Draw(txt_back)
write_object.text((0,0), "Result found in file {}\n But there were no faces in that file".format(png_key), fill="black")
display(txt_back)
else:
x = 0
y = 0
for face in face_list[:5]:
image_back.paste(face, (x, y))
x = x + 128
contact_sheet = Image.new('RGB', (128*5, 128+50), color="black")
contact_sheet.paste(txt_back,(0,0))
contact_sheet.paste(image_back,(0,50))
if len(face_list) > 5:
x = 0
y = 0
for face in face_list[5:10]:
image_back2.paste(face, (x, y))
x = x + 128
contact_sheet = Image.new('RGB', (128*5, 128+128+50), color="black")
contact_sheet.paste(txt_back,(0,0))
contact_sheet.paste(image_back,(0,50))
contact_sheet.paste(image_back2,(0,128+50))
display(contact_sheet)
else:
print('no such string')
main()
本文内容由网友自发贡献,版权归原作者所有,本站不承担相应法律责任。如您发现有涉嫌抄袭侵权的内容,请联系:hwhale#tublm.com(使用前将#替换为@)