一、数据介绍
AI识虫数据集结构如下:
- 提供了2183张图片,其中训练集1693张,验证集245,测试集245张。
- 包含7种昆虫,分别是Boerner、Leconte、Linnaeus、acuminatus、armandi、coleoptera和linnaeus。
- 包含了图片和标注(数据获取见文末)。
将数据解压之后,可以看到目录下的结构如下所示,包含train、val和test三个文件夹。train/annotations/xmls目录下存放着图片的标注。每个xml文件是对一张图片的说明,包括图片尺寸、包含的昆虫名称、在图片上出现的位置等信息。
    insects
        |---train
        |         |---annotations
        |         |         |---xmls
        |         |                  |---100.xml
        |         |                  |---101.xml
        |         |                  |---...
        |         |
        |         |---images
        |                   |---100.jpeg
        |                   |---101.jpeg
        |                   |---...
        |
        |---val
        |        |---annotations
        |        |         |---xmls
        |        |                  |---1221.xml
        |        |                  |---1277.xml
        |        |                  |---...
        |        |
        |        |---images
        |                  |---1221.jpeg
        |                  |---1277.jpeg
        |                  |---...
        |
        |---test
                 |---images
                           |---1833.jpeg
                           |---1838.jpeg
                           |---...
xml文件中的主要参数说明如下:
- size:图片尺寸。
- object:图片中包含的物体,一张图片可能中包含多个物体。
- name:昆虫名称;
- bndbox:物体真实框;
- difficult:识别是否困难。
<annotation>
        <folder>XXX</folder>
        <filename>100.jpeg</filename>
        <path>/home/XXX/XXX/XXX/100.jpeg</path>
        <source>
                <database>Unknown</database>
        </source>
        <size>
                <width>1336</width>
                <height>1336</height>
                <depth>3</depth>
        </size>
        <segmented>0</segmented>
        <object>
                <name>Boerner</name>
                <pose>Unspecified</pose>
                <truncated>0</truncated>
                <difficult>0</difficult>
                <bndbox>
                        <xmin>500</xmin>
                        <ymin>893</ymin>
                        <xmax>656</xmax>
                        <ymax>966</ymax>
                </bndbox>
        </object>
        ...
 </annotation>
二、标注数据读取
下面我们将从数据集中读取xml文件,将每张图片的标注信息读取出来。在读取具体的标注文件之前,我们先完成一件事情,就是将昆虫的类别名字(字符串)转化成数字表示的类别。因为神经网络里面计算时需要的输入类型是数值型的,所以需要将字符串表示的类别转化成具体的数字。昆虫类别名称的列表是:[‘Boerner’, ‘Leconte’, ‘Linnaeus’, ‘acuminatus’, ‘armandi’, ‘coleoptera’, ‘linnaeus’],这里我们约定此列表中:'Boerner’对应类别0,'Leconte’对应类别1,…,'linnaeus’对应类别6。使用下面的程序可以得到表示名称字符串和数字类别之间映射关系的字典。
INSECT_NAMES = ['Boerner', 'Leconte', 'Linnaeus',
                'acuminatus', 'armandi', 'coleoptera', 'linnaeus']

def get_insect_names():
    """
    return a dict, as following,
        {'Boerner': 0,
         'Leconte': 1,
         'Linnaeus': 2,
         'acuminatus': 3,
         'armandi': 4,
         'coleoptera': 5,
         'linnaeus': 6
        }
    It can map the insect name into an integer label.
    """
    insect_category2id = {}
    for i, item in enumerate(INSECT_NAMES):
        insect_category2id[item] = i

    return insect_category2id
下面的程序从annotations/xml目录下面读取所有文件标注信息。
import os
import numpy as np
import xml.etree.ElementTree as ET

def get_annotations(cname2cid, datadir):
    filenames = os.listdir(os.path.join(datadir, 'annotations', 'xmls'))
    records = []
    ct = 0
    for fname in filenames:
        fid = fname.split('.')[0]
        fpath = os.path.join(datadir, 'annotations', 'xmls', fname)
        img_file = os.path.join(datadir, 'images', fid + '.jpeg')
        tree = ET.parse(fpath)

        if tree.find('id') is None:
            im_id = np.array([ct])
        else:
            im_id = np.array([int(tree.find('id').text)])

        objs = tree.findall('object')
        im_w = float(tree.find('size').find('width').text)
        im_h = float(tree.find('size').find('height').text)
        gt_bbox = np.zeros((len(objs), 4), dtype=np.float32)
        gt_class = np.zeros((len(objs), ), dtype=np.int32)
        is_crowd = np.zeros((len(objs), ), dtype=np.int32)
        difficult = np.zeros((len(objs), ), dtype=np.int32)
        for i, obj in enumerate(objs):
            cname = obj.find('name').text
            gt_class[i] = cname2cid[cname]
            _difficult = int(obj.find('difficult').text)
            x1 = float(obj.find('bndbox').find('xmin').text)
            y1 = float(obj.find('bndbox').find('ymin').text)
            x2 = float(obj.find('bndbox').find('xmax').text)
            y2 = float(obj.find('bndbox').find('ymax').text)
            x1 = max(0, x1)
            y1 = max(0, y1)
            x2 = min(im_w - 1, x2)
            y2 = min(im_h - 1, y2)
            # 这里使用xywh格式来表示目标物体真实框
            gt_bbox[i] = [(x1+x2)/2.0 , (y1+y2)/2.0, x2-x1+1., y2-y1+1.]
            is_crowd[i] = 0
            difficult[i] = _difficult

        voc_rec = {
            'im_file': img_file,
            'im_id': im_id,
            'h': im_h,
            'w': im_w,
            'is_crowd': is_crowd,
            'gt_class': gt_class,
            'gt_bbox': gt_bbox,
            'gt_poly': [],
            'difficult': difficult
            }
        if len(objs) != 0:
            records.append(voc_rec)
        ct += 1
    return records
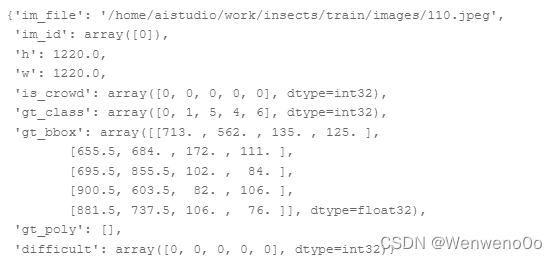
通过上面的程序,将所有训练数据集的标注数据全部读取出来了,存放在records列表下面,其中每一个元素是一张图片的标注数据,包含了图片存放地址,图片id,图片高度和宽度,图片中所包含的目标物体的种类和位置,具体格式如下。
三、数据读取
前面已经将图片的所有描述信息保存在records中了,其中每一个元素都包含了一张图片的描述,下面的程序展示了如何根据records里面的描述读取图片及标注。
# 数据读取
import cv2

def get_bbox(gt_bbox, gt_class):
    # 对于一般的检测任务来说,一张图片上往往会有多个目标物体
    # 设置参数MAX_NUM = 50, 即一张图片最多取50个真实框;如果真实
    # 框的数目少于50个,则将不足部分的gt_bbox, gt_class和gt_score的各项数值全设置为0
    MAX_NUM = 50
    gt_bbox2 = np.zeros((MAX_NUM, 4))
    gt_class2 = np.zeros((MAX_NUM,))
    for i in range(len(gt_bbox)):
        gt_bbox2[i, :] = gt_bbox[i, :]
        gt_class2[i] = gt_class[i]
        if i >= MAX_NUM:
            break
    return gt_bbox2, gt_class2

def get_img_data_from_file(record):
    """
    record is a dict as following,
      record = {
            'im_file': img_file,
            'im_id': im_id,
            'h': im_h,
            'w': im_w,
            'is_crowd': is_crowd,
            'gt_class': gt_class,
            'gt_bbox': gt_bbox,
            'gt_poly': [],
            'difficult': difficult
            }
    """
    im_file = record['im_file']
    h = record['h']
    w = record['w']
    is_crowd = record['is_crowd']
    gt_class = record['gt_class']
    gt_bbox = record['gt_bbox']
    difficult = record['difficult']

    img = cv2.imread(im_file)
    img = cv2.cvtColor(img, cv2.COLOR_BGR2RGB)

    # check if h and w in record equals that read from img
    assert img.shape[0] == int(h), \
             "image height of {} inconsistent in record({}) and img file({})".format(
               im_file, h, img.shape[0])

    assert img.shape[1] == int(w), \
             "image width of {} inconsistent in record({}) and img file({})".format(
               im_file, w, img.shape[1])

    gt_boxes, gt_labels = get_bbox(gt_bbox, gt_class)

    # gt_bbox 用相对值
    gt_boxes[:, 0] = gt_boxes[:, 0] / float(w)
    gt_boxes[:, 1] = gt_boxes[:, 1] / float(h)
    gt_boxes[:, 2] = gt_boxes[:, 2] / float(w)
    gt_boxes[:, 3] = gt_boxes[:, 3] / float(h)

    return img, gt_boxes, gt_labels, (h, w)
四、数据预处理
在计算机视觉中,通常会对图像做一些随机的变化,产生相似但又不完全相同的样本。主要作用是扩大训练数据集,抑制过拟合,提升模型的泛化能力,常用的方法主要有以下几种:
- 随机改变亮暗、对比度和颜色
- 随机填充
- 随机裁剪
- 随机缩放
- 随机翻转
- 随机打乱真实框排列顺序
下面我们分别使用numpy 实现这些数据增强方法。
1、随机改变亮暗、对比度和颜色等
import numpy as np
import cv2
from PIL import Image, ImageEnhance
import random

# 随机改变亮暗、对比度和颜色等
def random_distort(img):
    # 随机改变亮度
    def random_brightness(img, lower=0.5, upper=1.5):
        e = np.random.uniform(lower, upper)
        return ImageEnhance.Brightness(img).enhance(e)
    # 随机改变对比度
    def random_contrast(img, lower=0.5, upper=1.5):
        e = np.random.uniform(lower, upper)
        return ImageEnhance.Contrast(img).enhance(e)
    # 随机改变颜色
    def random_color(img, lower=0.5, upper=1.5):
        e = np.random.uniform(lower, upper)
        return ImageEnhance.Color(img).enhance(e)

    ops = [random_brightness, random_contrast, random_color]
    np.random.shuffle(ops)

    img = Image.fromarray(img)
    img = ops[0](img)
    img = ops[1](img)
    img = ops[2](img)
    img = np.asarray(img)

    return img

# 定义可视化函数,用于对比原图和图像增强的效果
import matplotlib.pyplot as plt
def visualize(srcimg, img_enhance):
    # 图像可视化
    plt.figure(num=2, figsize=(6,12))
    plt.subplot(1,2,1)
    plt.title('Src Image', color='#0000FF')
    plt.axis('off') # 不显示坐标轴
    plt.imshow(srcimg) # 显示原图片

    # 对原图做 随机改变亮暗、对比度和颜色等 数据增强
    srcimg_gtbox = records[0]['gt_bbox']
    srcimg_label = records[0]['gt_class']

    plt.subplot(1,2,2)
    plt.title('Enhance Image', color='#0000FF')
    plt.axis('off') # 不显示坐标轴
    plt.imshow(img_enhance)


image_path = records[0]['im_file']
print("read image from file {}".format(image_path))
srcimg = Image.open(image_path)
# 将PIL读取的图像转换成array类型
srcimg = np.array(srcimg)

# 对原图做 随机改变亮暗、对比度和颜色等 数据增强
img_enhance = random_distort(srcimg)
visualize(srcimg, img_enhance)
2、随机填充
# 随机填充
def random_expand(img,
                  gtboxes,
                  max_ratio=4.,
                  fill=None,
                  keep_ratio=True,
                  thresh=0.5):
    if random.random() > thresh:
        return img, gtboxes

    if max_ratio < 1.0:
        return img, gtboxes

    h, w, c = img.shape
    ratio_x = random.uniform(1, max_ratio)
    if keep_ratio:
        ratio_y = ratio_x
    else:
        ratio_y = random.uniform(1, max_ratio)
    oh = int(h * ratio_y)
    ow = int(w * ratio_x)
    off_x = random.randint(0, ow - w)
    off_y = random.randint(0, oh - h)

    out_img = np.zeros((oh, ow, c))
    if fill and len(fill) == c:
        for i in range(c):
            out_img[:, :, i] = fill[i] * 255.0

    out_img[off_y:off_y + h, off_x:off_x + w, :] = img
    gtboxes[:, 0] = ((gtboxes[:, 0] * w) + off_x) / float(ow)
    gtboxes[:, 1] = ((gtboxes[:, 1] * h) + off_y) / float(oh)
    gtboxes[:, 2] = gtboxes[:, 2] / ratio_x
    gtboxes[:, 3] = gtboxes[:, 3] / ratio_y

    return out_img.astype('uint8'), gtboxes


# 对原图做 随机改变亮暗、对比度和颜色等 数据增强
srcimg_gtbox = records[0]['gt_bbox']
img_enhance, new_gtbox = random_expand(srcimg, srcimg_gtbox)
visualize(srcimg, img_enhance)
3、随机裁剪
import numpy as np

def multi_box_iou_xywh(box1, box2):
    """
    In this case, box1 or box2 can contain multi boxes.
    Only two cases can be processed in this method:
       1, box1 and box2 have the same shape, box1.shape == box2.shape
       2, either box1 or box2 contains only one box, len(box1) == 1 or len(box2) == 1
    If the shape of box1 and box2 does not match, and both of them contain multi boxes, it will be wrong.
    """
    assert box1.shape[-1] == 4, "Box1 shape[-1] should be 4."
    assert box2.shape[-1] == 4, "Box2 shape[-1] should be 4."


    b1_x1, b1_x2 = box1[:, 0] - box1[:, 2] / 2, box1[:, 0] + box1[:, 2] / 2
    b1_y1, b1_y2 = box1[:, 1] - box1[:, 3] / 2, box1[:, 1] + box1[:, 3] / 2
    b2_x1, b2_x2 = box2[:, 0] - box2[:, 2] / 2, box2[:, 0] + box2[:, 2] / 2
    b2_y1, b2_y2 = box2[:, 1] - box2[:, 3] / 2, box2[:, 1] + box2[:, 3] / 2

    inter_x1 = np.maximum(b1_x1, b2_x1)
    inter_x2 = np.minimum(b1_x2, b2_x2)
    inter_y1 = np.maximum(b1_y1, b2_y1)
    inter_y2 = np.minimum(b1_y2, b2_y2)
    inter_w = inter_x2 - inter_x1
    inter_h = inter_y2 - inter_y1
    inter_w = np.clip(inter_w, a_min=0., a_max=None)
    inter_h = np.clip(inter_h, a_min=0., a_max=None)

    inter_area = inter_w * inter_h
    b1_area = (b1_x2 - b1_x1) * (b1_y2 - b1_y1)
    b2_area = (b2_x2 - b2_x1) * (b2_y2 - b2_y1)

    return inter_area / (b1_area + b2_area - inter_area)

def box_crop(boxes, labels, crop, img_shape):
    x, y, w, h = map(float, crop)
    im_w, im_h = map(float, img_shape)

    boxes = boxes.copy()
    boxes[:, 0], boxes[:, 2] = (boxes[:, 0] - boxes[:, 2] / 2) * im_w, (
        boxes[:, 0] + boxes[:, 2] / 2) * im_w
    boxes[:, 1], boxes[:, 3] = (boxes[:, 1] - boxes[:, 3] / 2) * im_h, (
        boxes[:, 1] + boxes[:, 3] / 2) * im_h

    crop_box = np.array([x, y, x + w, y + h])
    centers = (boxes[:, :2] + boxes[:, 2:]) / 2.0
    mask = np.logical_and(crop_box[:2] <= centers, centers <= crop_box[2:]).all(
        axis=1)

    boxes[:, :2] = np.maximum(boxes[:, :2], crop_box[:2])
    boxes[:, 2:] = np.minimum(boxes[:, 2:], crop_box[2:])
    boxes[:, :2] -= crop_box[:2]
    boxes[:, 2:] -= crop_box[:2]

    mask = np.logical_and(mask, (boxes[:, :2] < boxes[:, 2:]).all(axis=1))
    boxes = boxes * np.expand_dims(mask.astype('float32'), axis=1)
    labels = labels * mask.astype('float32')
    boxes[:, 0], boxes[:, 2] = (boxes[:, 0] + boxes[:, 2]) / 2 / w, (
        boxes[:, 2] - boxes[:, 0]) / w
    boxes[:, 1], boxes[:, 3] = (boxes[:, 1] + boxes[:, 3]) / 2 / h, (
        boxes[:, 3] - boxes[:, 1]) / h

    return boxes, labels, mask.sum()
# 随机裁剪
def random_crop(img,
                boxes,
                labels,
                scales=[0.3, 1.0],
                max_ratio=2.0,
                constraints=None,
                max_trial=50):
    if len(boxes) == 0:
        return img, boxes

    if not constraints:
        constraints = [(0.1, 1.0), (0.3, 1.0), (0.5, 1.0), (0.7, 1.0),
                       (0.9, 1.0), (0.0, 1.0)]

    img = Image.fromarray(img)
    w, h = img.size
    crops = [(0, 0, w, h)]
    for min_iou, max_iou in constraints:
        for _ in range(max_trial):
            scale = random.uniform(scales[0], scales[1])
            aspect_ratio = random.uniform(max(1 / max_ratio, scale * scale), \
                                          min(max_ratio, 1 / scale / scale))
            crop_h = int(h * scale / np.sqrt(aspect_ratio))
            crop_w = int(w * scale * np.sqrt(aspect_ratio))
            crop_x = random.randrange(w - crop_w)
            crop_y = random.randrange(h - crop_h)
            crop_box = np.array([[(crop_x + crop_w / 2.0) / w,
                                  (crop_y + crop_h / 2.0) / h,
                                  crop_w / float(w), crop_h / float(h)]])

            iou = multi_box_iou_xywh(crop_box, boxes)
            if min_iou <= iou.min() and max_iou >= iou.max():
                crops.append((crop_x, crop_y, crop_w, crop_h))
                break

    while crops:
        crop = crops.pop(np.random.randint(0, len(crops)))
        crop_boxes, crop_labels, box_num = box_crop(boxes, labels, crop, (w, h))
        if box_num < 1:
            continue
        img = img.crop((crop[0], crop[1], crop[0] + crop[2],
                        crop[1] + crop[3])).resize(img.size, Image.LANCZOS)
        img = np.asarray(img)
        return img, crop_boxes, crop_labels
    img = np.asarray(img)
    return img, boxes, labels
4、随机缩放&随机翻转&随机打乱真实框排列顺序
# 随机缩放
def random_interp(img, size, interp=None):
    interp_method = [
        cv2.INTER_NEAREST,
        cv2.INTER_LINEAR,
        cv2.INTER_AREA,
        cv2.INTER_CUBIC,
        cv2.INTER_LANCZOS4,
    ]
    if not interp or interp not in interp_method:
        interp = interp_method[random.randint(0, len(interp_method) - 1)]
    h, w, _ = img.shape
    im_scale_x = size / float(w)
    im_scale_y = size / float(h)
    img = cv2.resize(
        img, None, None, fx=im_scale_x, fy=im_scale_y, interpolation=interp)
    return img


# 随机翻转
def random_flip(img, gtboxes, thresh=0.5):
    if random.random() > thresh:
        img = img[:, ::-1, :]
        gtboxes[:, 0] = 1.0 - gtboxes[:, 0]
    return img, gtboxes


# 随机打乱真实框排列顺序
def shuffle_gtbox(gtbox, gtlabel):
    gt = np.concatenate(
        [gtbox, gtlabel[:, np.newaxis]], axis=1)
    idx = np.arange(gt.shape[0])
    np.random.shuffle(idx)
    gt = gt[idx, :]
    return gt[:, :4], gt[:, 4]
5、图像增广方法汇总
# 图像增广方法汇总
def image_augment(img, gtboxes, gtlabels, size, means=None):
    # 随机改变亮暗、对比度和颜色等
    img = random_distort(img)
    # 随机填充
    img, gtboxes = random_expand(img, gtboxes, fill=means)
    # 随机裁剪
    img, gtboxes, gtlabels, = random_crop(img, gtboxes, gtlabels)
    # 随机缩放
    img = random_interp(img, size)
    # 随机翻转
    img, gtboxes = random_flip(img, gtboxes)
    # 随机打乱真实框排列顺序
    gtboxes, gtlabels = shuffle_gtbox(gtboxes, gtlabels)

    return img.astype('float32'), gtboxes.astype('float32'), gtlabels.astype('int32')
最后形成一个函数:
def get_img_data(record, size=640):
    img, gt_boxes, gt_labels, scales = get_img_data_from_file(record)
    img, gt_boxes, gt_labels = image_augment(img, gt_boxes, gt_labels, size)
    mean = [0.485, 0.456, 0.406]
    std = [0.229, 0.224, 0.225]
    mean = np.array(mean).reshape((1, 1, -1))
    std = np.array(std).reshape((1, 1, -1))
    img = (img / 255.0 - mean) / std
    img = img.astype('float32').transpose((2, 0, 1))
    return img, gt_boxes, gt_labels, scales
至此就完成了一系列的数据读取与数据增强的操作。
最后附上数据获取方式:
链接:https://pan.baidu.com/s/1DtfPXCKjriH4B8yAWkRDVg 提取码:s4vz