Linux环境安装
具体步骤参考博客。
虚拟机环境准备
虚拟机克隆
在前一步骤中准备好安装了CentOS 7 的虚拟机,克隆一个虚拟机出来,过程如下图:


修改虚拟机IP


- 设置虚拟机虚拟网络编辑器,编辑->虚拟网络编辑器->VMnet8->更改配置:


将子网IP按下图调整,最后点击 NAT 设置:
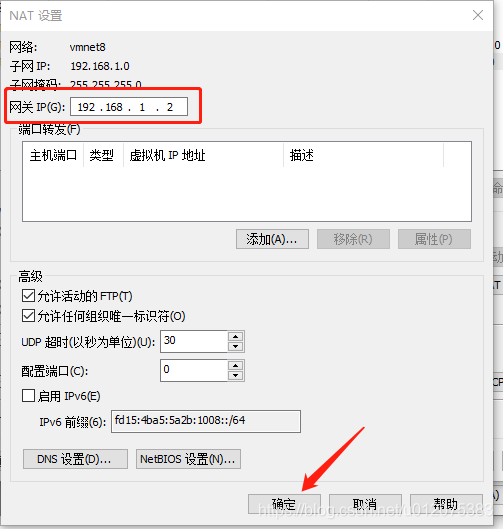

- 设置VMnet8 属性,保证默认网关、首先DNS服务器和Linux环境配置一致


修改主机名


创建普通用户


重启虚拟机

使用Xshell远程访问
在 VMware 上直接操作 Linux 用户体验不友好,故使用 Xshell来远程访问虚拟机。
- 修改Windows 主机映射文件(Win10 系统文件路径:C:\Windows\System32\drivers\etc)hosts,添加如下内容:
192.168.1.101 bigdata101
192.168.1.102 bigdata102
192.168.1.103 bigdata103


集群搭建
安装 JDK
-
在bigdata101虚拟机上创建目录,并调整目录所属用户及组
sudo mkdir /opt/module /opt/software


-
使用Xftp上传JDK安装包并解压


cd /opt/software
tar -zxvf jdk-8u212-linux-x64.tar.gz -C /opt/module/


安装 Hadoop
-
将 hadoop安装包上传至 /opt/software目录 ;
-
解压安装
cd /opt/software
tar -zxvf hadoop-2.7.2.tar.gz -C /opt/module/

-
配置环境变量
sudo vim /etc/profile.d/my_env.sh
# 输入以下内容并保存退出
#HADOOP_HOME
export HADOOP_HOME=/opt/module/hadoop-2.7.2
export PATH=$PATH:$HADOOP_HOME/bin
export PATH=$PATH:$HADOOP_HOME/sbin
-
刷新环境变量,验证是否安装成功
source /etc/profile.d/my_env.sh
hadoop version

关闭防火墙
-
查看防火墙状态
systemctl status firewalld.service

-
关闭防火墙
sudo systemctl stop firewalld.service

-
永久关闭防火墙
sudo systemctl disable firewalld.service

其它节点虚拟机克隆
配置 SSH 无密钥登录

-
分发公钥
ssh-copy-id bigdata101
ssh-copy-id bigdata102
ssh-copy-id bigdata103


-
切换到其它虚拟机分别执行生成公钥和私钥、分发公钥操作
-
切换root用户,对三台虚拟机分别执行生成公钥和私钥、分发公钥操作
-
验证 SSH 无密钥登录
ssh bigdata101
ssh bigdata102
ssh bigdata103

编写文件集群分发脚本


修改Hadoop配置为集群配置
集群时间同步
-
使用bigdata101为时间服务,其它虚拟机时间跟它保持同步,切换root用户,在三台虚拟机上安装 ntp 服务
su
yum install -y ntp
rpm -qa | grep ntp

-
修改 ntp 配置文件
vi /etc/ntp.conf
# 添加内容:授权192.168.1.0-192.168.1.255网段上的所有机器可以从这台机器上查询和同步时间
restrict 192.168.1.0 mask 255.255.255.0 nomodify notrap
# 修改内容:集群在局域网中,不使用其他互联网上的时间
#server 0.centos.pool.ntp.org iburst
#server 1.centos.pool.ntp.org iburst
#server 2.centos.pool.ntp.org iburst
#server 3.centos.pool.ntp.org iburst
# 添加内容:当该节点丢失网络连接,依然可以采用本地时间作为时间服务器为集群中的其他节点提供时间同步
server 127.127.1.0
fudge 127.127.1.0 stratum 10

-
修改/etc/sysconfig/ntpd 文件
vim /etc/sysconfig/ntpd
# 添加以下内容:让硬件时间与系统时间一起同步
SYNC_HWCLOCK=yes
-
重新启动ntpd服务并设置开机启动
# 启动服务
service ntpd start
# 查看服务状态
service ntpd status
# 设置开机启动
chkconfig ntpd on

-
其它机器配置(必须使用root用户)


