概述
这是一个系列的Android平台下OpenGl ES介绍,从最基本的使用最终到VR图的展示的实现,属于基础篇。(后面针对VR视频会再有几篇文章,属于进阶篇)
OpenGL ES之一——概念扫盲
OpenGL ES之二——Android中的OpenGL ES概述
OpenGL ES之三——绘制纯色背景
OpenGL ES之四——绘制点,线,三角形
OpenGL ES之五——相机和投影,绘制等腰三角形
OpenGL ES之六——绘制矩形和圆形
OpenGL ES之七——着色器语言GLSL
OpenGL ES之八——GLES20类和Matrix类
OpenGL ES之九——相机和投影
OpenGL ES之十——纹理贴图(展示一张图片)
OpenGL ES之十一——绘制3D图形
OpenGL ES之十二——地球仪和VR图
本篇概述
经过前面的铺垫,我们对OpenGLES了解了不少了,是时候绘制立体图像了。
一 圆锥
拆分原理:
在之前的文章中我们绘制过圆形,圆锥可以看成是圆心顶点坐标z不为0的圆形,绘制的方法和绘制一个圆是一样的,将圆锥的侧面切分为一个个三角形。如下:
着色器文件
顶点着色器
#version 300 es
layout (location = 0) in vec4 vPosition;
layout (location = 1) in vec4 aColor;
uniform mat4 u_Matrix;
out vec4 vColor;
void main() {
    gl_Position  = u_Matrix*vPosition;
    gl_PointSize = 10.0;
    vColor = aColor;
}
片段着色器
#version 300 es
precision mediump float;
in vec4 vColor;
out vec4 fragColor;
void main() {
    fragColor = vColor;
}
渲染器
public class ConeRenderer implements GLSurfaceView.Renderer {
    private static final int BYTES_PER_FLOAT = 4;
    //顶点位置缓存
    private final FloatBuffer vertexBuffer;
    //顶点颜色缓存
    private final FloatBuffer colorBuffer;
    //渲染程序
    private int mProgram;

    //相机矩阵
    private final float[] mViewMatrix = new float[16];
    //投影矩阵
    private final float[] mProjectMatrix = new float[16];
    //最终变换矩阵
    private final float[] mMVPMatrix = new float[16];

    //返回属性变量的位置
    //变换矩阵
    private int uMatrixLocation;
    //位置
    private int aPositionLocation;
    //颜色
    private int aColorLocation;

    //圆形顶点位置
    private float circularCoords[];
    //顶点的颜色
    private float color[];


    public ConeRenderer() {
        createPositions(0.5f,60);

        //顶点位置相关
        //分配本地内存空间,每个浮点型占4字节空间;将坐标数据转换为FloatBuffer,用以传入给OpenGL ES程序
        vertexBuffer = ByteBuffer.allocateDirect(circularCoords.length * BYTES_PER_FLOAT)
                .order(ByteOrder.nativeOrder())
                .asFloatBuffer();
        vertexBuffer.put(circularCoords);
        vertexBuffer.position(0);

        //顶点颜色相关
        colorBuffer = ByteBuffer.allocateDirect(color.length * BYTES_PER_FLOAT)
                .order(ByteOrder.nativeOrder())
                .asFloatBuffer();
        colorBuffer.put(color);
        colorBuffer.position(0);
    }

    private void createPositions(float radius, int n){
        ArrayList<Float> data=new ArrayList<>();
        data.add(0.0f);             //设置圆锥顶点坐标
        data.add(0.0f);
        data.add(-0.5f);
        float angDegSpan=360f/n;
        for(float i=0;i<360+angDegSpan;i+=angDegSpan){
            data.add((float) (radius*Math.sin(i*Math.PI/180f)));
            data.add((float)(radius*Math.cos(i*Math.PI/180f)));
            data.add(0.0f);
        }
        float[] f=new float[data.size()];
        for (int i=0;i<f.length;i++){
            f[i]=data.get(i);
        }

        circularCoords = f;

        //处理各个顶点的颜色
        color = new float[f.length*4/3];
        ArrayList<Float> tempC = new ArrayList<>();
        ArrayList<Float> totalC = new ArrayList<>();
        ArrayList<Float> total0 = new ArrayList<>();
        total0.add(0.5f);
        total0.add(0.0f);
        total0.add(0.0f);
        total0.add(1.0f);
        tempC.add(1.0f);
        tempC.add(1.0f);
        tempC.add(1.0f);
        tempC.add(1.0f);
        for (int i=0;i<f.length/3;i++){
            if (i==0){
                totalC.addAll(total0);
            }else {
                totalC.addAll(tempC);
            }

        }

        for (int i=0; i<totalC.size();i++){
            color[i]=totalC.get(i);
        }
    }

    @Override
    public void onSurfaceCreated(GL10 gl, EGLConfig config) {
        //将背景设置为白色
        GLES30.glClearColor(0.5f,0.5f,0.5f,1.0f);

        //编译顶点着色程序
        String vertexShaderStr = ResReadUtils.readResource(R.raw.vertex_simple_shade);
        int vertexShaderId = ShaderUtils.compileVertexShader(vertexShaderStr);
        //编译片段着色程序
        String fragmentShaderStr = ResReadUtils.readResource(R.raw.fragment_simple_shade);
        int fragmentShaderId = ShaderUtils.compileFragmentShader(fragmentShaderStr);
        //连接程序
        mProgram = ShaderUtils.linkProgram(vertexShaderId, fragmentShaderId);
        //在OpenGLES环境中使用程序
        GLES30.glUseProgram(mProgram);


        uMatrixLocation = GLES30.glGetUniformLocation(mProgram, "u_Matrix");
        aPositionLocation = GLES30.glGetAttribLocation(mProgram, "vPosition");
        aColorLocation = GLES30.glGetAttribLocation(mProgram, "aColor");
    }

    @Override
    public void onSurfaceChanged(GL10 gl, int width, int height) {
        //设置绘制窗口
        GLES30.glViewport(0, 0, width, height);


        //相机和透视投影方式
        //计算宽高比
        float ratio=(float)width/height;
        //设置透视投影
        Matrix.frustumM(mProjectMatrix, 0, -ratio, ratio, -1, 1, 3, 7);
        //设置相机位置
        Matrix.setLookAtM(mViewMatrix, 0, 6, 0, -1f, 0f, 0f, 0f, 0f, 0.0f, 1.0f);
        //计算变换矩阵
        Matrix.multiplyMM(mMVPMatrix,0,mProjectMatrix,0,mViewMatrix,0);
    }

    @Override
    public void onDrawFrame(GL10 gl) {
        //把颜色缓冲区设置为我们预设的颜色
        GLES30.glClear(GLES30.GL_COLOR_BUFFER_BIT);

        //将变换矩阵传入顶点渲染器
        GLES30.glUniformMatrix4fv(uMatrixLocation,1,false,mMVPMatrix,0);
        //准备坐标数据
        GLES30.glVertexAttribPointer(aPositionLocation, 3, GLES30.GL_FLOAT, false, 0, vertexBuffer);
        //启用顶点位置句柄
        GLES30.glEnableVertexAttribArray(aPositionLocation);

        //准备颜色数据
        GLES30.glVertexAttribPointer(aColorLocation, 4, GLES30.GL_FLOAT, false, 0, colorBuffer);
        //启用顶点颜色句柄
        GLES30.glEnableVertexAttribArray(aColorLocation);

        //绘制圆锥侧面
        GLES30.glDrawArrays(GLES30.GL_TRIANGLE_FAN, 0, circularCoords.length/3);

        //禁止顶点数组的句柄
        GLES30.glDisableVertexAttribArray(aPositionLocation);
        GLES30.glDisableVertexAttribArray(aColorLocation);
    }
}
上面唯一不同的就是相机的参数变了如下,如果认真看了之前关于相机和投影的知识这里很好理解。
		//设置相机位置
        Matrix.setLookAtM(mViewMatrix, 0, 6, 0, -1f, 0f, 0f, 0f, 0f, 0.0f, 1.0f);
效果图
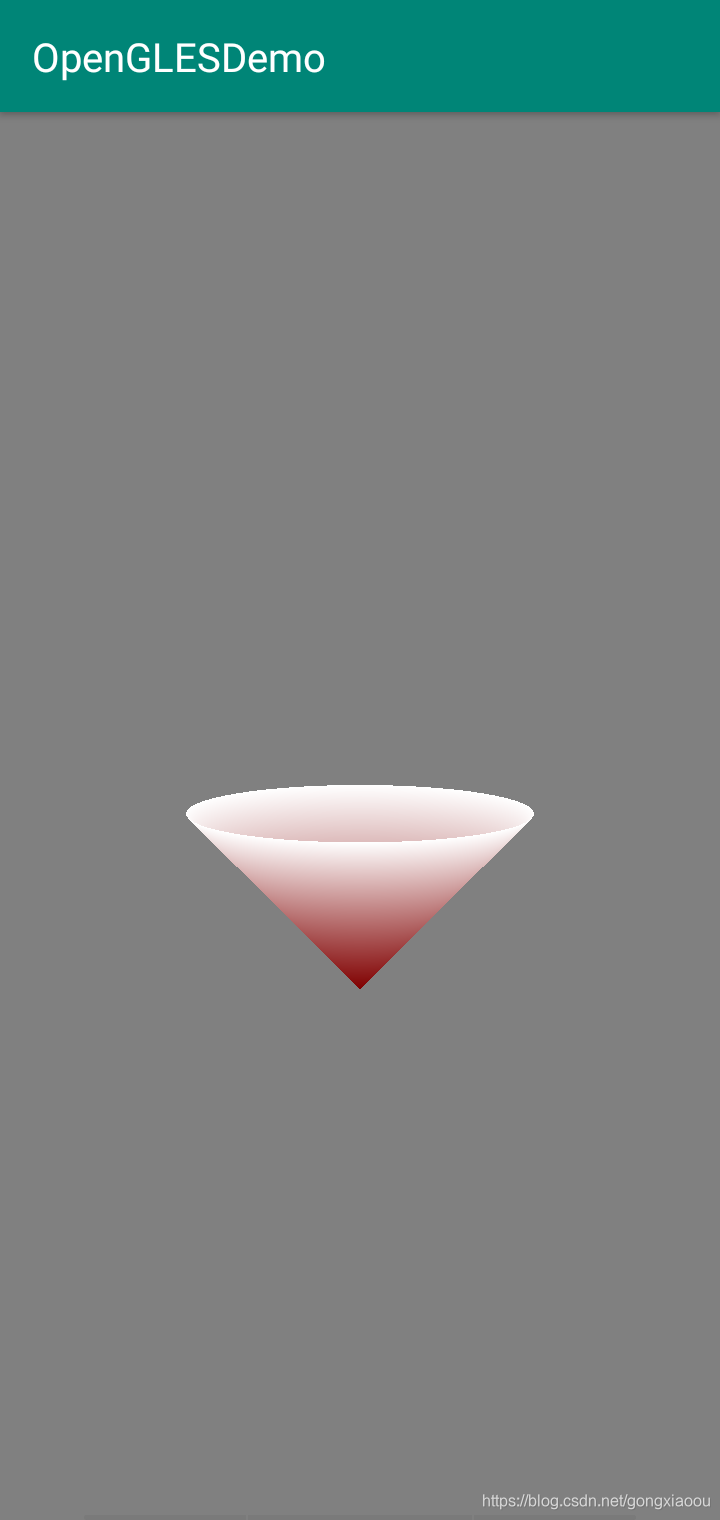
我们发现它不是个实体圆锥而是一个侧面。那么为了得到一个有底的圆锥,我们就再绘制一个圆就是了。
完整的渲染器
public class ConeRenderer implements GLSurfaceView.Renderer{
        //一个Float占用4Byte
        private static final int BYTES_PER_FLOAT = 4;
        //顶点位置缓存(圆锥侧面)
        private final FloatBuffer vertexBuffer;
        //顶点位置缓存(圆锥底面)
        private FloatBuffer vertexBuffer1;
        //顶点颜色缓存
        private final FloatBuffer colorBuffer;
        //渲染程序
        private int mProgram;

        //相机矩阵
        private final float[] mViewMatrix = new float[16];
        //投影矩阵
        private final float[] mProjectMatrix = new float[16];
        //最终变换矩阵
        private final float[] mMVPMatrix = new float[16];

        //返回属性变量的位置
        //变换矩阵
        private int uMatrixLocation;
        //位置
        private int aPositionLocation;
        //颜色
        private int aColorLocation;

        //圆锥顶点位置(侧面)
        private float coneCoords[];

        //圆锥顶点位置(圆底面)
        private float coneCoords1[];

        //顶点的颜色
        private float color[];

        public ConeRenderer() {
            //圆锥的侧面数据
            createPositions(0.5f,60);

            //圆锥的圆形底面数据
            createCircularPositions();

            //顶点位置相关(圆锥侧面)
            //分配本地内存空间,每个浮点型占4字节空间;将坐标数据转换为FloatBuffer,用以传入给OpenGL ES程序
            vertexBuffer = ByteBuffer.allocateDirect(coneCoords.length * BYTES_PER_FLOAT)
                    .order(ByteOrder.nativeOrder())
                    .asFloatBuffer();
            vertexBuffer.put(coneCoords);
            vertexBuffer.position(0);

            //顶点颜色相关
            colorBuffer = ByteBuffer.allocateDirect(color.length * BYTES_PER_FLOAT)
                    .order(ByteOrder.nativeOrder())
                    .asFloatBuffer();
            colorBuffer.put(color);
            colorBuffer.position(0);

            //顶点位置相关(圆锥底面)
            vertexBuffer1 = ByteBuffer.allocateDirect(coneCoords1.length * BYTES_PER_FLOAT)
                    .order(ByteOrder.nativeOrder())
                    .asFloatBuffer();
            vertexBuffer1.put(coneCoords1);
            vertexBuffer1.position(0);
        }

    private void createCircularPositions() {
        coneCoords1 = new float[coneCoords.length];

        for (int i=0;i<coneCoords.length;i++){
            if (i==2){
                coneCoords1[i]=0.0f;
            }else {
                coneCoords1[i]=coneCoords[i];
            }
        }
    }

    private void createPositions(float radius, int n){
            ArrayList<Float> data=new ArrayList<>();
            data.add(0.0f);//设置锥心坐标
            data.add(0.0f);
            data.add(-0.5f);

            float angDegSpan=360f/n;
            for(float i=0;i<360+angDegSpan;i+=angDegSpan){
                data.add((float) (radius*Math.sin(i*Math.PI/180f)));
                data.add((float)(radius*Math.cos(i*Math.PI/180f)));
                data.add(0.0f);
            }
            float[] f=new float[data.size()];

            for (int i=0;i<f.length;i++){
                f[i]=data.get(i);
            }

            coneCoords = f;

            //处理各个顶点的颜色
            color = new float[f.length*4/3];
            ArrayList<Float> tempC = new ArrayList<>();
            ArrayList<Float> totalC = new ArrayList<>();
            ArrayList<Float> totalCForColor = new ArrayList<>();

            tempC.add(0.8f);
            tempC.add(0.8f);
            tempC.add(0.8f);
            tempC.add(1.0f);

            ArrayList<Float> zeroIndexC = new ArrayList<>();
            zeroIndexC.add(1.0f);
            zeroIndexC.add(0.0f);
            zeroIndexC.add(0.0f);
            zeroIndexC.add(1.0f);
            for (int i=0;i<f.length/3;i++){
                if (i==0){
                    totalC.addAll(zeroIndexC);
                }else {
                    totalC.addAll(tempC);
                }

                totalCForColor.addAll(tempC);
            }

            for (int i=0; i<totalC.size();i++){
                color[i]=totalC.get(i);
            }
        }

        @Override
        public void onSurfaceCreated(GL10 gl, EGLConfig config) {
            //将背景设置为白色
            GLES30.glClearColor(0.3f,0.3f,0.3f,1.0f);

            //编译顶点着色程序
            String vertexShaderStr = ResReadUtils.readResource(R.raw.vertex_cone_renderer);
            int vertexShaderId = ShaderUtils.compileVertexShader(vertexShaderStr);
            //编译片段着色程序
            String fragmentShaderStr = ResReadUtils.readResource(R.raw.fragment_cone_renderer);
            int fragmentShaderId = ShaderUtils.compileFragmentShader(fragmentShaderStr);
            //连接程序
            mProgram = ShaderUtils.linkProgram(vertexShaderId, fragmentShaderId);
            //在OpenGLES环境中使用程序
            GLES30.glUseProgram(mProgram);

            uMatrixLocation = GLES30.glGetUniformLocation(mProgram, "u_Matrix");
            aPositionLocation = GLES30.glGetAttribLocation(mProgram, "vPosition");
            aColorLocation = GLES30.glGetAttribLocation(mProgram, "aColor");
        }

        @Override
        public void onSurfaceChanged(GL10 gl, int width, int height) {
            //设置绘制窗口
            GLES30.glViewport(0, 0, width, height);

            //相机和透视投影方式
            //计算宽高比
            float ratio=(float)width/height;
            //设置透视投影
            Matrix.frustumM(mProjectMatrix, 0, -ratio, ratio, -1, 1, 3, 7);
            //设置相机位置
            Matrix.setLookAtM(mViewMatrix, 0, 6, 0, -1f, 0f, 0f, 0f, 0f, 0f, 1f);

            //计算变换矩阵
            Matrix.multiplyMM(mMVPMatrix,0,mProjectMatrix,0,mViewMatrix,0);
        }

        @Override
        public void onDrawFrame(GL10 gl) {
            //把颜色缓冲区设置为我们预设的颜色
            GLES30.glClear(GLES30.GL_COLOR_BUFFER_BIT);

            //将变换矩阵传入顶点渲染器
            GLES30.glUniformMatrix4fv(uMatrixLocation,1,false,mMVPMatrix,0);

            //准备坐标数据
            GLES30.glVertexAttribPointer(aPositionLocation, 3, GLES30.GL_FLOAT, false, 0, vertexBuffer);
            //启用顶点位置句柄
            GLES30.glEnableVertexAttribArray(aPositionLocation);
            //准备颜色数据
            GLES30.glVertexAttribPointer(aColorLocation, 4, GLES30.GL_FLOAT, false, 0, colorBuffer);
            //启用顶点颜色句柄
            GLES30.glEnableVertexAttribArray(aColorLocation);
            //绘制圆锥侧面
            GLES30.glDrawArrays(GLES30.GL_TRIANGLE_FAN, 0, coneCoords.length/3);

            //准备坐标数据
            GLES30.glVertexAttribPointer(aPositionLocation, 3, GLES30.GL_FLOAT, false, 0, vertexBuffer1);
            //启用顶点位置句柄
            GLES30.glEnableVertexAttribArray(aPositionLocation);

            //绘制圆锥圆形底面
            GLES30.glDrawArrays(GLES30.GL_TRIANGLE_FAN, 0, coneCoords1.length/3);

            //禁止顶点数组的句柄
            GLES30.glDisableVertexAttribArray(aPositionLocation);
            GLES30.glDisableVertexAttribArray(aColorLocation);
        }
}
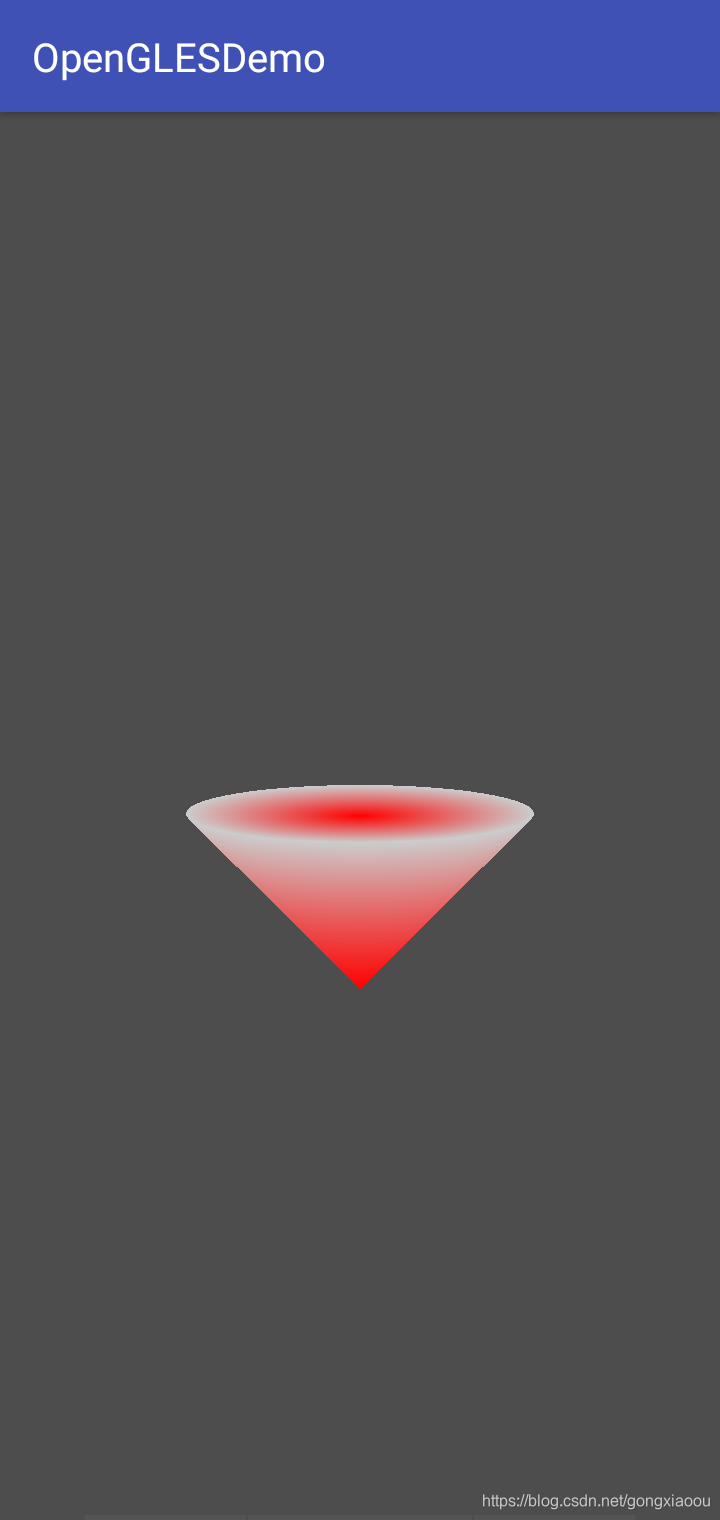
下面是效果图
二 圆柱
2.1 拆分原理
圆柱的与圆锥类似,我们可以把圆柱拆解成上下两个圆面,加上一个圆筒。圆筒我们之前也没画过,它怎么拆解成三角形呢?我们可以如同拆圆的思路来理解圆柱,想想正三菱柱、正八菱柱、正一百菱柱……菱越多,就越圆滑与圆柱越接近了,然后再把每个菱面(矩形)拆解成两个三角形就OK了。
2.2 完整的渲染器
public class CylinderRenderer implements GLSurfaceView.Renderer{
    private static final int SEPARATE_COUNT = 120;
    private static final float RADIUS = 0.5f;
    private static final float HEIGHT = 1.0f;

    //一个Float占用4Byte
    private static final int BYTES_PER_FLOAT = 4;
    //顶点位置缓存(圆柱侧面)
    private final FloatBuffer vertexBuffer;
    //顶点位置缓存(圆柱底面)
    private FloatBuffer vertexBuffer1;
    //顶点位置缓存(圆柱底面)
    private FloatBuffer vertexBuffer2;
    //渲染程序
    private int mProgram;

    //相机矩阵
    private final float[] mViewMatrix = new float[16];
    //投影矩阵
    private final float[] mProjectMatrix = new float[16];
    //最终变换矩阵
    private final float[] mMVPMatrix = new float[16];

    //返回属性变量的位置
    //变换矩阵
    private int uMatrixLocation;
    //位置
    private int aPositionLocation;

    //圆柱顶点位置(侧面)
    private float cylinderCoords[];

    //圆柱顶点位置(圆底面)
    private float cylinderCoords1[];

    //圆柱顶点位置(圆底面)
    private float cylinderCoords2[];

    public CylinderRenderer() {
        //侧面数据
        createCylinderPositions();

        //底面数据
        createCircularPositions();

        //顶点位置相关(圆柱侧面)
        //分配本地内存空间,每个浮点型占4字节空间;将坐标数据转换为FloatBuffer,用以传入给OpenGL ES程序
        vertexBuffer = ByteBuffer.allocateDirect(cylinderCoords.length * BYTES_PER_FLOAT)
                .order(ByteOrder.nativeOrder())
                .asFloatBuffer();
        vertexBuffer.put(cylinderCoords);
        vertexBuffer.position(0);

        //顶点位置相关(圆柱底面)
        vertexBuffer1 = ByteBuffer.allocateDirect(cylinderCoords1.length * BYTES_PER_FLOAT)
                .order(ByteOrder.nativeOrder())
                .asFloatBuffer();
        vertexBuffer1.put(cylinderCoords1);
        vertexBuffer1.position(0);

        //顶点位置相关(圆柱底面)
        vertexBuffer2 = ByteBuffer.allocateDirect(cylinderCoords2.length * BYTES_PER_FLOAT)
                .order(ByteOrder.nativeOrder())
                .asFloatBuffer();
        vertexBuffer2.put(cylinderCoords2);
        vertexBuffer2.position(0);
    }

    private void createCircularPositions() {
        ArrayList<Float> data=new ArrayList<>();
        data.add(0.0f);
        data.add(0.0f);
        data.add(HEIGHT);

        ArrayList<Float> data1=new ArrayList<>();
        data1.add(0.0f);
        data1.add(0.0f);
        data1.add(0.0f);

        float angDegSpan=360f/SEPARATE_COUNT;
        for(float i=0;i<360+angDegSpan;i+=angDegSpan){
            data.add((float) (RADIUS*Math.sin(i*Math.PI/180f)));
            data.add((float)(RADIUS*Math.cos(i*Math.PI/180f)));
            data.add(HEIGHT);

            data1.add((float) (RADIUS*Math.sin(i*Math.PI/180f)));
            data1.add((float)(RADIUS*Math.cos(i*Math.PI/180f)));
            data1.add(0.0f);
        }
        float[] f=new float[data.size()];
        float[] f1=new float[data.size()];

        for (int i=0;i<f.length;i++){
            f[i]=data.get(i);
            f1[i]=data1.get(i);
        }

        cylinderCoords1 = f;
        cylinderCoords2 = f1;
    }

    private void createCylinderPositions(){
        ArrayList<Float> pos=new ArrayList<>();
        float angDegSpan=360f/SEPARATE_COUNT;
        for(float i=0;i<360+angDegSpan;i+=angDegSpan){
            pos.add((float) (RADIUS*Math.sin(i*Math.PI/180f)));
            pos.add((float)(RADIUS*Math.cos(i*Math.PI/180f)));
            pos.add(HEIGHT);
            pos.add((float) (RADIUS*Math.sin(i*Math.PI/180f)));
            pos.add((float)(RADIUS*Math.cos(i*Math.PI/180f)));
            pos.add(0.0f);
        }
        float[] d=new float[pos.size()];
        for (int i=0;i<d.length;i++){
            d[i]=pos.get(i);
        }

        cylinderCoords = d;
    }

    @Override
    public void onSurfaceCreated(GL10 gl, EGLConfig config) {
        //将背景设置为白色
        GLES30.glClearColor(0.3f,0.3f,0.3f,1.0f);

        //编译顶点着色程序
        String vertexShaderStr = ResReadUtils.readResource(R.raw.vertex_cone_renderer);
        int vertexShaderId = ShaderUtils.compileVertexShader(vertexShaderStr);
        //编译片段着色程序
        String fragmentShaderStr = ResReadUtils.readResource(R.raw.fragment_cone_renderer);
        int fragmentShaderId = ShaderUtils.compileFragmentShader(fragmentShaderStr);
        //连接程序
        mProgram = ShaderUtils.linkProgram(vertexShaderId, fragmentShaderId);
        //在OpenGLES环境中使用程序
        GLES30.glUseProgram(mProgram);

        uMatrixLocation = GLES30.glGetUniformLocation(mProgram, "u_Matrix");
        aPositionLocation = GLES30.glGetAttribLocation(mProgram, "vPosition");
    }

    @Override
    public void onSurfaceChanged(GL10 gl, int width, int height) {
        //设置绘制窗口
        GLES30.glViewport(0, 0, width, height);

        //相机和透视投影方式
        //计算宽高比
        float ratio=(float)width/height;
        //设置透视投影
        Matrix.frustumM(mProjectMatrix, 0, -ratio, ratio, -1, 1, 3, 7);
        //设置相机位置
        Matrix.setLookAtM(mViewMatrix, 0, 6, 0, -1f, 0f, 0f, 0f, 0f, 0f, 1f);

        //计算变换矩阵
        Matrix.multiplyMM(mMVPMatrix,0,mProjectMatrix,0,mViewMatrix,0);
    }

    @Override
    public void onDrawFrame(GL10 gl) {
        //把颜色缓冲区设置为我们预设的颜色
        GLES30.glClear(GLES30.GL_COLOR_BUFFER_BIT);

        //将变换矩阵传入顶点渲染器
        GLES30.glUniformMatrix4fv(uMatrixLocation,1,false,mMVPMatrix,0);

        //准备坐标数据
        GLES30.glVertexAttribPointer(aPositionLocation, 3, GLES30.GL_FLOAT, false, 0, vertexBuffer);
        //启用顶点位置句柄
        GLES30.glEnableVertexAttribArray(aPositionLocation);
        //绘制圆柱侧面
        GLES30.glDrawArrays(GLES30.GL_TRIANGLE_FAN, 0, cylinderCoords.length/3);

        //准备坐标数据
        GLES30.glVertexAttribPointer(aPositionLocation, 3, GLES30.GL_FLOAT, false, 0, vertexBuffer1);
        //启用顶点位置句柄
        GLES30.glEnableVertexAttribArray(aPositionLocation);
        //绘制圆柱侧面
        GLES30.glDrawArrays(GLES30.GL_TRIANGLE_FAN, 0, cylinderCoords1.length/3);

        //准备坐标数据
        GLES30.glVertexAttribPointer(aPositionLocation, 3, GLES30.GL_FLOAT, false, 0, vertexBuffer2);
        //启用顶点位置句柄
        GLES30.glEnableVertexAttribArray(aPositionLocation);
        //绘制圆柱侧面
        GLES30.glDrawArrays(GLES30.GL_TRIANGLE_FAN, 0, cylinderCoords2.length/3);

        //禁止顶点数组的句柄
        GLES30.glDisableVertexAttribArray(aPositionLocation);
    }
}
2.3 顶点着色器
稍微有变化,这里不去特意处理颜色。
#version 300 es
layout (location = 0) in vec4 vPosition;
layout (location = 1) in vec4 aColor;
uniform mat4 u_Matrix;
out vec4 vColor;
void main() {
    gl_Position=u_Matrix*vPosition;
    if(vPosition.z!=0.0){
        vColor=vec4(0.0,0.0,0.0,1.0);
    }else{
        vColor=vec4(0.8,0.8,0.8,1.0);
    }
}
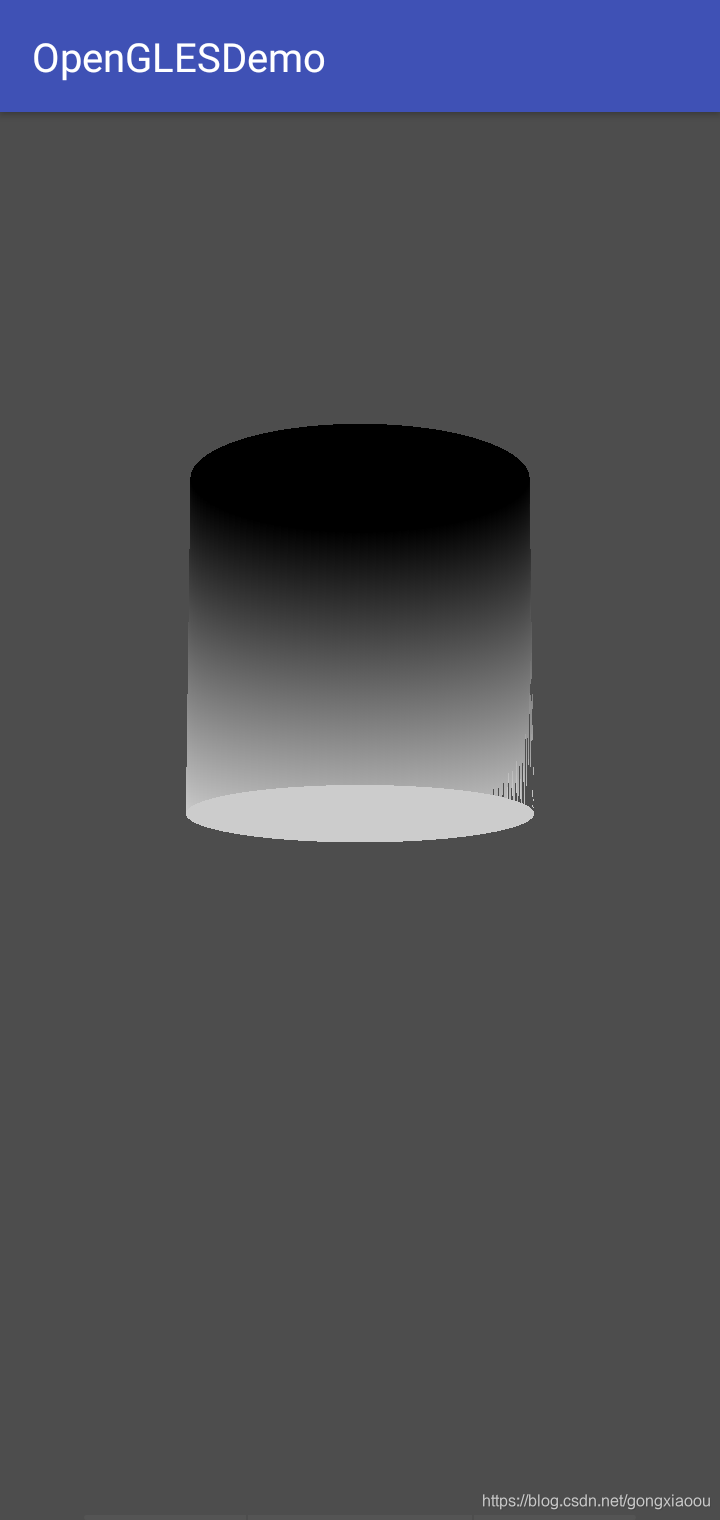
2.4 效果图
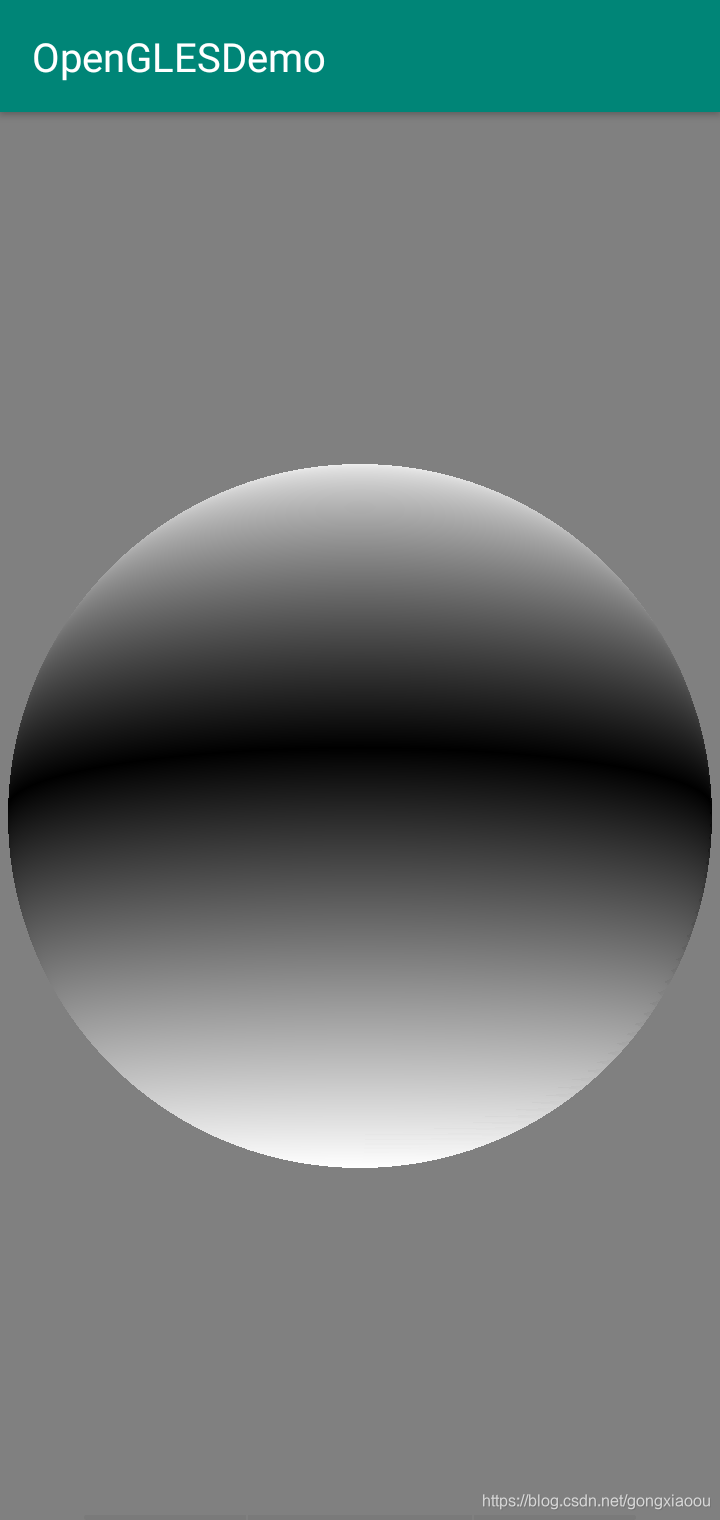
三 球
球的绘制这里只是一个铺垫为后面的绘制“地球仪”和后面的VR图做准备。
3.1 原理
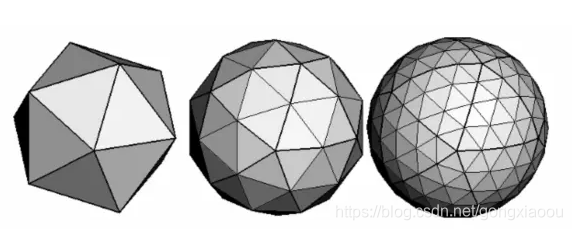
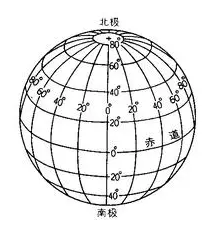
相对于圆锥圆柱来说,球体的拆解就复杂了许多,比较常见的拆解方法是将按照经纬度拆解和按照正多面体拆解,下图分别为正多面体示意和经纬度拆解示意:
正多面体的方法拆解:
经纬度的方法拆解(每一个小块看做一个四边形形,再拆成三角形。):
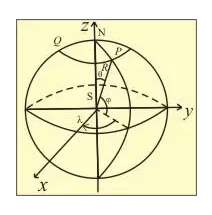
球面上点的坐标
无论是按照经纬度拆还是按照多面体拆,都需要知道球上面点的坐标,这算是基本的几何知识了。以球的中心为坐标中心,球的半径为R的话,那么球上点的坐标则为:
(R∗cos(ψ)∗sin(λ),R∗sin(ψ),R∗cos(ψ)∗cos(λ))
其中,ψ为圆心到点的线段与xz平面的夹角,λ为圆心到点的线段在xz平面的投影与z轴的夹角。用图形表示如下:
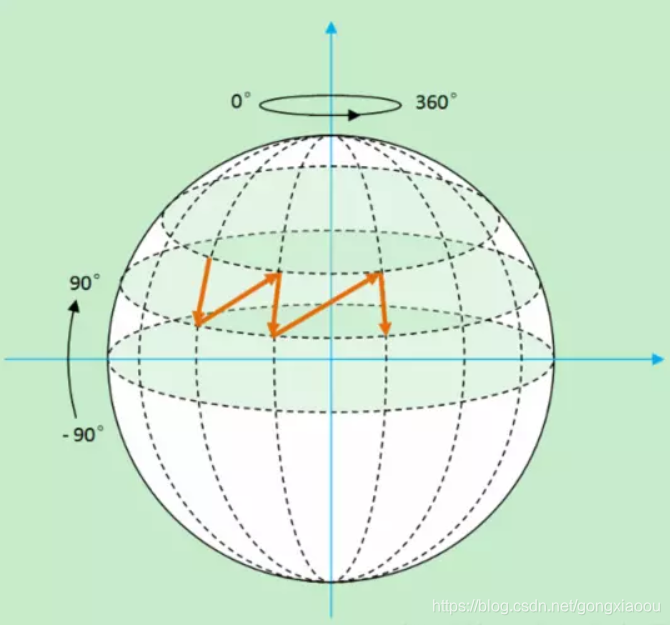
按经纬度切分如下
先将球体以经度为准分为若干份,再在相应经度的一圈纬度上进行切分如下图(注意看下面获取顶点坐标时候的操作)。
3.2 绘制
顶点着色器
#version 300 es
in vec4 vPosition;
uniform mat4 u_Matrix;
out vec4 vColor;
void main(){
    gl_Position=u_Matrix*vPosition;
    float color;
    if(vPosition.z>0.0){
        color=vPosition.z;
    }else{
        color=-vPosition.z;
    }
    vColor=vec4(color,color,color,1.0);
}
片段着色器
#version 300 es
precision mediump float;
in vec4 vColor;
out vec4 fragColor;
void main() {
    fragColor = vColor;
}
渲染器
public class BallRenderer implements GLSurfaceView.Renderer {
    private static final int BYTES_PER_FLOAT = 4;
    //顶点位置缓存
    private final FloatBuffer vertexBuffer;
    //渲染程序
    private int mProgram;

    //相机矩阵
    private final float[] mViewMatrix = new float[16];
    //投影矩阵
    private final float[] mProjectMatrix = new float[16];
    //最终变换矩阵
    private final float[] mMVPMatrix = new float[16];

    //返回属性变量的位置
    //变换矩阵
    private int uMatrixLocation;
    //位置
    private int aPositionLocation;

    private float[] ballCoords;

    public BallRenderer() {
        createVertexPos();

        //顶点位置相关
        //分配本地内存空间,每个浮点型占4字节空间;将坐标数据转换为FloatBuffer,用以传入给OpenGL ES程序
        vertexBuffer = ByteBuffer.allocateDirect(ballCoords.length * BYTES_PER_FLOAT)
                .order(ByteOrder.nativeOrder())
                .asFloatBuffer();
        vertexBuffer.put(ballCoords);
        vertexBuffer.position(0);
    }

    private void createVertexPos() {
        float radius = 1.0f; // 球的半径
        double angleSpan = Math.PI / 90f; // 将球进行单位切分的角度
        ArrayList<Float> alVertix = new ArrayList<>();
        for (double vAngle = 0; vAngle < Math.PI; vAngle = vAngle + angleSpan){

            for (double hAngle = 0; hAngle < 2*Math.PI; hAngle = hAngle + angleSpan){
            	//获取一个四边形的四个顶点
                float x0 = (float) (radius* Math.sin(vAngle) * Math.cos(hAngle));
                float y0 = (float) (radius* Math.sin(vAngle) * Math.sin(hAngle));
                float z0 = (float) (radius * Math.cos((vAngle)));

                float x1 = (float) (radius* Math.sin(vAngle) * Math.cos(hAngle + angleSpan));
                float y1 = (float) (radius* Math.sin(vAngle) * Math.sin(hAngle + angleSpan));
                float z1 = (float) (radius * Math.cos(vAngle));

                float x2 = (float) (radius* Math.sin(vAngle + angleSpan) * Math.cos(hAngle + angleSpan));
                float y2 = (float) (radius* Math.sin(vAngle + angleSpan) * Math.sin(hAngle + angleSpan));
                float z2 = (float) (radius * Math.cos(vAngle + angleSpan));

                float x3 = (float) (radius* Math.sin(vAngle + angleSpan) * Math.cos(hAngle));
                float y3 = (float) (radius* Math.sin(vAngle + angleSpan) * Math.sin(hAngle));
                float z3 = (float) (radius * Math.cos(vAngle + angleSpan));

				//将四个点拆分为两个三角形
                alVertix.add(x1);
                alVertix.add(y1);
                alVertix.add(z1);

                alVertix.add(x0);
                alVertix.add(y0);
                alVertix.add(z0);

                alVertix.add(x3);
                alVertix.add(y3);
                alVertix.add(z3);

                alVertix.add(x1);
                alVertix.add(y1);
                alVertix.add(z1);

                alVertix.add(x3);
                alVertix.add(y3);
                alVertix.add(z3);

                alVertix.add(x2);
                alVertix.add(y2);
                alVertix.add(z2);
            }
        }

        int size = alVertix.size();
        ballCoords = new float[size];
        for (int i=0;i<size;i++){
            ballCoords[i] = alVertix.get(i);
        }
    }

    @Override
    public void onSurfaceCreated(GL10 gl, EGLConfig config) {
        //将背景设置为灰色
        GLES30.glClearColor(0.5f,0.5f,0.5f,1.0f);

        //编译顶点着色程序
        String vertexShaderStr = ResReadUtils.readResource(R.raw.vertex_simple_shade);
        int vertexShaderId = ShaderUtils.compileVertexShader(vertexShaderStr);
        //编译片段着色程序
        String fragmentShaderStr = ResReadUtils.readResource(R.raw.fragment_simple_shade);
        int fragmentShaderId = ShaderUtils.compileFragmentShader(fragmentShaderStr);
        //连接程序
        mProgram = ShaderUtils.linkProgram(vertexShaderId, fragmentShaderId);
        //在OpenGLES环境中使用程序
        GLES30.glUseProgram(mProgram);


        uMatrixLocation = GLES30.glGetUniformLocation(mProgram, "u_Matrix");
        aPositionLocation = GLES30.glGetAttribLocation(mProgram, "vPosition");
    }

    @Override
    public void onSurfaceChanged(GL10 gl, int width, int height) {
        //设置绘制窗口
        GLES30.glViewport(0, 0, width, height);

        //相机和透视投影方式
        //计算宽高比
        float ratio=(float)width/height;
        //设置透视投影
        Matrix.frustumM(mProjectMatrix, 0, -ratio, ratio, -1, 1, 3, 7);
        //设置相机位置
        Matrix.setLookAtM(mViewMatrix, 0, 6, 0, -1f, 0f, 0f, 0f, 0f, 0.0f, 1.0f);
        //计算变换矩阵
        Matrix.multiplyMM(mMVPMatrix,0,mProjectMatrix,0,mViewMatrix,0);
    }

    @Override
    public void onDrawFrame(GL10 gl) {
        //把颜色缓冲区设置为我们预设的颜色
        GLES30.glClear(GLES30.GL_COLOR_BUFFER_BIT);

        //将变换矩阵传入顶点渲染器
        GLES30.glUniformMatrix4fv(uMatrixLocation,1,false,mMVPMatrix,0);
        //准备坐标数据
        GLES30.glVertexAttribPointer(aPositionLocation, 3, GLES30.GL_FLOAT, false, 0, vertexBuffer);
        //启用顶点位置句柄
        GLES30.glEnableVertexAttribArray(aPositionLocation);

        //绘制球
        GLES30.glDrawArrays(GLES30.GL_TRIANGLES, 0, ballCoords.length/3);

        //禁止顶点数组的句柄
        GLES30.glDisableVertexAttribArray(aPositionLocation);
    }
}
里面最重要的是获取球面上顶点位置也就是方法createVertexPos()。
绘制结果