1.spring-mvc.xml
这里有一点要注意,<注解扫描包>的配置要符合自己项目的package名称。
下面附上我的目录图片:
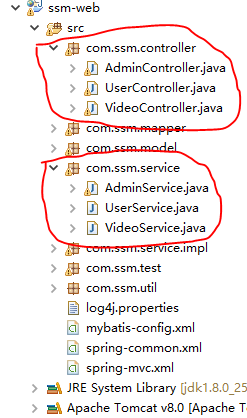
这里不要一味的复制粘贴过去,记得修改成自己的包目录。

想必大概了解过Mybatis框架的同志们都懂,过多的我就不赘述了。
文件名称:spring-mvc.xml
<?xml version="1.0" encoding="UTF-8"?>
<beans
    xmlns="http://www.springframework.org/schema/beans" xmlns:xsi="http://www.w3.org/2001/XMLSchema-instance"  xmlns:context="http://www.springframework.org/schema/context"
    xmlns:util="http://www.springframework.org/schema/util" xmlns:jee="http://www.springframework.org/schema/jee" xmlns:tx="http://www.springframework.org/schema/tx"
    xmlns:mvc="http://www.springframework.org/schema/mvc" xmlns:aop="http://www.springframework.org/schema/aop" xmlns:jpa="http://www.springframework.org/schema/data/jpa"
    xsi:schemaLocation="http://www.springframework.org/schema/beans http://www.springframework.org/schema/beans/spring-beans-3.2.xsd
        http://www.springframework.org/schema/context http://www.springframework.org/schema/context/spring-context-3.2.xsd
        http://www.springframework.org/schema/util http://www.springframework.org/schema/util/spring-util-3.2.xsd
        http://www.springframework.org/schema/jee http://www.springframework.org/schema/jee/spring-jee-3.2.xsd
        http://www.springframework.org/schema/tx http://www.springframework.org/schema/tx/spring-tx-3.2.xsd
        http://www.springframework.org/schema/data/jpa http://www.springframework.org/schema/data/jpa/spring-jpa-1.3.xsd
        http://www.springframework.org/schema/mvc http://www.springframework.org/schema/mvc/spring-mvc-3.2.xsd
        http://www.springframework.org/schema/aop http://www.springframework.org/schema/aop/spring-aop-3.2.xsd">
    <!-- 注解扫描包 -->
    <context:component-scan base-package="com.ssm.controller"></context:component-scan>
    <context:component-scan base-package="com.ssm.service"></context:component-scan>
    <!-- 开启注解 -->
    <mvc:annotation-driven/>
    <!-- 配置静态资源,直接映射到对应的文件夹,不被DispatcherServlet处理,3.04新增功能,需要重新设置spring-mvc-3.0.xsd -->
    <mvc:resources location="/img/**" mapping="/img/"/>
    <mvc:resources location="/js/**" mapping="/js/"/>
    <mvc:resources location="/css/**" mapping="/css/"/>
    <mvc:resources location="/html/**" mapping="/html/"/>
    <!-- 定义跳转的文件的前后缀 ,视图模式配置-->
    <bean id="viewResolver" class="org.springframework.web.servlet.view.InternalResourceViewResolver">
        <!-- 这里的配置我的理解是自动给后面action的方法return的字符串加上前缀和后缀,变成一个 可用的url地址 -->
        <property name="prefix" value="/"></property>
        <property name="suffix" value=".jsp"></property>
    </bean>
</beans>
2.spring-common.xml
这个配置文件关系到Mybatis和Spring的整合,主要关键是配置了数据库的连接和对sql文件的映射。(当然,有的整合方法是额外建立一个db.properties的文件,然后再引入,从而连接数据库)
主要修改这几个地方:
1.数据库配置
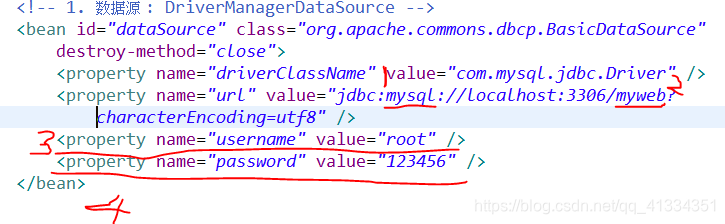
其中
(1):代表我使用的是mysql数据库
(2):我的数据库名称
(3):用户名
(4):密码
2.sql映射文件的配置
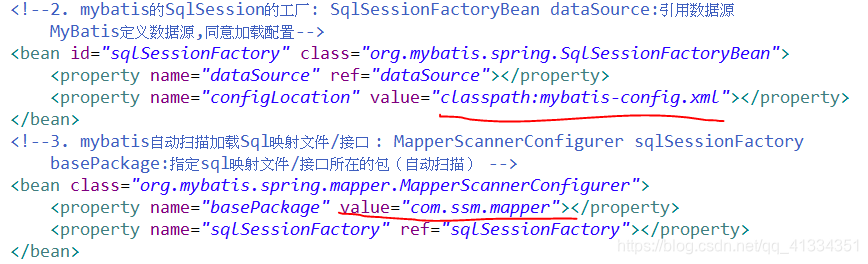
(1)classpath:这里理解为放在src目录下即可(用maven构建项目时候resource目录就是默认的classpath)
划红线的地方mybatis-config.xml这个配置文件会在下面一步讲到
再补充一个额外的知识:
-------------classpath 和 classpath* 区别: --------------
classpath:只会到你的class路径中查找找文件;
classpath*:不仅包含class路径,还包括jar文件中(class路径)进行查找。
——————————————————————————————
(2)画第二条红线的地方一定要记得配置,如注释中写的
“basePackage:指定sql映射文件/接口所在的包(自动扫描)”
com.ssm.mapper这个包下面的mapper.java文件和mapper.xml文件一定都要放在com.ssm.mapper这个包下,这样才会被扫描到。
如下图:

spring-common.xml
<?xml version="1.0" encoding="UTF-8"?>
<beans
    xmlns="http://www.springframework.org/schema/beans" xmlns:xsi="http://www.w3.org/2001/XMLSchema-instance"  xmlns:context="http://www.springframework.org/schema/context"
    xmlns:util="http://www.springframework.org/schema/util" xmlns:jee="http://www.springframework.org/schema/jee" xmlns:tx="http://www.springframework.org/schema/tx"
    xmlns:mvc="http://www.springframework.org/schema/mvc" xmlns:aop="http://www.springframework.org/schema/aop" xmlns:jpa="http://www.springframework.org/schema/data/jpa"
    xsi:schemaLocation="http://www.springframework.org/schema/beans http://www.springframework.org/schema/beans/spring-beans-3.2.xsd
        http://www.springframework.org/schema/context http://www.springframework.org/schema/context/spring-context-3.2.xsd
        http://www.springframework.org/schema/util http://www.springframework.org/schema/util/spring-util-3.2.xsd
        http://www.springframework.org/schema/jee http://www.springframework.org/schema/jee/spring-jee-3.2.xsd
        http://www.springframework.org/schema/tx http://www.springframework.org/schema/tx/spring-tx-3.2.xsd
        http://www.springframework.org/schema/data/jpa http://www.springframework.org/schema/data/jpa/spring-jpa-1.3.xsd
        http://www.springframework.org/schema/mvc http://www.springframework.org/schema/mvc/spring-mvc-3.2.xsd
        http://www.springframework.org/schema/aop http://www.springframework.org/schema/aop/spring-aop-3.2.xsd">
<!-- Mybatis和Spring的整合 -->
    <!-- 1. 数据源 : DriverManagerDataSource -->
    <bean id="dataSource" class="org.apache.commons.dbcp.BasicDataSource"
		destroy-method="close">
		<property name="driverClassName" value="com.mysql.jdbc.Driver" />
		<property name="url" value="jdbc:mysql://localhost:3306/myweb?characterEncoding=utf8" />
		<property name="username" value="root" />
		<property name="password" value="123456" />
	</bean>

    <!--2. mybatis的SqlSession的工厂: SqlSessionFactoryBean dataSource:引用数据源
        MyBatis定义数据源,同意加载配置-->
    <bean id="sqlSessionFactory" class="org.mybatis.spring.SqlSessionFactoryBean">
        <property name="dataSource" ref="dataSource"></property>
        <property name="configLocation" value="classpath:mybatis-config.xml"></property>
    </bean>
    <!--3. mybatis自动扫描加载Sql映射文件/接口 : MapperScannerConfigurer sqlSessionFactory
        basePackage:指定sql映射文件/接口所在的包(自动扫描)  -->
    <bean class="org.mybatis.spring.mapper.MapperScannerConfigurer">
        <property name="basePackage" value="com.ssm.mapper"></property>
        <property name="sqlSessionFactory" ref="sqlSessionFactory"></property>
    </bean>
    <!--4. 事务管理 : DataSourceTransactionManager dataSource:引用上面定义的数据源-->
    <bean id="txManager" class="org.springframework.jdbc.datasource.DataSourceTransactionManager">
        <property name="dataSource" ref="dataSource"></property>
    </bean>
    <!-- 5. 使用声明式事务  transaction-manager:引用上面定义的事务管理器-->
    <tx:annotation-driven transaction-manager="txManager"/>
</beans>
3.mybatis-config.xml
mybatis-config.xml配置文件,设置了实体类(model)的别名,例如:我们在配置使用UserMapper.xml这个文件时,可以用User这个别名来代替com.ssm.model.User这种写法。
副上一张图理解:
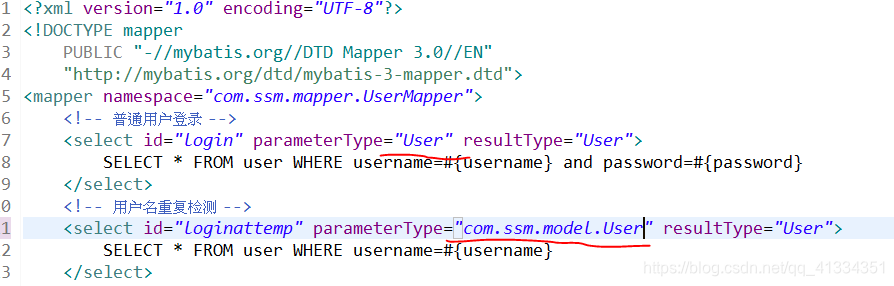
同时,如下方第二条配置:<实体接口映射资源>
框架也会默认会去查找与xxMapper.java相同目录和名称的xxMapper.xml
mybatis-config.xml
<?xml version="1.0" encoding="UTF-8"?>
<!DOCTYPE configuration
    PUBLIC "-//mybatis.org//DTD Config 3.0//EN"
    "http://mybatis.org/dtd/mybatis-3-config.dtd">
<configuration>
    <!-- 实体类,简称 -设置别名 -->
    <typeAliases>
        <typeAlias alias="Admin" type="com.ssm.model.Admin"/>
        <typeAlias alias="User" type="com.ssm.model.User"/>
        <typeAlias alias="Video" type="com.ssm.model.Video"/>
    </typeAliases>
    <!-- 实体接口映射资源 -->
    <!--说明:如果xxMapper.xml配置文件放在和xxMapper.java统一目录下
        mappers也可以省略
        因为org.mybatis.spring.mapper.MapperFactoryBean默认会去查找与xxMapper.java相同目录和名称的xxMapper.xml
    -->
    <mappers>
        <mapper resource="com/ssm/mapper/AdminMapper.xml"/>
        <mapper resource="com/ssm/mapper/UserMapper.xml"/>
        <mapper resource="com/ssm/mapper/VideoMapper.xml"/>
    </mappers>
</configuration>
4.配置日志文件log4j.properties
这条用来配置日志文件,再之后的程序报错或者异常时,经常查看日志信息来查找错误也是个良好的编程习惯。
具体原理,小白我也不知道,同志你们只管复制过去就行了。记得放在src这个目录下。
log4j.properties
log4j.rootLogger=DEBUG, stdout, R
log4j.appender.stdout=org.apache.log4j.ConsoleAppender
log4j.appender.stdout.layout=org.apache.log4j.PatternLayout
# Pattern to output the caller's file name and line number.
#log4j.appender.stdout.layout.ConversionPattern=%5p [%t] (%F:%L) - %m%n
# Print the date in ISO 8601 format
log4j.appender.stdout.layout.ConversionPattern=%d [%t] %-5p %c - %m%n
log4j.appender.R=org.apache.log4j.RollingFileAppender
log4j.appender.R.File=example.log
log4j.appender.R.MaxFileSize=100KB
# Keep one backup file
log4j.appender.R.MaxBackupIndex=1
log4j.appender.R.layout=org.apache.log4j.PatternLayout
log4j.appender.R.layout.ConversionPattern=%p %t %c - %m%n
# Print only messages of level WARN or above in the package com.foo.
log4j.logger.com.foo=WARN
5.web.xml
这个文件也是最关键的一个步骤,所有的配置文件改好后(当然很多是复制粘贴)。再web.xml这个文件的配置都复制过去。
记得划红线的地方,文件名称和路径都要配置对。

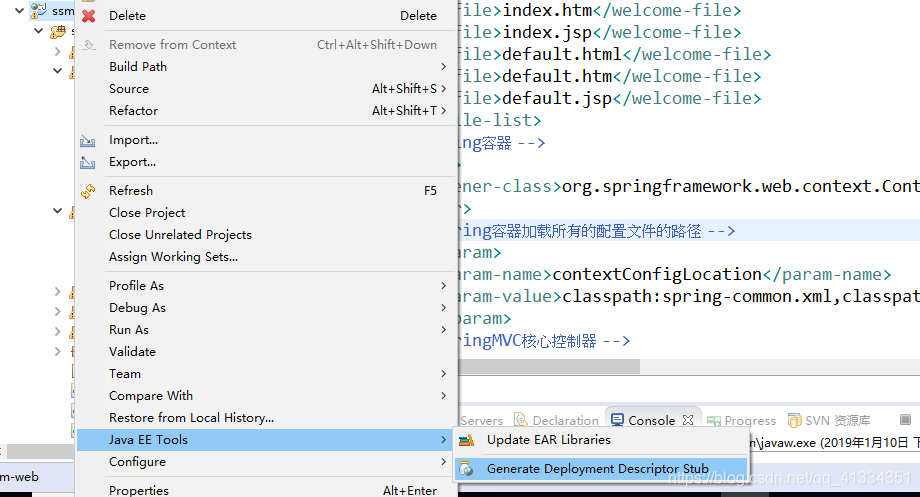
额外问题:如果自己的项目中没有web.xml这个文件可以自己生成一个。
选中自己的项目—>右键—>Java EE Tools—>Generate Deployment Descripor Stub 这样在你的WebRoot目录下(也可能是WebContent)的WEB-INF文件夹中就会有web.xml这个文件了。
我的项目名字叫ssm-web,在web.xml文件中记得修改成你自己项目的名字,就在开头(display-name)-ssm-web-(display-name)这个标签里。
web.xml
<?xml version="1.0" encoding="UTF-8"?>
<web-app xmlns:xsi="http://www.w3.org/2001/XMLSchema-instance" xmlns="http://xmlns.jcp.org/xml/ns/javaee" xsi:schemaLocation="http://xmlns.jcp.org/xml/ns/javaee http://xmlns.jcp.org/xml/ns/javaee/web-app_3_1.xsd" id="WebApp_ID" version="3.1">
  <display-name>ssm-web</display-name>
  <welcome-file-list>
    <welcome-file>index.html</welcome-file>
    <welcome-file>index.htm</welcome-file>
    <welcome-file>index.jsp</welcome-file>
    <welcome-file>default.html</welcome-file>
    <welcome-file>default.htm</welcome-file>
    <welcome-file>default.jsp</welcome-file>
  </welcome-file-list>
  <!-- 加载spring容器 -->
    <listener>
        <listener-class>org.springframework.web.context.ContextLoaderListener</listener-class>
    </listener>
   <!-- 设置Spring容器加载所有的配置文件的路径 -->
   <context-param>
           <param-name>contextConfigLocation</param-name>
           <param-value>classpath:spring-common.xml,classpath:spring-mvc.xml</param-value>
   </context-param>
   <!-- 配置SpringMVC核心控制器 -->
   <servlet>
           <servlet-name>springMVC</servlet-name>
           <servlet-class>org.springframework.web.servlet.DispatcherServlet</servlet-class>
           <!-- 配置初始配置化文件,前面contextConfigLocation看情况二选一 -->
           <init-param>
               <param-name>contextConfigLocation</param-name>
               <param-value>classpath:spring-common.xml,classpath:spring-mvc.xml</param-value>
           </init-param>
           <!-- 启动加载一次 -->
           <load-on-startup>1</load-on-startup>
   </servlet>
   <!--为DispatcherServlet建立映射 -->
   <servlet-mapping>
           <servlet-name>springMVC</servlet-name>
           <!-- 此处可以可以配置成*.do,对应struts的后缀习惯 -->
           <url-pattern>*.do</url-pattern>
   </servlet-mapping>
   <!-- 防止Spring内存溢出监听器 -->
   <listener>
           <listener-class>org.springframework.web.util.IntrospectorCleanupListener</listener-class>
   </listener>
   <!-- 解决工程编码过滤器 -->
   <filter>
           <filter-name>encodingFilter</filter-name>
           <filter-class>org.springframework.web.filter.CharacterEncodingFilter</filter-class>
           <init-param>
               <param-name>encoding</param-name>
               <param-value>UTF-8</param-value>
           </init-param>
           <init-param>
               <param-name>forceEncoding</param-name>
            <param-value>true</param-value>
           </init-param>
   </filter>

   <filter-mapping>
           <filter-name>encodingFilter</filter-name>
           <url-pattern>/*</url-pattern>
   </filter-mapping>
   <welcome-file-list>
           <welcome-file>index.jsp</welcome-file>
   </welcome-file-list>
</web-app>
以上所有配置文件都OK了,将你的项目add进Tomcat服务器里,启动服务,查看Console控制台,没有抛出异常就意味着配置成功了。
启动前,记得耐心等待,让框架的Bean自动注入完成后再启动Tomcat。
自动注入时,Eclipse右下角会有一个正在加载生效的进程。
如下图:
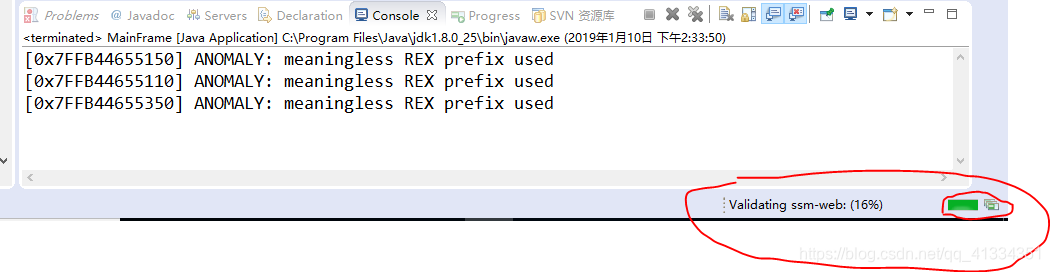
点击小红圈的图片可以查看具体加载的内容
OVER 希望可以给入门的小白们一点帮助
(博主我也是小白,还很菜的那种)
本文内容由网友自发贡献,版权归原作者所有,本站不承担相应法律责任。如您发现有涉嫌抄袭侵权的内容,请联系:hwhale#tublm.com(使用前将#替换为@)