简介
本文是对谷歌原生文档的翻译,仅供学习参照。
原文链接
此文档写给希望学习最优编程实践和架构以开发健壮、高质量APP的开发者。
开发者常遇到的问题
传统的桌面程序大多数使用场景是有一个启动入口,作为一个独立进程运行。Android app结构要复杂很多,一个典型的Android app由很多组件构成,包括activities,fragment,services,content providers 和broadcast receivers。
App四大组件在Androidmanifest.xml文件里面声明,它们被安卓系统用来决定如何构建App在设备上的交互体验。之前提到,桌面App一般运行在一个独立进程里面,安卓App则不同。安卓设备交互场景经常会遇到多个App之间切换任务,因此安卓App设计上需要灵活一些以满足需求。
举个例子:使用社交App分享一张照片。首先,社交App发intent启动相机App,此时用户已经离开了社交App,但是用户可能并未感知到这个状态。相机App又可能发送intent启动其他的App,比如图片选择器,最终用户返回社交App完成分享照片的动作。在此过程还可能被其他事件中断,比如来电话,用户需要等通话结束以后才可以继续操作分享照片的动作。
Android app组件可以被单独启动,也可以无序启动,并且可能会随时被用户手动或系统销毁。用户无法掌控Android app组件的生命周期,因此不应该在组件里面存储app的数据和状态,组件之间也不应相互依赖耦合。
通用的架构原则
- 关注点分离一个常见的错误是将所有代码都写到Activity或者Fragment,这么做不仅会让代码看起来很臃肿,难以阅读和维护,而且容易导致生命周期相关的问题产生。按照谷歌官方的开发推荐,任何不是处理UI和系统的代码都不应该写到这两个类里面。Activity或者Fragment可能会因为一些原因被系统销毁,比如低内存的时候,用户无法掌控。为了使得App更加的稳定可靠,我们应该在开发中最小化对它们的依赖。
- Mode驱动UI更新:优选持久化模型。持久化模型有两个好处:(1)当app被系统回收的时候用户不用再担心丢失数据,即使网络不通,app仍然可以继续运行。Modes是一种组件,它用来持有app的数据,它独立于views和app的其他组件。因此,它与app四大组件存在的生命周期问题是隔离的。保持UI代码和逻辑之间的隔离可以使得代码更加容易管理和维护。通过引入Modes类,并给予每一个mode定义好明确的数据映射关系,可以使得app更加方便测试和维护。
推荐的app架构
本节通过一个案例介绍如何使用Architecture Components 来构建App。
说明:理论上,不存在一种万能架构使得app在所有场景下都是最优。因此,本文推荐的架构适用范围有限,如果你已经有不错的架构方式,可以不用更换。
下面我们开始案例,假设需要构建UI来显示用户的简历,简历数据需要通过REST API从后台获取。
构建接口
UI 对应的类UserProfileFragment.java 布局文件是 user_profile_layout.xml.
为了驱动UI,model需要持有两个数据元素
- The User ID: 用户ID。传递这个数值最好的方式是在fragment的argument里面。因为如果app进程被系统回收,这个数值会被持久化,当app重启的时候还可以获取到这个数据。
- The User object: A POJO 持有用户数据.
给予ViewModel类构建UserProfileViewModel
ViewModel 用来为UI组件(activity或者fragment)提供数据,并且负责UI与业务数据处理之间的通信。ViewMode不关心UI的变化,例如activity旋转或者重建。
Now we have 3 files.
user_profile.xml: UI定义UserProfileViewModel.java: 为UI提供数据UserProfileFragment.java: UI控制器,用来显示UserProfileViewModel提供的数据
以下是代码实现(为简单起见,布局文件被省略)
public class UserProfileViewModel extends ViewModel {
    private String userId;
    private User user;

    public void init(String userId) {
        this.userId = userId;
    }
    public User getUser() {
        return user;
    }
}
public class UserProfileFragment extends LifecycleFragment {
    private static final String UID_KEY = "uid";
    private UserProfileViewModel viewModel;

    @Override
    public void onActivityCreated(@Nullable Bundle savedInstanceState) {
        super.onActivityCreated(savedInstanceState);
        String userId = getArguments().getString(UID_KEY);
        viewModel = ViewModelProviders.of(this).get(UserProfileViewModel.class);
        viewModel.init(userId);
    }

    @Override
    public View onCreateView(LayoutInflater inflater,
                @Nullable ViewGroup container, @Nullable Bundle savedInstanceState) {
        return inflater.inflate(R.layout.user_profile, container, false);
    }
}
Note: 上面的例子使用 LifecycleFragment 代替 Fragment 。等lifecycles API稳定以后,Support Library里面的Fragment将会更新实现 LifecycleOwner。
现在已经有三个模块,如何连接他们?当ViewModel里面用户数据更新以后,需要通知UI来同步显示。这时LiveData登场了。
LiveData 可观察的数据持有者。它允许app组件在不创建与它之间显示和刚性依赖的前提下观察LiveData对象的改变。LiveData遵守app组件的生命周期原则,可以避免内存泄漏。
Note: 如果你正在使用其他的库,例如RxJava 或者 Agera,可以不用替换成LiveData。但是如果你准备使用LiveData,你务必要正确处置生命周期,这样当LifecycleOwner stopped的时候你的数据流也暂停,当LifecycleOwner destroyed的时候你的数据流也destroyed。如果你要在使用LiveData的时候搭配RxJava2等库,可以通过引入 android.arch.lifecycle:reactivestreams 。
现在我们使用LiveData来替换 UserProfileViewModel里面User的属性,这样当这个值有变化会通知fragment同步更新。LiveData遵守lifecycle原则,当它不在被需要的时候会自动清理引用。
public class UserProfileViewModel extends ViewModel {
    ...
    private User user;
    private LiveData<User> user;
    public LiveData<User> getUser() {
        return user;
    }
}
Now we modify UserProfileFragment to observe the data and update the UI.
@Override
public void onActivityCreated(@Nullable Bundle savedInstanceState) {
super.onActivityCreated(savedInstanceState);
viewModel.getUser().observe(this, user -> {
});
}
每当用户数据更新,onChanged回调方法会被执行用来刷新UI。
如果你熟悉其它类似LiveData功能的库,你会发现我们没有重写fragment的onStop()方法来停止观察数据。使用LiveData无需做这个处理,因为它被设计自动感知Lifecycle,当fragment执行onDestroy()的时候,LiveData会自动删除观察。
We also didn’t do anything special to handle configuration changes (for example, user rotating the screen). The ViewModel is automatically restored when the configuration changes, so as soon as the new fragment comes to life, it will receive the same instance of ViewModel and the callback will be called instantly with the current data. This is the reason why ViewModels should not reference Views directly; they can outlive the View’s lifecycle. SeeThe lifecycle of a ViewModel.
不必针对configuration 的改变做特殊处理(例如activity旋转)。当configuration 变化时,ViewModel 会自动恢复数据。因此,当fragment重新启动,将获取到与configuration 变化之前相同的ViewModels ,并且callback会被马上调用,数据也和之前保持一致。因此,ViewModes不必直接引用Views,他们可以超越View的生命周期。参考The lifecycle of a ViewModel.
获取数据
至此,ViewModel和fragment之间已经建立了联系,那么ViewModel如何获取用户数据的?在本例中,我们假设后台提供的是REST API,我们使用Retrofit 来封装http请求。
下图展示了使用retrofit与后台交互
public interface Webservice {
    /**
     * @GET declares an HTTP GET request
     * @Path("user") annotation on the userId parameter marks it as a
     * replacement for the {user} placeholder in the @GET path
     */
    @GET("/users/{user}")
    Call<User> getUser(@Path("user") String userId);
}
ViewMode可以直接调用webservice来从后台获取数据并传递给用户对象,这是最简单的一种实现方式。不过这不是最佳方案,因为随着业务增加,这种架构会比较难扩展和维护。这种架构给予ViewMode过多的责任,因此违背了上文提到的关注分离原则。另外,ViewModel已经跟Activity或者Fragment的生命周期绑定,当UI的生命周期结束时数据丢失是非常不好的体验,因此我们引入了Repository模块,将ViewModel获取数据的工作交于它。
Repository 模块用来处理数据,包括:从哪儿获取数据,当数据变化时调用什么API来更新。它可以被看做是不同数据源之间的调解人,数据来源大致有:持久化数据,webservice,缓存等。
UserRepository 使用 WebService 来获取用户数据
public class UserRepository {
private Webservice webservice;
public LiveData<User> getUser(int userId) {
final MutableLiveData<User> data = new MutableLiveData<>();
webservice.getUser(userId).enqueue(new Callback<User>() {
@Override
public void onResponse(Call<User> call, Response<User> response) {
data.setValue(response.body());
}
});
return data;
}
}
respository看起来不是必须的,但是它有一个很重要的优点:抽象了app获取数据的通道,比如在上例中ViewModel并不知道数据源来自Webservice,因此当我们业务需要变更时可以方便修改数据源。
Note: 为了简单起见,我们已经排除了网络错误案例。 暴露错误和加载状态的替代实现请参阅Addendum: exposing network status.
管理组件之间的依赖:
UserRepository获取数据的时候需要一个webservice实例,创建webservice实例并不麻烦,但是需要知道构造webservice时的依赖。这样会稍显复杂并产生冗余代码,因为并不是只有UserrRepository需要webservice的实例,其他类在使用webservice实例的时候都需要知道构建webservice时的依赖。
有两个模式可以用来解决上述问题:
- 依赖注入: 依赖注入框架允许你定义一个类的依赖,而不必自己去构建这个依赖对象。代码执行期,有专门的类来负责提供依赖对象。我们推荐Android app使用谷歌Dagger 2 框架来实现依赖注入。Dagger 2通过遍历依赖关系树自动构建对象,并在依赖关系上提供编译时保证。
- 服务定位: 服务定位器提供了一个注册表,其中类可以获取它们的依赖关系而不是构造它们. 它的实现比依赖注入简单很多,如果你对依赖注入不熟悉,可以考虑使用服务定位。
这些模式允许您扩展代码,因为它们提供明确的模式来管理依赖关系,而不会重复代码或增加复杂性。 两者都允许交换实现进行测试; 这是使用它们的主要好处之一。
在本示例中,我们继续使用Dagger 2 来管理依赖关系。
连接 ViewModel 与 repository
我们通过修改 UserProfileViewModel 来使用repository
public class UserProfileViewModel extends ViewModel {
private LiveData<User> user;
private UserRepository userRepo;
@Inject
public UserProfileViewModel(UserRepository userRepo) {
this.userRepo = userRepo;
}
public void init(String userId) {
if (this.user != null) {
return;
}
user = userRepo.getUser(userId);
}
public LiveData<User> getUser() {
return this.user;
}
}
缓存数据
repository对于抽象webservice的请求非常奏效,但是上文示例只有一个数据源,所以可能感觉不是很明显。
UserRepository也有自身的缺陷,如果用户离开了UserProfileFragment,app会重新加载数据。这有两个弊端:
- 浪费了网络流量
- 重新请求网络数据耗费时间,用户需要等待
为此,我们在UserRepository里面增加了缓存。
@Singleton
public class UserRepository {
private Webservice webservice;
private UserCache userCache;
public LiveData<User> getUser(String userId) {
LiveData<User> cached = userCache.get(userId);
if (cached != null) {
return cached;
}
final MutableLiveData<User> data = new MutableLiveData<>();
userCache.put(userId, data);
webservice.getUser(userId).enqueue(new Callback<User>() {
@Override
public void onResponse(Call<User> call, Response<User> response) {
data.setValue(response.body());
}
});
return data;
}
}
持久化数据
在当前示例中,如果旋转设备,UI会立即重新显示之前的数据,这是因为我们使用了内存缓存。但是当用户离开app,进程被杀死,然后再次返回app,此时会出现什么情况?
在当前架构中,遇到这种情况需要重新从后台读取数据。这个体验不太好,既耽误时间也浪费流量。为了解决这个问题,可以缓存web请求。但是 如果相同的用户数据从另一种类型的请求显示(例如,获取一个朋友列表)会发生什么情况? 那么您的应用程序可能会显示不一致的数据,这是最令人困惑的用户体验。 例如,相同的用户的数据可能会不同,因为朋友列表请求和用户请求可以在不同的时间执行。 您的应用需要合并,以避免显示不一致的数据。
解决上面问题最好的方法是使用持久化模型。再次谷歌推荐使用Room。
Room 是一个对象映射库,提供本地数据持久性和最小的样板代码。 在编译时,它根据模式验证每个查询,损坏的SQL查询会导致编译时错误,而不是运行时失败。 Room摘录了使用原始SQL表和查询的一些基本实现细节。 它还允许观察数据库数据(包括集合和连接查询)的更改,通过LiveData对象公开这些更改。 另外,它明确地定义了线程约束,解决常见问题,如访问主线程上的存储。
Note: 如果您熟悉SQLite ORM或Realm等不同数据库的其他持久性解决方案,则无需将其替换为Room,除非Room的功能集与您的用例更相关。
要使用Room,我们需要定义我们的本地模式。 首先,用@Entity注释User类,将其标记为数据库中的一个表。
@Entity
class User {
@PrimaryKey
private int id;
private String name;
private String lastName;
}
然后,创建一个类继承 RoomDatabase
@Database(entities = {User.class}, version = 1)
public abstract class MyDatabase extends RoomDatabase {
}
MyDatabase是一个抽象类,Room自动提供一个它的实现类。参考文档Room
现在我们需要通过一种方式来向数据库插入用户数据,为此我们先新建一个data access object (DAO).
@Dao
public interface UserDao {
    @Insert(onConflict = REPLACE)
    void save(User user);
    @Query("SELECT * FROM user WHERE id = :userId")
    LiveData<User> load(String userId);
}
然后在数据库类中引用这个DAO
@Database(entities = {User.class}, version = 1)
public abstract class MyDatabase extends RoomDatabase {
    public abstract UserDao userDao();
}
请注意,load方法返回一个LiveData。 Room知道数据库何时被修改,当数据发生变化时,它会自动通知所有的主动观察者。使用LiveData,只会在至少有一个主动观察者时更新数据。
Note: 从alpha 1版本开始,Room根据表修改检查无效,这意味着它可能会发送错误的正面通知。
现在,我们可以修改我们的UserRepository来整合Room数据源。
@Singleton
public class UserRepository {
private final Webservice webservice;
private final UserDao userDao;
private final Executor executor;
@Inject
public UserRepository(Webservice webservice, UserDao userDao, Executor executor) {
this.webservice = webservice;
this.userDao = userDao;
this.executor = executor;
}
public LiveData<User> getUser(String userId) {
refreshUser(userId);
return userDao.load(userId);
}
private void refreshUser(final String userId) {
executor.execute(() -> {
boolean userExists = userDao.hasUser(FRESH_TIMEOUT);
if (!userExists) {
Response response = webservice.getUser(userId).execute();
userDao.save(response.body());
}
});
}
}
请注意,即使我们更改了UserRepository中数据来源的位置,我们也不需要更改UserProfileViewModel或UserProfileFragment。 这是抽象提供的灵活性。 这也非常适合测试,因为您可以在测试UserProfileViewModel时提供假的UserRepository。
现在我们的代码实现已经比较完整了。 如果用户日后再回到同一个用户界面,他们会立即看到用户信息,因为我们已经实现了持久化。 同时,如果数据过期,我们的存储库将在后台更新数据。 当然,根据您的用例,如果持久数据太旧,您可能不希望显示持久化的数据。
在一些使用情况下,例如下拉刷新,当有网络操作的时候UI也应该照常显示用户数据。UI与数据分离是很好的做法,因为改变UI的原因可能有很多。
有两种方法来解决这种情况遇到的问题:
- 改变getUser的实现,返回一个LiveData数据,包含网络操作的状态。这里有一个参考示例Addendum: exposing network status
- 在repository类中新增一个public方法,返回用户对象最新的状态。如果希望通过在UI上显示网络状态来响应用户动作(例如下拉刷新),那么此方法更好。
唯一的可靠数据源
不同REST API返回相同数据也很正常,例如:如果后台有另外一个请求接口返回一个朋友列表,同样的用户对象可能会来自两个不同的请求接口。通过webservice获取数据,当后台数据在在多次请求之间发生变化时,用户得到的数据可能会出现不一致的现象。因此,在UserRepository实现中web service的回调只是将数据存储到数据库,然后数据库发生改变会触发生成一个激活的LiveData对象。
在这个模型中,数据库是唯一可靠的数据来源,app其他组件通过repository访问数据库。无论是否使用磁盘缓存,我们推荐repository来为app设计唯一一个可靠的数据源。
测试
上面提到,关注分离带来的一个好处是方便测试。来看下如何测试每一个模块
User Interface & Interactions: 这是唯一需要Android UI Instrumentation测试的。 测试UI代码的最好方法是创建一个Espresso测试。 您可以创建该fragment并为其提供一个模拟的ViewModel。 由于fragment只与ViewModel进行通信,所以模拟它将足以完全测试UI。
ViewModel: ViewModel 可以使用 JUnit test测试.
UserRepository: 您也可以使用JUnit测试来测试UserRepository。 您需要模拟Webservice和DAO。 您可以测试它是否进行正确的Web服务调用,将结果保存到数据库中,如果数据被缓存并且是最新的,则不会发生任何不必要的请求。 既然Webservice和UserDao都是接口,那么你可以模拟它们,或为更复杂的测试用例伪造一个实现。
UserDao: 测试DAO类的推荐方法是使用仪器测试。 由于这些仪器测试不需要任何UI,因此它们可以快速运行。 对于每个测试,可以创建一个内存数据库,以确保测试没有任何副作用(如更改磁盘上的数据库文件)。
Room 还允许指定数据库实现,以便您可以通过向其提供支持SQLiteOpenHelper的JUnit实现来测试它。 通常不推荐使用此方法,因为在设备上运行的SQLite版本可能与主机上的SQLite版本不同。
Webservice: 保证测试与外界的独立性很重要,即使是webservice测试也应该避免向后台发送网络请求。有很多的库可以帮助来实现这个需求,例如MockWebServer 可以伪造一个本地服务器来用于测试。
Testing Artifacts架构组件提供了一个maven工件来控制其后台线程。 在android.arch.core中:核心测试工件,有2个JUnit规则:
InstantTaskExecutorRule: 此规则可用于强制架构组件立即执行调用线程上的任何后台操作。CountingTaskExecutorRule: 该规则可用于仪器测试,以等待架构组件的后台操作或将其连接到Espresso作为闲置资源。
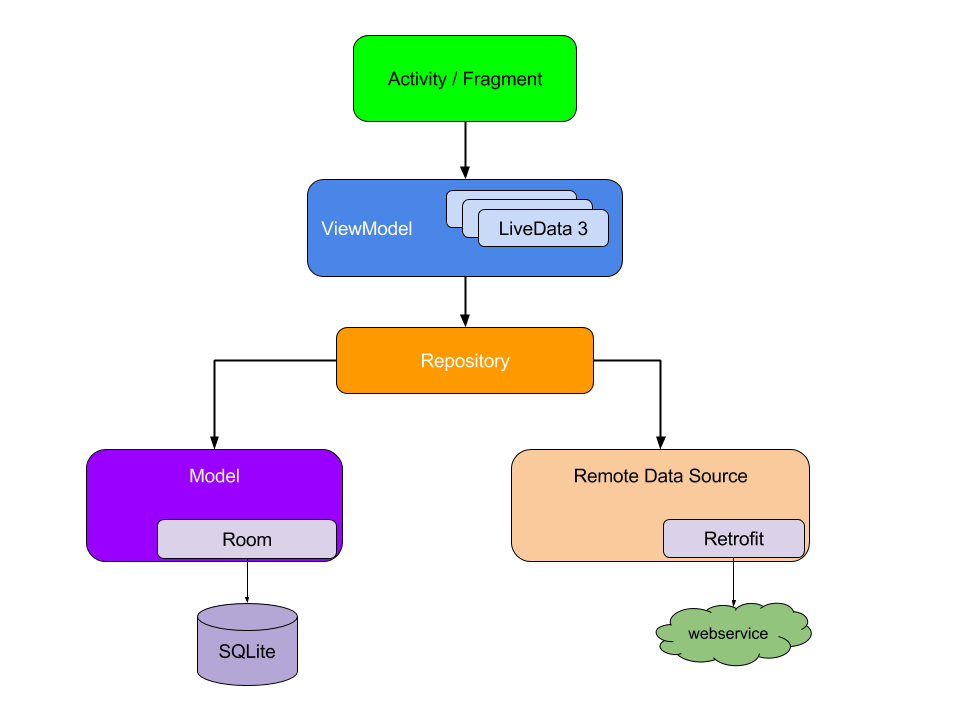
最终的架构
下图展示了谷歌推荐的架构包含的所有模块,以及模块之间如何交互。
指导原则
编程是一项创造性工作,开发Android应用程序也不例外。 无论是在多个activity或fragment之间传递数据,检索远程数据并将其在本地保持离线模式,还是任何其他场景,都有多种方法来解决问题,
谷歌推荐,遵循这些建议将使您的代码库从长远来看更加强大,可测试和可维护。
- 安卓四大组件不应当被用作数据源
- 关注分离,为应用程序的各个模块之间创建明确的责任界限
- 模块内部高内聚,尽量少的暴露每个模块的是实现细节
- 模块之间低耦合
- 不重复造轮子,将开发精力聚焦在自己app独一无二的特性上
- 持久化数据,这样用户离线状态也可以使用
- 为repository设计使用唯一的数据源 Single source of truth.
附录:暴露网络状态
在上面推荐的应用程序体系结构部分,我们故意省略网络错误和加载状态,以保持样本简单。 在本节中,我们演示了一种使用Resource类公开网络状态来封装数据及其状态的方法。
以下是一个示例实现:
public class Resource<T> {
@NonNull public final Status status;
@Nullable public final T data;
@Nullable public final String message;
private Resource(@NonNull Status status, @Nullable T data, @Nullable String message) {
this.status = status;
this.data = data;
this.message = message;
}
public static <T> Resource<T> success(@NonNull T data) {
return new Resource<>(SUCCESS, data, null);
}
public static <T> Resource<T> error(String msg, @Nullable T data) {
return new Resource<>(ERROR, data, msg);
}
public static <T> Resource<T> loading(@Nullable T data) {
return new Resource<>(LOADING, data, null);
}
}
因为在从磁盘中显示它的时候加载数据是一个常见的用例,所以我们要创建一个帮助类,可以在多个地方重复使用NetworkBoundResourcethat。 以下是NetworkBoundResource的决策树:
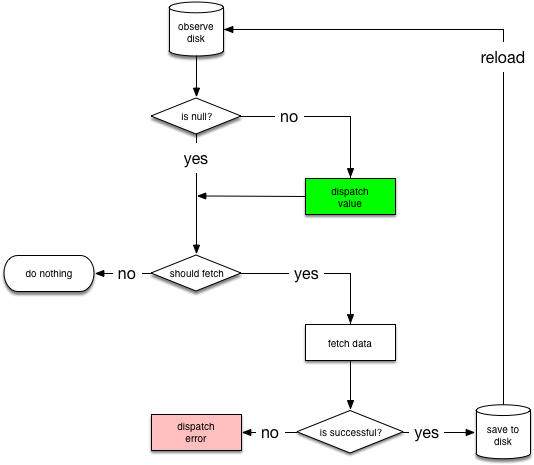
请求从监听数据库开始,当第一次从数据库加载数据,NetworkBoundResource会检查数据是否有效,如果有效则分发出去,否则开始从网络获取数据。注意,这两个动作可以同时发生,例如你在发送网络请求的时候可能想先展示数据库中的缓存数据,等网络请求完成再用来更新数据内容。
如果网络请求成功完成,则将响应保存到数据库中并重新初始化流。 如果网络请求失败,我们直接发送失败。
以下是NetworkBoundResource类为其子节点提供的公共API:
public abstract class NetworkBoundResource<ResultType, RequestType> {
@WorkerThread
protected abstract void saveCallResult(@NonNull RequestType item);
@MainThread
protected abstract boolean shouldFetch(@Nullable ResultType data);
@NonNull @MainThread
protected abstract LiveData<ResultType> loadFromDb();
@NonNull @MainThread
protected abstract LiveData<ApiResponse<RequestType>> createCall();
@MainThread
protected void onFetchFailed() {
}
public final LiveData<Resource<ResultType>> getAsLiveData() {
return result;
}
}
请注意,上面的类定义了两个类型参数(ResultType,RequestType),因为从API返回的数据类型可能与本地使用的数据类型不匹配。
还要注意,上面的代码使用ApiResponse作为网络请求。 ApiResponse是Retrofit2.Call类的简单包装,用于将其响应转换为LiveData。
以下是NetworkBoundResource类的其余实现:
public abstract class NetworkBoundResource<ResultType, RequestType> {
private final MediatorLiveData<Resource<ResultType>> result = new MediatorLiveData<>();
@MainThread
NetworkBoundResource() {
result.setValue(Resource.loading(null));
LiveData<ResultType> dbSource = loadFromDb();
result.addSource(dbSource, data -> {
result.removeSource(dbSource);
if (shouldFetch(data)) {
fetchFromNetwork(dbSource);
} else {
result.addSource(dbSource,
newData -> result.setValue(Resource.success(newData)));
}
});
}
private void fetchFromNetwork(final LiveData<ResultType> dbSource) {
LiveData<ApiResponse<RequestType>> apiResponse = createCall();
result.addSource(dbSource,
newData -> result.setValue(Resource.loading(newData)));
result.addSource(apiResponse, response -> {
result.removeSource(apiResponse);
result.removeSource(dbSource);
if (response.isSuccessful()) {
saveResultAndReInit(response);
} else {
onFetchFailed();
result.addSource(dbSource,
newData -> result.setValue(
Resource.error(response.errorMessage, newData)));
}
});
}
@MainThread
private void saveResultAndReInit(ApiResponse<RequestType> response) {
new AsyncTask<Void, Void, Void>() {
@Override
protected Void doInBackground(Void... voids) {
saveCallResult(response.body);
return null;
}
@Override
protected void onPostExecute(Void aVoid) {
result.addSource(loadFromDb(),
newData -> result.setValue(Resource.success(newData)));
}
}.execute();
}
}
现在,我们可以使用NetworkBoundResource将我们的磁盘和网络绑定用户实现写入存储库。
class UserRepository {
    Webservice webservice;
    UserDao userDao;

    public LiveData<Resource<User>> loadUser(final String userId) {
        return new NetworkBoundResource<User,User>() {
            @Override
            protected void saveCallResult(@NonNull User item) {
                userDao.insert(item);
            }

            @Override
            protected boolean shouldFetch(@Nullable User data) {
                return rateLimiter.canFetch(userId) && (data == null || !isFresh(data));
            }

            @NonNull @Override
            protected LiveData<User> loadFromDb() {
                return userDao.load(userId);
            }

            @NonNull @Override
            protected LiveData<ApiResponse<User>> createCall() {
                return webservice.getUser(userId);
            }
        }.getAsLiveData();
    }
}
本文内容由网友自发贡献,版权归原作者所有,本站不承担相应法律责任。如您发现有涉嫌抄袭侵权的内容,请联系:hwhale#tublm.com(使用前将#替换为@)