0. 背景
在之前的文章TensorRT的plugin实现中介绍了,如何从零实现一个TensorRT的plugin,这篇文章来介绍如何使用TensorRT自带的plugin,将其添加到Network Definition中加速我们的模型。
自TensorRT8.0之后,官方提供了大量的plugin,可用于常用目标分类,目标检测等算法的部署。
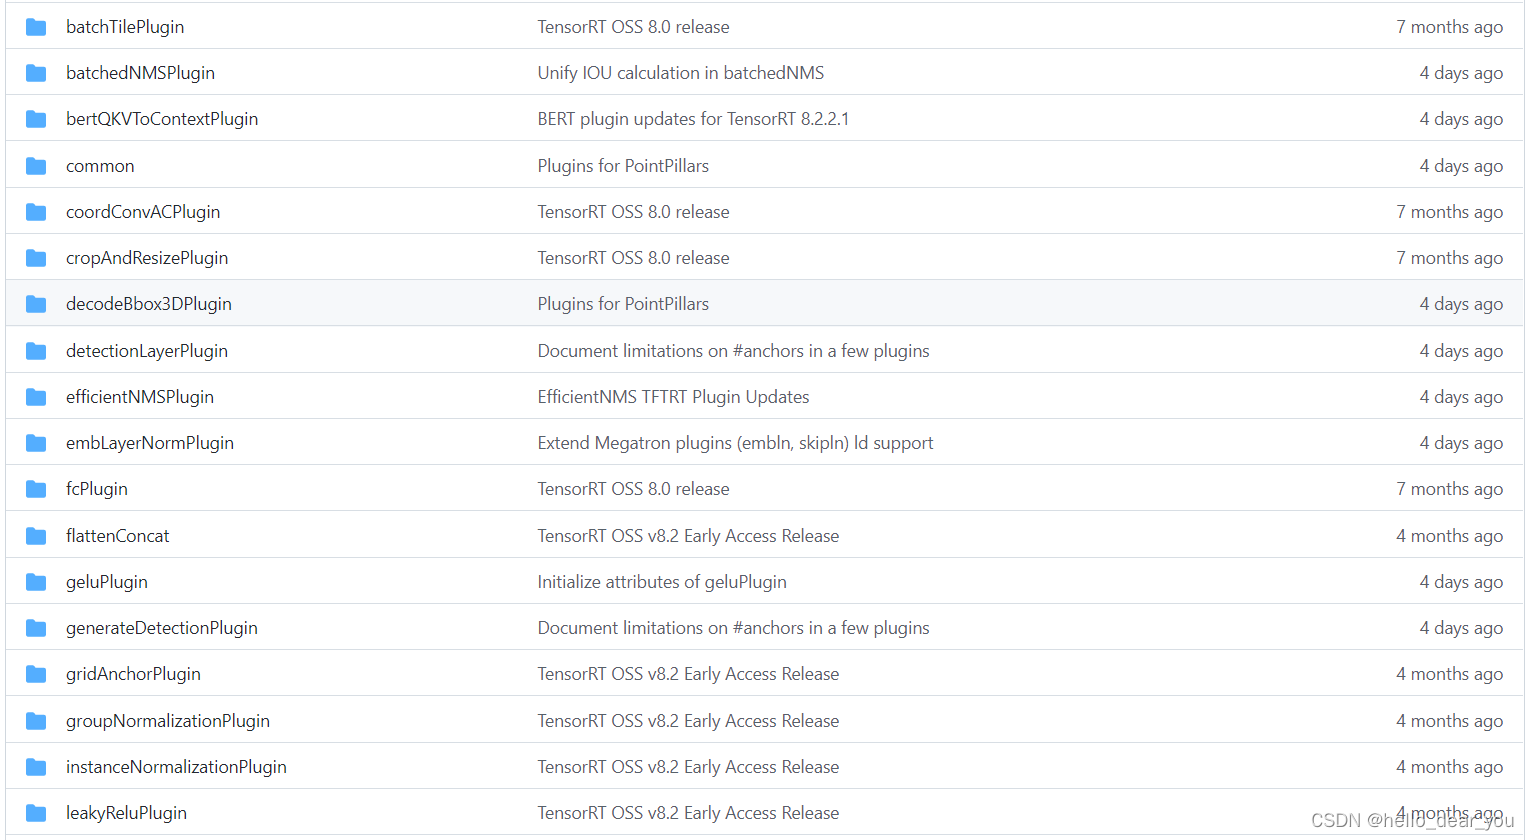
本文章以batchedNMSPlugin举例,介绍如何向Network Definition中添加该plugin,并验证其性能。
1. batchedNMSPlugin介绍
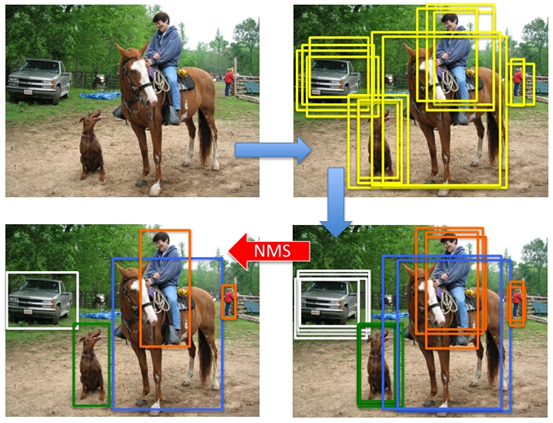
上图为目标检测算法的常见推理过程,该plugin实现功能为最后一步去除冗余的检测框,保留最后的一个。
本文不对NMS的具体实现过程做过多的赘述,主要介绍如何向Network中添加该plugin。
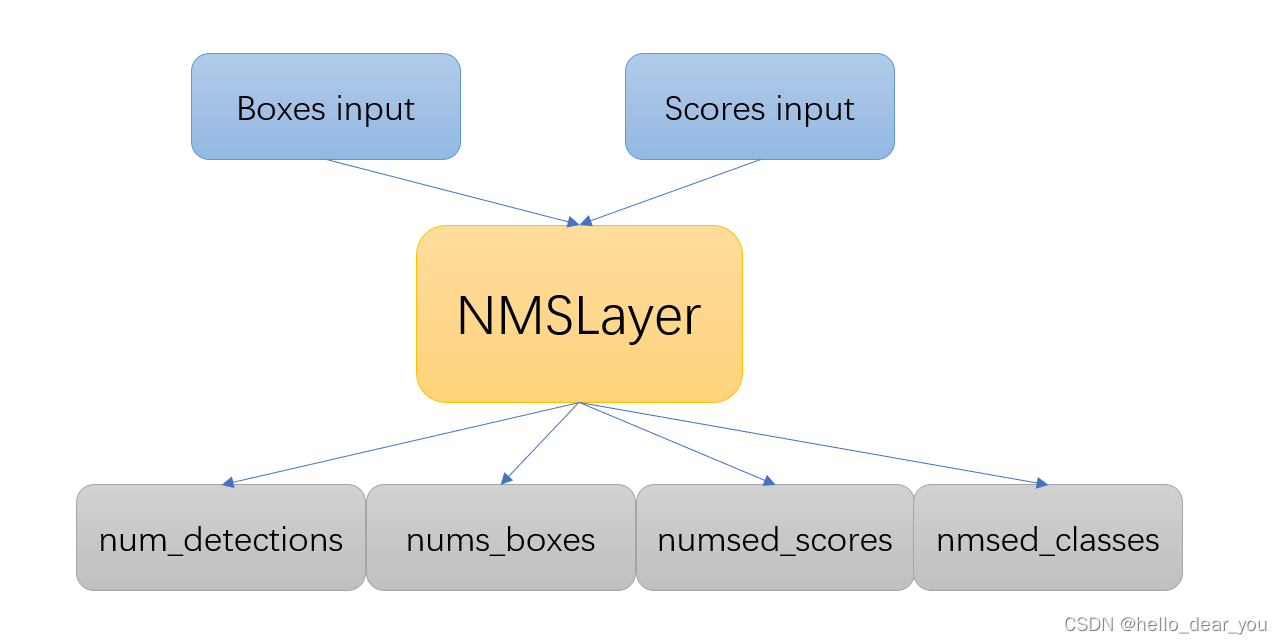
batchedNMSPlugin包含两个输入和四个输出。
两个输入:boxes input 和scores input.
boxes input: 此时输入的boxes信息是经过decode之后的,维度信息[batch_size, number_boxes, number_classes, number_box_parameters],
- batch_size:批处理大小
- number_boxes:bounding boxes的数量
- number_classes:分类的类别数目
- number_box_parameters:boxes的位置信息,通常由4个参数组成:[x1, y1, x2, y2]分别为左上和右下角点
Scores input: 维度信息[batch_size, number_boxes, number_classes],每一个box包含所有分类类别的置信度
四个输出:
- num_detections: 维度信息[batch_size, 1],最后一维大小为1,类型为INT32,表示每一帧图像中有效的物体数
- nums_boxes:维度信息[batch_size, keepTopK, 4] 类型为float32,包含经过NMS之后boxes的位置信息
- numsed_scores:维度信息:[batch_size, keepTopK]类型为float32,表示boxes的得分信息
- nmsed_classes:维度信息:[batch_size, keepTopK],类型为float32,表示boxes的类别信息
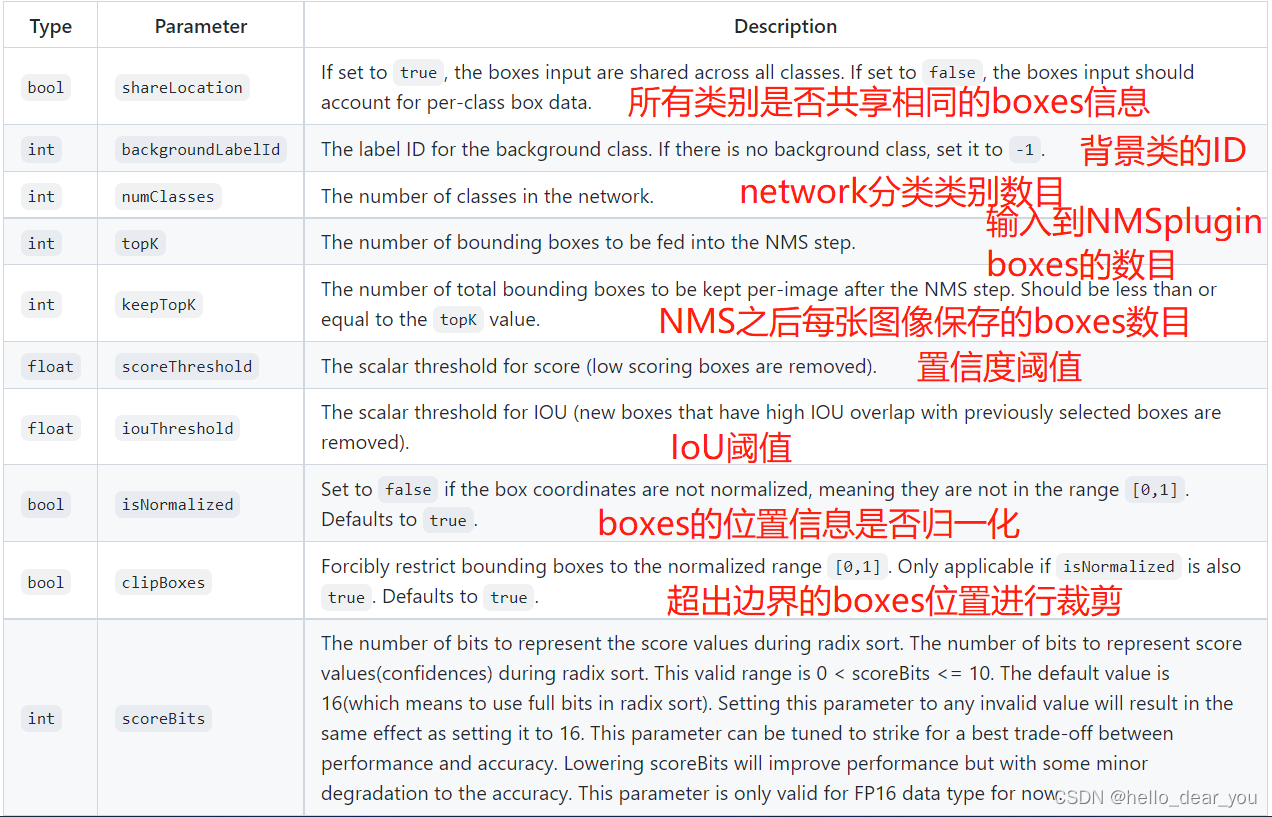
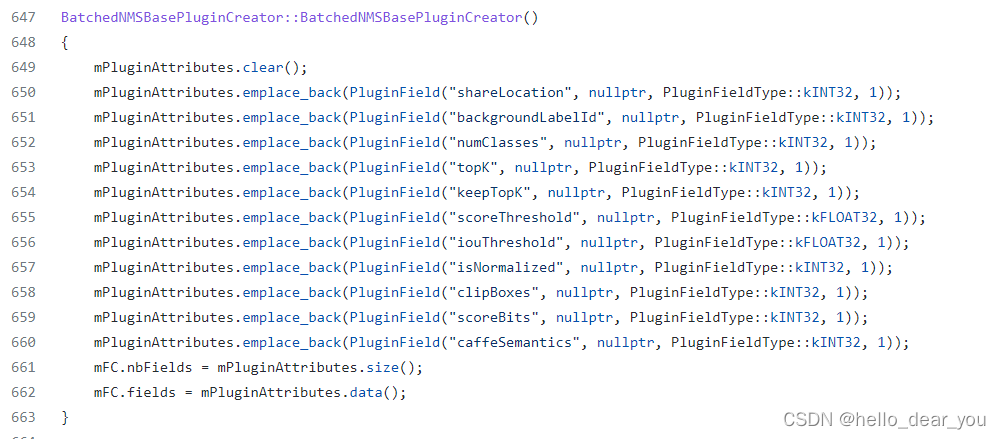
该plugin除了指定输入输出参数的信息之后,还提供了十余个可配置的参数。
plugin需要知道的知识先介绍到这里,下面学习如何调用该plugin在Network中生成engine。
2. 调用plugin
下图为TensorRT的engine编译过程,其中最关键的是如何生成Network Definition,表示推理的网络结构。
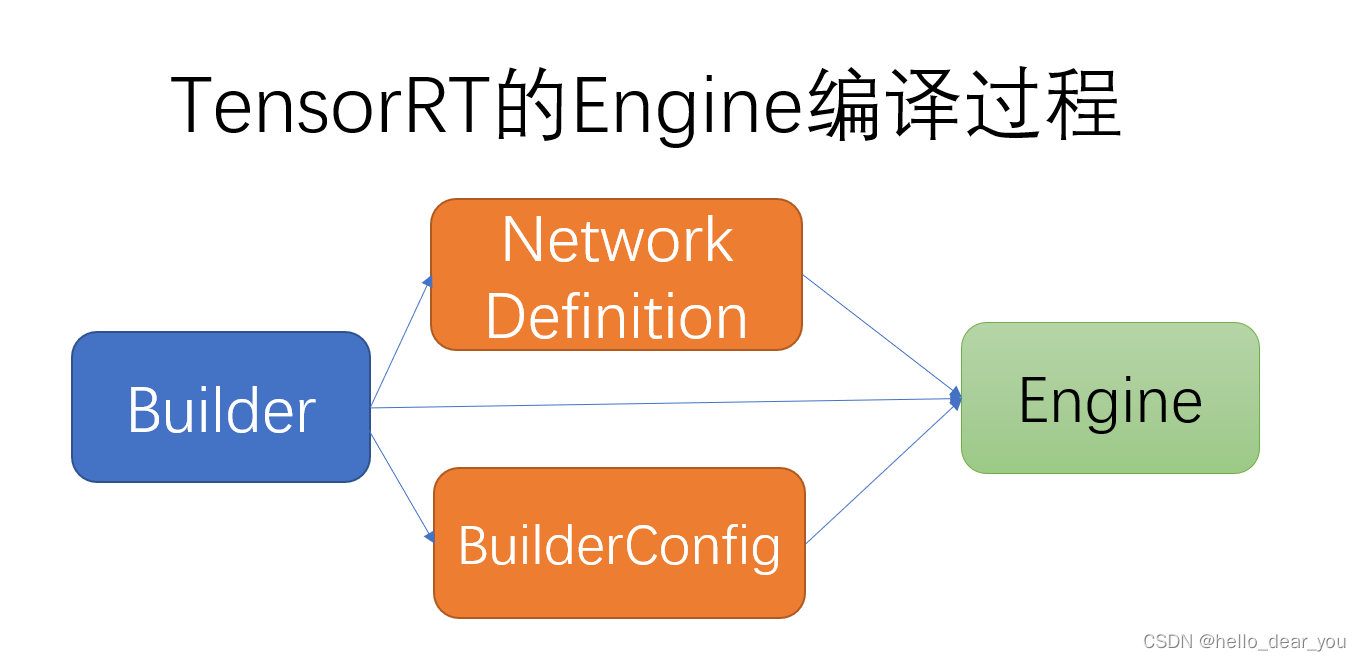
下面,我们基于plugin构建一个简单的Network,来展示如何调用plugin和验证性能。通过自定义合适的输入,推理,得到输出结果。
其中上述Network Definition的具体实现代码如下:
    network = builder.create_network()    # 定义网络
    # 输入
    boxes = network.add_input('boxes', tensorrt.DataType.FLOAT, input_shape[0])
    scores = network.add_input('scores', tensorrt.DataType.FLOAT, input_shape[1])
    # 配置参数
    mPluginAttributes = list()
    topK = 6
    keepTok = 5
    iouThreshold = 0.7
    mPluginAttributes.append(trt.PluginField('shareLocation', np.array([1], dtype=np.int32), tensorrt.PluginFieldType.INT32))
    mPluginAttributes.append(trt.PluginField('backgroundLabelId', np.array([-1], dtype=np.int32), tensorrt.PluginFieldType.INT32))
    mPluginAttributes.append(trt.PluginField('numClasses', np.array([1], dtype=np.int32), tensorrt.PluginFieldType.INT32))
    mPluginAttributes.append(trt.PluginField('topK', np.array([topK], dtype=np.int32), tensorrt.PluginFieldType.INT32))
    mPluginAttributes.append(trt.PluginField('keepTopK', np.array([keepTok], dtype=np.int32), tensorrt.PluginFieldType.INT32))
    mPluginAttributes.append(trt.PluginField('scoreThreshold', np.array([0.3], dtype=np.float32), tensorrt.PluginFieldType.FLOAT32,))
    mPluginAttributes.append(trt.PluginField('iouThreshold', np.array([iouThreshold], dtype=np.float32), tensorrt.PluginFieldType.FLOAT32))
    mPluginAttributes.append(trt.PluginField('isNormalized', np.array([0], dtype=np.int32), tensorrt.PluginFieldType.INT32))
    mPluginAttributes.append(trt.PluginField('clipBoxes', np.array([0], dtype=np.int32), tensorrt.PluginFieldType.INT32))
    mPluginAttributes.append(trt.PluginField('scoreBits', np.array([4], dtype=np.int32), tensorrt.PluginFieldType.INT32))
    mPluginAttributes.append(trt.PluginField('caffeSemantics', np.array([0], dtype=np.int32), tensorrt.PluginFieldType.INT32))
    # 调用plugin
    layer = network.add_plugin_v2(
        [boxes, scores],
        plugin_creator.create_plugin('BatchedNMS_TRT', tensorrt.PluginFieldCollection(mPluginAttributes))
    )
    # 获取输出
    num_detections = layer.get_output(0)
    num_detections.name = "num_detections"
    nmsed_boxes  = layer.get_output(1)
    nmsed_boxes.name = "nmsed_boxes"
    nmsed_scores  = layer.get_output(2)
    nmsed_scores.name = "nmsed_scores"
    nmsed_classes  = layer.get_output(3)
    nmsed_classes.name = "nmsed_classes"
    network.mark_output(num_detections)
    network.mark_output(nmsed_boxes)
    network.mark_output(nmsed_scores)
    network.mark_output(nmsed_classes)
上述代码,两个重要的点是,如何配置plugin对应的参数和调用plugin。参数配置可以参考源码实现中creator的构造函数在初始化参数的过程。
3. 验证plugin效果
以NMS的python实现博客的python实现为对比,验证该plugin的效果。
import numpy as np


boxes=np.array([[100,100,210,210,0.72],
        [250,250,420,420,0.8],
        [220,220,320,330,0.92],
        [100,100,210,210,0.72],
        [230,240,325,330,0.81],
        [220,230,315,340,0.9]])


def py_cpu_nms(dets, thresh):

    x1 = dets[:,0]
    y1 = dets[:,1]
    x2 = dets[:,2]
    y2 = dets[:,3]
    areas = (y2-y1+1) * (x2-x1+1)
    scores = dets[:,4]
    keep = []
    index = scores.argsort()[::-1]
    while index.size >0:
        i = index[0]       # every time the first is the biggst, and add it directly
        keep.append(i)


        x11 = np.maximum(x1[i], x1[index[1:]])    # calculate the points of overlap
        y11 = np.maximum(y1[i], y1[index[1:]])
        x22 = np.minimum(x2[i], x2[index[1:]])
        y22 = np.minimum(y2[i], y2[index[1:]])


        w = np.maximum(0, x22-x11+1)    # the weights of overlap
        h = np.maximum(0, y22-y11+1)    # the height of overlap

        overlaps = w*h
        ious = overlaps / (areas[i]+areas[index[1:]] - overlaps)

        idx = np.where(ious<=thresh)[0]
        index = index[idx+1]   # because index start from 1

    return keep


import matplotlib.pyplot as plt
def plot_bbox(dets, c='k'):
    x1 = dets[:,0]
    y1 = dets[:,1]
    x2 = dets[:,2]
    y2 = dets[:,3]

    plt.plot([x1,x2], [y1,y1], c)
    plt.plot([x1,x1], [y1,y2], c)
    plt.plot([x1,x2], [y2,y2], c)
    plt.plot([x2,x2], [y1,y2], c)
    plt.title(" nms")


plt.figure(1)
ax1 = plt.subplot(1,2,1)
ax2 = plt.subplot(1,2,2)

plt.sca(ax1)
plot_bbox(boxes,'k')   # before nms

keep = py_cpu_nms(boxes, thresh=0.7)
plt.sca(ax2)
plot_bbox(boxes[keep], 'r')# after nms
通过运行如上的代码,我们可以得到下图
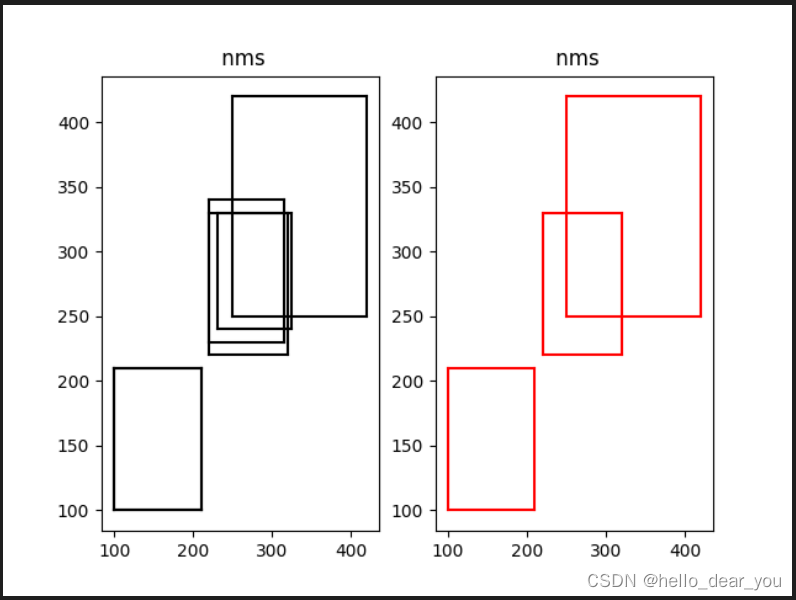
同样通过如下的代码,在TensorRT的环境下推理也能得到同样的效果
    batch_size = 1
    num_boxes = 6       ###############
    boxes = np.array([100,100,210,210,
                    250,250,420,420,
                    220,220,320,330,
                    100,100,210,210,
                    230,240,325,330,
                    220,230,315,340],  dtype=np.float32).reshape(batch_size, num_boxes, 1, 4)        # shape:(batch_size, 3, 1, 4)
    scores = np.array([0.72, 0.8, 0.92, 0.72, 0.81, 0.9],  dtype=np.float32).reshape(batch_size, num_boxes, 1)       # shape: (batch_size, 3, 1)
    plt.figure(1)
    ax1 = plt.subplot(1,2,1)
    ax2 = plt.subplot(1,2,2)
    plt.sca(ax1)
    plot_bbox(boxes.reshape(num_boxes, 4),'k')   # before nms

    trt = TrtLite(build_engine, (boxes.shape[1:], scores.shape[1:]))
    # trt.print_info()

    d_buffers = trt.allocate_io_buffers(batch_size, True)
    # host -> device
    cuda.memcpy_htod(d_buffers[0], boxes)
    cuda.memcpy_htod(d_buffers[1], scores)
    trt.execute(d_buffers, batch_size)
    keepTok = 5         ##########
    num_detections = np.zeros((batch_size, 1), dtype=np.int32)
    nmsed_boxes  = np.zeros((batch_size, keepTok, 4), dtype=np.float32 )
    nmsed_scores  = np.zeros((batch_size, keepTok), dtype=np.float32 )
    nmsed_classes  = np.zeros((batch_size, keepTok), dtype=np.float32 )
    cuda.memcpy_dtoh(num_detections, d_buffers[2])
    cuda.memcpy_dtoh(nmsed_boxes, d_buffers[3])
    cuda.memcpy_dtoh(nmsed_scores, d_buffers[4])
    cuda.memcpy_dtoh(nmsed_classes, d_buffers[5])
    plt.sca(ax2)
    plot_bbox(nmsed_boxes[0][:num_detections[0][0]], 'r')# after nms
通过上面的尝试,对于Yolo系列一个可行的方案是:网络前向传播得到三个不同尺度特征图的输出,然后链接一个YoloLayerPlugin来对检测框进行解码,最后链接batchedNMSPlugin去除冗余的检测框,这样生成的engine就可以实现“End-to-End"的部署且都是在GPU上完成应该可以加速网络的推理。
4. 有用的链接
NVIDIA/trt-samples-for-hackathon-cn: Simple samples for TensorRT programming (github.com)
NMS的python实现_a1103688841的博客-CSDN博客_nms python