Ubuntu 18.04 服务器版安装软件记录
- 设置root密码
- 使用root用户登录
- 安装ssh(远程连接用),最小化安装的需要,一般已安装。
- 将“#PermitRootLogin prohibit-password”修改为yes
- 重启ssh服务即可远程root用户连接
- 更改apt源为阿里云源
- 安装 Xfce桌面
- 安装语言环境设置工具、中文字体包
- en_US.UTF-8 UTF-8
- zh_CN.UTF-8 UTF-8
- zh_CN.UTF-8 UTF-8
- 安装谷歌浏览器
- 安装gcc
- 安装中文输入法
- 安装qemu/kvm
- 18.04官方源
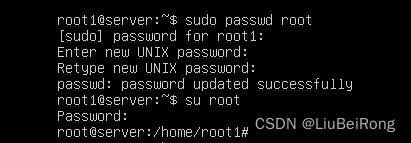
设置root密码
sudo passwd root
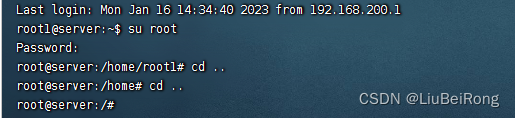
使用root用户登录
su root
安装ssh(远程连接用),最小化安装的需要,一般已安装。
1.安装ssh服务端
sudo apt-get install openssh-server
2.确认sshserver是否启动了
ps -e | grep ssh
如果只有ssh-agent那ssh-server还没有启动,需要/etc/init.d/ssh start,如果看到sshd那说明ssh-server已经启动了
3.启动sshserver
/etc/init.d/ssh start
4.SSH配置(如果需要)
修改配置文件/etc/ssh/sshd_config,这里可以定义SSH的服务端口,默认端口是22,你可以自己定义成其他端口号如32,然后重启服务
5.重启sshserver
/etc/init.d/ssh restart
使用FinalShell 软件登录(用安装时候的用户登录,root现在还不能登录,然后可以切换到root用户)
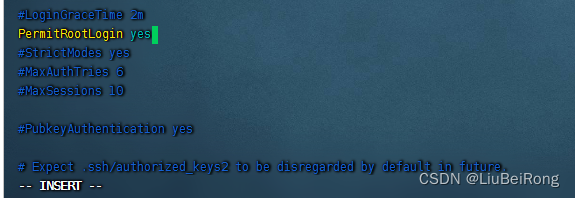
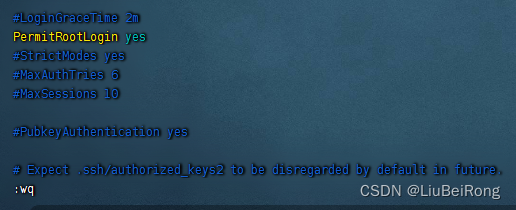
将“#PermitRootLogin prohibit-password”修改为yes
找到【#PermitRootLogin prohibit-password】一行,修改为:【PermitRootLogin yes】
vim /etc/ssh/sshd_config
注:vim 进入编辑按【 I 】键,按【esc】键退出编辑,冒号+wq【:wq】保存退出。
重启ssh服务即可远程root用户连接
systemctl restart sshd.service
更改apt源为阿里云源
1.复制源文件备份,以防万一
我们要修改的文件是sources.list,它在目录/etc/apt/下,sources.list是包管理工具apt所用的记录软件包仓库位置的配置文件,同样类型的还有位于 同目录下sources.list.d文件下的各种.list后缀的各文件。
命令如下:
sudo cp /etc/apt/sources.list /etc/apt/sources.list.bak
2.编辑源列表文件(FinalShell软件等ssh软件)
需要先授权文件为读写权限,默认只读无法编辑的。
sudo chmod 777 /etc/apt/sources.list

deb http:
deb-src http:
deb http:
deb-src http:
deb http:
deb-src http:
deb http:
deb-src http:
deb http:
deb-src http:
3.最后更新系统配置,更新源就完成了。
sudo apt update -y && sudo apt upgrade -y
安装 Xfce桌面
1-2.安装Xfce,它 是一个快速,稳定和轻量级的桌面环境,非常适合在远程服务器上使用。
sudo apt -y install xfce4 xfce4-goodies xorg dbus-x11 x11-xserver-utils
2.不用远程桌面可以当前主机命令行下直接打开图形界面。
startx
安装 Xrdp,提供远程桌面服务
sudo apt install xrdp -y
2.配置 Xrdp
Xrdp 配置文件位于 /etc/xrdp 目录中。对于基本的 Xrdp 连接,我们只需要配置 Xrdp 即可使用 Xfce 。为此,请在文本编辑器中打开以下文件:
文件 /etc/xrdp/xrdp.ini
sudo nano /etc/xrdp/xrdp.ini
在文件末尾添加以下行:
exec startxfce4
ctrl + o 保存文件,回车后,ctrl + x 退出。
并重新启动 Xrdp 服务:
sudo systemctl restart xrdp
打开软件RDP,登录成功!

配置防火墙
默认情况下, Xrdp 侦听 3389 所有接口上的端口。如果您在 Ubuntu 服务器上运行防火墙(您应该总是这样做),则需要添加一个规则来启用 Xrdp 端口上的流量。
要允许从特定 IP 地址或 IP 范围访问 Xrdp 服务器,请在此示例 192.168.1.0/24 中运行以下命令:
sudo ufw allow from 192.168.1.0/24 to any port 3389
如果您想允许从任何地方进行访问(出于安全原因而非常不鼓励),请运行:
sudo ufw allow 3389
为了提高安全性,您可以考虑将 Xrdp 设置为仅在 localhost 上侦听并创建一个 SSH 隧道,该隧道将安全地将来自本地计算机的端口 3389 上的流量转发到同一端口上的服务器。另一个安全选项是安装 OpenVPN 并通过专用网络连接到 Xrdp 服务器。
安装语言环境设置工具、中文字体包
第一步 安装语言环境设置
sudo apt-get -y install locales xfonts-intl-chinese fonts-wqy-microhei
第二步 运行语言环境设置
sudo dpkg-reconfigure locales

使用空格键选中
en_US.UTF-8 UTF-8
zh_CN.UTF-8 UTF-8
使用Tab键切换至OK,再将
zh_CN.UTF-8 UTF-8
选为默认。


重启服务器,界面就是中文的了。
sudo reboot

安装谷歌浏览器
sudo apt-get install libgconf2-4 libnss3-1d libxss1
sudo apt-get -f install
sudo wget https:
sudo dpkg -i google-chrome-stable_current_amd64.deb
如果安装后不能打开,以下可以解决:
方法1.
进入/usr/share/applications/目录,右键谷歌浏览器的图标.
在命令一行后边添加一句–no-sandbox
/usr/bin/google-chrome-stable %U --no-sandbox
安装gcc
sudo apt install build-essential
安装中文输入法
sudo apt-get install fcitx fcitx-table-wbpy
安装完成后需要注销或者重启!
安装qemu/kvm
sudo apt-get install qemu-kvm
sudo apt-get install qemu
sudo apt-get install virt-manager
sudo apt-get install virt-viewer
sudo apt-get install libvirt-bin
sudo apt-get install bridge-utils
18.04官方源
# See http:
# newer versions of the distribution.
deb http:
# deb-src http:
## Major bug fix updates produced after the final release of the
## distribution.
deb http:
# deb-src http:
## N.B. software from this repository is ENTIRELY UNSUPPORTED by the Ubuntu
## team. Also, please note that software in universe WILL NOT receive any
## review or updates from the Ubuntu security team.
deb http:
# deb-src http:
deb http:
# deb-src http:
## N.B. software from this repository is ENTIRELY UNSUPPORTED by the Ubuntu
## team, and may not be under a free licence. Please satisfy yourself as to
## your rights to use the software. Also, please note that software in
## multiverse WILL NOT receive any review or updates from the Ubuntu
## security team.
deb http:
# deb-src http:
deb http:
# deb-src http:
## N.B. software from this repository may not have been tested as
## extensively as that contained in the main release, although it includes
## newer versions of some applications which may provide useful features.
## Also, please note that software in backports WILL NOT receive any review
## or updates from the Ubuntu security team.
deb http:
# deb-src http:
## Uncomment the following two lines to add software from Canonical's
## 'partner' repository.
## This software is not part of Ubuntu, but is offered by Canonical and the
## respective vendors as a service to Ubuntu users.
# deb http:
# deb-src http:
deb http:
# deb-src http:
deb http:
# deb-src http:
deb http:
# deb-src http:
Ubuntu server 下安装KDE桌面环境
sudo apt-get install kubuntu-desktop
然后选择gdm,按回车,OK
KDE为英文界面,可以为它安装中文环境:
sudo apt-get install language-pack-kde-zh language-pack-kde-zh-base language-pack-zh language-pack-zh-base language-support-zh
重启就行了。
本文内容由网友自发贡献,版权归原作者所有,本站不承担相应法律责任。如您发现有涉嫌抄袭侵权的内容,请联系:hwhale#tublm.com(使用前将#替换为@)