vue框架自己好像没有弹出框,而vuetify有弹出框v-dialog,没有确认框confirm,虽然确认框本身就是弹出框,但是弹出框的功能有个特点,就是确定做一件事情,而取消了就是做另一件事情,类似一个Promise要做的事情。
今天主要就是要自定义一个确认框,我们利用组件的思维,先定义组件结构,然后定义组件如何配合文档document工作,最后声明和调用。按照这个思路,我们分如下几步:
1、定义组件结构体src/components/Confirm.vue
<template>
	<div class="dialogwrapper" v-if="show">
		<div class="overlay"></div>
		<v-card class="dialog">
			<v-card-title>提示</v-card-title>
			<v-card-text>
				您确定这么做吗?
			</v-card-text>
			<v-card-actions>
				<v-btn @click="ok">确定</v-btn>
				<v-btn @click="cancel">取消</v-btn>
			</v-card-actions>
		</v-card>
	</div>
</template>
<script>
	export default {
		data() {
			return {
				promiseStatus: null,
				show: false
			}
		},
		methods: {
			confirm() {
				let _this = this;
				this.show = true;
				return new Promise(function (resolve,reject){
					_this.promiseStatus = {resolve,reject};
				});
			},
			ok(){
				this.show = false;
				this.promiseStatus && this.promiseStatus.resolve();
			},
			cancel(){
				this.show = false;
				this.promiseStatus && this.promiseStatus.reject();
			}
		}
	}
</script>
<style>
	.dialogwrapper{
		    align-items: center;
			display: flex;
			height: 100%;
			justify-content: center;
			left: 0px;
			pointer-events: none;
			position: fixed;
			top: 0px;
			width: 100%;
			z-index: 6;
			transition: all 0.2s cubic-bezier(0.25, 0.8, 0.25, 1) 0s, z-index 1ms ease 0s;
			outline: none;
	}
	.dialog{
		overflow-y: auto;
		pointer-events: auto;
		width: 100%;
		z-index: inherit;
		box-shadow: rgba(0, 0, 0, 0.2) 0px 11px 15px -7px, rgba(0, 0, 0, 0.14) 0px 24px 38px 3px, rgba(0, 0, 0, 0.12) 0px 9px 46px 8px;
		border-radius: 4px;
		margin: 24px;
		transition: all 0.3s cubic-bezier(0.25, 0.8, 0.25, 1) 0s;
		max-width:290px;
	}
	.overlay{
		align-items: center;
		border-radius: inherit;
		display: flex;
		justify-content: center;
		position: fixed;
		top: 0;
		left: 0;
		right: 0;
		bottom: 0;
		pointer-events: auto;
		background:#000;
		opacity:0.46;
	}
</style>
2、定义插件src/plugins/confirm.js
import Vue from 'vue'
import Confirm from '@/components/Confirm.vue'
const VueComponent = Vue.extend(Confirm)
const vm = new VueComponent().$mount()

let init = false;
let defaultOptions = {

}

const confirm = function(options){
	Object.assign(vm,defaultOptions,options,{
		type:"confirm"
	})
	if(!init){
		document.body.appendChild(vm.$el)
		init = true;
	}
	return vm.confirm();
};

export default confirm;
3、全局声明组件src/main.js
import Vue from 'vue'
import App from './App'
import router from './router'
import vuetify from '@/plugins/vuetify'
import confirm from '@/plugins/confirm'
Vue.config.productionTip = false
Vue.prototype.$confirm = confirm
/* eslint-disable no-new */
new Vue({
  el: '#app',
  router,
  vuetify,
  components: { App },
  template: '<App/>'
})
4、调用src/components/TestPage.vue
<template>
	<v-card>
		<v-btn @click="confirm">open</v-btn>
	</v-card>
</template>
<script>
	export default {
	  methods: {
		confirm(){
		  this.$confirm({

		  }).then(()=>{
			console.log("ok");
		  }).catch(()=>{
			console.log("cancel");
		  })
		}
	  }

	}
</script>
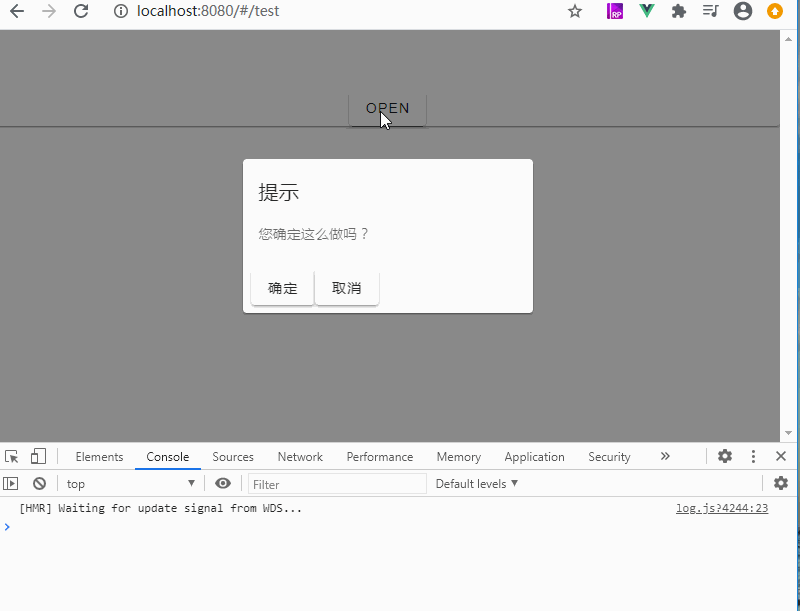
5、效果图:
以上是一个简单的示例,我们在需要使用的地方直接通过this.$confirm().then().catch()就可以把逻辑全部设置好,可以看出this.$confirm是一个Promise,而这个Promise是通过定义组件结构的时候confirm方法返回的。如下所示:
confirm() {
	let _this = this;
	this.show = true;
	return new Promise(function (resolve,reject){
		_this.promiseStatus = {resolve,reject};
	});
}
我们在src/plugins/confirm.js中通过了一些方法找到了组件挂载点,组件元素,组件中的方法。
这个组件不比vuetify自带的v-dialog一开始就是长在文档中的,而是需要我们手动appendChild的方式将元素插入文档中。
本文内容由网友自发贡献,版权归原作者所有,本站不承担相应法律责任。如您发现有涉嫌抄袭侵权的内容,请联系:hwhale#tublm.com(使用前将#替换为@)