目录
一,软件安装
二,配置参数
三,使用Vins-fusion建立Octomap
四,使用 DenseSurfelMapping建立Octomap
先决条件
Ubuntu 64-bit 16.04 or 18.04.
ROS Kinetic or Melodic.
一,软件安装
#ros安装,推荐使用鱼香ros一键安装,换源,安装,更新rosdep方便省心
wget http://fishros.com/install -O fishros && . fishros#然后建议安装多终端操作软件Terminator,方便多终端操作
sudo apt install terminator
#Ctrl+Alt+T开启,Alt+A同时操作,Alt+O关闭同时操作
#realsense安装
sudo apt-key adv --keyserver keyserver.ubuntu.com --recv-key F6E65AC044F831AC80A06380C8B3A55A6F3EFCDE || sudo apt-key adv --keyserver hkp://keyserver.ubuntu.com:80 --recv-key F6E65AC044F831AC80A06380C8B3A55A6F3EFCDE

sudo add-apt-repository "deb https://librealsense.intel.com/Debian/apt-repo $(lsb_release -cs) main" -u

sudo apt-get install librealsense2-dkms
sudo apt-get install librealsense2-utils
sudo apt-get install librealsense2-dev
sudo apt-get install librealsense2-dbg
#测试:realsense-viewer
注意测试时左上角显示的USB必须是3.x,如果是2.x,可能是USB线是2.0的,或者插在了2.0的USB口上(3.0的线和口都是蓝色的)
#安装RealSense-ROS
mkdir -p ~/catkin_ws/src
cd ~/catkin_ws/src

git clone https://github.com/IntelRealSense/realsense-ros
cd realsense-ros/
git checkout `git tag | sort -V | grep -P "^2.\d+\.\d+" | tail -1
cd ..
git clone https://github.com/pal-robotics/ddynamic_reconfigure.git

catkin_init_workspace
cd ..
catkin_make clean
catkin_make -DCATKIN_ENABLE_TESTING=False -DCMAKE_BUILD_TYPE=Release
catkin_make install
ROS接口使用
sudo apt install ros-melodic-rgbd-launch
roslaunch realsense2_camera rs_camera.launch
#ceres-solver安装
官方网站http://www.ceres-solver.org/installation.html
sudo apt-get install cmake
sudo apt-get install libgoogle-glog-dev libgflags-dev
sudo apt-get install libatlas-base-dev
sudo apt-get install libeigen3-dev
sudo apt-get install libsuitesparse-dev
git clone https://ceres-solver.googlesource.com/ceres-solver
或者直接下载安装包,注意版本,需要CMake 3.10 或更高版本,需要Eigen 3.3 或更高版本。
tar zxf ceres-solver-2.1.0.tar.gz
mkdir ceres-bin
cd ceres-bin
cmake ../ceres-solver-2.1.0
sudo make -j8
make test
sudo make install
#构建VINS-Fusion,创建工作空间
    cd ~/catkin_ws/src
    git clone https://github.com/HKUST-Aerial-Robotics/VINS-Fusion.git
    cd ../
    catkin_make
    source ~/catkin_ws/devel/setup.bash
(如果此步骤失败,请尝试寻找另一台系统干净的计算机或重新安装 Ubuntu 和 ROS)
设置环境变量默认路径,在终端中输入该命令,会进入一个文件
gedit ~/.bashrc
#编译安装 OctomapServer 建图包
cd src/
git clone https://github.com/OctoMap/octomap_mapping.git
返回你的工作空间主目录,安装下依赖,然后开始编译:
cd ../
rosdep install octomap_mapping
catkin_make
ROS 中提供了一个 Rviz 可视化 Octomap 的插件,如果没有安装使用下面的命令即可:
sudo apt-get install ros-你的ROS版本-octomap-rviz-plugins安装完成后rviz工具中会出现octomap相关选项
其中的OccupancyGrid是显示三维概率地图,也就是octomap地图。OccupancyMap是显示二维占据栅格地图。
二,配置参数
1.创建启动文件
cd ~/catkin_ws/src/realsense-ros-development/realsense2_camera/launch
touch rs_camera_vins.launch
在rs_camera_vins.launch文件中填入如下代码:
<launch>
  <arg name="serial_no"           default=""/>
  <arg name="usb_port_id"         default=""/>
  <arg name="device_type"         default=""/>
  <arg name="json_file_path"      default=""/>
  <arg name="camera"              default="camera"/>
  <arg name="tf_prefix"           default="$(arg camera)"/>
  <arg name="external_manager"    default="false"/>
  <arg name="manager"             default="realsense2_camera_manager"/>

  <arg name="fisheye_width"       default="640"/>
  <arg name="fisheye_height"      default="480"/>
  <arg name="enable_fisheye"      default="false"/>

  <arg name="depth_width"         default="640"/>
  <arg name="depth_height"        default="480"/>
  <arg name="enable_depth"        default="true"/>

  <arg name="infra_width"        default="640"/>
  <arg name="infra_height"       default="480"/>
  <arg name="enable_infra1"       default="true"/>
  <arg name="enable_infra2"       default="true"/>

  <arg name="color_width"         default="640"/>
  <arg name="color_height"        default="480"/>
  <arg name="enable_color"        default="true"/>

  <arg name="fisheye_fps"         default="30"/>
  <arg name="depth_fps"           default="30"/>
  <arg name="infra_fps"           default="30"/>
  <arg name="color_fps"           default="30"/>
  <arg name="gyro_fps"            default="200"/>
  <arg name="accel_fps"           default="200"/>
  <arg name="enable_gyro"         default="true"/>
  <arg name="enable_accel"        default="true"/>

  <arg name="enable_pointcloud"         default="false"/>
  <arg name="pointcloud_texture_stream" default="RS2_STREAM_COLOR"/>
  <arg name="pointcloud_texture_index"  default="0"/>

  <arg name="enable_sync"               default="true"/>
  <arg name="align_depth"               default="true"/>

  <arg name="publish_tf"                default="true"/>
  <arg name="tf_publish_rate"           default="0"/>

  <arg name="filters"                   default=""/>
  <arg name="clip_distance"             default="-2"/>
  <arg name="linear_accel_cov"          default="0.01"/>
  <arg name="initial_reset"             default="false"/>
  <arg name="unite_imu_method"          default="linear_interpolation"/>
  <arg name="topic_odom_in"             default="odom_in"/>
  <arg name="calib_odom_file"           default=""/>
  <arg name="publish_odom_tf"           default="true"/>
  <arg name="allow_no_texture_points"   default="false"/>
  <arg name="emitter_enable"   		default="false"/>

<!-- rosparam set /camera/stereo_module/emitter_enabled false -->
<rosparam>
  /camera/stereo_module/emitter_enabled: 0
</rosparam>

<rosparam if="$(arg emitter_enable)">
  /camera/stereo_module/emitter_enabled: 1
</rosparam>

  <group ns="$(arg camera)">
    <include file="$(find realsense2_camera)/launch/includes/nodelet.launch.xml">
      <arg name="tf_prefix"                value="$(arg tf_prefix)"/>
      <arg name="external_manager"         value="$(arg external_manager)"/>
      <arg name="manager"                  value="$(arg manager)"/>
      <arg name="serial_no"                value="$(arg serial_no)"/>
      <arg name="usb_port_id"              value="$(arg usb_port_id)"/>
      <arg name="device_type"              value="$(arg device_type)"/>
      <arg name="json_file_path"           value="$(arg json_file_path)"/>

      <arg name="enable_pointcloud"        value="$(arg enable_pointcloud)"/>
      <arg name="pointcloud_texture_stream" value="$(arg pointcloud_texture_stream)"/>
      <arg name="pointcloud_texture_index"  value="$(arg pointcloud_texture_index)"/>
      <arg name="enable_sync"              value="$(arg enable_sync)"/>
      <arg name="align_depth"              value="$(arg align_depth)"/>

      <arg name="fisheye_width"            value="$(arg fisheye_width)"/>
      <arg name="fisheye_height"           value="$(arg fisheye_height)"/>
      <arg name="enable_fisheye"           value="$(arg enable_fisheye)"/>

      <arg name="depth_width"              value="$(arg depth_width)"/>
      <arg name="depth_height"             value="$(arg depth_height)"/>
      <arg name="enable_depth"             value="$(arg enable_depth)"/>

      <arg name="color_width"              value="$(arg color_width)"/>
      <arg name="color_height"             value="$(arg color_height)"/>
      <arg name="enable_color"             value="$(arg enable_color)"/>

      <arg name="infra_width"              value="$(arg infra_width)"/>
      <arg name="infra_height"             value="$(arg infra_height)"/>
      <arg name="enable_infra1"            value="$(arg enable_infra1)"/>
      <arg name="enable_infra2"            value="$(arg enable_infra2)"/>

      <arg name="fisheye_fps"              value="$(arg fisheye_fps)"/>
      <arg name="depth_fps"                value="$(arg depth_fps)"/>
      <arg name="infra_fps"                value="$(arg infra_fps)"/>
      <arg name="color_fps"                value="$(arg color_fps)"/>
      <arg name="gyro_fps"                 value="$(arg gyro_fps)"/>
      <arg name="accel_fps"                value="$(arg accel_fps)"/>
      <arg name="enable_gyro"              value="$(arg enable_gyro)"/>
      <arg name="enable_accel"             value="$(arg enable_accel)"/>

      <arg name="publish_tf"               value="$(arg publish_tf)"/>
      <arg name="tf_publish_rate"          value="$(arg tf_publish_rate)"/>

      <arg name="filters"                  value="$(arg filters)"/>
      <arg name="clip_distance"            value="$(arg clip_distance)"/>
      <arg name="linear_accel_cov"         value="$(arg linear_accel_cov)"/>
      <arg name="initial_reset"            value="$(arg initial_reset)"/>
      <arg name="unite_imu_method"         value="$(arg unite_imu_method)"/>
      <arg name="topic_odom_in"            value="$(arg topic_odom_in)"/>
      <arg name="calib_odom_file"          value="$(arg calib_odom_file)"/>
      <arg name="publish_odom_tf"          value="$(arg publish_odom_tf)"/>
      <arg name="allow_no_texture_points"  value="$(arg allow_no_texture_points)"/>
    </include>
  </group>
</launch>
2.修改外参
打开~/catkin_ws/src/VINS-Fusion/config/realsense_d435i/
%YAML:1.0

#common parameters
#support: 1 imu 1 cam; 1 imu 2 cam: 2 cam;
imu: 1
num_of_cam: 2

imu_topic: "/camera/imu"
image0_topic: "/camera/infra1/image_rect_raw"
image1_topic: "/camera/infra2/image_rect_raw"
output_path: "/home/dji/output/"

cam0_calib: "left.yaml"
cam1_calib: "right.yaml"
image_width: 640
image_height: 480


# IMU和Camera之间的外部参数。
estimate_extrinsic : 1    # 0 有一个准确的外在参数。我们将信任以下 imu^R_cam,imu^T_cam,不要更改它。
                        # 1 初步猜测外在参数。我们将围绕您最初的猜测进行优化。

body_T_cam0: !!opencv-matrix
   rows: 4
   cols: 4
   dt: d
   data: [ 1, 0, 0, -0.00552,
           0, 1, 0, 0.0051,
           0, 0, 1, 0.01174,
           0, 0, 0, 1 ]

body_T_cam1: !!opencv-matrix
   rows: 4
   cols: 4
   dt: d
   data: [ 1, 0, 0, 0.0446571,
           0, 1, 0, 0.0051,
           0, 0, 1, 0.01174,
           0, 0, 0, 1 ]


#多线程支持
multiple_thread: 1

#特征跟踪器参数
max_cnt : 150             #特征跟踪中的最大特征数
min_dist : 30             #两个特征之间的最小距离
freq : 10                 #发布跟踪结果的频率 (Hz)。至少 10Hz 以获得良好的估计。如果设置为 0,则频率将与原始图像相同
F_threshold : 1.0         # ransac 阈值(像素)
show_track : 0            # 将跟踪图像发布为主题
flow_back : 1             #执行正向和反向光流以提高特征跟踪精度

#优化参数
max_solver_time : 0.04   #最大求解器迭代时间(毫秒),保证实时
max_num_iterations : 8    #最大求解器迭代次数,以保证实时
keyframe_parallax : 10.0  #关键帧选择阈值(像素)

# imu 参数 你提供的参数越准确,性能越好
acc_n : 0.1           #加速度计测量噪声标准偏差。#0.2 0.04
gyr_n : 0.01          #陀螺仪测量噪声标准偏差。#0.05 0.004
acc_w : 0.001          #加速度计偏差随机工作噪声标准偏差。#0.002
gyr_w : 0.0001        #陀螺仪偏差随机工作噪声标准偏差。#4.0e-5
g_norm : 9.805          #重力大小

#非同步参数
estimate_td : 1                       #在线估计相机和imu之间的时间偏移
td : 0.00                              #时间偏移的初始值。单位。读取图像时钟 + td = 真实图像时钟(IMU 时钟)

#闭环参数
load_previous_pose_graph : 0         #加载并重用之前的位姿图;从“pose_graph_save_path”加载
pose_graph_save_path : " /home/dji/output/pose_graph/ "  #保存和加载路径
save_image : 0                   # 将图像保存在姿势图中,以便可视化;您可以通过设置0来关闭此功能
上面的参数可以套用,但是时间长了还是会飘走,建议有条件还是标定一下相机吧,相机参数文件标定参考Ubuntu 18.04 ———(Intel RealSense D435i)标定后结果用于VINS-Fusion_@曾记否的博客-CSDN博客
注意修改显示image-track
show_track = 1 # 将跟踪图像发布为主题
修改开启回环检测:
save_image: 1 # 将图像保存在姿势图中,以便可视化;您可以通过设置0来关闭此功能
3.修改内参
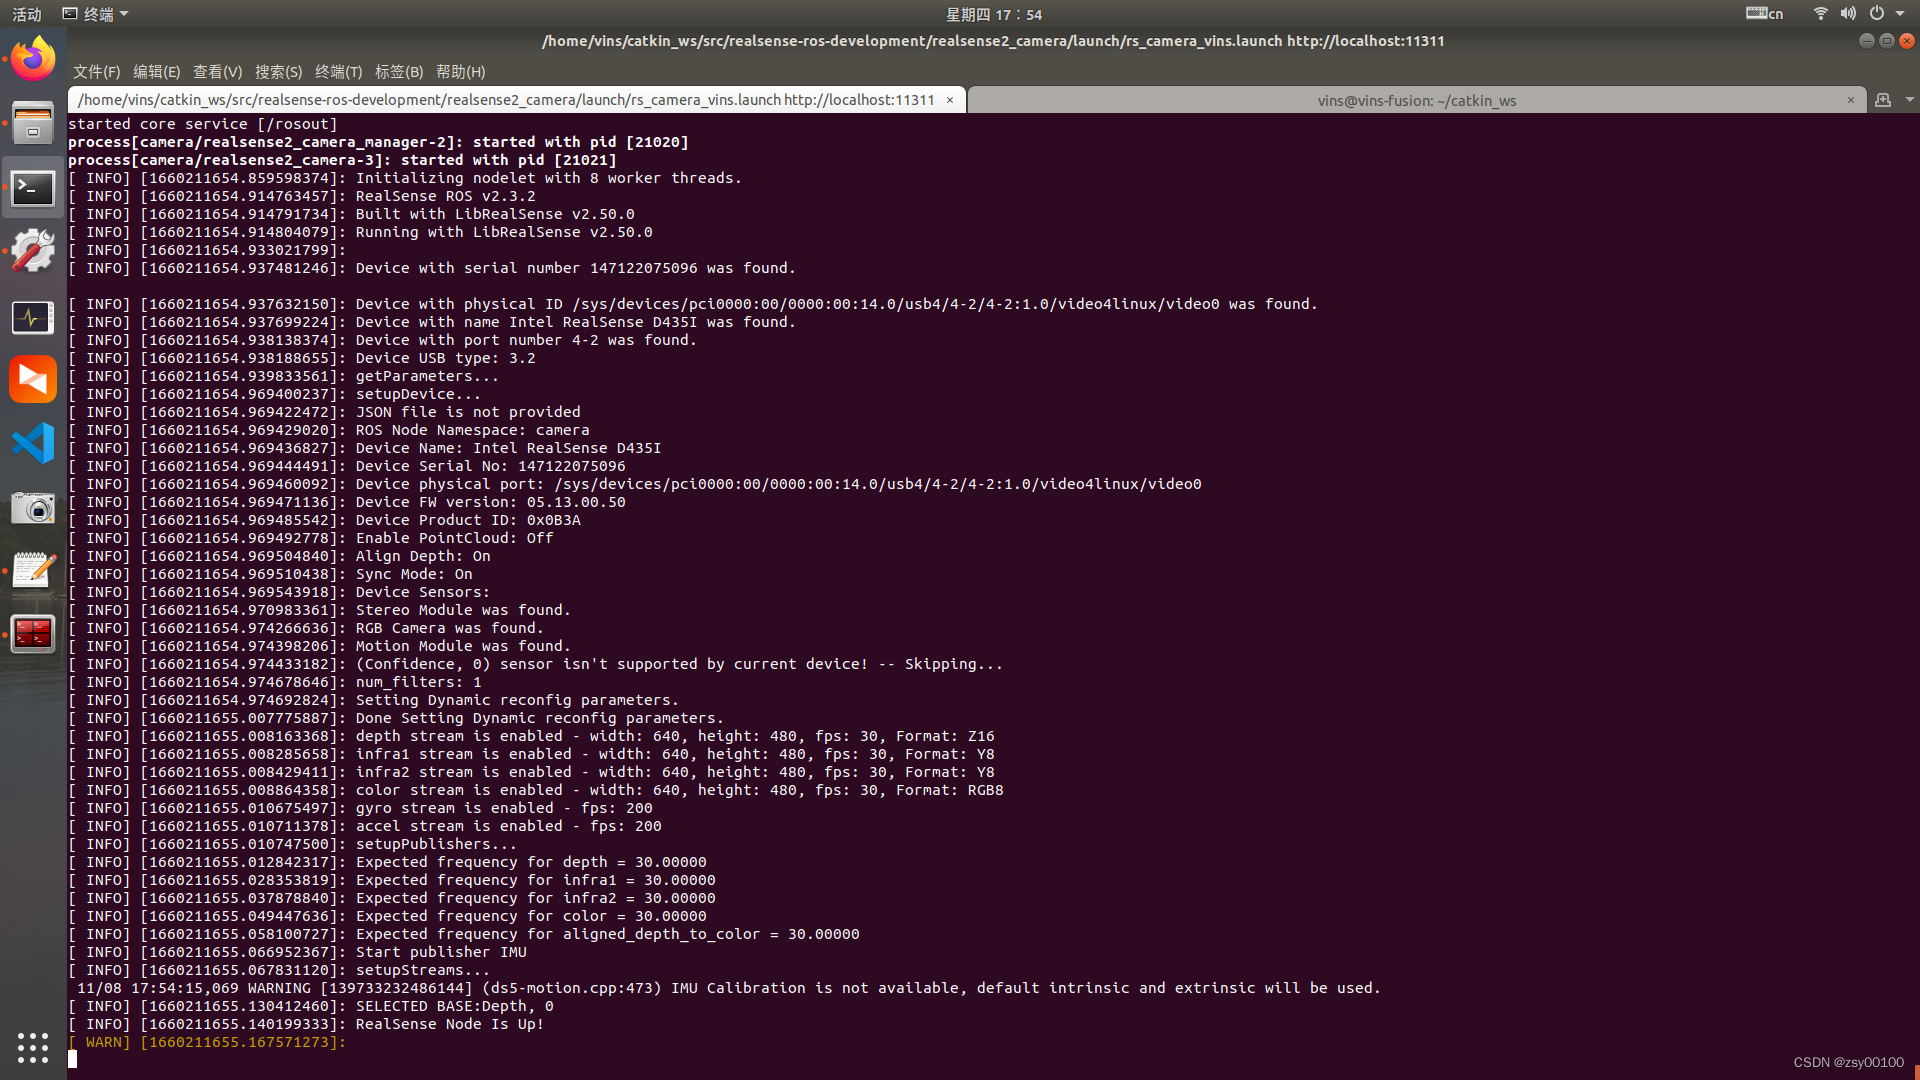
首先启动相机
roslaunch realsense2_camera rs_camera_vins.launch
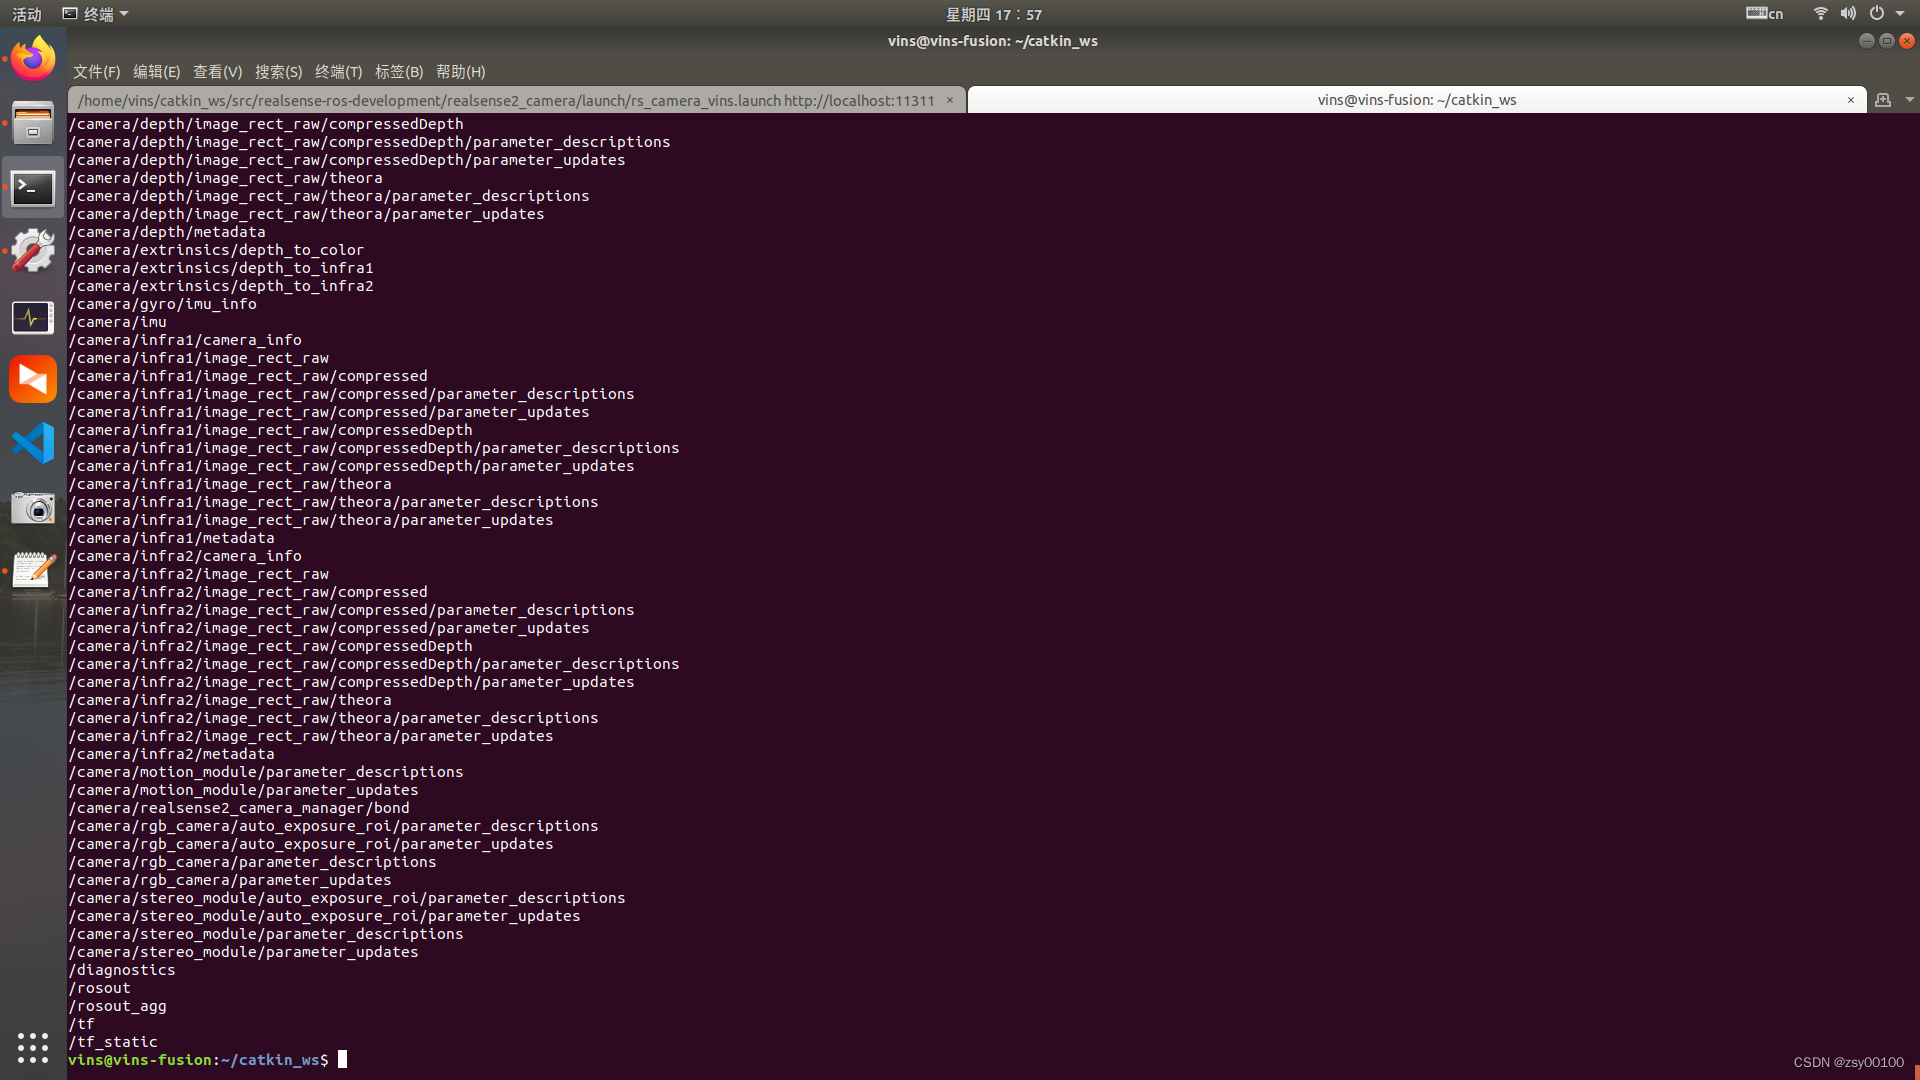
查看相机话题
rostopic list
/camera/depth/camera_info为深度相机的参数话题
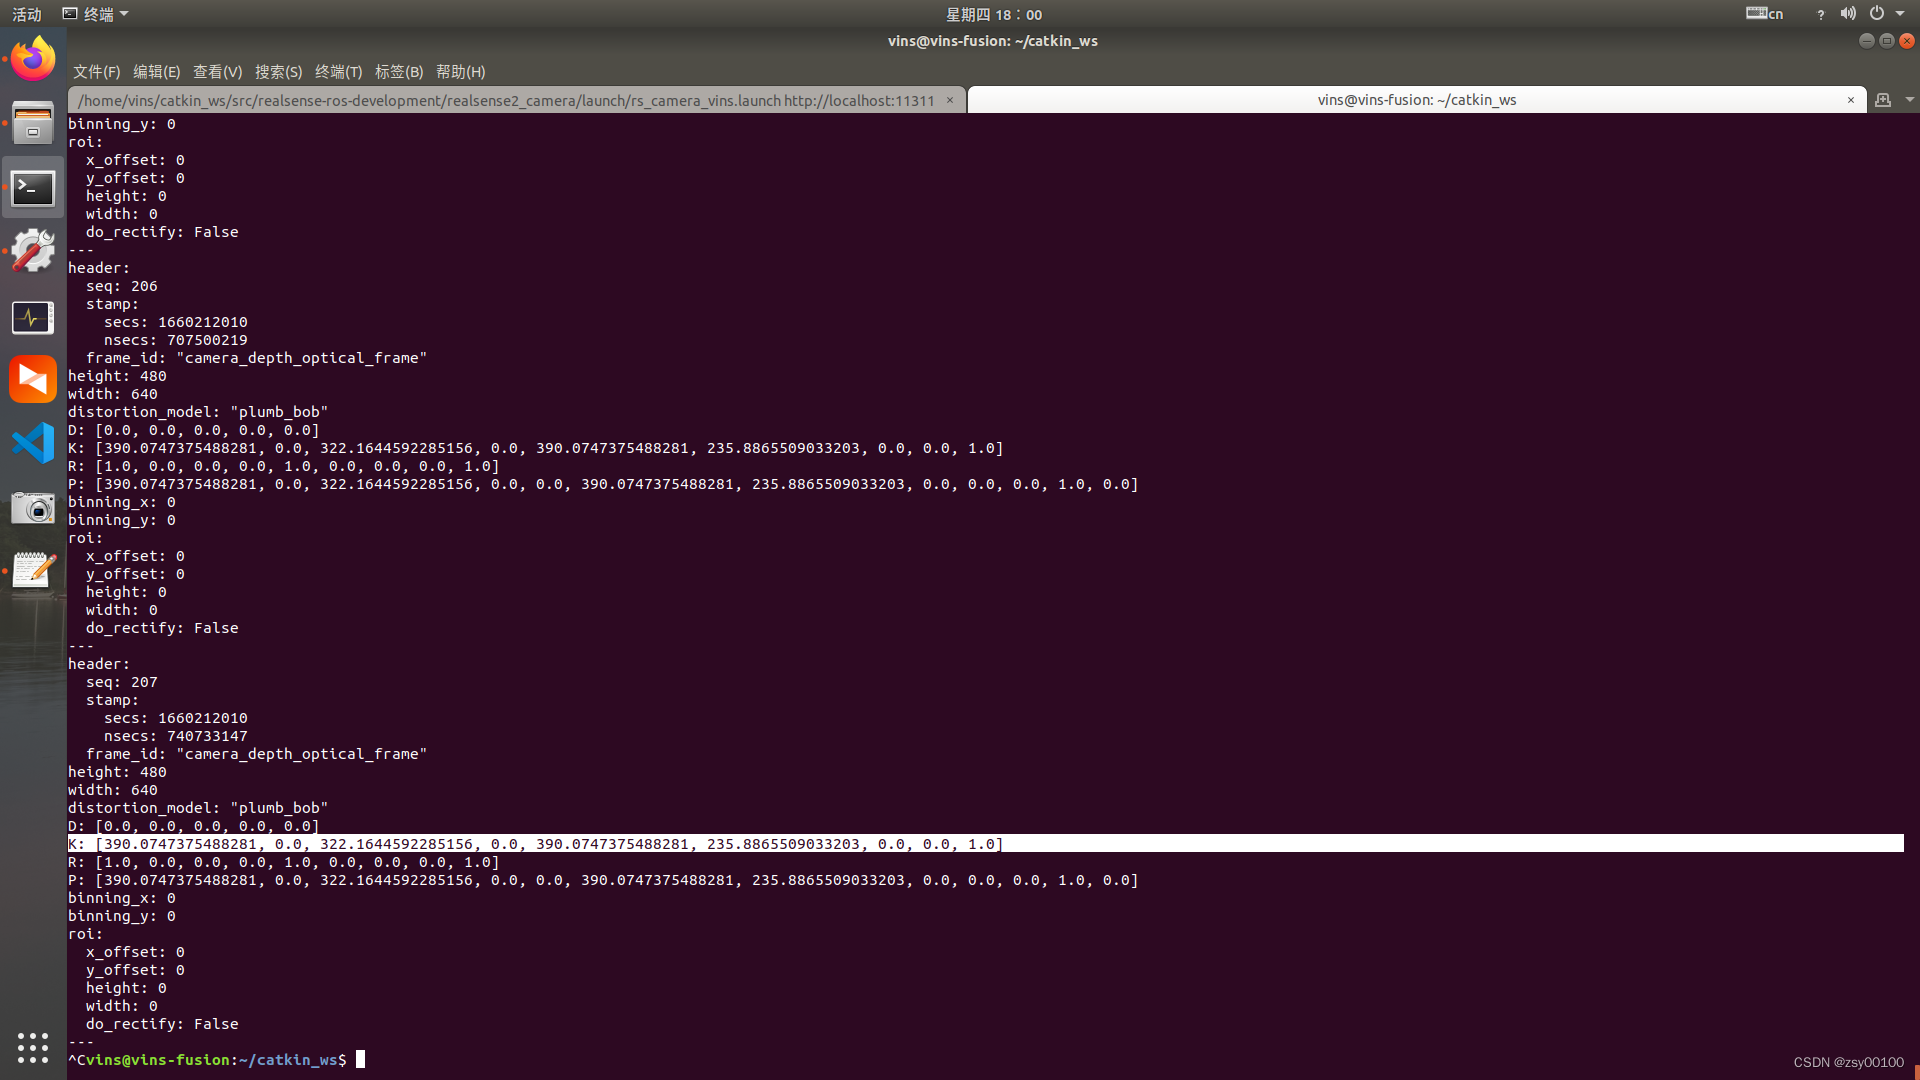
rostopic echo /camera/depth/camera_info
其中
K: [390.0747375488281, 0.0, 322.1644592285156, 0.0, 390.0747375488281, 235.8865509033203, 0.0, 0.0, 1.0]为相机内参,每个相机内参都不一样,别无脑复制别人的,不然模型效果很差。
390.0747375488281为fx
390.0747375488281为fy
322.1644592285156为cx
235.8865509033203为cy
复制后修改~/catkin_ws/src/VINS-Fusion-master/config/realsense_d435i 目录下的
left.yaml和right.yaml参数一样
三,使用Vins-fusion建立Octomap
1.链接D435i启动vins连接相机
roslaunch realsense2_camera rs_camera_vins.launch 2.连接相机参数
rosrun vins vins_node ~/catkin_ws/src/VINS-Fusion-master/config/realsense_d435i/realsense_stereo_imu_config.yaml3.开启回环检测
rosrun loop_fusion loop_fusion_node ~/catkin_ws/src/VINS-Fusion-master/config/realsense_d435i/realsense_stereo_imu_config.yaml4.启动vins rviz
roslaunch vins vins_rviz.launch
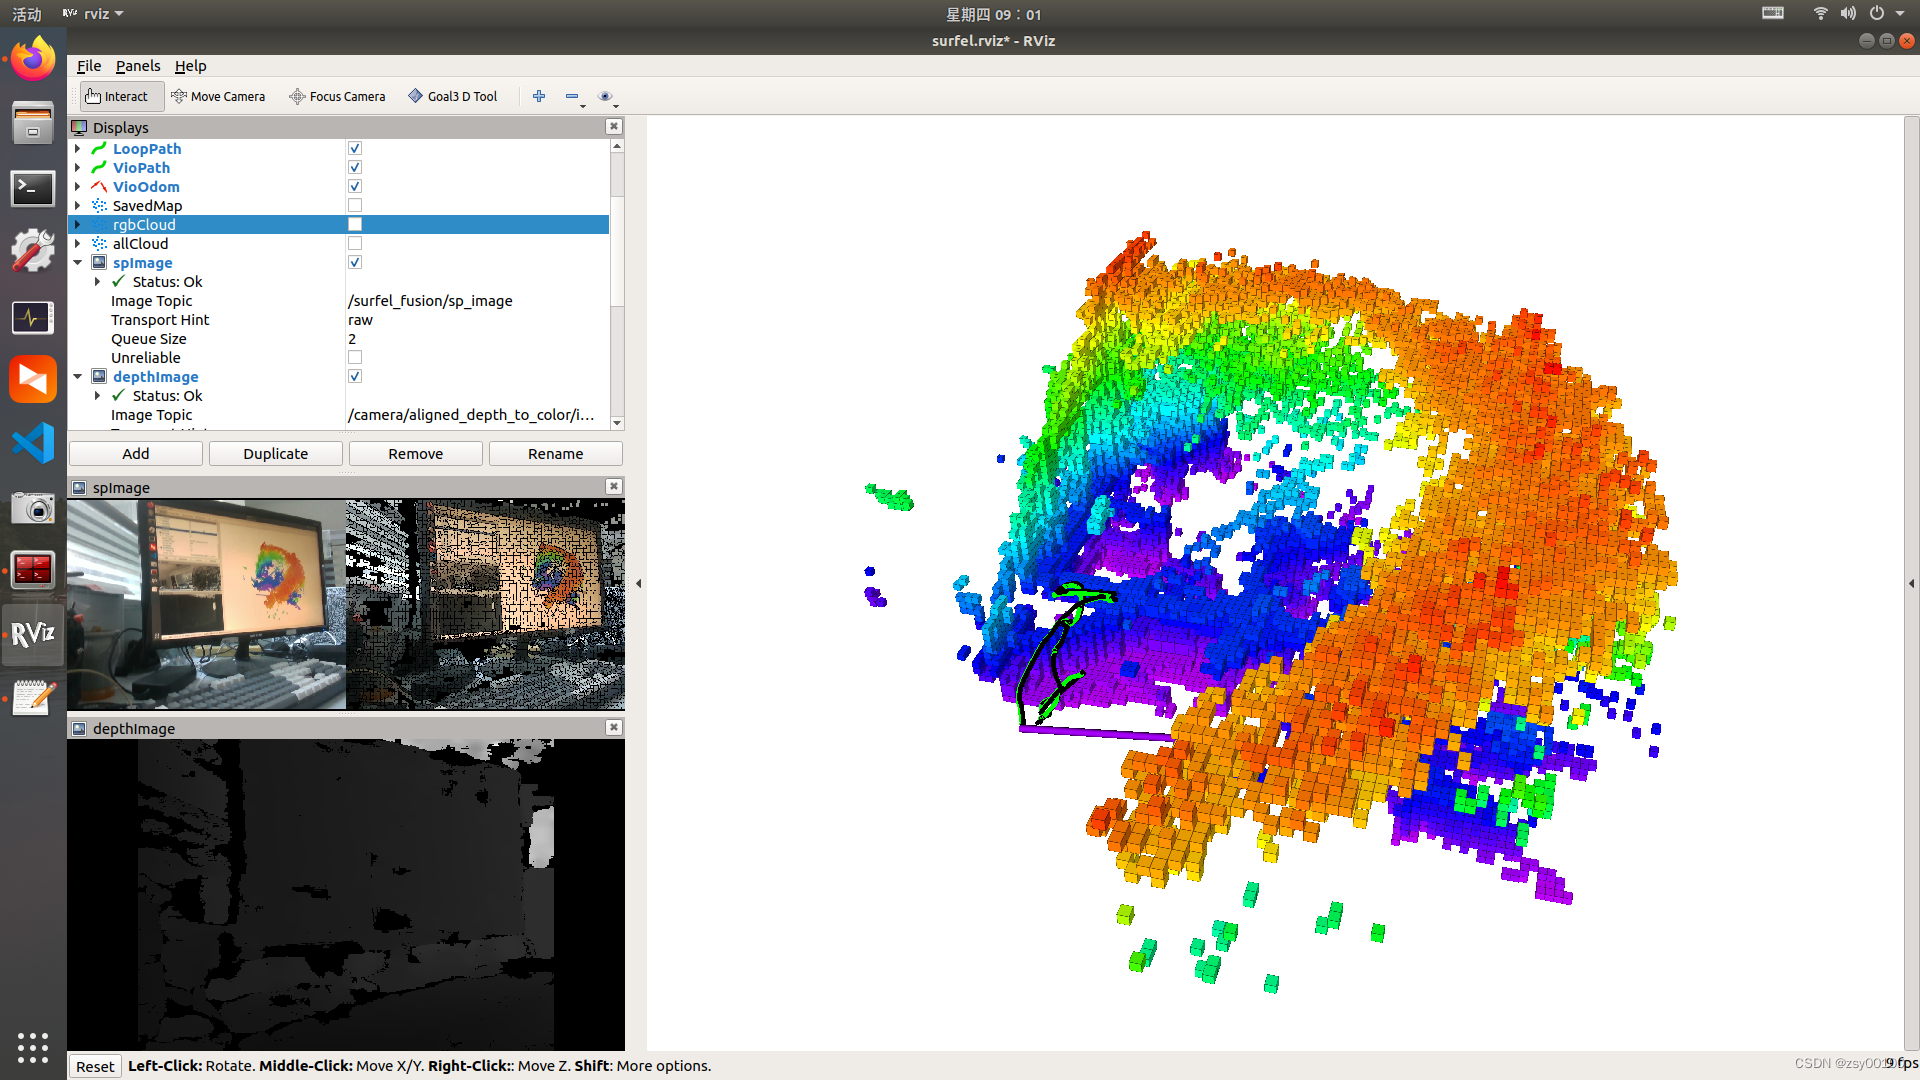
vins生成的点云如图所示,可以查一下生成点云的话题名
rostopic list
可以看到vins和相机发布的话题,其中的/vins_estimator/point_cloud即是我们需要的点云话题。但是由于我们使用的点云转octomap需要的是pointcloud2,所以我们需要先把pointcloud转换为pointcloud2。发布pointcloud2的源码地址GitHub - 1332927388/pcl2octomap
cd ~/catkin_ws/src
git clone https://github.com/1332927388/pcl2octomap.git
cd ~/catkin_ws && catkin_make
point_cloud_converter.launch的内容为
<launch>
	<node pkg="point_cloud_converter" name="point_cloud_converter" type="point_cloud_converter_node" >
		<remap from="points_in" to="/vins_estimator/point_cloud"/>
		<remap from="points2_out" to="/points" />
	</node>
</launch>
作用是将pointcloud转换为pointcloud2。
编辑:~/catkin_ws/src/octomap_mapping-kinetic-devel/octomap_server/launch 中的octomap_mapping.launch,将两个launch文件合二为一
<!--
  Example launch file for octomap_server mapping:
  Listens to incoming PointCloud2 data and incrementally builds an octomap.
  The data is sent out in different representations.

  Copy this file into your workspace and adjust as needed, see
  www.ros.org/wiki/octomap_server for details
-->
<launch>
	<node pkg="point_cloud_converter" name="point_cloud_converter" type="point_cloud_converter_node" >
		<remap from="points_in" to="/vins_estimator/point_cloud"/>
		<remap from="points2_out" to="/points" />
	</node>


	<node pkg="octomap_server" type="octomap_server_node" name="octomap_server">
		<param name="resolution" value="0.05" />

		<!-- fixed map frame (set to 'map' if SLAM or localization running!) -->
		<param name="frame_id" type="string" value="world" />

		<!-- maximum range to integrate (speedup!) -->
		<param name="sensor_model/max_range" value="5.0" />

		<!-- data source to integrate (PointCloud2) -->
		<remap from="cloud_in" to="points" />

	</node>
</launch>
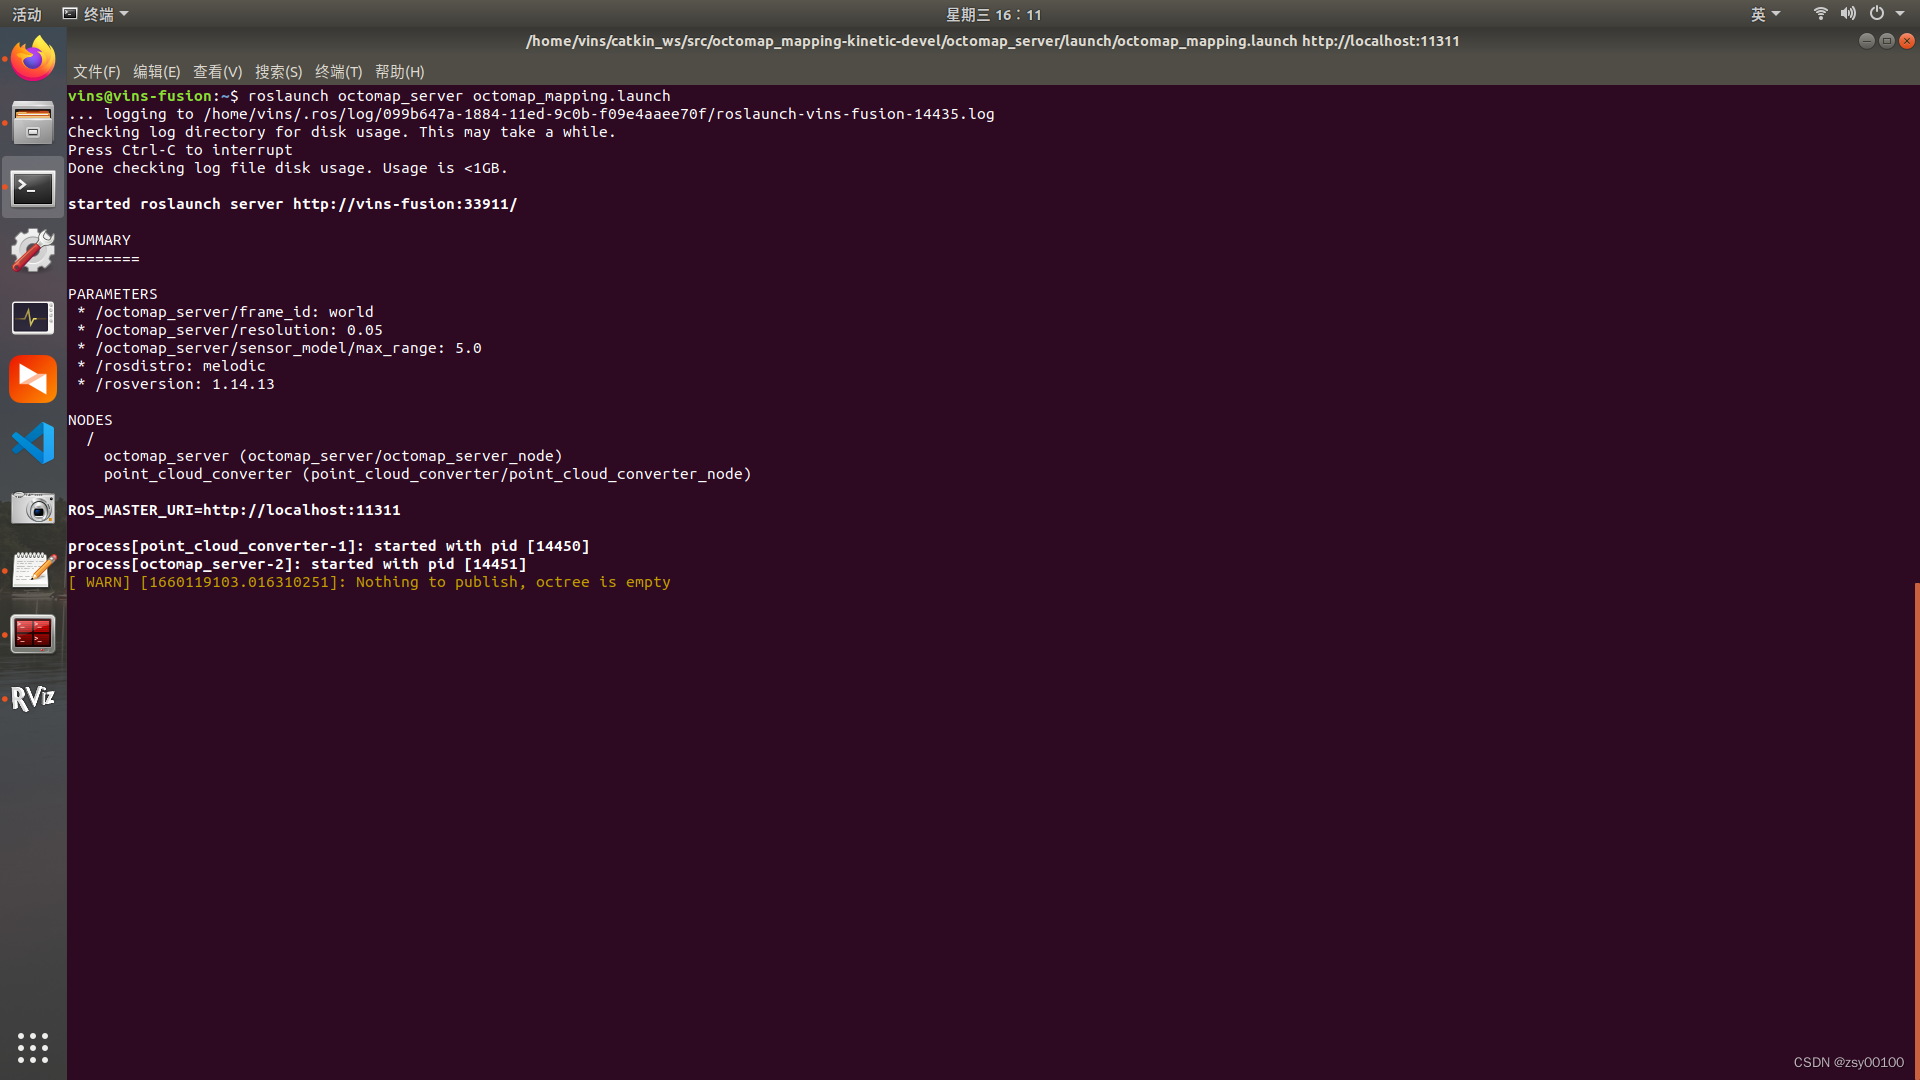
启动octomap_server
roslaunch octomap_server octomap_mapping.launch
rosrun octomap_server octomap_saver 2022.bt保存一个完整的概率八叉树地图:
rosrun octomap_server octomap_saver -f 2022.ot保存一个二维栅格地图:
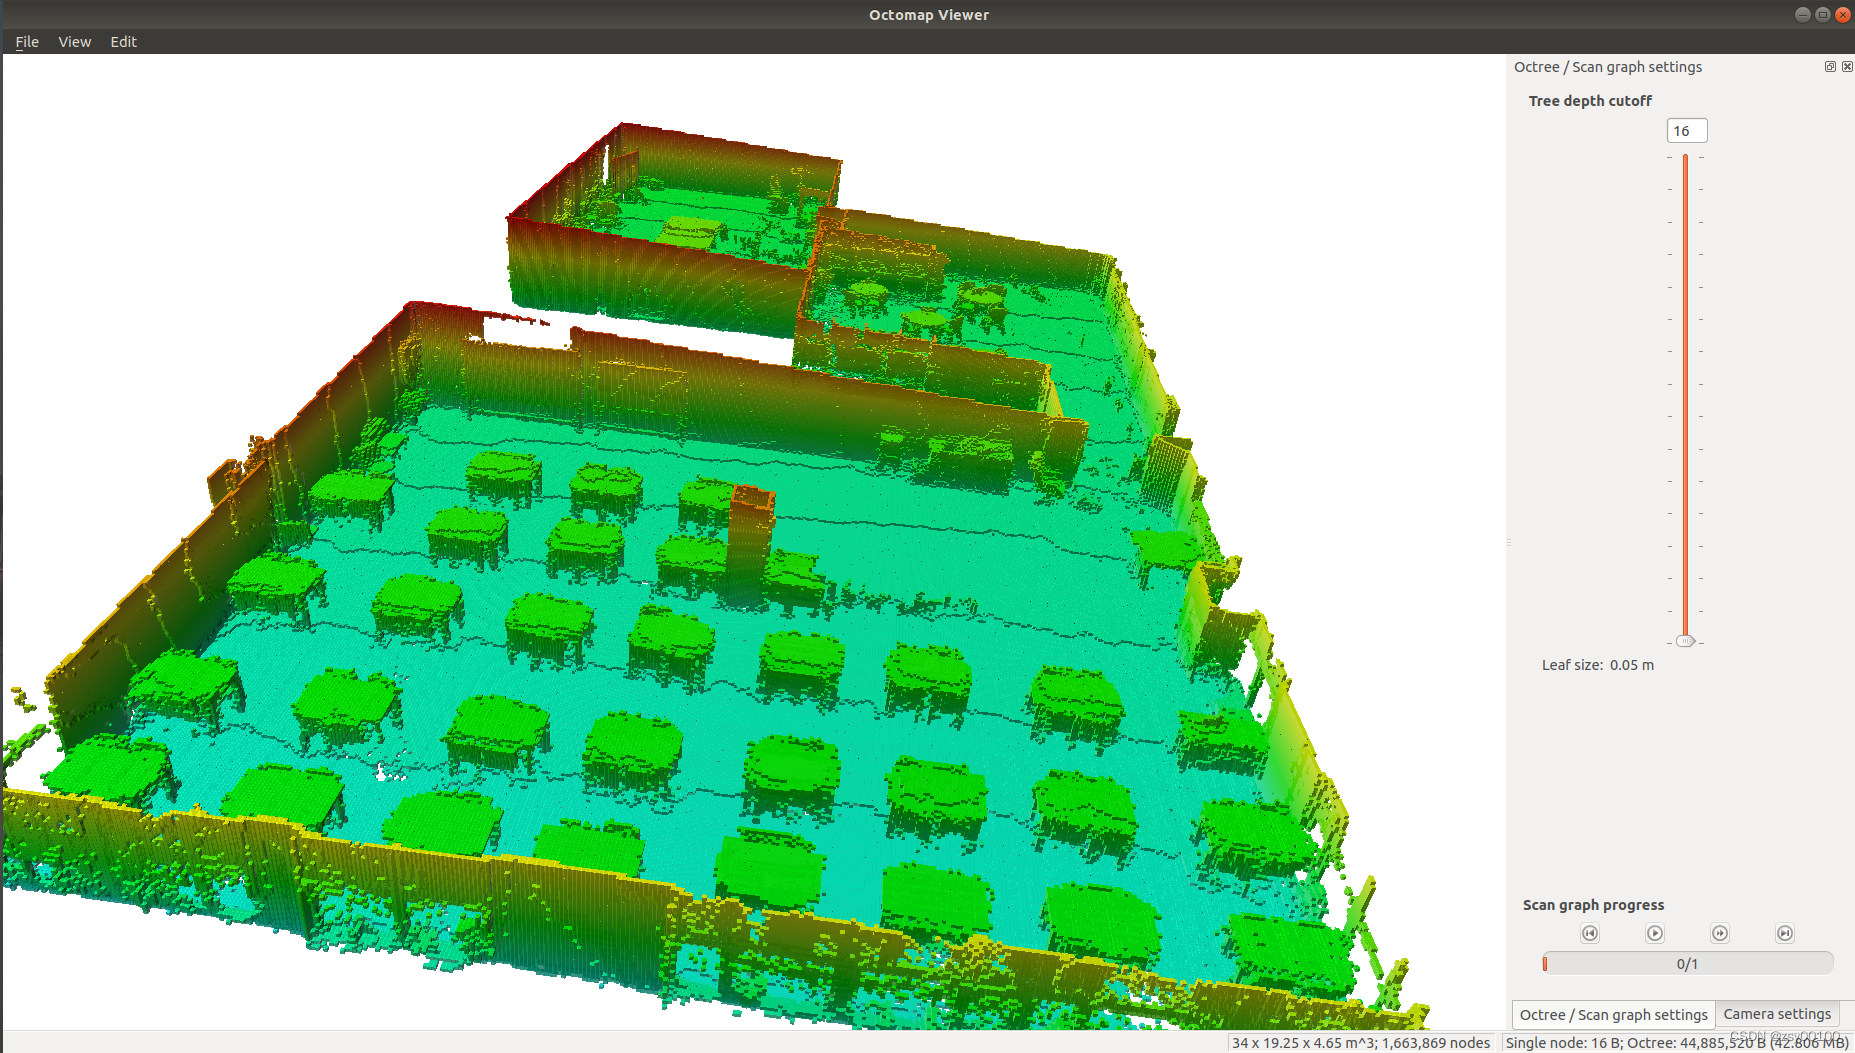
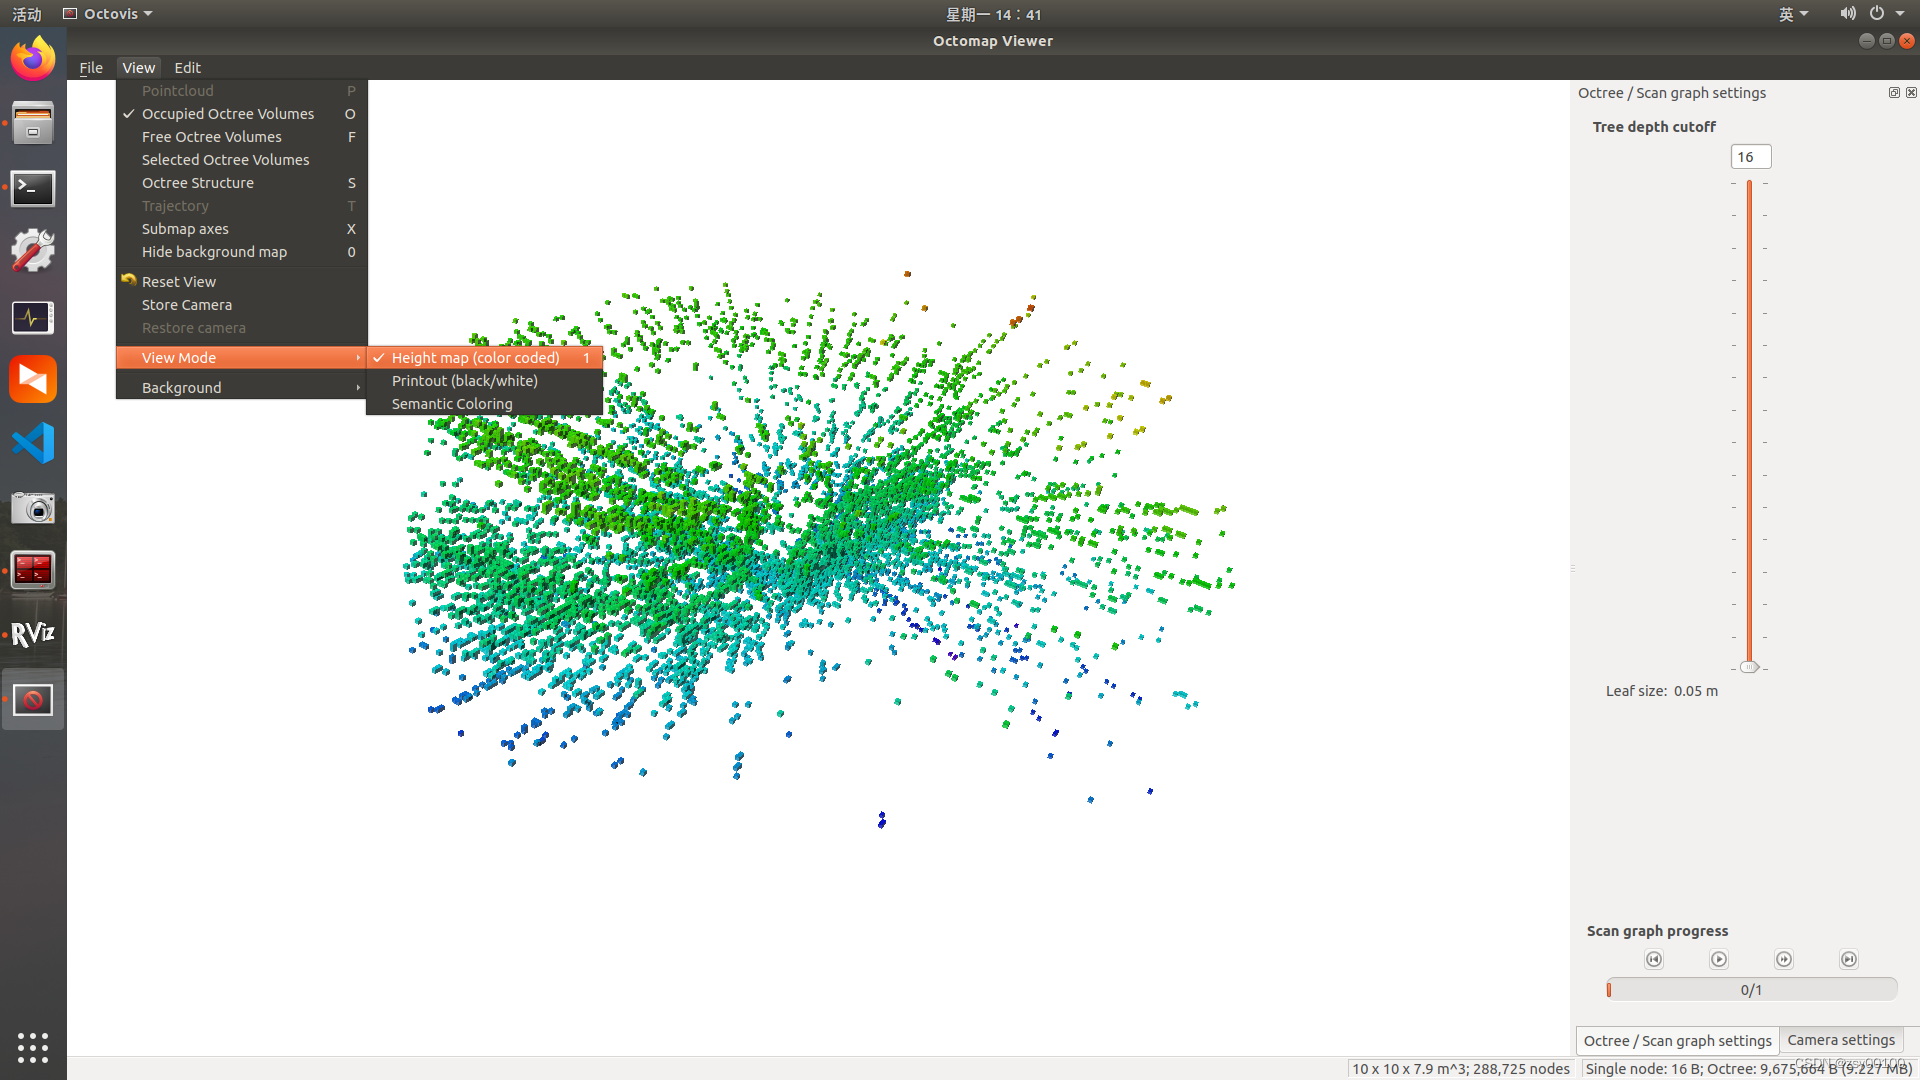
rosrun map_server map_server map:=/projected_map -f mapname安装Octovis可视化工具可以查看八叉树模型效果
sudo apt-get install octovis查看ocotmap.bt八叉树地图文件
octovis 2022.bt
可以按高程显示
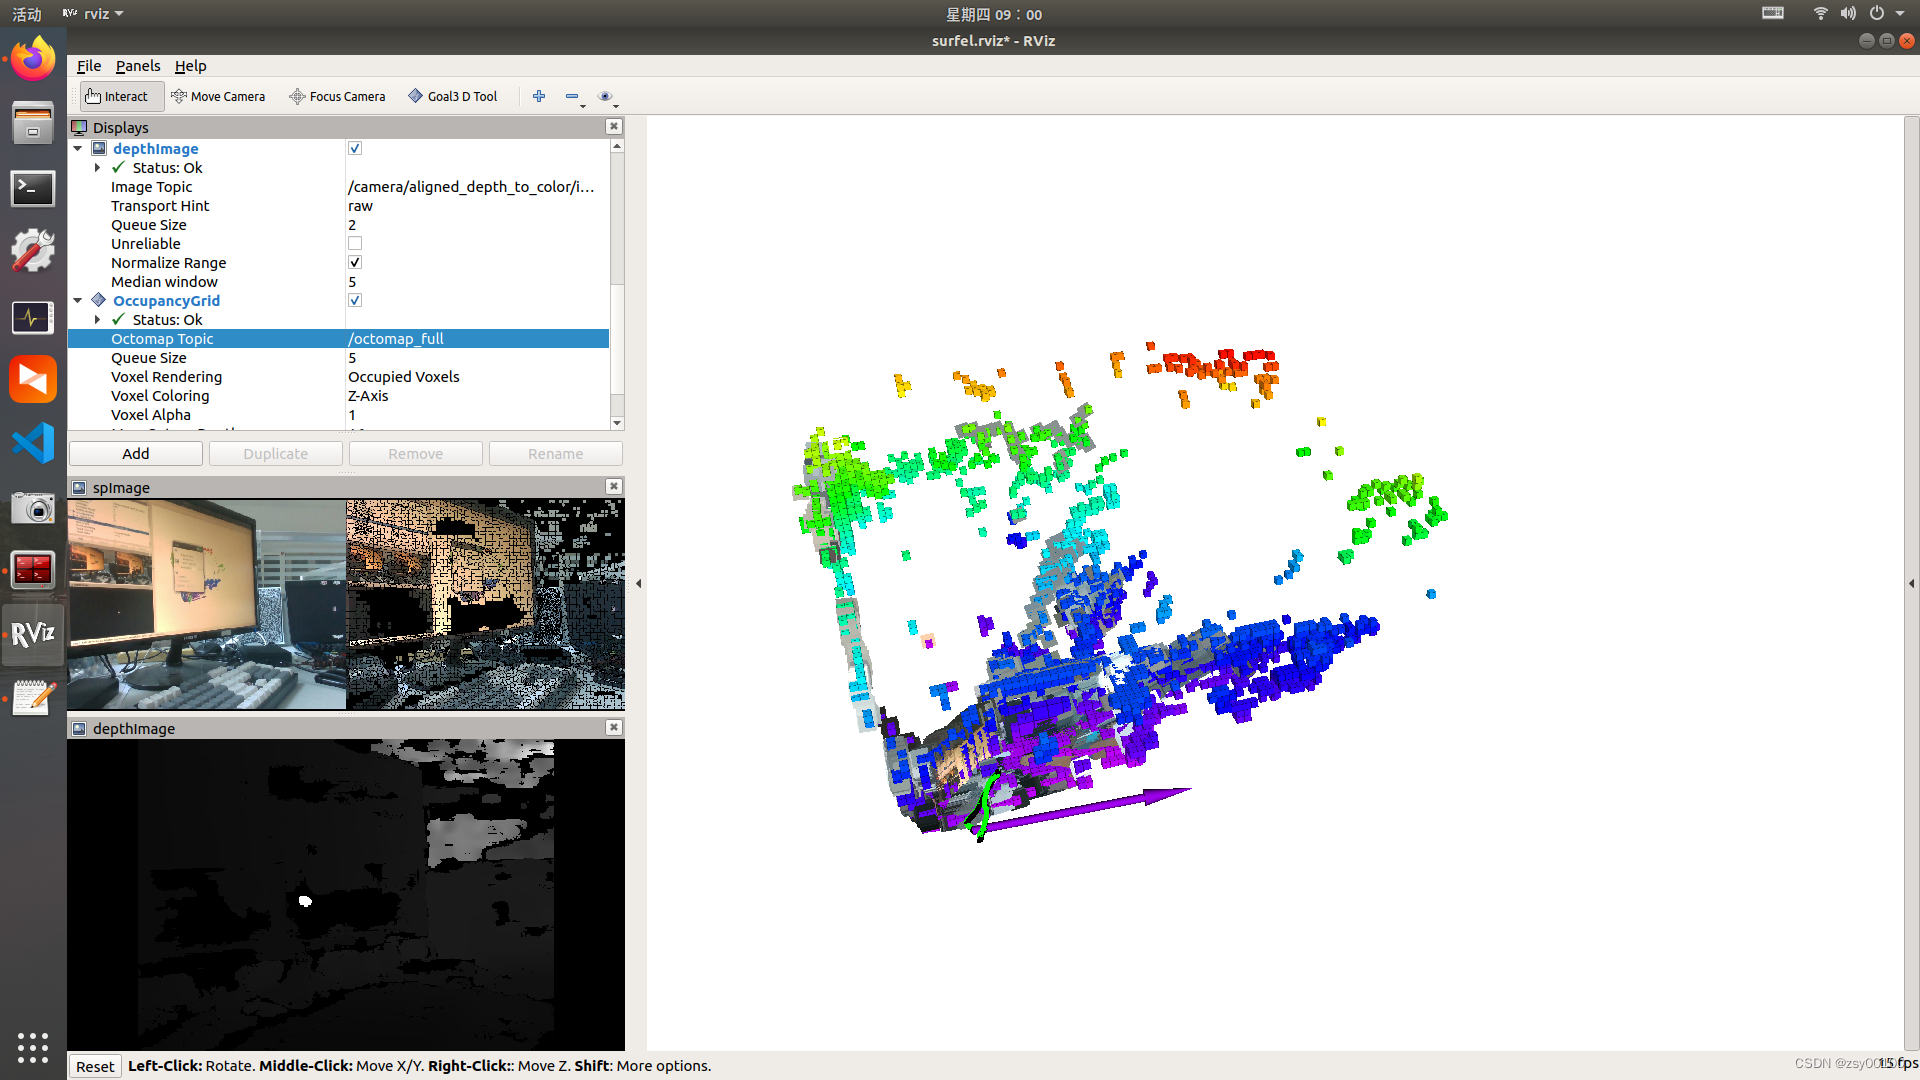
可以看到如果直接使用vins的点云转化八叉树模型,没有滤波效果还是很差,噪点会让空中也布满模型,导致转换的八叉树模型很杂乱,下面介绍另一种方法
四,使用 DenseSurfelMapping建立Octomap
源码地址:GitHub - HKUST-Aerial-Robotics/DenseSurfelMapping at VINS-supported
下载源码到工作空间,并使用catkin_make编译,和Vins-fusion步骤一样
cd ~/catkin_ws/src
git clone https://github.com/HKUST-Aerial-Robotics/DenseSurfelMapping/tree/VINS-supported
cd ..
catkin_make
1.然后链接D435i启动vins连接相机
roslaunch realsense2_camera rs_camera_vins.launch 2.连接相机参数
rosrun vins vins_node ~/catkin_ws/src/VINS-Fusion-master/config/realsense_d435i/realsense_stereo_imu_config.yaml3.开启回环检测
rosrun loop_fusion loop_fusion_node ~/catkin_ws/src/VINS-Fusion-master/config/realsense_d435i/realsense_stereo_imu_config.yaml4.启动 Surfel Fusion
roslaunch surfel_fusion vins_realsense.launch
拿起相机扫一扫周围,转一圈形成闭环,观察模型效果,是否错位,如果错位,调整相机参数。
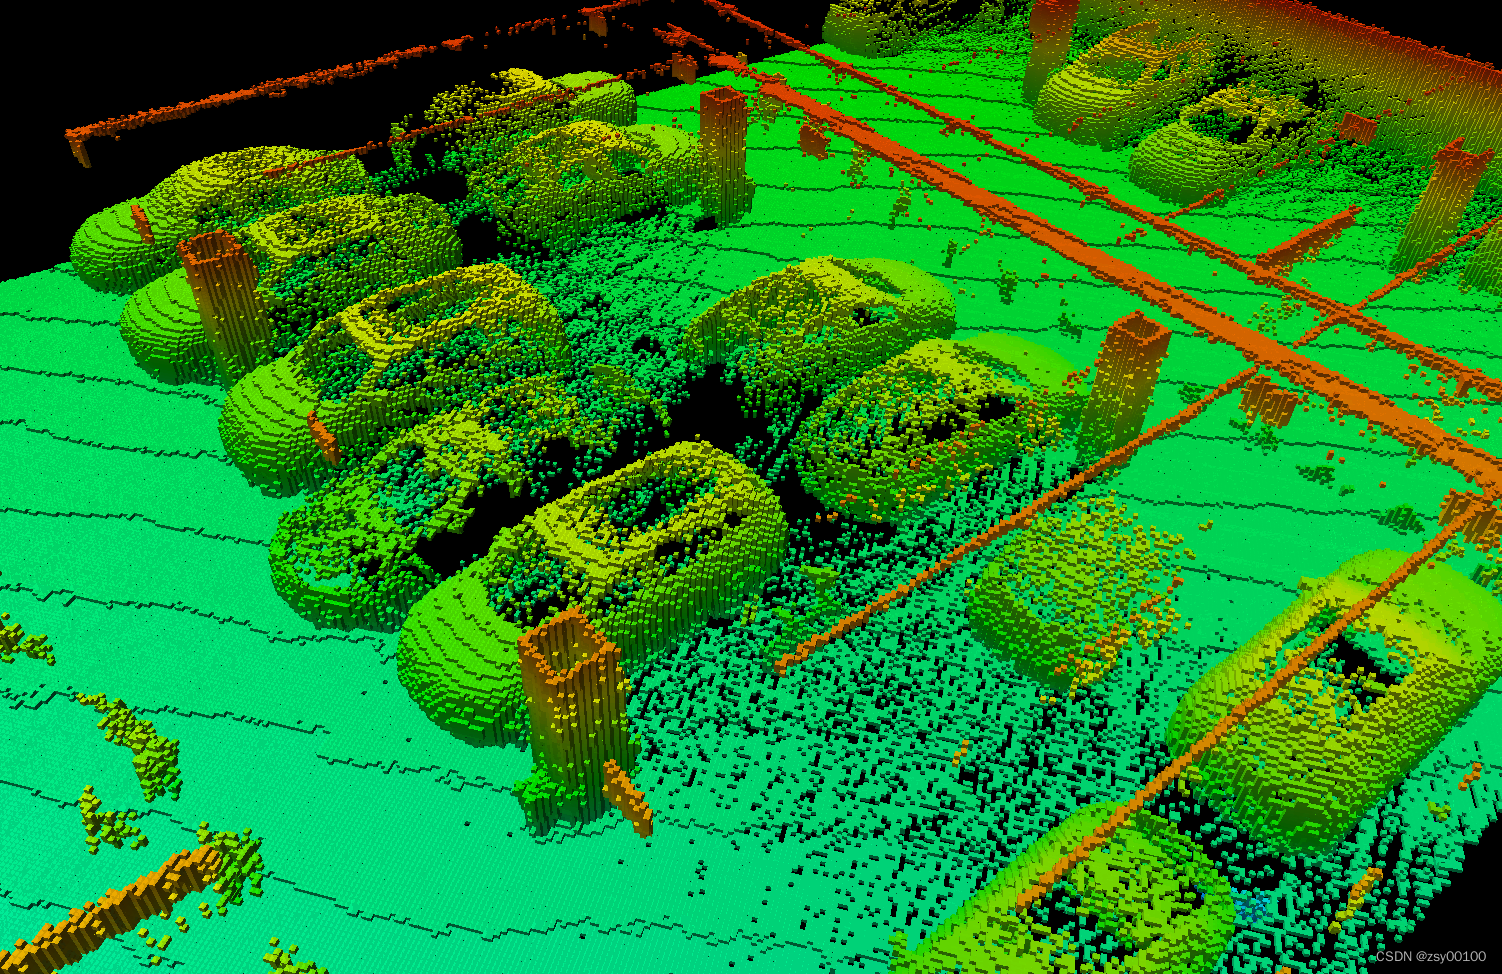
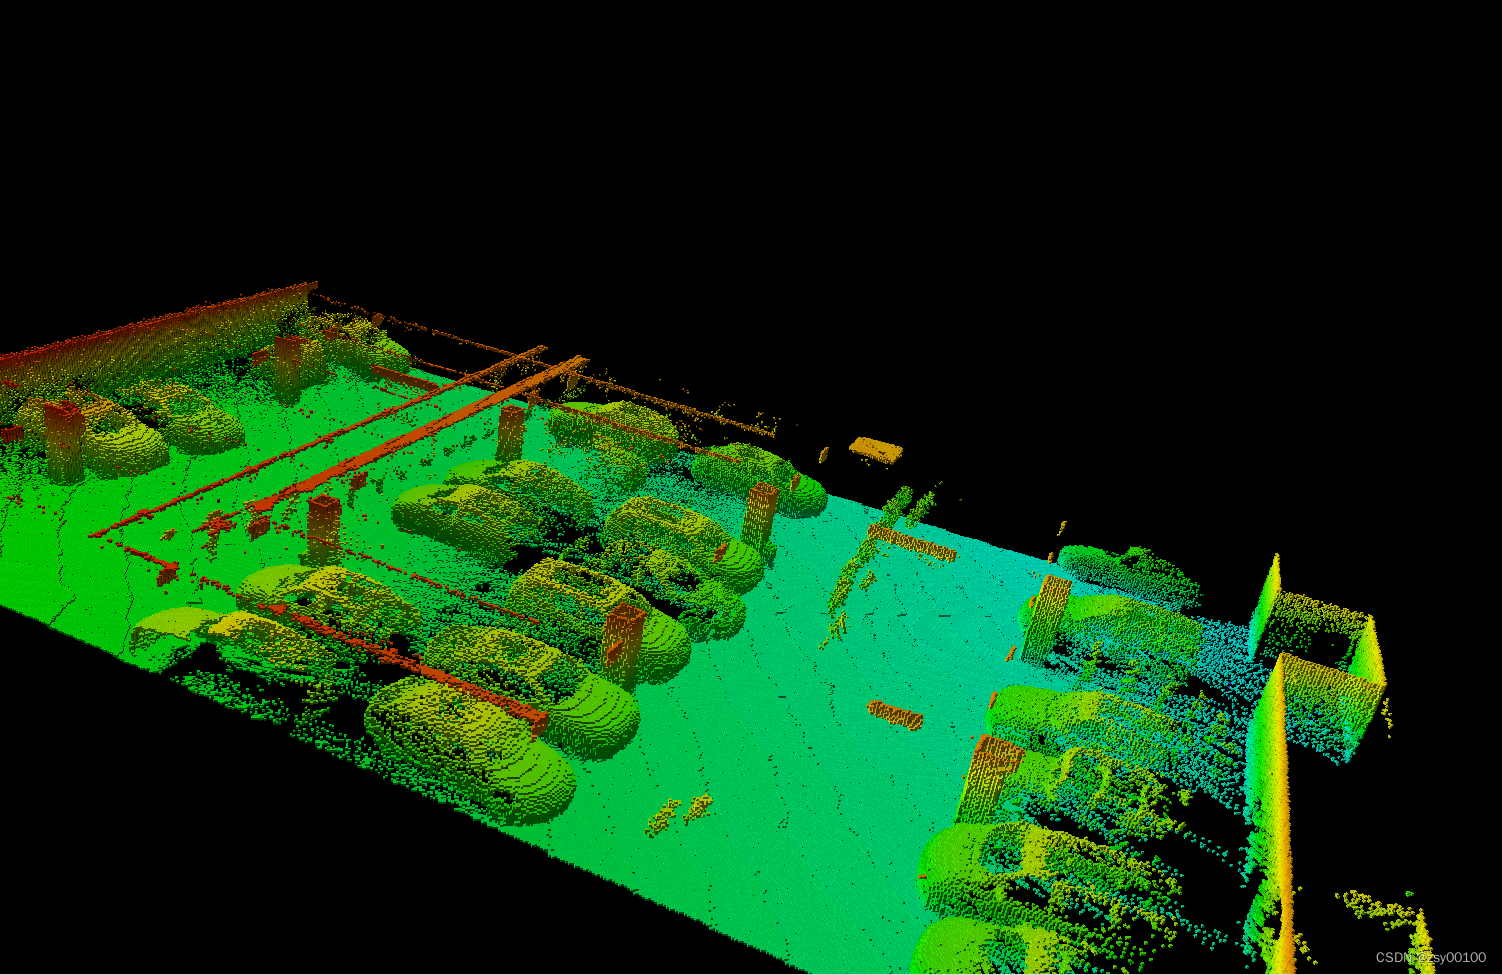
DenseSurfelMapping实时建图生成点云模型
数据来源:西安大地测绘股份有限公司
数据来源:西安大地测绘股份有限公司
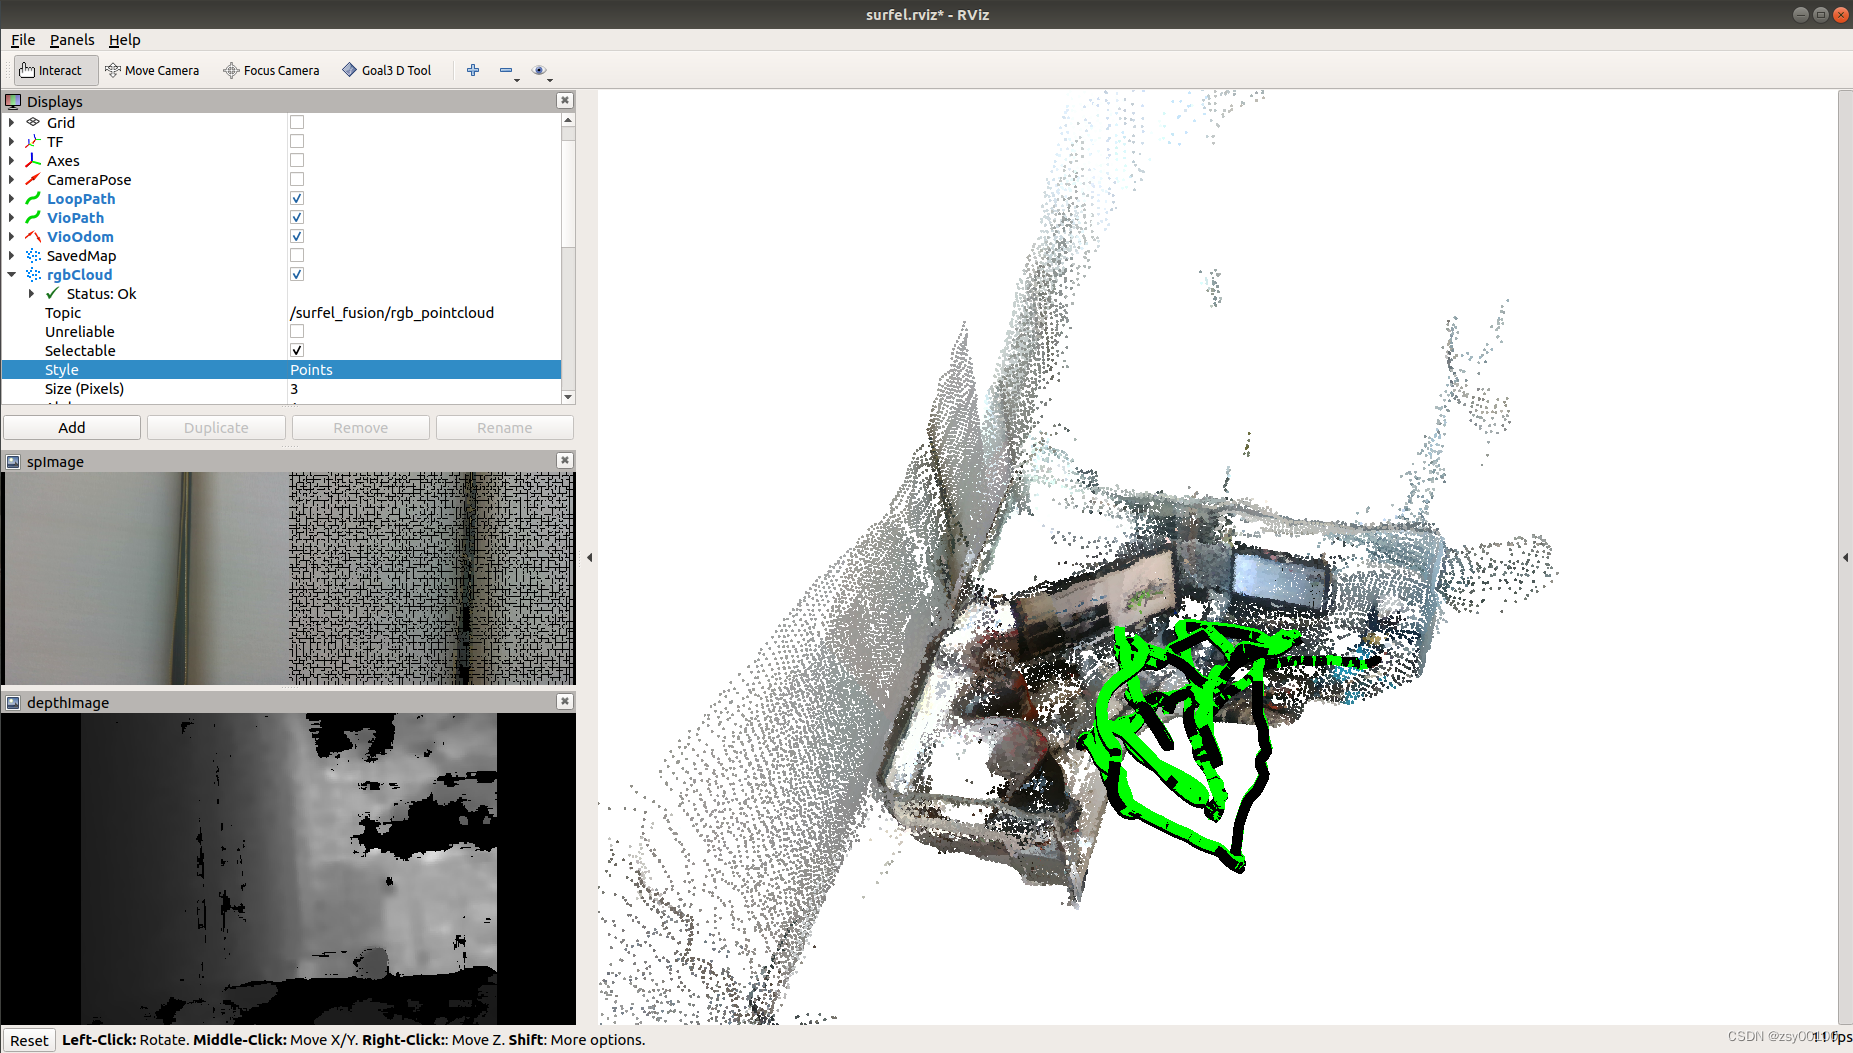
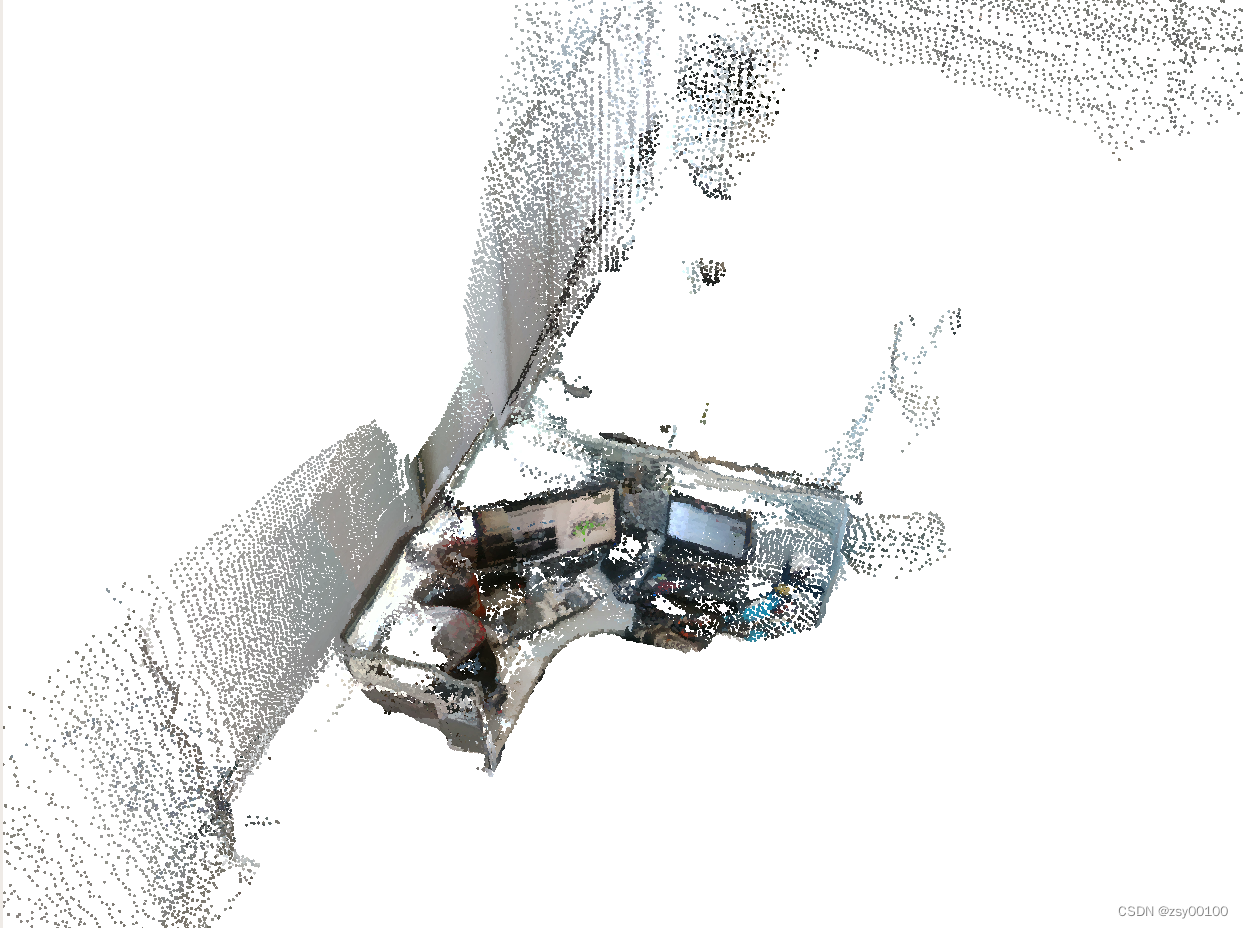
此生成彩色点云数据,topic为 /surfel_fusion/rgb_pointcloud
修改编辑:~/catkin_ws/src/octomap_mapping-kinetic-devel/octomap_server/launch 中的octomap_mapping.launch中的point
		<!-- data source to integrate (PointCloud2) -->
		<remap from="cloud_in" to="points" />
point改为/surfel_fusion/rgb_pointcloud
<!--
  Example launch file for octomap_server mapping:
  Listens to incoming PointCloud2 data and incrementally builds an octomap.
  The data is sent out in different representations.

  Copy this file into your workspace and adjust as needed, see
  www.ros.org/wiki/octomap_server for details
-->
<launch>
	<node pkg="point_cloud_converter" name="point_cloud_converter" type="point_cloud_converter_node" >
		<remap from="points_in" to="/vins_estimator/point_cloud"/>
		<remap from="points2_out" to="/points" />
	</node>


	<node pkg="octomap_server" type="octomap_server_node" name="octomap_server">
		<param name="resolution" value="0.05" />

		<!-- fixed map frame (set to 'map' if SLAM or localization running!) -->
		<param name="frame_id" type="string" value="world" />

		<!-- maximum range to integrate (speedup!) -->
		<param name="sensor_model/max_range" value="5.0" />

		<!-- data source to integrate (PointCloud2) -->
		<remap from="cloud_in" to="/surfel_fusion/rgb_pointcloud" />

	</node>
</launch>
5.运行Octomap
roslaunch octomap_server octomap_mapping.launch
数据来源:西安大地测绘股份有限公司
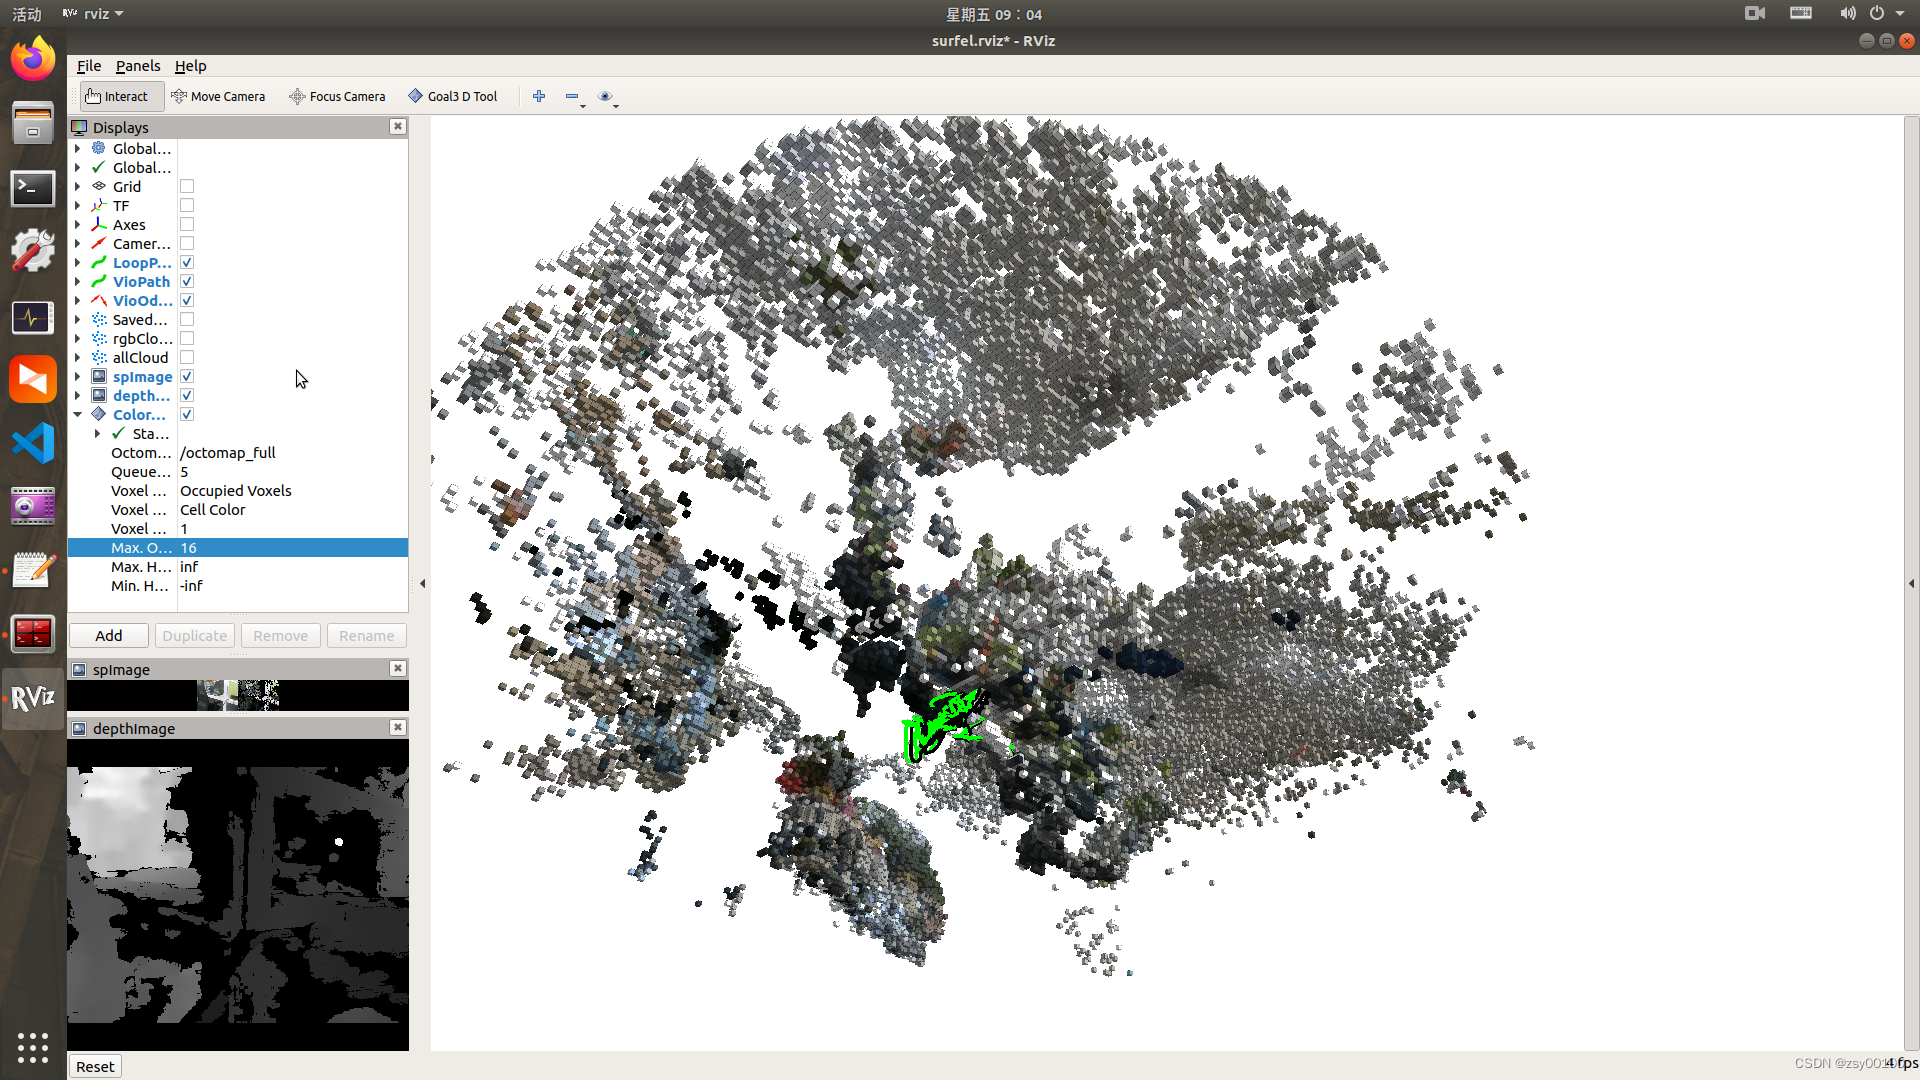
栅格模型和彩色点云数据一起显示,如果觉得卡的话可以只显示栅格模型
数据来源:西安大地测绘股份有限公司
6.同样,可以使用命令保存二进制成果
rosrun octomap_server octomap_saver 2022.bt
数据来源:西安大地测绘股份有限公司
数据来源:西安大地测绘股份有限公司
数据来源:西安大地测绘股份有限公司
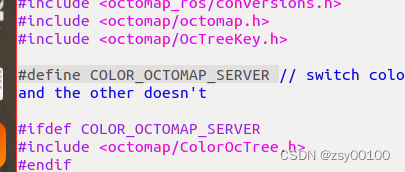
默认编译的 octomap 不能显示颜色,要开启颜色的支持,需要 2 个步骤,第一步编辑 OctomapServer.h 文件:
vim octomap_mapping/octomap_server/include/octomap_server/OctomapServer.h打开下面 COLOR_OCTOMAP_SERVER 的注释即可:
然后重新编译一遍源码:
catkin_make第二步是在 launch 文件中禁用 height_map,启用 colored_map
<param name = "height_map" value = "false" />
<param name = "colored_map" value = "true" />
不如从新创建一个launch文件吧,命名为octomap_mapping222.launch,内容如下:
<!--
  octomap_server映射的启动文件示例:
侦听传入的PointCloud2数据,并增量构建一个八进制映射。
数据以不同的表示形式发送。
将此文件复制到工作区并根据需要进行调整,请参见
网址:www.ros。org/wiki/octomap_server了解详细信息
-->
<launch>
	<node pkg="point_cloud_converter" name="point_cloud_converter" type="point_cloud_converter_node" >
		<remap from="points_in" to="/vins_estimator/point_cloud"/>
		<remap from="points2_out" to="/points" />
	</node>


	<node pkg="octomap_server" type="octomap_server_node" name="octomap_server">
		<!--从空地图开始时,地图的分辨率(以米为单位)。否则将使用加载的文件的分辨率-->
		<param name="resolution" value="0.05" />

		<!--固定地图框架(如果运行SLAM或本地化,则设置为“地图”!)-->
		<param name="frame_id" type="string" value="world" />

		<!--禁用高度模式,开启颜色模式-->
		<param name="height_map"  value="false" />
		<param name="colored_map"  value="true" />

		<!-- 动态构建地图时用于插入点云数据的最大范围(以米为单位),将范围限制在有用的范围内(例如 5m)可以防止虚假的错误点。-->
		<param name="sensor_model/max_range" value="5.0" />

		<!-- 要集成的数据源(PointCloud2) -->
		<remap from="/cloud_in" to="/surfel_fusion/rgb_pointcloud" />

	</node>
</launch>
然后再次按顺序启动
1.链接D435i启动vins连接相机
2.连接相机参数
3.开启回环检测
4.启动 Surfel Fusion
5.运行Octomap
roslaunch octomap_server octomap_mapping222.launch
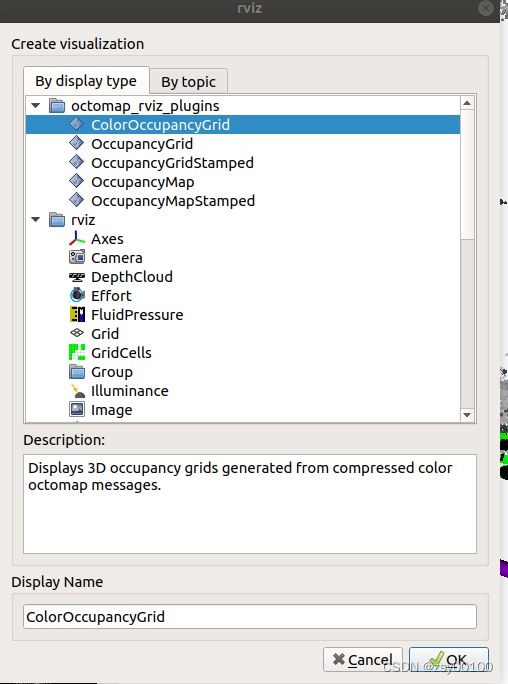
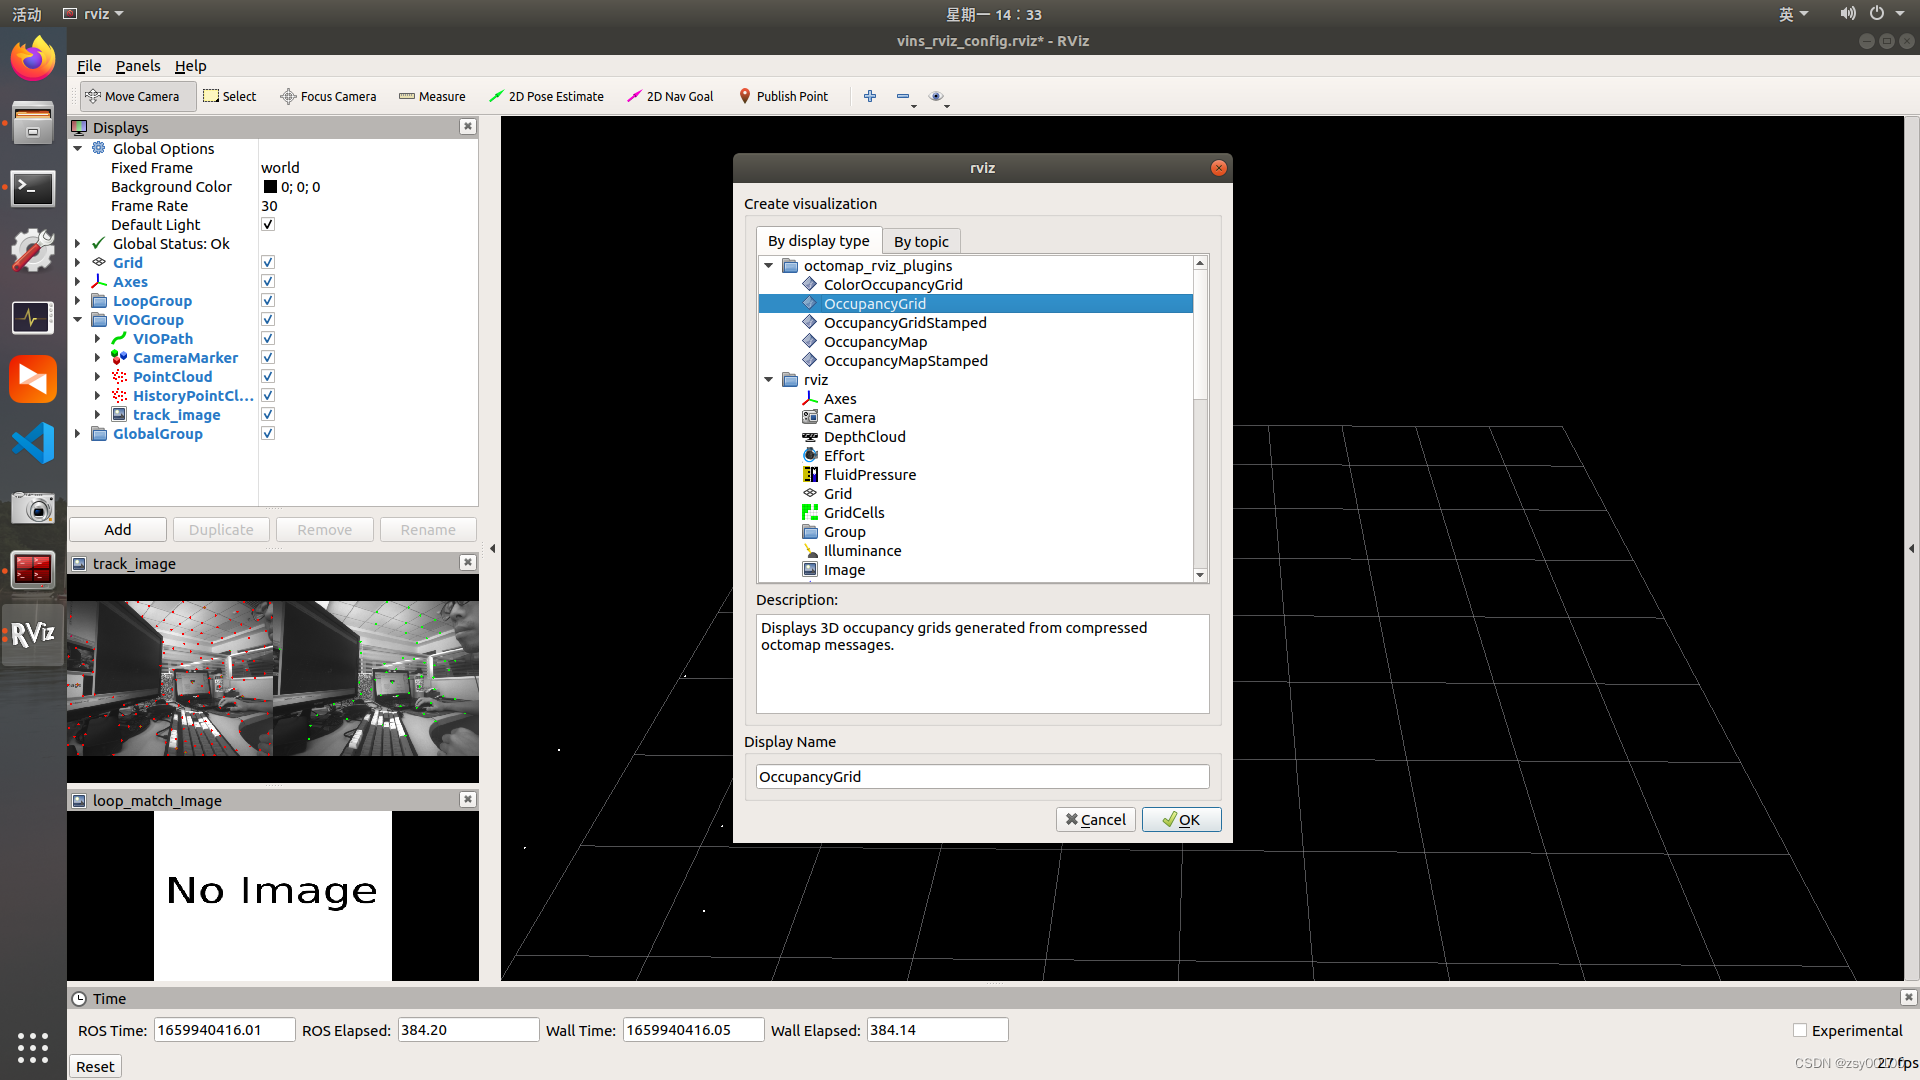
Rviz启动后,直接添加一个八叉树占用网格的类型,第一个是带颜色的类型,第二个不带颜色:
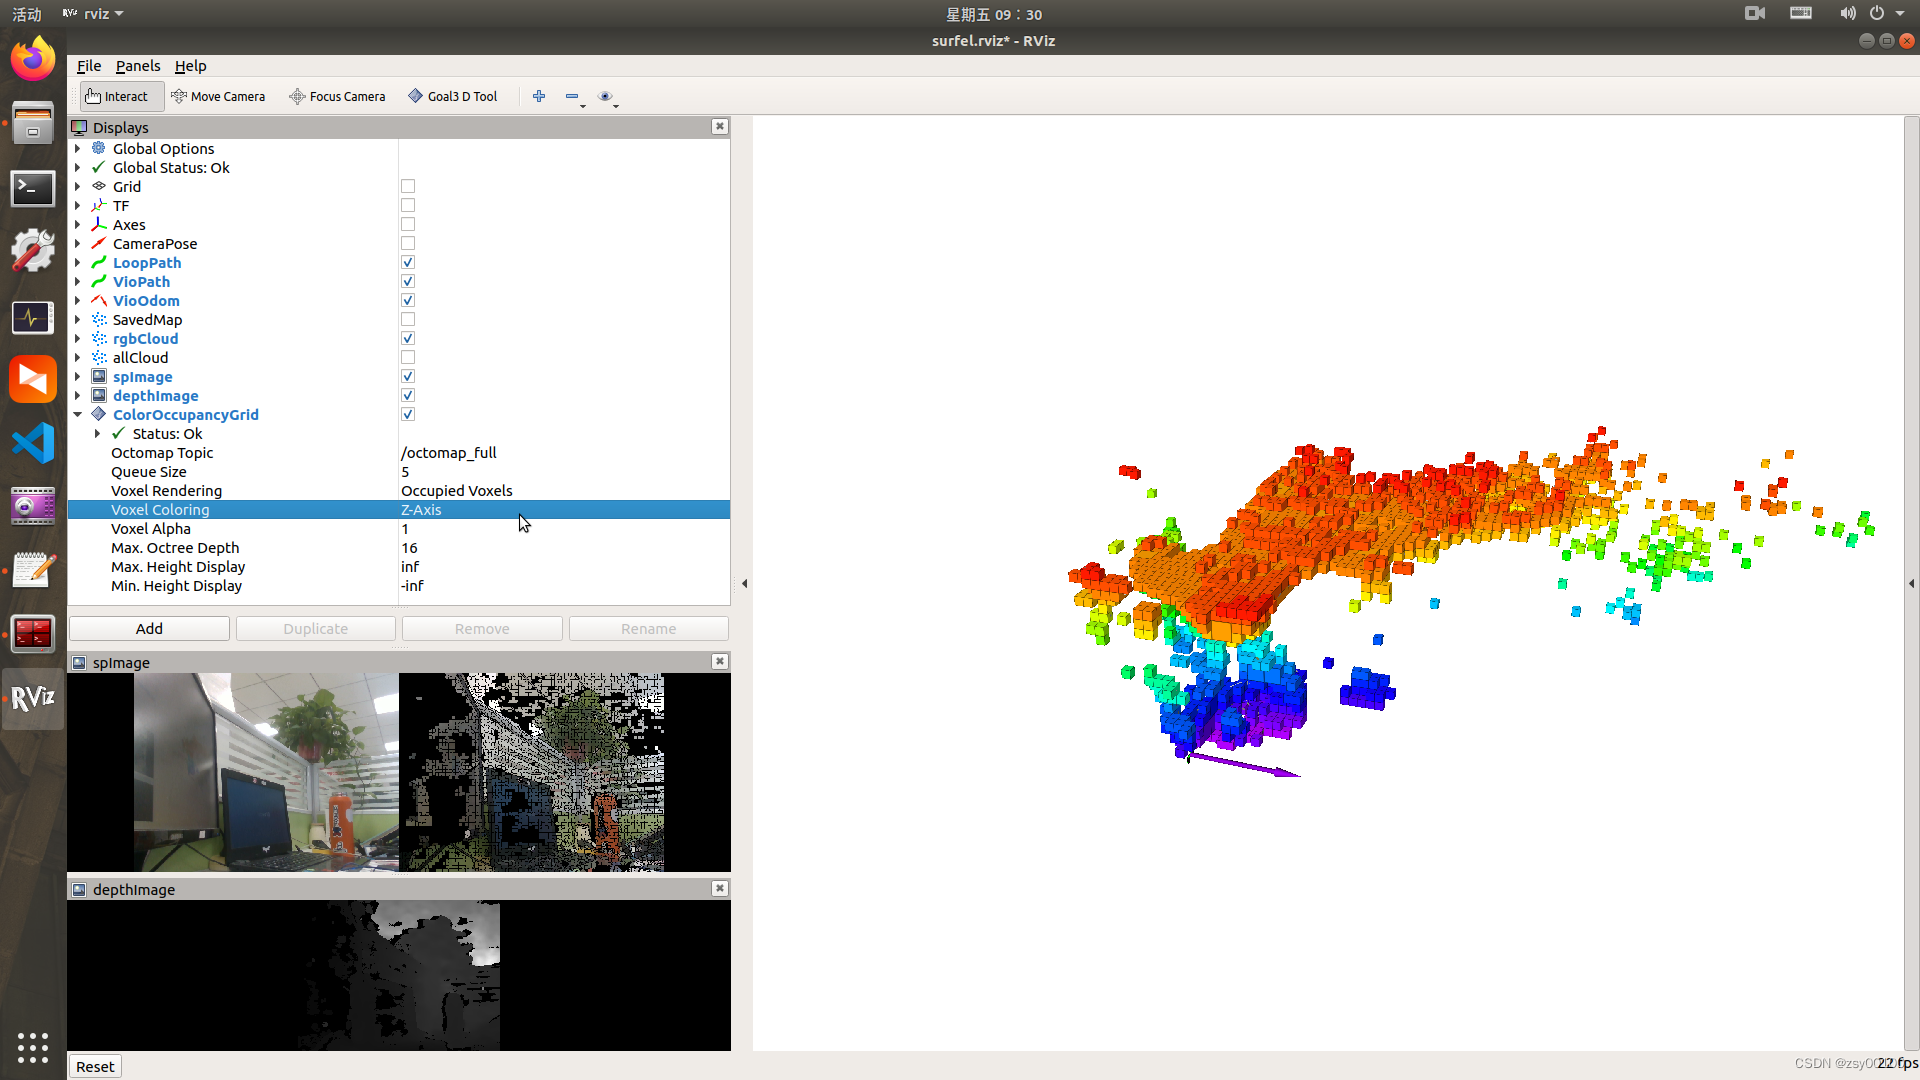
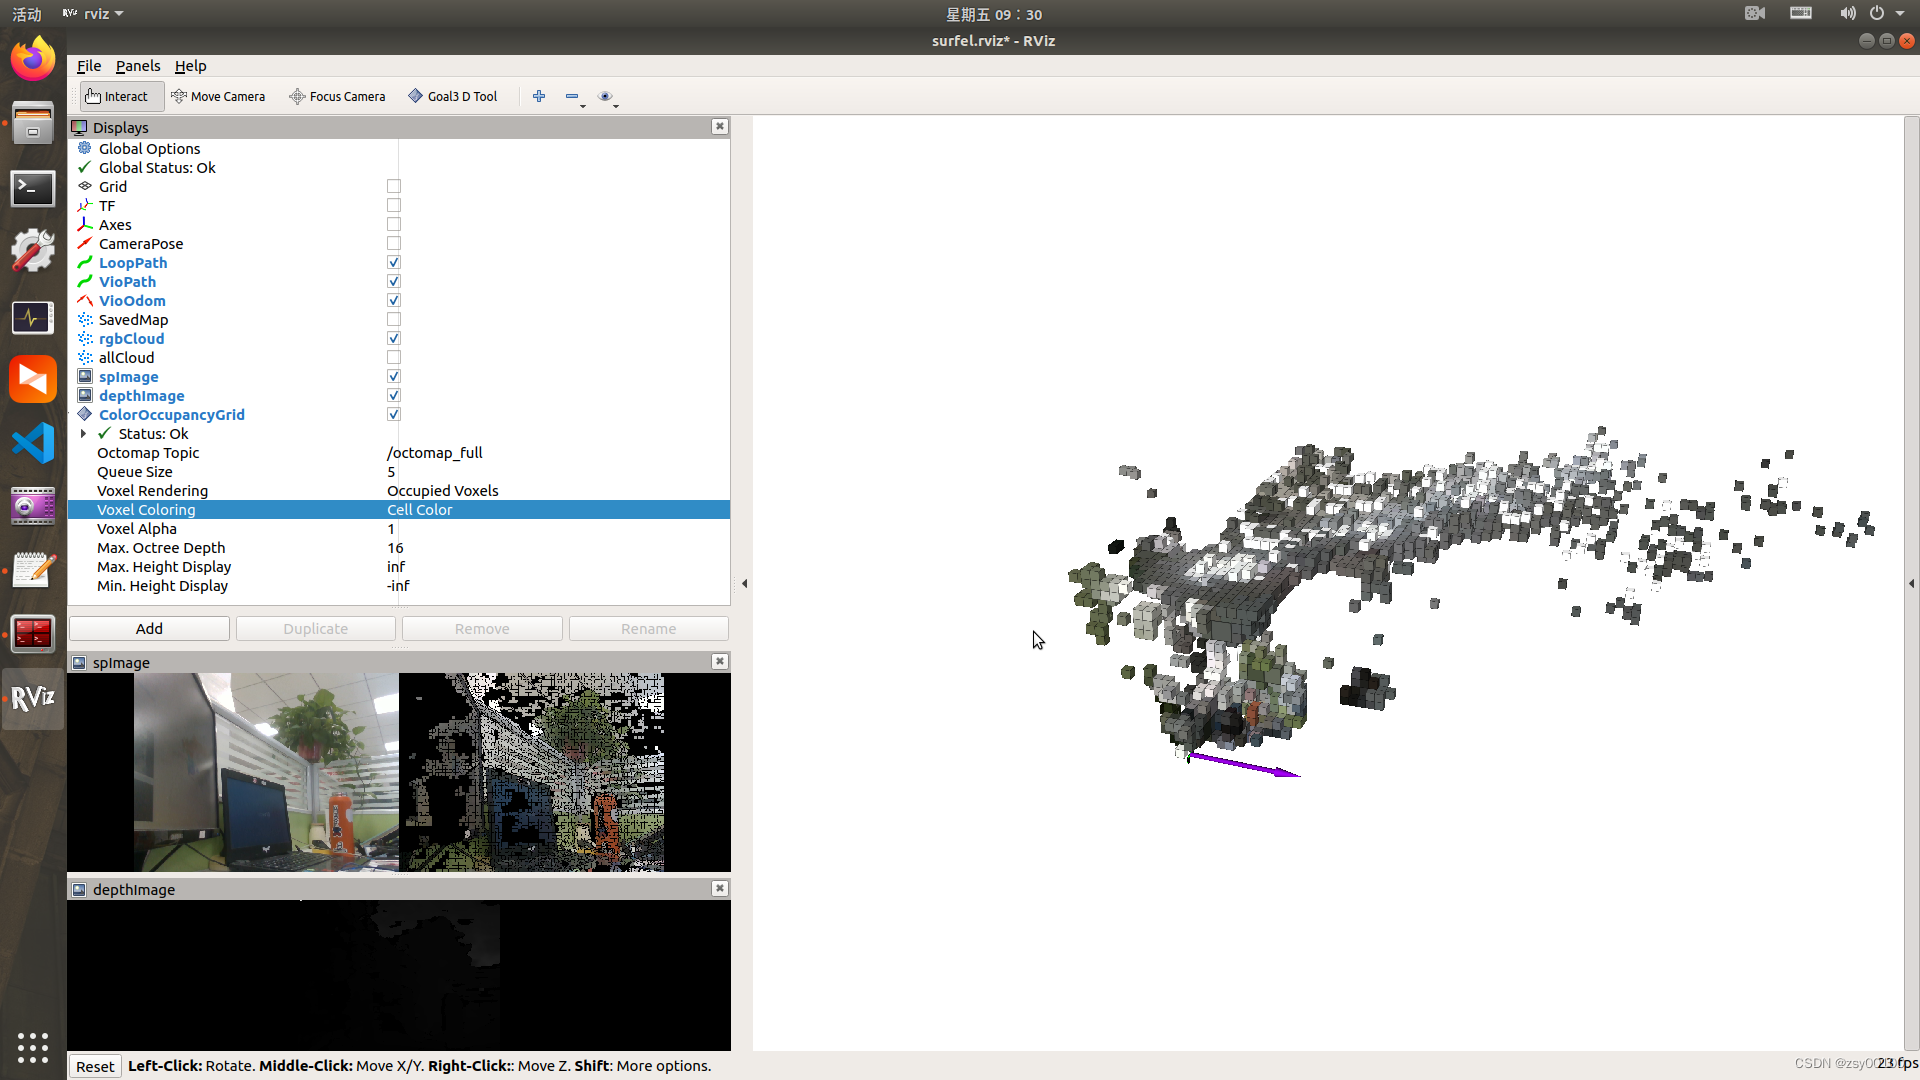
建图节点启动后,选择话题名称为 octomap_full,即可显示出八叉树模型
选择显示模式为 Cell Color,即可显示出彩色八叉树体素栅格
6.同样,可以使用命令保存二进制成果
rosrun octomap_server octomap_saver -f 2022.ot
完结
本文内容由网友自发贡献,版权归原作者所有,本站不承担相应法律责任。如您发现有涉嫌抄袭侵权的内容,请联系:hwhale#tublm.com(使用前将#替换为@)


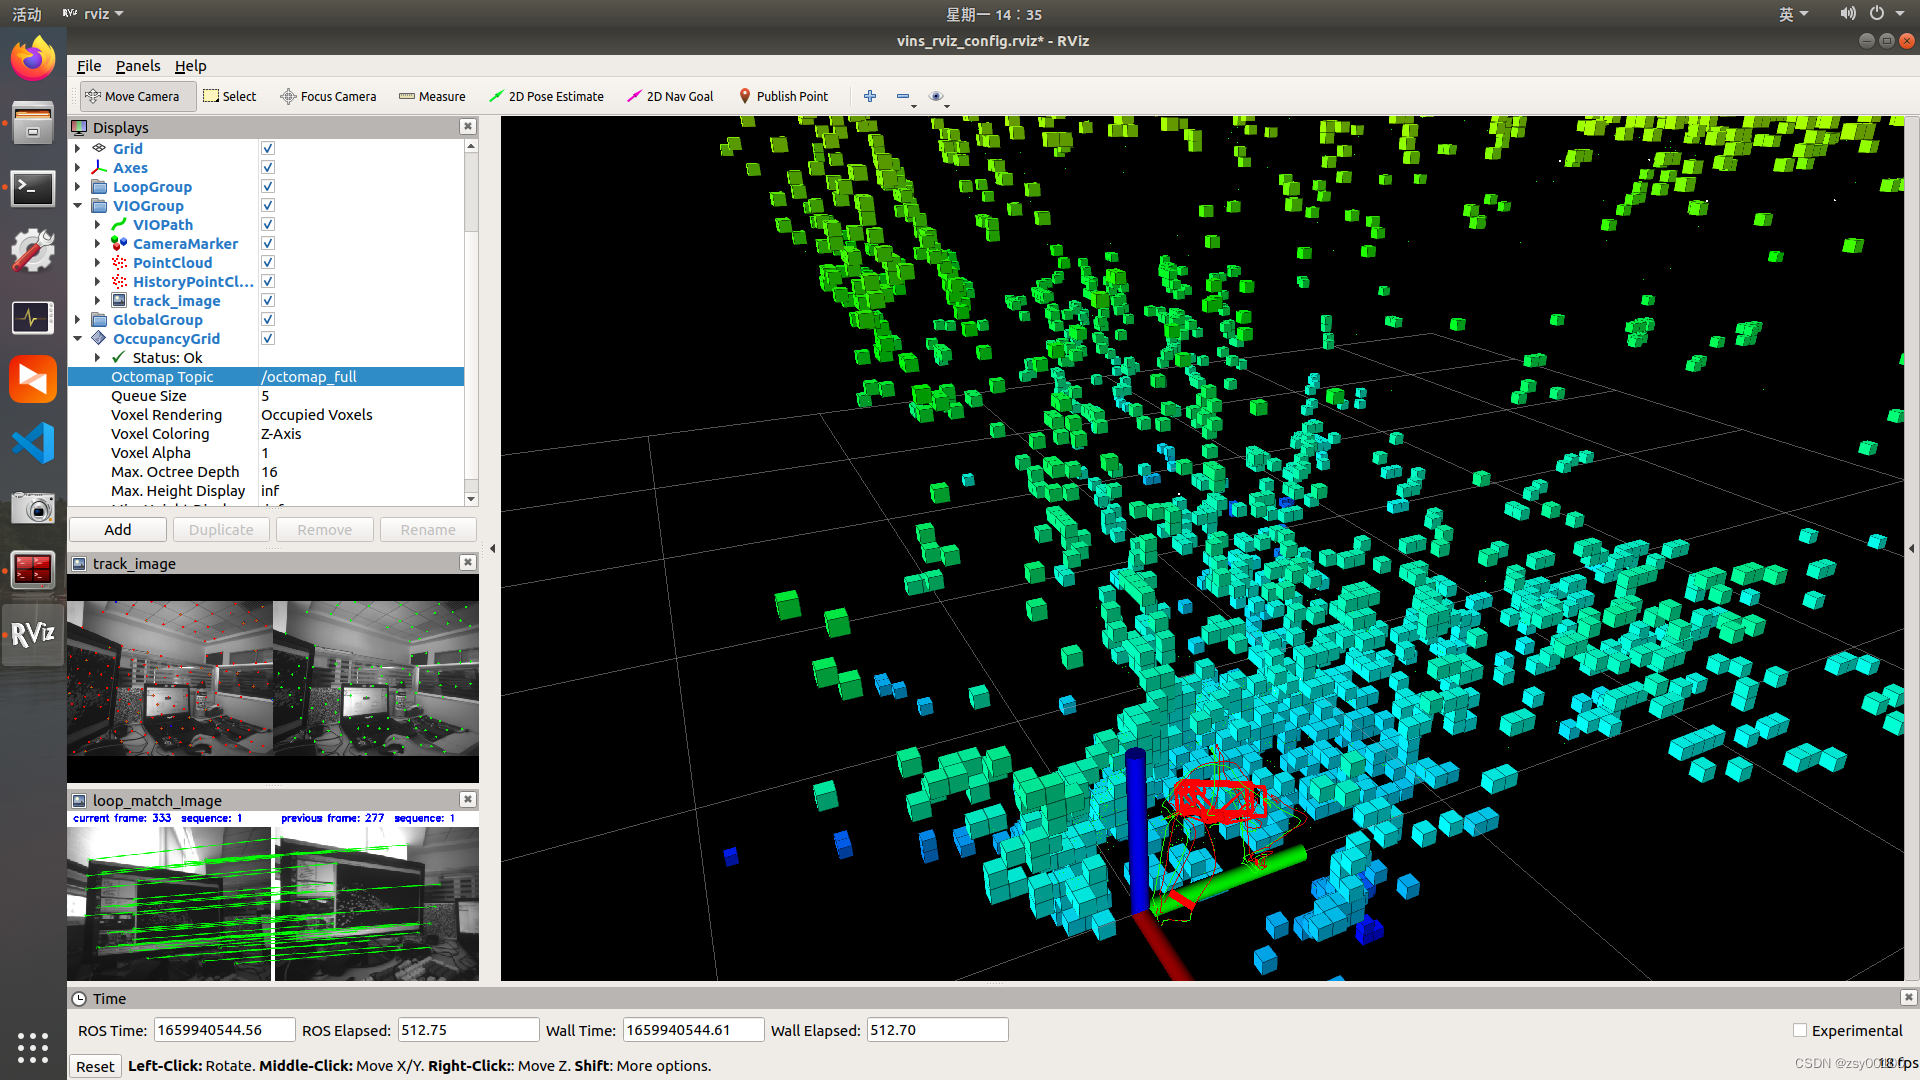
 最后在rviz 中添加一个 “OccupancyGrid” 模块,设置 topic 为"/octomap_full",即可以得到如下结果:

 启动 octomap_server 节点后,可以使用它提供的地图保存服务

 最后在rviz 中添加一个 “OccupancyGrid” 模块. 设置 topic 为"/octomap_full",即可以得到如下结果: