ubuntu2004安装cuda11.7+cuDNN8.6 deb版本
- 1.显卡驱动安装
-
- 2.安装cuda
- 2.1安装前检查
- 2.2下载CUDA11.7
- 2.3安装
- 2.4设置环境变量
- 2.5检测
- 3.cuDNN安装
- 3.1下载cuDNN8.6
- 3.2 安装cuDNN8.6 deb
- 3.3测试cuDNN
- 3.4问题描述
教程参考扫地的小和尚
1.显卡驱动安装
为了稳定和不折腾,最好还是装系统推荐的驱动版本吧。
打开设置(software&updates)
选择Additional Drivers
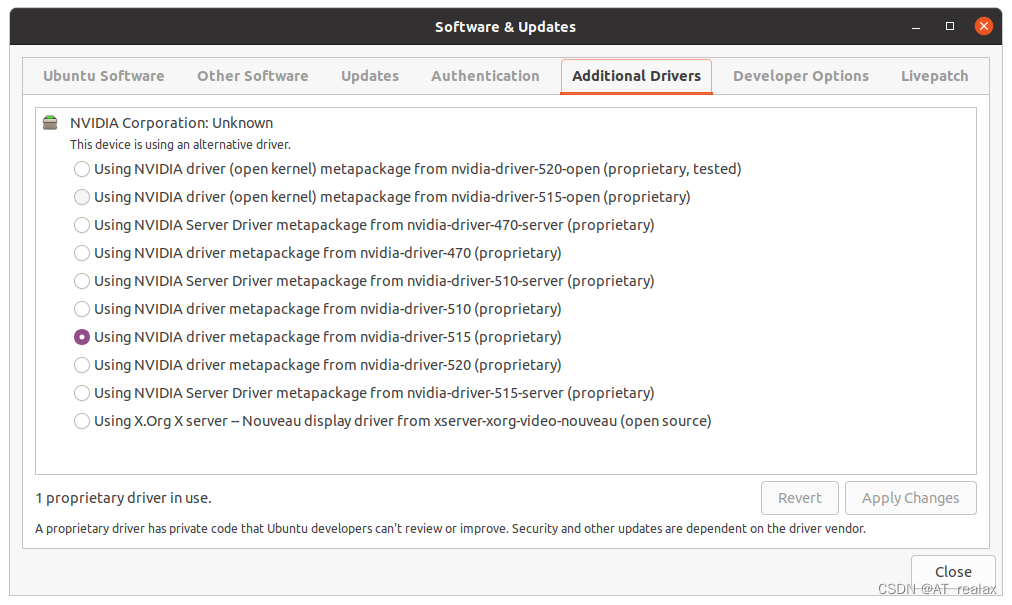
安装推荐的驱动即可。
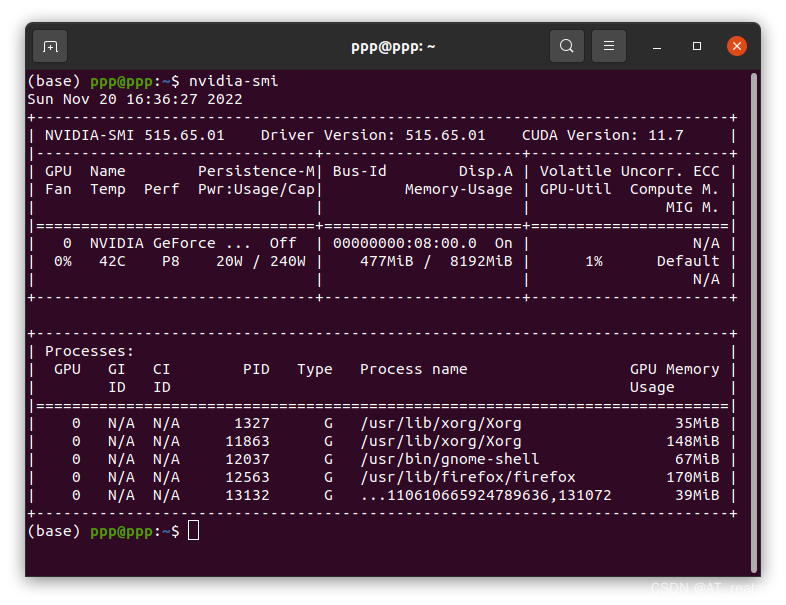
1.1查看驱动版本
完成安装后输入
nvidia-smi
进行检测
2.安装cuda
2.1安装前检查
1.显卡
lspci | grep -i nvidia
输出
08:00.0 VGA compatible controller: NVIDIA Corporation Device 2484 (rev a1)
08:00.1 Audio device: NVIDIA Corporation Device 228b (rev a1)
2.系统
uname -m && cat /etc/*release
输出
x86_64
DISTRIB_ID=Ubuntu
DISTRIB_RELEASE=20.04
DISTRIB_CODENAME=focal
DISTRIB_DESCRIPTION=“Ubuntu 20.04.5 LTS”
NAME=“Ubuntu”
VERSION=“20.04.5 LTS (Focal Fossa)”
ID=ubuntu
ID_LIKE=debian
PRETTY_NAME=“Ubuntu 20.04.5 LTS”
VERSION_ID=“20.04”
HOME_URL=“https://www.ubuntu.com/”
SUPPORT_URL=“https://help.ubuntu.com/”
BUG_REPORT_URL=“https://bugs.launchpad.net/ubuntu/”
PRIVACY_POLICY_URL=“https://www.ubuntu.com/legal/terms-and-policies/privacy-policy”
VERSION_CODENAME=focal
UBUNTU_CODENAME=focal
3.gcc
gcc --version
输出
gcc (Ubuntu 9.4.0-1ubuntu1~20.04.1) 9.4.0
Copyright © 2019 Free Software Foundation, Inc.
This is free software; see the source for copying conditions. There is NO
warranty; not even for MERCHANTABILITY or FITNESS FOR A PARTICULAR PURPOSE.
2.2下载CUDA11.7
https://developer.nvidia.com/cuda-downloads
选择“Archive of Previous CUDA Releases”
找到与显卡驱动“515.65”对应的的cuda版本cuda_11.7.1_515.65.01_linux.run
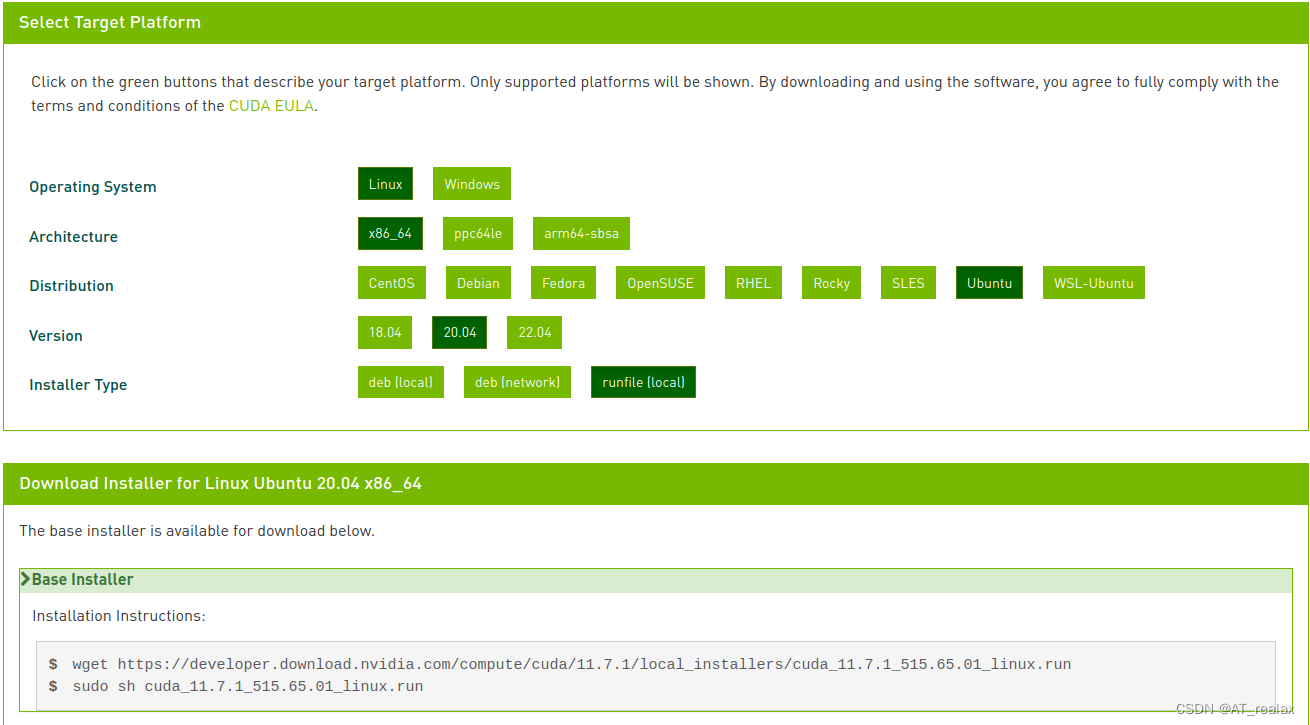
如图,最下面已经给出了安装命令。网络不好,直接复制wget后面的地址用下载器下载。
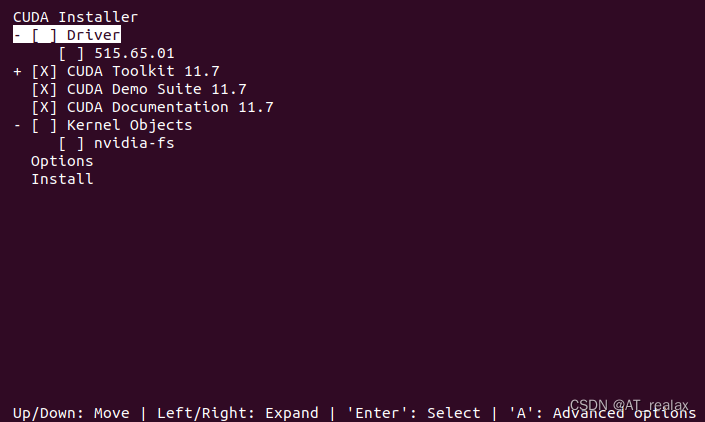
2.3安装
最后在文件目录右键鼠标打开命令行进行安装
wget https://developer.download.nvidia.com/compute/cuda/11.7.1/local_installers/cuda_11.7.1_515.65.01_linux.run
sudo sh cuda_11.7.1_515.65.01_linux.run
同意并继续,取消勾选驱动(因为系统已经帮我们装了)
2.4设置环境变量
安装完成后会有提示
===========
= Summary =
===========
Driver: Not Selected
Toolkit: Installed in /usr/local/cuda-11.7/
Please make sure that
- PATH includes /usr/local/cuda-11.7/bin
- LD_LIBRARY_PATH includes /usr/local/cuda-11.7/lib64, or, add /usr/local/cuda-11.7/lib64 to /etc/ld.so.conf and run ldconfig as root
To uninstall the CUDA Toolkit, run cuda-uninstaller in /usr/local/cuda-11.7/bin
***WARNING: Incomplete installation! This installation did not install the CUDA Driver. A driver of version at least 515.00 is required for CUDA 11.7 functionality to work.
To install the driver using this installer, run the following command, replacing with the name of this run file:
sudo .run --silent --driver
Logfile is /var/log/cuda-installer.log
提示你添加环境变量
sudo gedit ~/.bashrc
或者
vim ~/.bashrc
最后一行添加:
export LD_LIBRARY_PATH=$LD_LIBRARY_PATH:/usr/local/cuda/lib64
export PATH=$PATH:/usr/local/cuda/bin
export CUDA_HOME=$CUDA_HOME:/usr/local/cuda
保存关闭后,应用一下更改
source ~/.bashrc
sudo ldconfig
2.5检测
nvcc -V
输出:
nvcc: NVIDIA ® Cuda compiler driver
Copyright © 2005-2022 NVIDIA Corporation
Built on Wed_Jun__8_16:49:14_PDT_2022
Cuda compilation tools, release 11.7, V11.7.99
Build cuda_11.7.r11.7/compiler.31442593_0
查看你的系统GPU参数, 运行deviceQuery:
/usr/local/cuda/extras/demo_suite/deviceQuery
输出:
/usr/local/cuda/extras/demo_suite/deviceQuery Starting…
CUDA Device Query (Runtime API) version (CUDART static linking)
Detected 1 CUDA Capable device(s)
Device 0: “NVIDIA GeForce RTX 3070”
CUDA Driver Version / Runtime Version 11.7 / 11.7
CUDA Capability Major/Minor version number: 8.6
Total amount of global memory: 7981 MBytes (8368685056 bytes)
(46) Multiprocessors, (128) CUDA Cores/MP: 5888 CUDA Cores
GPU Max Clock rate: 1830 MHz (1.83 GHz)
Memory Clock rate: 7001 Mhz
Memory Bus Width: 256-bit
L2 Cache Size: 4194304 bytes
Maximum Texture Dimension Size (x,y,z) 1D=(131072), 2D=(131072, 65536), 3D=(16384, 16384, 16384)
Maximum Layered 1D Texture Size, (num) layers 1D=(32768), 2048 layers
Maximum Layered 2D Texture Size, (num) layers 2D=(32768, 32768), 2048 layers
Total amount of constant memory: 65536 bytes
Total amount of shared memory per block: 49152 bytes
Total number of registers available per block: 65536
Warp size: 32
Maximum number of threads per multiprocessor: 1536
Maximum number of threads per block: 1024
Max dimension size of a thread block (x,y,z): (1024, 1024, 64)
Max dimension size of a grid size (x,y,z): (2147483647, 65535, 65535)
Maximum memory pitch: 2147483647 bytes
Texture alignment: 512 bytes
Concurrent copy and kernel execution: Yes with 2 copy engine(s)
Run time limit on kernels: Yes
Integrated GPU sharing Host Memory: No
Support host page-locked memory mapping: Yes
Alignment requirement for Surfaces: Yes
Device has ECC support: Disabled
Device supports Unified Addressing (UVA): Yes
Device supports Compute Preemption: Yes
Supports Cooperative Kernel Launch: Yes
Supports MultiDevice Co-op Kernel Launch: Yes
Device PCI Domain ID / Bus ID / location ID: 0 / 8 / 0
Compute Mode:
< Default (multiple host threads can use ::cudaSetDevice() with device simultaneously) >
deviceQuery, CUDA Driver = CUDART, CUDA Driver Version = 11.7, CUDA Runtime Version = 11.7, NumDevs = 1, Device0 = NVIDIA GeForce RTX 3070
Result = PASS
3.cuDNN安装
我采用deb安装的,地址如下。需要注册登录NVIDIA。
https://developer.nvidia.com/rdp/cudnn-download
同样Archived cuDNN Releases (不知道11.x啥意思,我没找到11.7的就装了8.6,最后好像成了)
3.1下载cuDNN8.6
cudnn-local-repo-ubuntu2004-8.6.0.163_1.0-1_amd64.deb
按照官方文档安装
https://docs.nvidia.com/deeplearning/cudnn/install-guide/index.html#installlinux-deb\
文档说了cuDNN前置条件是
1.装了显卡驱动
2.cuda
3.zlib
2.1.3. Installing Zlib
About this task
For Ubuntu users, to install the zlib package, run:
sudo apt-get install zlib1g
2.3.2. Debian Local Installation
Download the Debian local repository installation package. Before issuing the following commands, you must replace X.Y and 8.x.x.x with your specific CUDA and cuDNN versions.
Procedure
1.Navigate to your directory containing the cuDNN Debian local installer file.
2.Enable the local repository.
sudo dpkg -i cudnn-local-repo-${OS}-8.x.x.x_1.0-1_amd64.deb
Or
sudo dpkg -i cudnn-local-repo-${OS}-8.x.x.x_1.0-1_arm64.deb
3.Import the CUDA GPG key.
sudo cp /var/cudnn-local-repo-*/cudnn-local-*-keyring.gpg /usr/share/keyrings/
4.Refresh the repository metadata.
sudo apt-get update
5.Install the runtime library.
sudo apt-get install libcudnn8=8.x.x.x-1+cudaX.Y
6.Install the developer library.
sudo apt-get install libcudnn8-dev=8.x.x.x-1+cudaX.Y
7.Install the code samples and the cuDNN library documentation.
sudo apt-get install libcudnn8-samples=8.x.x.x-1+cudaX.Y
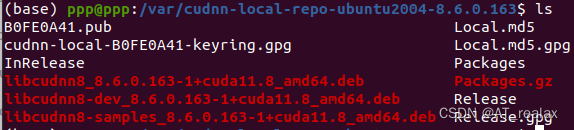
3.2 安装cuDNN8.6 deb
到download目录打开终端,
sudo dpkg -i cudnn-local-repo-ubuntu2004-8.6.0.163_1.0-1_amd64.deb
提示:
Selecting previously unselected package cudnn-local-repo-ubuntu2004-8.6.0.163.
(Reading database … 206235 files and directories currently installed.)
Preparing to unpack cudnn-local-repo-ubuntu2004-8.6.0.163_1.0-1_amd64.deb …
Unpacking cudnn-local-repo-ubuntu2004-8.6.0.163 (1.0-1) …
Setting up cudnn-local-repo-ubuntu2004-8.6.0.163 (1.0-1) …
The public cudnn-local-repo-ubuntu2004-8.6.0.163 GPG key does not appear to be installed.
To install the key, run this command:
sudo cp /var/cudnn-local-repo-ubuntu2004-8.6.0.163/cudnn-local-B0FE0A41-keyring.gpg /usr/share/keyrings/
按照官方3.提示输入
sudo cp /var/cudnn-local-repo-ubuntu2004-8.6.0.163/cudnn-local-B0FE0A41-keyring.gpg /usr/share/keyrings/
按照官方4.Refresh the repository metadata
sudo apt-get update
打开路径/var/cudnn-local-repo-ubuntu2004-8.6.0.163/
按照5.6.7.的步骤输入
sudo apt-get install libcudnn8=8.6.0.163-1+cuda11.8
sudo apt-get install libcudnn8-dev=8.6.0.163-1+cuda11.8
sudo apt-get install libcudnn8-samples=8.6.0.163-1+cuda11.8
这下就OKK了
3.3测试cuDNN
2.4. Verifying the Install on Linux
To verify that cuDNN is installed and is running properly, compile the mnistCUDNN sample located in the /usr/src/cudnn_samples_v8 directory in the Debian file.
Procedure
Copy the cuDNN samples to a writable path.
cp -r /usr/src/cudnn_samples_v8/ $HOME
Go to the writable path.
cd $HOME/cudnn_samples_v8/mnistCUDNN
Compile the mnistCUDNN sample.
make clean && make
Run the mnistCUDNN sample.
./mnistCUDNN
If cuDNN is properly installed and running on your Linux system, you will see a message similar to the following:
Test passed!
3.4问题描述
nvcc warning : The ‘compute_35’, ‘compute_37’, ‘sm_35’, and ‘sm_37’ architectures are deprecated, and may be removed in a future release (Use -Wno-deprecated-gpu-targets to suppress warning).
https://blog.csdn.net/qq_51182466/article/details/120183001
原因是Makefile中采用了CUDA中的compute capability 3.5、3.7这几种计算能力。而我安装的是CUDA11.7,可能已经将这几种计算能力弃用了。可以用cmake或者GUI进行修改(我不会)
https://zhuanlan.zhihu.com/p/398023201
这个教程教了如何写,其中的SMS ? =35 37 50 52 60很像
因此在HOME/cudnn_samples_v8/mnistCUDNN这个目录的makefile中搜索SMS
#Gencode arguments
#Setting SMS inside samples_common.mk
include …/samples_common.mk
打开HOME/cudnn_samples_v8中的samples_common.mk
最后一行
SMS ?= 37 50 53 60 61 62 $(SMS_VOLTA) $(SMS_AMPERE)
删除37
本文内容由网友自发贡献,版权归原作者所有,本站不承担相应法律责任。如您发现有涉嫌抄袭侵权的内容,请联系:hwhale#tublm.com(使用前将#替换为@)