文章目录
- 一.CAS的概述
-
- 二.CAS的流程
- 三.CAS服务端部署
- 1.下载地址
- 2.源码打包
- 3.部署运行
- 4. java.io.FileNotFoundException: \etc\cas\thekeystore (系统找不到指定的文件。)
- 四.CAS的定制
-
- 五.SpringBoot集成CAS
- 1.工程创建
- 2.导入依赖
- 3.修改包名
- 4.编写配置文件
- 5.编写角色授权
- 6.编写配置对象
- 7.编写控制器类
- 8.启动项目测试
- 六. SpringBoot-jar的方式启动 cas-server
- 七.cas.properties配置项介绍
一.CAS的概述
1.SSO
2.CAS
CAS(Central Authentication Service的缩写,中央认证服务) 是耶鲁大学 Technology and Planning 实验室的 Shawn Bayern 在2002年出的一个开源系统。刚开始名字叫Yale CAS。Yale CAS 1.0的目标只是一个单点登录的系统,随着慢慢公开,功能就越来越多了,2.0就提供了多种认证的方式。
-
从结构上看,CAS 包含两个部分: CAS Server 和 CAS Client。只要将开发单点登录的系统集成CAS Client,然后部署好CAS Server ,就可以实现多系统的单点登录。
-
官网地址:https://www.apereo.org/projects/cas
-
源码地址:https://github.com/apereo/cas-overlay-template/tree/5.3
特点:
- 开源的企业级单点登录解决方案。
- CAS Server 为需要独立部署的 Web 应用。
- CAS Client 支持非常多的客户端(这里指单点登录系统中的各个 Web 应用),包 括
Java, .Net, PHP, Perl,Apache, uPortal, Ruby 等。
3.概念
-
CAS Server(CAS服务端)需要独立部署,负责完成对用户的认证工作,完成与浏览器端的用户认证和CAS客户端的票据验证。
-
CAS Client(CAS客户端)负责处理对受保护资源的访问请求,需要对请求方进行身份认证时,重定向到 CAS Server 进行认证。 CAS Client 与受保护的客户端应用部署在一起,以 Filter 方式保护受保护的资源。
-
TGT( Ticket Granting Ticket):相当于我们平时所见到的 HttpSession 的作用,用户登录成功后,用户的基本信息,如用户名、登录有效期等信息,都将存储在此。
- TGT 是 CAS 为用户签发的登录票据,拥有了 TGT,用户就可以证明自己在CAS成功登录过。 TGT 封装了 Cookie 值以及此 Cookie 值对应的用户信息。用户在 CAS 认证成功后,CAS 生成 cookie(叫TGC),写入浏览器,同时生成一个 TGT 对象,放入自己的缓存,TGT 对象的 ID 就是 cookie 的值。 当 HTTP 再次请求到来时,如果传过来的有 CAS 生成的 cookie,则 CAS 以此 cookie 值为 key 查询缓存中有无 TGT,如果有,说明用户之前登录过,如果没有,则用户需要重新登录。
-
TGC(Ticket Granting Cookie):存放用户身份认证凭证的 cookie,在浏览器和 CAS Server 间通讯时使用,并且只能基于安全通道传输(Https),是 CAS Server 用来明确用户身份的凭证。根据 TGC 可以帮助用户找到对应的 TGT,所以这个 TGC 有点类似与会话 ID。
-
ST( Service Ticket):服务票据,服务的惟一标识码 , 由 CAS Server 发出( Http 传送),用户访问 Service 时,Service 发现用户没有 ST,则要求用户去 CAS 获取 ST。
- 这是 CAS Sever 通过 TGT 给用户发放的一张
票据,用户在访问其他服务时,发现没有 Cookie 或者 ST ,那么就会302CAS Server 获取 ST,然后会携带着 ST 302 回来,CAS Client 则通过 ST 去 CAS Server 上获取用户的登录状态。
SERVICE TICKET(ST)
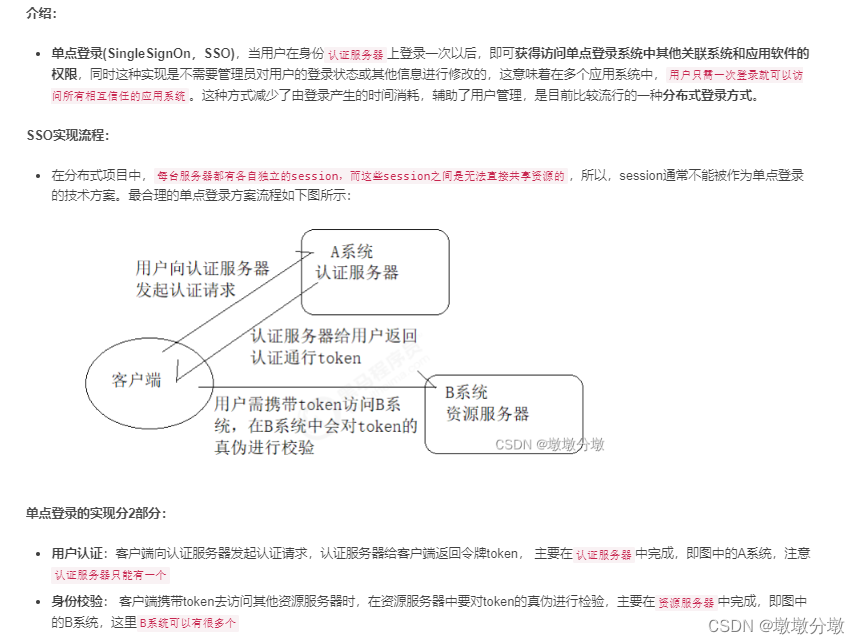
二.CAS的流程
下图是 CAS 最基本的协议过程,主要有以下步骤:
-
用户webBrowser访问cas-client,被拦截重定向到cas-server进行登录,输入正确的用户信息
-
登录成功后,cas-server签发一个TGC票据,写入浏览器同时生成一个TGT对象,放入自己的缓存,TGT对象的ID就是cookie的值,同时携带着ST票据,再次跳转到cas-client, cas-client发现有ST票据则拿着ST票据去cas-server验证ST票据,如果验证通过,则返回用户名信息
-
cas-client登录成功,用户访问另一个cas-client2时,也会被拦截再次跳转到cas-server发现TGC票据生成的TGT对象的ID值存在则直接验证通过,签发一个ST票据给cas-client2。
- CAS Client 与受保护的客户端应用部署在一起,以
Filter 方式保护受保护的资源。对于访问受保护资源的每个 Web 请求,CAS Client 会分析该请求的 Http 请求中是否包含 Service Ticket,如果没有,则说明当前用户尚未登录,于是将请求重定向到指定好的 CAS Server 登录地址,并传递 Service (也就是要访问的目的资源地址),以便登录成功过后转回该地址。用户在第 3 步中输入认证信息,如果登录成功,CAS Server 随机产生一个相当长度、唯一、不可伪造的 Service Ticket,并缓存以待将来验证,之后系统自动重定向到 Service 所在地址,并为客户端浏览器设置一个 Ticket Granted Cookie(TGC),CAS Client 在拿到Service和新产生的 Ticket 过后,在第5,6 步中与 CAS Server 进行身份核实,以确保 Service Ticket 的合法性。
三.CAS服务端部署
1.下载地址
环境要求
- JDK 8+
- CAS 5.3x
- CAS4.x 的server是基于Spring的,模版引擎使用的是JSP。
- CAS5.X 之后使用的是基于
SpringBoot的,模版引擎使用Thymeleaf。
- tomcat 8+
下载地址
-
cas server 客户端模板下载 ,https://github.com/apereo/cas-overlay-template
-
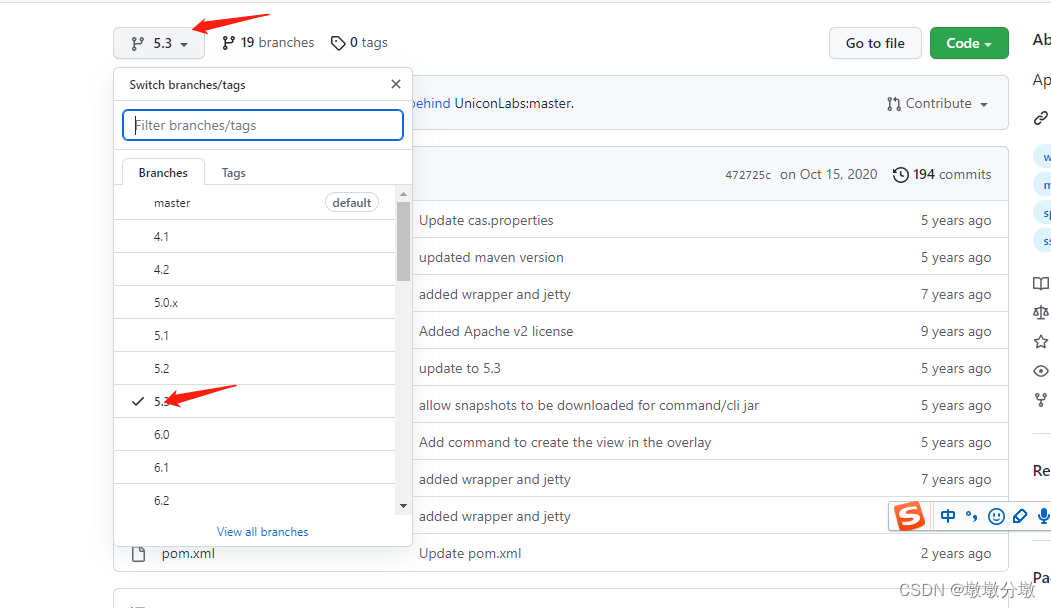
目前最新版是6.x,但是需要java11以上,我们还是使用java8,所以选择了5.3
2.源码打包
maven打包命令
mvn clean package -Dmaven.test.skip=true
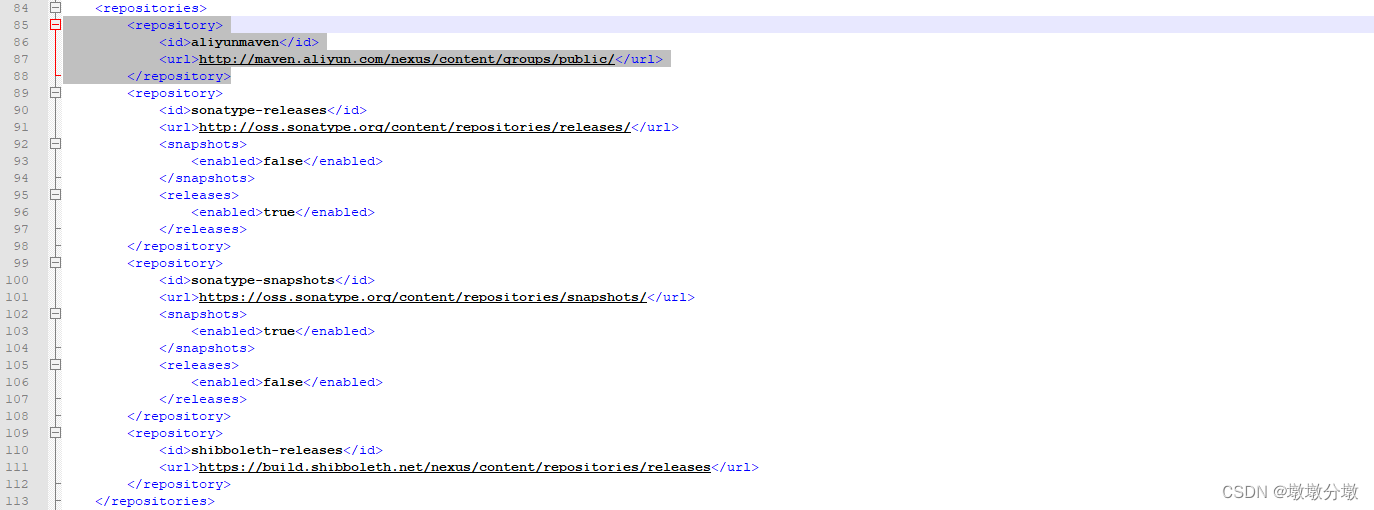
更换下载源
如果你想要下载速度快点,请更换下载源,找到pom.xml中的repositories,使用aliyun代理服务器下载依赖
<repository>
    <id>aliyunmaven</id>
    <url>http://maven.aliyun.com/nexus/content/groups/public/</url>
</repository>
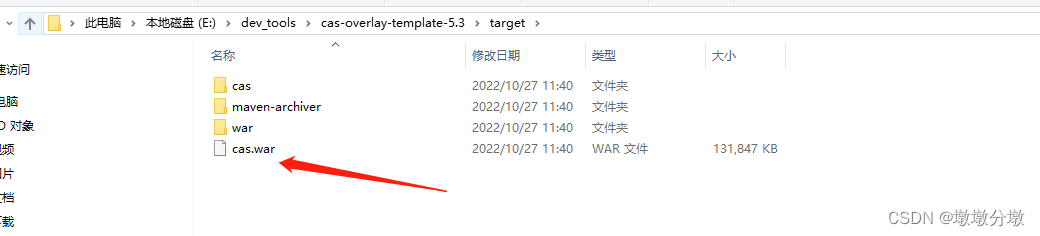
3.部署运行
由于打完包后是一个war包,需要tomcat才能运行
- 下载路径:https://mirrors.bfsu.edu.cn/apache/tomcat/tomcat-8/v8.5.83/bin/
将打包好的cas.war,放到tomcat的webapps目录中,然后点击bin目录下的startup.bat启动。
正常启动后,在浏览器中输入地址:http://localhost:8080/cas/login,将会看到如下界面:
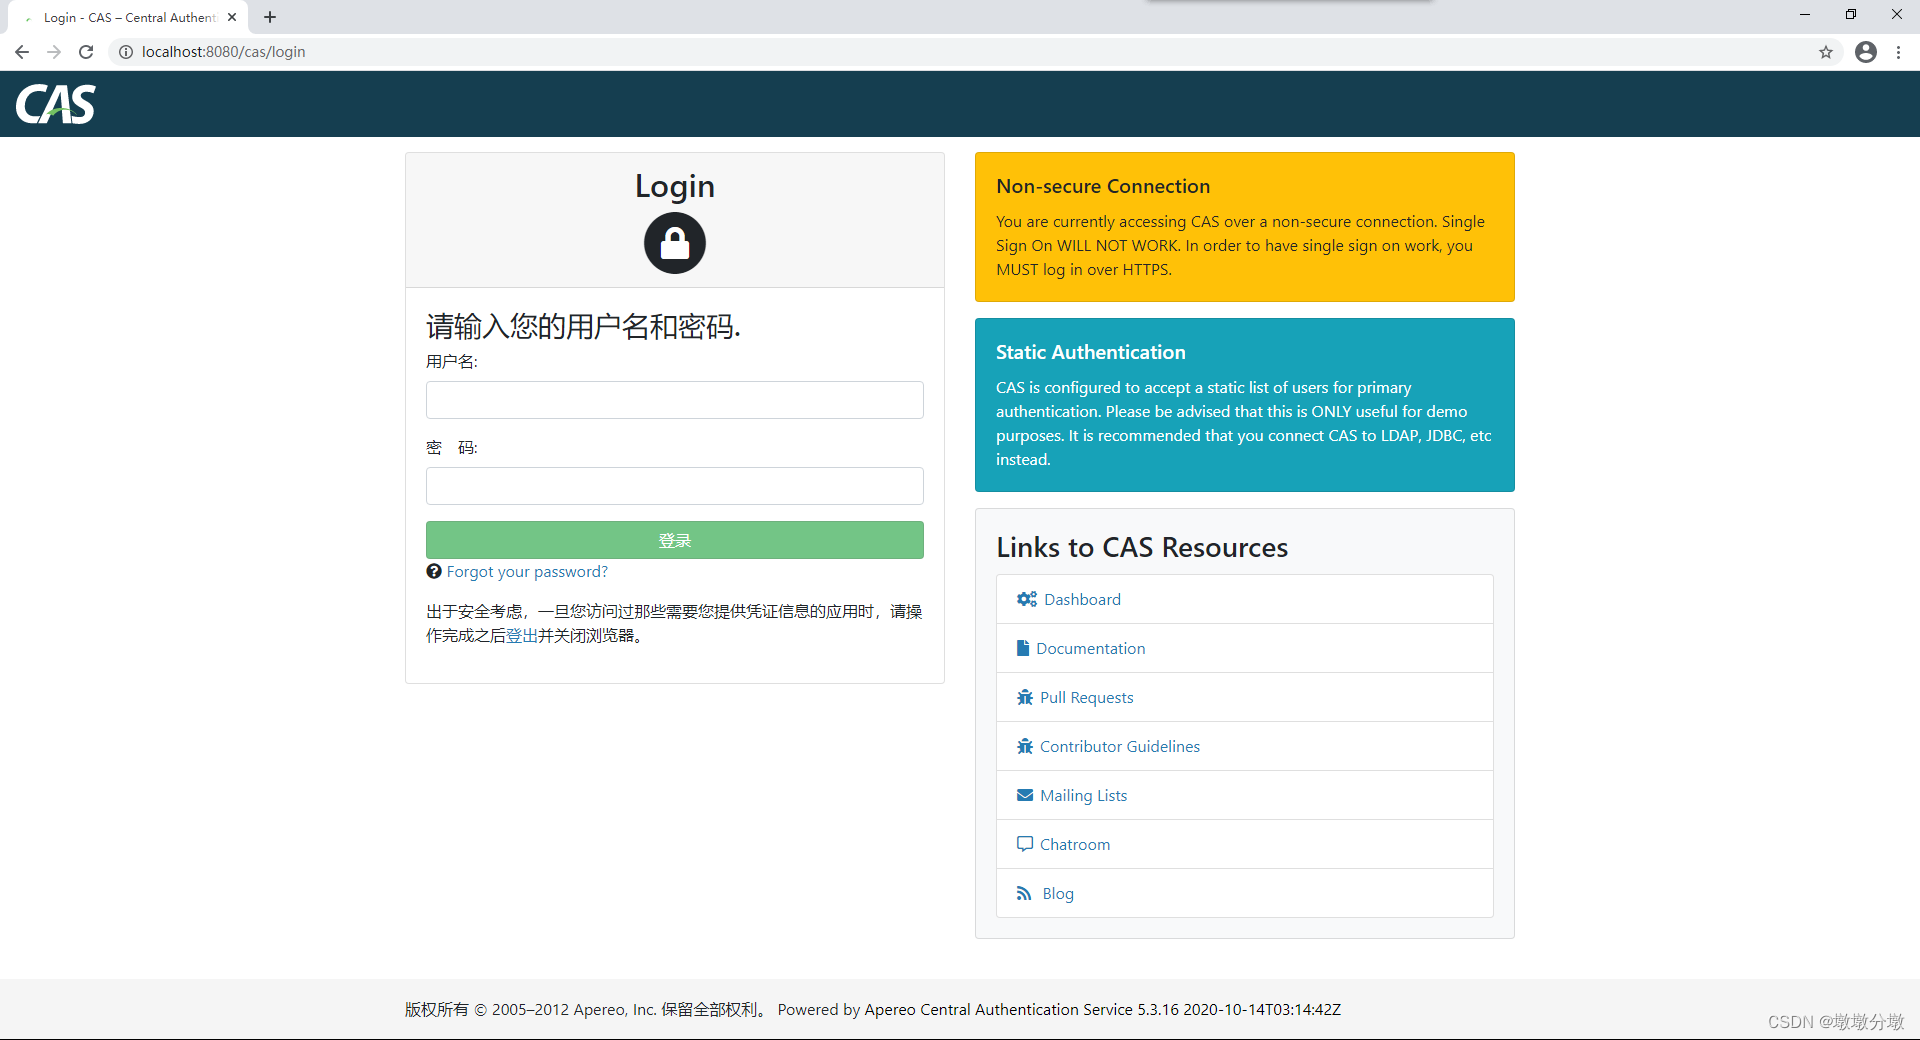
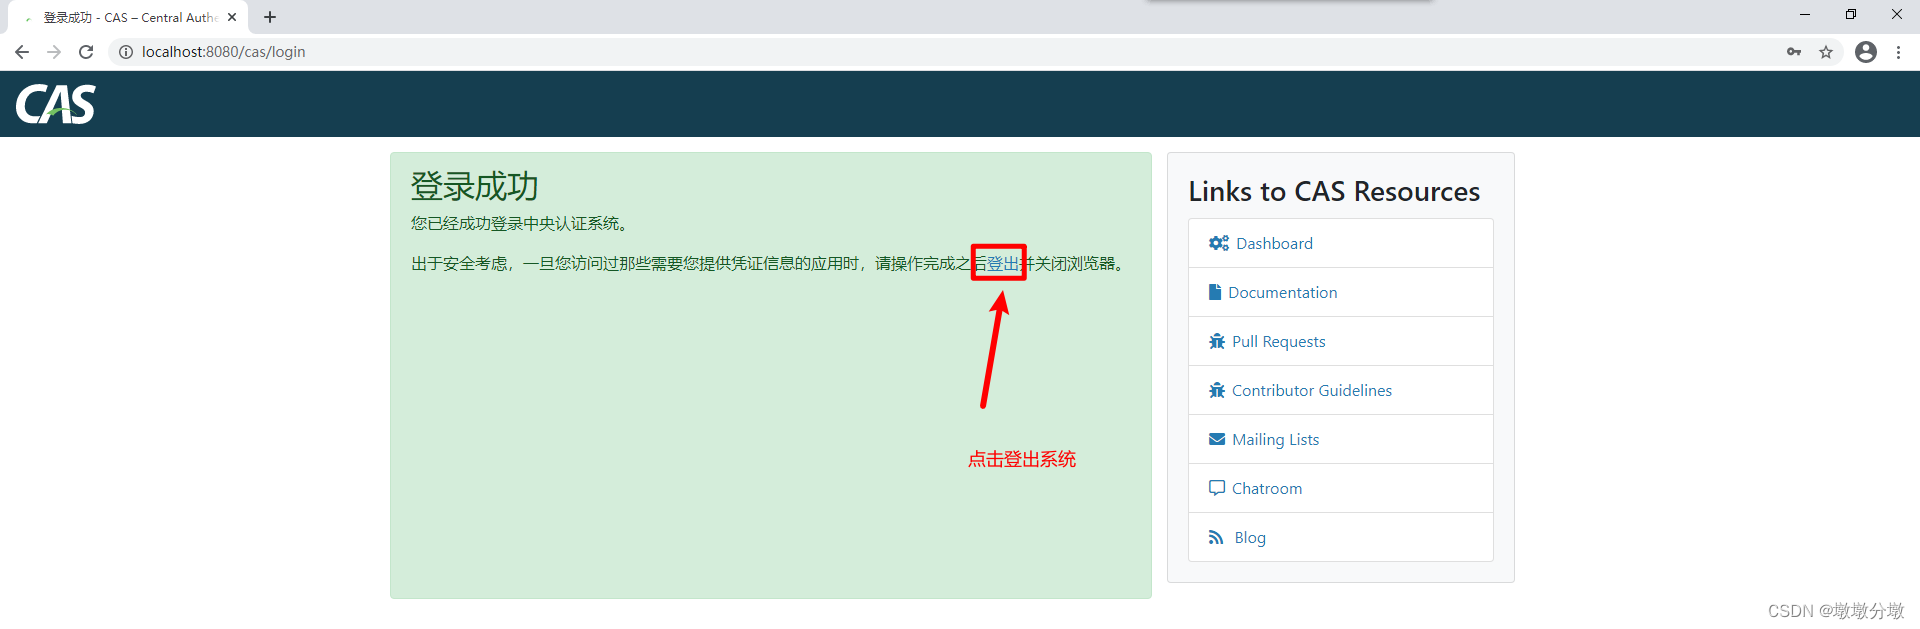
- 使用上边提供的
登出链接,还可以手动在地址栏输入http://localhost:8080/cas/logout

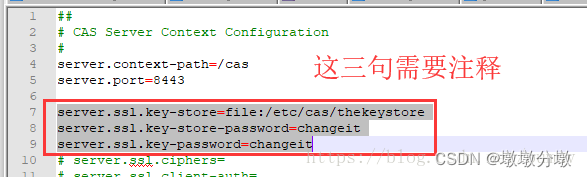
4. java.io.FileNotFoundException: \etc\cas\thekeystore (系统找不到指定的文件。)
\etc\cas\thekeystore是生成的密钥文件的,由于我这里不使用加密,所以需要将cas的https协议忽略并将http协议设置为允许,步骤:
- 修改cas/WEB-INF/classes/application.properties,加入配置:
cas.tgc.secure=false
cas.serviceRegistry.initFromJson=true
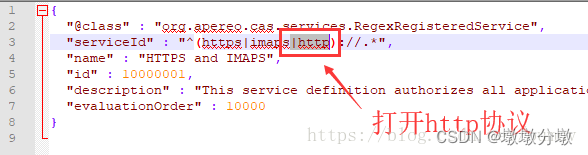
- 修改
services\HTTPSandIMAPS-10000001.json
四.CAS的定制
1.定制数据源
1.如果要让cas直接连接数据库做用户认证,引入依赖
-
找到源码目录cas-overlay-template-5.3中的pom.xml
<dependency>
<groupId>org.apereo.cas</groupId>
<artifactId>cas-server-support-jdbc</artifactId>
<version>${cas.version}</version>
</dependency>
<dependency>
<groupId>org.apereo.cas</groupId>
<artifactId>cas-server-support-jdbc-drivers</artifactId>
<version>${cas.version}</version>
</dependency>
<dependency>
<groupId>mysql</groupId>
<artifactId>mysql-connector-java</artifactId>
<version>5.1.49</version>
</dependency>

2 重新打包部署后重启tomccat
- 找到源码目录
cas-overlay-template-5.3,在地址栏输入cmd,然后回车,运行打包命令:mvn clean package -Dmaven.test.skip=true,
3.加入数据源的配置
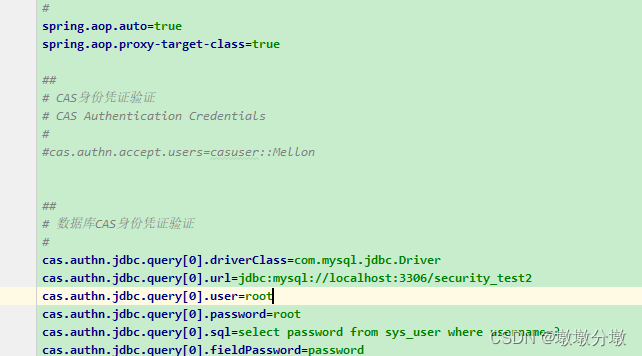
- 打开
apache-tomcat-8.5.61\webapps\cas\WEB-INF\classes目录,修改application.properties,注释cas.authn.accept.users=....禁用默认用户,添加数据库配置:
cas.authn.jdbc.query[0].driverClass=com.mysql.jdbc.Driver
cas.authn.jdbc.query[0].url=jdbc:mysql://localhost:3306/security_test2
cas.authn.jdbc.query[0].user=root
cas.authn.jdbc.query[0].password=root
cas.authn.jdbc.query[0].sql=select password from sys_user where username=?
cas.authn.jdbc.query[0].fieldPassword=password
4.数据库密码字段如果是加密的,需要cas配置密码加密规则
-
cas5.X 提供了4种加密配置:
cas.authn.jdbc.query[0].passwordEncoder.type=NONE|DEFAULT|STANDARD|BCRYPT
-
默认值为 NONE,这四种方式脱胎于spring security中的加密方式,spring security提供了 MD5PasswordEncoder、SHAPasswordEncoder、StandardPasswordEncoder和 BCryptPasswordEncoder。
- NONE:对密码不做任何加密,即保留明文。
- DEFAULT:启用DefaultPasswordEncoder。 MD5PasswordEncoder和 SHAPasswordEncoder加密是
编码算法加密,现在cas把他们归属于 DefaultPasswordEncoder。DefaultPasswordEncoder需要带参数 encodingAlgorithm:cas.authn.accept.passwordEncoder.encodingAlgorithm=MD5|SHA - STANDARD:启用StandardPasswordEncoder加密方式 。1024次迭代的 SHA‐256 散列 哈希加密实现,并使用一个随机8字节的
salt盐 - BCRYPT:启用BCryptPasswordEncoder加密方式。
这里采用BCRYPT加密,因为我们数据库中的密码加密方式就是这种加密,应该保持一致,修改application.properties 配置文件。
cas.authn.jdbc.query[0].passwordEncoder.type=BCRYPT
cas.authn.jdbc.query[0].passwordEncoder.characterEncoding=UTF-8
5.导入数据库数据表
DROP DATABASE IF EXISTS `security_test2`;

CREATE DATABASE `security_test2`;

USE `security_test2`;

DROP TABLE IF EXISTS `sys_role`;

CREATE TABLE `sys_role` (
  `id` int(11) NOT NULL AUTO_INCREMENT COMMENT '角色编号',
  `name` varchar(32) NOT NULL COMMENT '角色名称',
  `desc` varchar(32) NOT NULL COMMENT '角色描述',
  PRIMARY KEY (`id`)
) ENGINE=InnoDB AUTO_INCREMENT=5 DEFAULT CHARSET=utf8;

insert  into `sys_role`(`id`,`name`,`desc`) values (1,'ROLE_USER','用户权限');
insert  into `sys_role`(`id`,`name`,`desc`) values (2,'ROLE_ADMIN','管理权限');
insert  into `sys_role`(`id`,`name`,`desc`) values (3,'ROLE_PRODUCT','产品权限');
insert  into `sys_role`(`id`,`name`,`desc`) values (4,'ROLE_ORDER','订单权限');

DROP TABLE IF EXISTS `sys_user`;

CREATE TABLE `sys_user` (
  `id` int(11) NOT NULL AUTO_INCREMENT COMMENT '用户编号',
  `username` varchar(32) NOT NULL COMMENT '用户名称',
  `password` varchar(128) NOT NULL COMMENT '用户密码',
  `status` int(1) NOT NULL DEFAULT '1' COMMENT '用户状态(0:关闭、1:开启)',
  PRIMARY KEY (`id`)
) ENGINE=InnoDB AUTO_INCREMENT=4 DEFAULT CHARSET=utf8;

insert  into `sys_user`(`id`,`username`,`password`,`status`) values (1,'zhangsan','$2a$10$M7fmKpMZEkkzrTBiKie.EeAKZhQDrWAltpCA1y/py5AU/8lyiNB8y',0);
insert  into `sys_user`(`id`,`username`,`password`,`status`) values (2,'lisi','$2a$10$M7fmKpMZEkkzrTBiKie.EeAKZhQDrWAltpCA1y/py5AU/8lyiNB8y',0);
insert  into `sys_user`(`id`,`username`,`password`,`status`) values (3,'wangwu','$2a$10$M7fmKpMZEkkzrTBiKie.EeAKZhQDrWAltpCA1y/py5AU/8lyiNB8y',0);

DROP TABLE IF EXISTS `sys_user_role`;

CREATE TABLE `sys_user_role` (
  `uid` int(11) NOT NULL COMMENT '用户编号',
  `rid` int(11) NOT NULL COMMENT '角色编号',
  PRIMARY KEY (`uid`,`rid`)
) ENGINE=InnoDB DEFAULT CHARSET=utf8;

insert  into `sys_user_role`(`uid`,`rid`) values (1,1);
insert  into `sys_user_role`(`uid`,`rid`) values (1,3);
insert  into `sys_user_role`(`uid`,`rid`) values (2,1);
insert  into `sys_user_role`(`uid`,`rid`) values (2,4);
insert  into `sys_user_role`(`uid`,`rid`) values (3,1);
insert  into `sys_user_role`(`uid`,`rid`) values (3,2);
insert  into `sys_user_role`(`uid`,`rid`) values (3,3);
insert  into `sys_user_role`(`uid`,`rid`) values (3,4);
2.兼容 HTTP
-
CAS默认使用的是基于https协议( HTTP + SSL),需要改为兼容使用http协议,修改apache-tomcat-8.5.61\webapps\cas\WEB-INF\classes目录的application.properties文件
- TGC:Ticket Granted Cookie (客户端用户持有,传送到服务器,用于验证)存放用户身份认证凭证的cookie,在浏览器和CAS Server间通讯时使用,并且只能基于
安全通道传输(Https),是CAS Server用来明确用户身份的凭证。
cas.tgc.secure=false
cas.serviceRegistry.initFromJson=true
-
修改apache-tomcat-8.5.61\webapps\cas\WEB-INF\classes\services目录下的HTTPSandIMAPS-10000001.json修改内容如下,即添加http
{
  "@class" : "org.apereo.cas.services.RegexRegisteredService",
  "serviceId" : "^(https|http|imaps)://.*",
  "name" : "HTTPS and IMAPS",
  "id" : 10000001,
  "description" : "This service definition authorizes all application urls that support HTTPS and IMAPS protocols.",
  "evaluationOrder" : 10000
}
-
重新启动tomcat,然后zhangsan登录进行测试,或许看起来并没有什么不一样,但是现在已经兼容http协议。
3.定制登录页
CAS项目结构
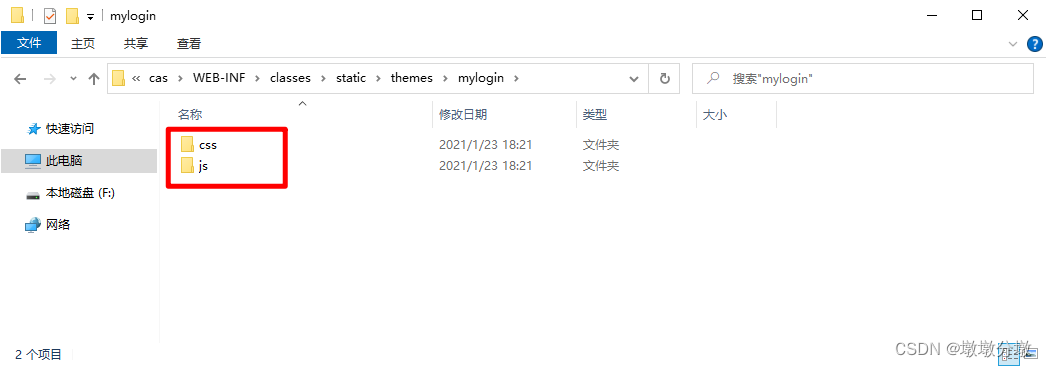
- 静态资源(js、css) 存放目录为
WEB-INF\classes\static - html资源(thymeleaf模板) 存放目录为
WEB-INF\classes\templates - 主题配置文件存放在
WEB-INF\classes,并且命名为[theme_name].properties
-
在静态资源目录(WEB-INF\classes\static\themes)下创建一个文件夹,一般跟工程名字保持一致,这里我们叫mylogin然后把咱们的css和js都拷贝进去。
-
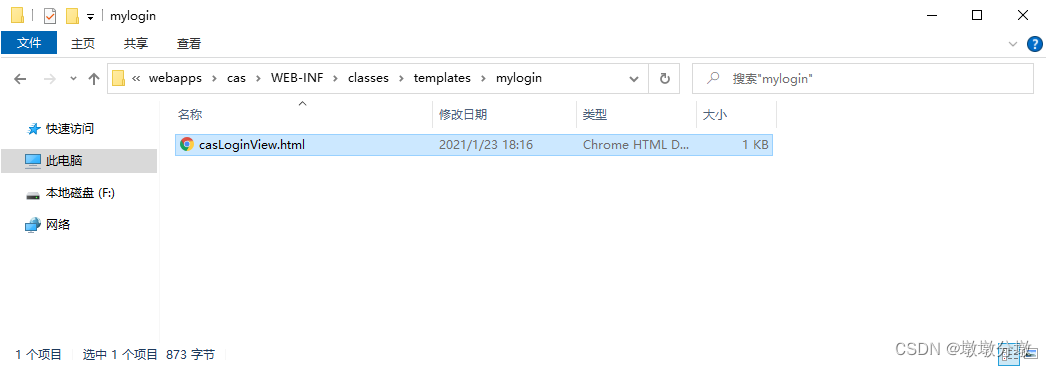
在模板资源目录(WEB-INF\classes\static\templates)创建一个文件夹,一般跟工程名字保持一致,这里我们叫mylogin,把咱们的静态资源 login.html 拷贝到这里,然后把名称改为 casLoginView.html
-
登录页面模板添加thymeleaf的命名空间
<!DOCTYPE html>
<html xmlns:th="http://www.thymeleaf.org">
-
修改所有静态资源的路径,改成绝对路径
<!DOCTYPE html>
<html xmlns:th="http://www.thymeleaf.org">
<head>
    <title>自定义登录页</title>
    <link rel="stylesheet" href="/cas/themes/mylogin/css/bootstrap.min.css">
</head>
<body>
...
...
<script src="/cas/themes/mylogin/js/jquery-3.5.1.min.js"></script>
<script src="/cas/themes/mylogin/js/bootstrap.bundle.min.js"></script>
</body>
</html>
-
修改表单的提交路径并加上特定对象属性
<form th:object="${credential}" action="login" method="post">
...
...
</form>
-
修改表单的用户名和密码文本框都添加上一个th:field属性,并去掉无用属性
...
<input type="text" class="form-control" th:field="*{username}" placeholder="请输入用户" required>
...
<input type="text" class="form-control" th:field="*{password}" placeholder="请输入密码" required>
...
-
为此表单添加登录失败错误信息以及隐藏域表单项,直接拷贝以下代码到button提交按钮上边即可
<div class="form-group" th:if="${#fields.hasErrors('*')}">
    <span th:each="err : ${#fields.errors('*')}" th:utext="${err}"></span>
</div>
<input type="hidden" name="execution" th:value="${flowExecutionKey}"/>
<input type="hidden" name="_eventId" value="submit"/>
<input type="hidden" name="geolocation"/>
-
在apache-tomcat-8.5.61\webapps\cas\WEB-INF\classes目录下创建一个主题配置文件,名字叫mylogin.properties,配置内容如下:
cas.standard.css.file=/css/cas.css
-
找到application.properties配置文件,在文件的最后,我们启用默认主题为我们自己的主题即可。
cas.theme.defaultThemeName=mylogin
-
重启tomcat应用,访问登录地址:http://localhost:8080/cas/login,您将会看到如下界面:
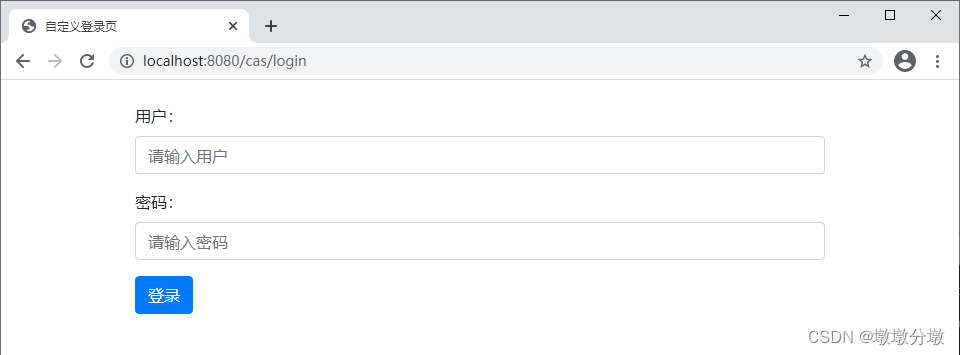
-
登录测试,使用账号zhangsan,密码:123456进行登录测试。好就这样,我们保持工程启动状态,接下来,进行下一环节。
五.SpringBoot集成CAS
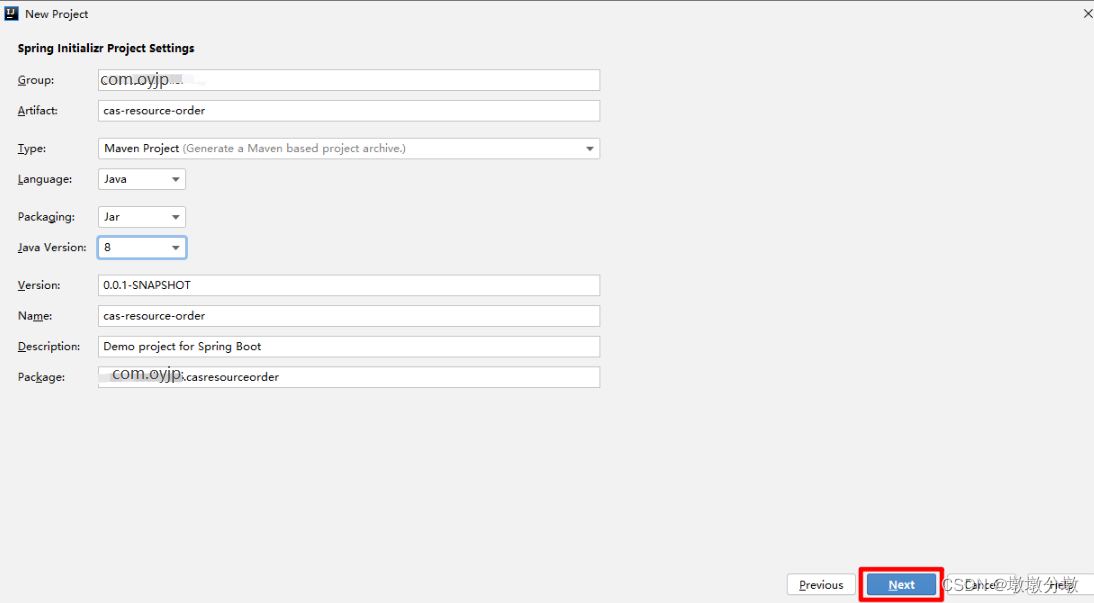
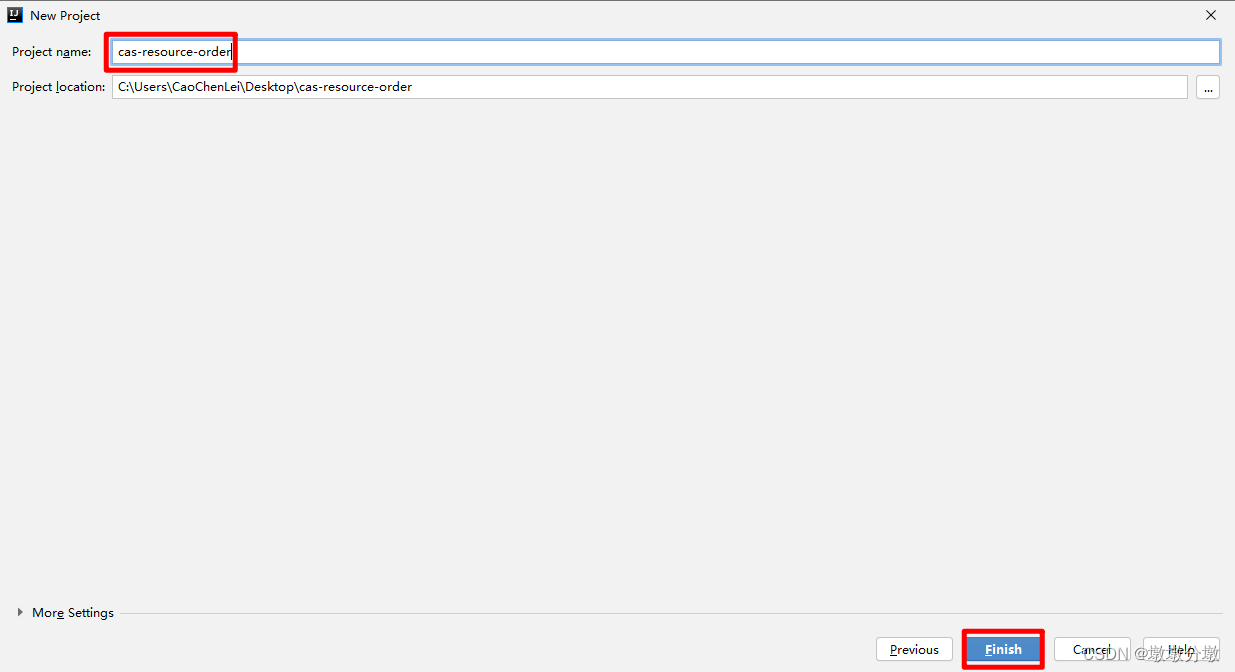
1.工程创建
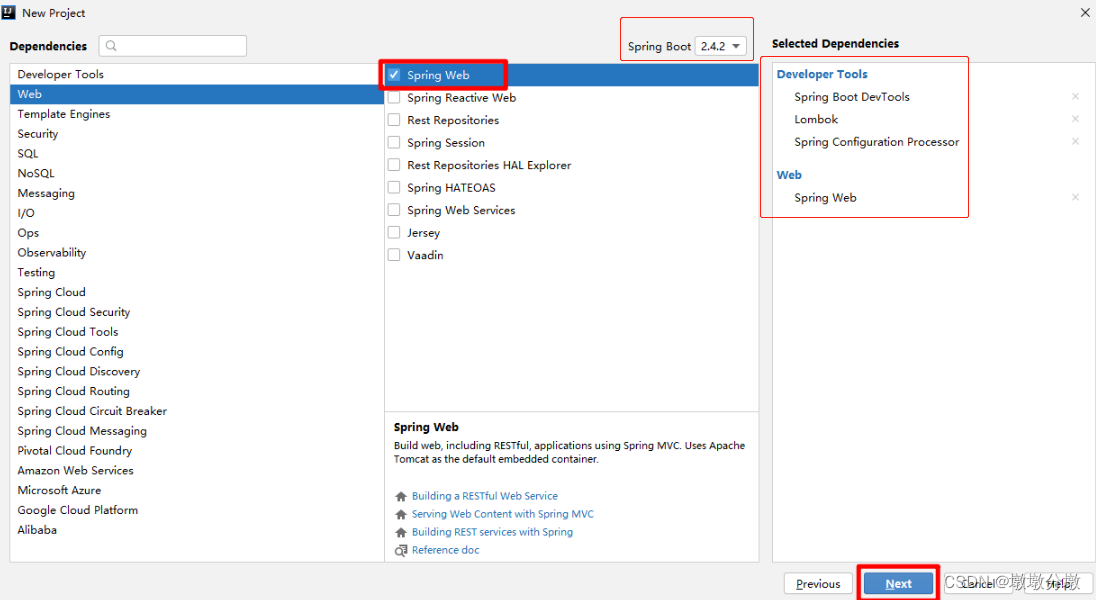
2.导入依赖
<dependency>
<groupId>org.mybatis.spring.boot</groupId>
<artifactId>mybatis-spring-boot-starter</artifactId>
<version>2.1.4</version>
</dependency>
<dependency>
<groupId>mysql</groupId>
<artifactId>mysql-connector-java</artifactId>
<version>5.1.49</version>
</dependency>
<dependency>
<groupId>org.springframework.boot</groupId>
<artifactId>spring-boot-starter-security</artifactId>
</dependency>
<dependency>
<groupId>org.springframework.security</groupId>
<artifactId>spring-security-cas</artifactId>
</dependency>
3.修改包名
com.oyjp.domain:用于存放实体对象
com.oyjp.prop:用于存放配置属性类
com.oyjp.mapper:用于存放映射文件
com.oyjp.service:用于存放服务接口
com.oyjp.controller:用于存放控制器类
com.oyjp.config:用于存放配置对象
4.编写配置文件
server:
port: 9001
servlet:
application-display-name: cas-resource-order
spring:
datasource:
driver-class-name: com.mysql.jdbc.Driver
url: jdbc:mysql://localhost:3306/security_test2
username: root
password: root
mybatis:
type-aliases-package: com.oyjp.domain
configuration:
map-underscore-to-camel-case: true
logging:
level:
com.oyjp: debug
app:
server:
host:
url: http://localhost:9001
login_url: /login
logout_url: /logout
cas:
server:
host:
url: http://localhost:8080/cas
login_url: ${cas.server.host.url}/login
logout_url: ${cas.server.host.url}/logout?service=${app.server.host.url}
5.编写角色授权
@Service
@Transactional
public class CustomUserDetailsService implements UserDetailsService {
    @Autowired(required = false)
    private SysUserMapper sysUserMapper;

    @Override
    public UserDetails loadUserByUsername(String username) throws UsernameNotFoundException {
        return sysUserMapper.findByUsername(username);
    }
}
6.编写配置对象
@Component
@Data
public class CasProperties {
@Value("${cas.server.host.url}")
private String casServerUrl;
@Value("${cas.server.host.login_url}")
private String casServerLoginUrl;
@Value("${cas.server.host.logout_url}")
private String casServerLogoutUrl;
@Value("${app.server.host.url}")
private String appServerUrl;
@Value("${app.server.host.login_url}")
private String appServerLoginUrl;
@Value("${app.server.host.logout_url}")
private String appServerLogoutUrl;
}
@Configuration
@EnableWebSecurity
@EnableGlobalMethodSecurity(securedEnabled = true)
public class SecurityConfig extends WebSecurityConfigurerAdapter {
@Autowired
private CasProperties casProperties;
@Override
protected void configure(AuthenticationManagerBuilder auth) throws Exception {
super.configure(auth);
auth.authenticationProvider(casAuthenticationProvider());
}
@Override
protected void configure(HttpSecurity http) throws Exception {
http.csrf().disable();
http.cors().disable();
http.formLogin().disable();
http.exceptionHandling()
.authenticationEntryPoint(casAuthenticationEntryPoint())
.and()
.addFilterAt(casAuthenticationFilter(), CasAuthenticationFilter.class)
.addFilterBefore(logoutFilter(), LogoutFilter.class)
.addFilterBefore(singleSignOutFilter(), CasAuthenticationFilter.class);
}
@Bean
public CasAuthenticationEntryPoint casAuthenticationEntryPoint() {
CasAuthenticationEntryPoint casAuthenticationEntryPoint = new CasAuthenticationEntryPoint();
casAuthenticationEntryPoint.setLoginUrl(casProperties.getCasServerLoginUrl());
casAuthenticationEntryPoint.setServiceProperties(serviceProperties());
return casAuthenticationEntryPoint;
}
@Bean
public ServiceProperties serviceProperties() {
ServiceProperties serviceProperties = new ServiceProperties();
serviceProperties.setService(casProperties.getAppServerUrl() + casProperties.getAppServerLoginUrl());
serviceProperties.setAuthenticateAllArtifacts(true);
return serviceProperties;
}
@Bean
public CasAuthenticationFilter casAuthenticationFilter() throws Exception {
CasAuthenticationFilter casAuthenticationFilter = new CasAuthenticationFilter();
casAuthenticationFilter.setAuthenticationManager(authenticationManager());
casAuthenticationFilter.setFilterProcessesUrl(casProperties.getAppServerLoginUrl());
return casAuthenticationFilter;
}
@Bean
public CasAuthenticationProvider casAuthenticationProvider() {
CasAuthenticationProvider casAuthenticationProvider = new CasAuthenticationProvider();
casAuthenticationProvider.setAuthenticationUserDetailsService(userDetailsByNameServiceWrapper());
casAuthenticationProvider.setServiceProperties(serviceProperties());
casAuthenticationProvider.setTicketValidator(new Cas20ServiceTicketValidator(casProperties.getCasServerUrl()));
casAuthenticationProvider.setKey("an_id_for_this_auth_provider_only");
return casAuthenticationProvider;
}
@Bean
public UserDetailsByNameServiceWrapper userDetailsByNameServiceWrapper() {
UserDetailsByNameServiceWrapper userDetailsByNameServiceWrapper = new UserDetailsByNameServiceWrapper();
userDetailsByNameServiceWrapper.setUserDetailsService(userDetailsService());
return userDetailsByNameServiceWrapper;
}
@Override
@Bean
public UserDetailsService userDetailsService() {
return new CustomUserDetailsServiceImpl();
}
@Bean
public LogoutFilter logoutFilter() {
LogoutFilter logoutFilter = new LogoutFilter(casProperties.getCasServerLogoutUrl(), new SecurityContextLogoutHandler());
logoutFilter.setFilterProcessesUrl(casProperties.getAppServerLogoutUrl());
return logoutFilter;
}
@Bean
public SingleSignOutFilter singleSignOutFilter() {
SingleSignOutFilter singleSignOutFilter = new SingleSignOutFilter();
singleSignOutFilter.setIgnoreInitConfiguration(true);
return singleSignOutFilter;
}
}
7.编写控制器类
@SpringBootApplication
public class CasResourceOrderApplication {
    public static void main(String[] args) {
        SpringApplication.run(CasResourceOrderApplication.class, args);
    }
}
8.启动项目测试
-
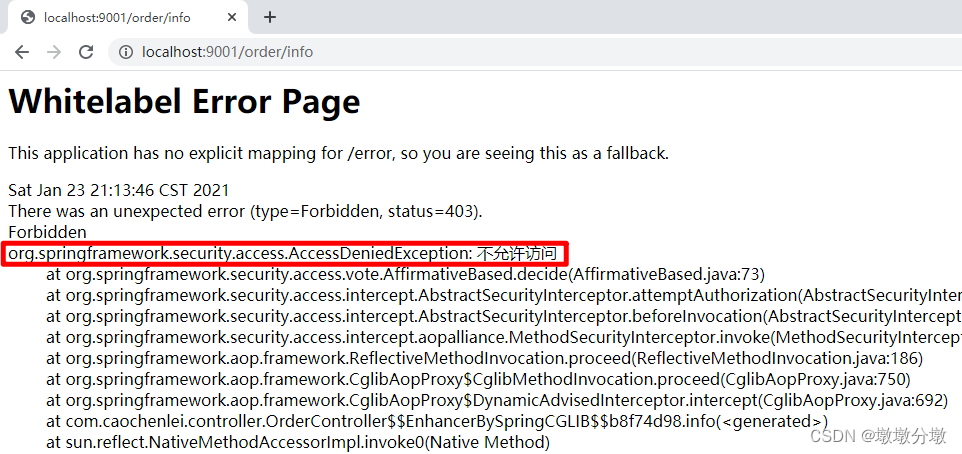
在浏览器输入地址进行访问:http://localhost:9001/order/info ,发现报错了,报错的原因很简单,zhangsan不能访问订单,只有lisi可以。
-
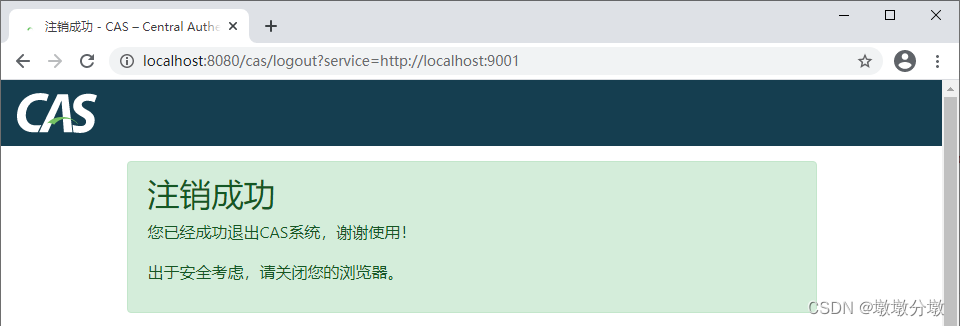
使用退出链接 http://localhost:9001/logout 进行退出
使用lisi进行重新访问:http://localhost:9001/order/info
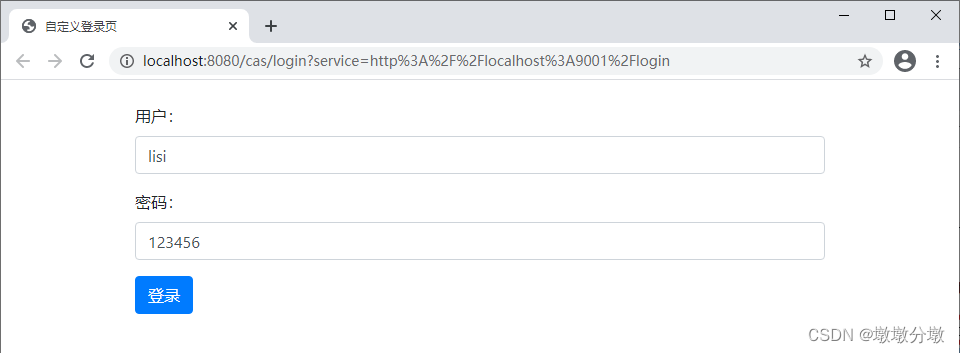
登录以后,我们就可以看到我们的业务逻辑执行后所返回的数据了。

六. SpringBoot-jar的方式启动 cas-server
<?xml version="1.0" encoding="UTF-8"?>
<project xmlns="http://maven.apache.org/POM/4.0.0"
xmlns:xsi="http://www.w3.org/2001/XMLSchema-instance"
xsi:schemaLocation="http://maven.apache.org/POM/4.0.0 http://maven.apache.org/xsd/maven-4.0.0.xsd ">
<modelVersion>4.0.0</modelVersion>
<groupId>org.apereo.cas</groupId>
<artifactId>cas-overlay</artifactId>
<packaging>war</packaging>
<version>1.0</version>
<properties>
<cas.version>5.3.16</cas.version>
<mysql.version>8.0.23</mysql.version>
<main-class>org.springframework.boot.loader.WarLauncher</main-class>
</properties>
<dependencies>
<dependency>
<groupId>org.apereo.cas</groupId>
<artifactId>cas-server-webapp-tomcat</artifactId>
<version>${cas.version}</version>
<type>war</type>
<scope>runtime</scope>
</dependency>
<dependency>
<groupId>org.apereo.cas</groupId>
<artifactId>cas-server-support-jdbc</artifactId>
<version>${cas.version}</version>
<exclusions>
<exclusion>
<groupId>net.shibboleth.tool</groupId>
<artifactId>xmlsectool</artifactId>
</exclusion>
</exclusions>
</dependency>
<dependency>
<groupId>org.apereo.cas</groupId>
<artifactId>cas-server-support-jdbc-authentication</artifactId>
<version>${cas.version}</version>
<exclusions>
<exclusion>
<groupId>net.shibboleth.tool</groupId>
<artifactId>xmlsectool</artifactId>
</exclusion>
</exclusions>
</dependency>
<dependency>
<groupId>mysql</groupId>
<artifactId>mysql-connector-java</artifactId>
<version>${mysql.version}</version>
</dependency>
<dependency>
<groupId>org.apereo.cas</groupId>
<artifactId>cas-server-core-services-api</artifactId>
<version>${cas.version}</version>
</dependency>
</dependencies>
<build>
<finalName>cas-server</finalName>
<plugins>
<plugin>
<groupId>org.springframework.boot</groupId>
<artifactId>spring-boot-maven-plugin</artifactId>
<version>2.1.7.RELEASE</version>
<configuration>
<mainClass>org.apereo.cas.web.CasWebApplication</mainClass>
<excludes>
<exclude>
<groupId>org.apereo.cas</groupId>
<artifactId>cas-server-webapp-tomcat</artifactId>
</exclude>
</excludes>
</configuration>
<executions>
<execution>
<id>repackage</id>
<goals>
<goal>repackage</goal>
</goals>
</execution>
</executions>
</plugin>
<plugin>
<groupId>org.apache.maven.plugins</groupId>
<artifactId>maven-war-plugin</artifactId>
<configuration>
<archiveClasses>false</archiveClasses>
<failOnMissingWebXml>false</failOnMissingWebXml>
<overlays>
<overlay>
<groupId>org.apereo.cas</groupId>
<artifactId>cas-server-webapp-tomcat</artifactId>
</overlay>
</overlays>
</configuration>
</plugin>
</plugins>
</build>
</project>
java -jar cas-server.war
七.cas.properties配置项介绍
1、cas.securityContext.status.allowedSubnet=127.0.0.1
  可以访问的服务端统计页面:http://sso.jadyer.com:8080/cas-server-web/status
  可以访问的服务端统计页面:http://sso.jadyer.com:8080/cas-server-web/statistics

2、host.name=S3
  uniqueIdGenerators.xml中的各种UniqueTicketIdGenerator生成TGT/ST等ticket时会用到host.name作为ticket的后缀
  host.name通常用在集群环境下,其值对于每个节点来说都必须是唯一的,这样整个集群环境生成的各种ticket也必定是唯一的
  单机环境下就没必要修改它了

3、slo.callbacks.disabled=false:是否禁用单点登出
4、cas.logout.followServiceRedirects=true:是否允许客户端Logout后重定向到service参数指定的资源


5、tgt.maxTimeToLiveInSeconds=28800 指的是TGT(Session)的最大有效时间,默认28800s,即8小时
   tgt.timeToKillInSeconds=7200  指在用户没有对系统进行任何操作的情况下,7200秒之后,也就是两个小时之后TGT会过期。过期之后需要重新登录操作。


6、st.timeToKillInSeconds=10    指定ServiceTicket的有效时间,默认10s
   st.numberOfUses=1    指的是ST可以用几次才过期,默认是用过一次就过期。
  说明当你访问一个应用系统时,cas server签发了一张票据,需在十秒钟之内拿ST去server进行校验,过了10秒钟就过期了,系统也就访问不了
    但从Cas Server生成service ticket返回给Cas client应用,到Cas client应用发送service ticket到Cas Server进行验证这个过10秒已经足够。
  这也是debug追踪CAS应用认证过程中经常会失败的原因,因为追踪的时候ServiceTicket已经过了10秒有效期了
CAS单点登录开源框架解读
前后端分离模式下 CAS 单点登录实现方案
本文内容由网友自发贡献,版权归原作者所有,本站不承担相应法律责任。如您发现有涉嫌抄袭侵权的内容,请联系:hwhale#tublm.com(使用前将#替换为@)