目录
- 一、更新软件源
- 二、安装python3.8
- 三、安装pip
一、更新软件源
- 1)首先,打开sources.list文件
sudo vim /etc/apt/sources.list
若没有vim,则需要进行安装。
sudo apt-get install vim-gtk - 2)进入sources.list后,按
i输入,在最后添加以下的国内源:
阿里源地址
deb http://mirrors.aliyun.com/ubuntu/ bionic main restricted universe multiverse
deb http://mirrors.aliyun.com/ubuntu/ bionic-security main restricted universe multiverse
deb http://mirrors.aliyun.com/ubuntu/ bionic-updates main restricted universe multiverse
deb http://mirrors.aliyun.com/ubuntu/ bionic-proposed main restricted universe multiverse
deb http://mirrors.aliyun.com/ubuntu/ bionic-backports main restricted universe multiverse
deb-src http://mirrors.aliyun.com/ubuntu/ bionic main restricted universe multiverse
deb-src http://mirrors.aliyun.com/ubuntu/ bionic-security main restricted universe multiverse
deb-src http://mirrors.aliyun.com/ubuntu/ bionic-updates main restricted universe multiverse
deb-src http://mirrors.aliyun.com/ubuntu/ bionic-proposed main restricted universe multiverse
deb-src http://mirrors.aliyun.com/ubuntu/ bionic-backports main restricted universe multiverse
华为源地址
deb https://repo.huaweicloud.com/ubuntu/ focal main restricted
deb https://repo.huaweicloud.com/ubuntu/ focal-updates main restricted
deb https://repo.huaweicloud.com/ubuntu/ focal universe
deb https://repo.huaweicloud.com/ubuntu/ focal-updates universe
deb https://repo.huaweicloud.com/ubuntu/ focal-backports main restricted universe
deb https://repo.huaweicloud.com/ubuntu/ focal-security main restricted
deb https://repo.huaweicloud.com/ubuntu/ focal-security universe
中科大源地址
deb http://mirrors.ustc.edu.cn/ubuntu/ bionic main restricted universe multiverse
deb-src http://mirrors.ustc.edu.cn/ubuntu/ bionic main restricted universe multiverse
deb http://mirrors.ustc.edu.cn/ubuntu/ bionic-updates main restricted universe multiverse
deb-src http://mirrors.ustc.edu.cn/ubuntu/ bionic-updates main restricted universe multiverse
deb http://mirrors.ustc.edu.cn/ubuntu/ bionic-backports main restricted universe multiverse
deb-src http://mirrors.ustc.edu.cn/ubuntu/ bionic-backports main restricted universe multiverse
deb http://mirrors.ustc.edu.cn/ubuntu/ bionic-security main restricted universe multiverse
deb-src http://mirrors.ustc.edu.cn/ubuntu/ bionic-security main restricted universe multiverse
deb http://mirrors.ustc.edu.cn/ubuntu/ bionic-proposed main restricted universe multiverse
deb-src http://mirrors.ustc.edu.cn/ubuntu/ bionic-proposed main restricted universe multiverse
清华源地址
deb http://mirrors.tuna.tsinghua.edu.cn/ubuntu/ bionic main restricted universe multiverse
deb-src http://mirrors.tuna.tsinghua.edu.cn/ubuntu/ bionic main restricted universe multiverse
deb http://mirrors.tuna.tsinghua.edu.cn/ubuntu/ bionic-updates main restricted universe multiverse
deb-src http://mirrors.tuna.tsinghua.edu.cn/ubuntu/ bionic-updates main restricted universe multiverse
deb http://mirrors.tuna.tsinghua.edu.cn/ubuntu/ bionic-security main restricted universe multiverse
deb-src http://mirrors.tuna.tsinghua.edu.cn/ubuntu/ bionic-security main restricted universe multiverse
二、安装python3.8
在 Ubuntu 18.中,python3 的默认版本为 3.6
$ python3 -V
Python 3.6.9
$ sudo apt update
$ sudo apt install software-properties-common
$ sudo add-apt-repository ppa:deadsnakes/ppa
$ sudo apt install python3.8

$ python3.8 -V
- 4)配置 python3.8 为系统默认 python3,将 python 各版本添加到 update-alternatives
$ which python3.8

/usr/bin/python3.8

$ sudo update-alternatives --install /usr/bin/python3 python3 /usr/bin/python3.8 1

$ which python3.6

/usr/bin/python3.6

$ sudo update-alternatives --install /usr/bin/python3 python3 /usr/bin/python3.6 2
- 5)配置 python3 默认指向 python3.8
$ sudo update-alternatives --config python3

There are 2 choices for the alternative python3 (providing /usr/bin/python3).

Selection Path Priority Status

------------------------------------------------------------

* 0 /usr/bin/python3.6 2 auto mode

1 /usr/bin/python3.6 2 manual mode

2 /usr/bin/python3.8 1 manual mode

Press to keep the current choice[*], or type selection number: 2
选择/输入 2, 回车。
$ python3 -V

Python 3.8.2
三、安装pip
$ sudo apt install python3-pip
如若出现以下错误
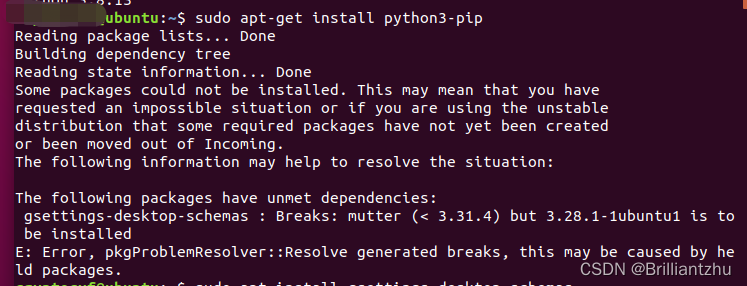
解决办法
sudo apt install gsettings-desktop-schemas
再安装
sudo apt-get install build-essential
然后,再次安装pip
$ sudo apt install python3-pip
本文内容由网友自发贡献,版权归原作者所有,本站不承担相应法律责任。如您发现有涉嫌抄袭侵权的内容,请联系:hwhale#tublm.com(使用前将#替换为@)