1 前言
由于之前已经对相关论文进行了翻译,因此这里就不再对DWA的原理进行赘述。本文主要目的是根据相关的程序进一步强化对论文中所体现思想的理解。
2 示例1
以下是使用python写的一个例子,其中比较核心的是把搜索空间减小到一个动态窗口的calc_dynamic_window(x, config)函数和筛选评价最高的calc_control_and_trajectory(x, dw, config, goal, ob)函数。
2.1 代码
import math
from enum import Enum

import matplotlib.pyplot as plt
import numpy as np

show_animation = True


""" Dynamic Window Approach control """
def dwa_control(x, config, goal, ob):

    dw = calc_dynamic_window(x, config)

    u, trajectory = calc_control_and_trajectory(x, dw, config, goal, ob)

    return u, trajectory

""" 机器人的类型 """
class RobotType(Enum):
    circle = 0
    rectangle = 1

""" 配置参数 """
class Config:

    def __init__(self):
        # robot parameter
        self.max_speed = 1.0  # [m/s]
        self.min_speed = -0.5  # [m/s]
        self.max_yaw_rate = 40.0 * math.pi / 180.0  # [rad/s]
        self.max_accel = 0.2  # [m/ss]
        self.max_delta_yaw_rate = 40.0 * math.pi / 180.0  # [rad/ss]
        self.v_resolution = 0.01  # [m/s]
        self.yaw_rate_resolution = 0.1 * math.pi / 180.0  # [rad/s]
        self.dt = 0.1  # [s] Time tick for motion prediction
        self.predict_time = 3.0  # [s]
        self.to_goal_cost_gain = 0.15
        self.speed_cost_gain = 1.0
        self.obstacle_cost_gain = 1.0
        self.robot_stuck_flag_cons = 0.001  # constant to prevent robot stucked
        self.robot_type = RobotType.circle

        # if robot_type == RobotType.circle
        # Also used to check if goal is reached in both types
        self.robot_radius = 1.0  # [m] for collision check

        # if robot_type == RobotType.rectangle
        self.robot_width = 0.5  # [m] for collision check
        self.robot_length = 1.2  # [m] for collision check
        # obstacles [x(m) y(m), ....]
        self.ob = np.array([[-1, -1],
                            [0, 2],
                            [4.0, 2.0],
                            [5.0, 4.0],
                            [5.0, 5.0],
                            [5.0, 6.0],
                            [5.0, 9.0],
                            [8.0, 9.0],
                            [7.0, 9.0],
                            [8.0, 10.0],
                            [9.0, 11.0],
                            [12.0, 13.0],
                            [12.0, 12.0],
                            [15.0, 15.0],
                            [13.0, 13.0]
                            ])

    @property
    def robot_type(self):
        return self._robot_type

    @robot_type.setter
    def robot_type(self, value):
        if not isinstance(value, RobotType):
            raise TypeError("robot_type must be an instance of RobotType")
        self._robot_type = value


config = Config()

""" 二轮差分底盘的运动学模型 """
def motion(x, u, dt):

    x[2] += u[1] * dt
    x[0] += u[0] * math.cos(x[2]) * dt
    x[1] += u[0] * math.sin(x[2]) * dt
    x[3] = u[0]
    x[4] = u[1]

    return x

""" 基于当前状态计算动态窗口 """
def calc_dynamic_window(x, config):

    # Dynamic window from robot specification
    Vs = [config.min_speed, config.max_speed,
          -config.max_yaw_rate, config.max_yaw_rate]

    # Dynamic window from motion model
    Vd = [x[3] - config.max_accel * config.dt,
          x[3] + config.max_accel * config.dt,
          x[4] - config.max_delta_yaw_rate * config.dt,
          x[4] + config.max_delta_yaw_rate * config.dt]

    #  [v_min, v_max, yaw_rate_min, yaw_rate_max]
    dw = [max(Vs[0], Vd[0]), min(Vs[1], Vd[1]),
          max(Vs[2], Vd[2]), min(Vs[3], Vd[3])]

    return dw

""" 根据输入预测运动轨迹 """
def predict_trajectory(x_init, v, y, config):

    x = np.array(x_init)
    trajectory = np.array(x)
    time = 0
    while time <= config.predict_time:
        x = motion(x, [v, y], config.dt)
        trajectory = np.vstack((trajectory, x))
        time += config.dt

    return trajectory

""" 对动态窗口内的轨迹进行评价进而获取最优的控制速度 """
def calc_control_and_trajectory(x, dw, config, goal, ob):

    x_init = x[:]
    min_cost = float("inf")
    best_u = [0.0, 0.0]
    best_trajectory = np.array([x])

    # evaluate all trajectory with sampled input in dynamic window
    for v in np.arange(dw[0], dw[1], config.v_resolution):
        for y in np.arange(dw[2], dw[3], config.yaw_rate_resolution):

            trajectory = predict_trajectory(x_init, v, y, config)

            # 代价计算
            to_goal_cost = config.to_goal_cost_gain * calc_to_goal_cost(trajectory, goal)
            speed_cost = config.speed_cost_gain * (config.max_speed - trajectory[-1, 3])
            ob_cost = config.obstacle_cost_gain * calc_obstacle_cost(trajectory, ob, config)

            final_cost = to_goal_cost + speed_cost + ob_cost

            # search minimum trajectory
            if min_cost >= final_cost:
                min_cost = final_cost
                best_u = [v, y]
                best_trajectory = trajectory
                if abs(best_u[0]) < config.robot_stuck_flag_cons \
                        and abs(x[3]) < config.robot_stuck_flag_cons:
                    # to ensure the robot do not get stuck in
                    # best v=0 m/s (in front of an obstacle) and
                    # best omega=0 rad/s (heading to the goal with
                    # angle difference of 0)
                    best_u[1] = -config.max_delta_yaw_rate
    return best_u, best_trajectory

""" 与障碍物的间隙代价 """
def calc_obstacle_cost(trajectory, ob, config):
    """
    calc obstacle cost inf: collision
    """
    ox = ob[:, 0]
    oy = ob[:, 1]
    dx = trajectory[:, 0] - ox[:, None]
    dy = trajectory[:, 1] - oy[:, None]
    r = np.hypot(dx, dy)

    """ 碰撞检测 """
    if config.robot_type == RobotType.rectangle:
        yaw = trajectory[:, 2]
        rot = np.array([[np.cos(yaw), -np.sin(yaw)], [np.sin(yaw), np.cos(yaw)]]) #旋转矩阵
        rot = np.transpose(rot, [2, 0, 1])
        local_ob = ob[:, None] - trajectory[:, 0:2]
        local_ob = local_ob.reshape(-1, local_ob.shape[-1])
        local_ob = np.array([local_ob @ x for x in rot]) #矩阵乘法
        local_ob = local_ob.reshape(-1, local_ob.shape[-1])

        upper_check = local_ob[:, 0] <= config.robot_length / 2
        right_check = local_ob[:, 1] <= config.robot_width / 2
        bottom_check = local_ob[:, 0] >= -config.robot_length / 2
        left_check = local_ob[:, 1] >= -config.robot_width / 2

        if (np.logical_and(np.logical_and(upper_check, right_check),
                           np.logical_and(bottom_check, left_check))).any():
            return float("Inf")
    elif config.robot_type == RobotType.circle:
        if np.array(r <= config.robot_radius).any():
            return float("Inf")

    min_r = np.min(r)
    return 1.0 / min_r  # OK

""" heading target的代价 """
def calc_to_goal_cost(trajectory, goal):
    """
        calc to goal cost with angle difference
    """

    dx = goal[0] - trajectory[-1, 0]
    dy = goal[1] - trajectory[-1, 1]
    error_angle = math.atan2(dy, dx)
    cost_angle = error_angle - trajectory[-1, 2]
    cost = abs(math.atan2(math.sin(cost_angle), math.cos(cost_angle)))

    return cost

""" 绘制箭头 """
def plot_arrow(x, y, yaw, length=0.5, width=0.1):  # pragma: no cover
    plt.arrow(x, y, length * math.cos(yaw), length * math.sin(yaw),
              head_length=width, head_width=width)
    plt.plot(x, y)

""" 绘制机器人 """
def plot_robot(x, y, yaw, config):  # pragma: no cover
    if config.robot_type == RobotType.rectangle:
        outline = np.array([[-config.robot_length / 2, config.robot_length / 2,
                             (config.robot_length / 2), -config.robot_length / 2,
                             -config.robot_length / 2],
                            [config.robot_width / 2, config.robot_width / 2,
                             - config.robot_width / 2, -config.robot_width / 2,
                             config.robot_width / 2]])
        Rot1 = np.array([[math.cos(yaw), math.sin(yaw)],
                         [-math.sin(yaw), math.cos(yaw)]])
        outline = (outline.T.dot(Rot1)).T
        outline[0, :] += x
        outline[1, :] += y
        plt.plot(np.array(outline[0, :]).flatten(),
                 np.array(outline[1, :]).flatten(), "-k")
    elif config.robot_type == RobotType.circle:
        circle = plt.Circle((x, y), config.robot_radius, color="b")
        plt.gcf().gca().add_artist(circle)
        out_x, out_y = (np.array([x, y]) +
                        np.array([np.cos(yaw), np.sin(yaw)]) * config.robot_radius)
        plt.plot([x, out_x], [y, out_y], "-k")


def main(gx=10.0, gy=10.0, robot_type=RobotType.circle):
    print(__file__ + " start!!")
    # initial state [x(m), y(m), yaw(rad), v(m/s), omega(rad/s)]
    x = np.array([0.0, 0.0, math.pi / 8.0, 0.0, 0.0])
    # goal position [x(m), y(m)]
    goal = np.array([gx, gy])

    # input [forward speed, yaw_rate]

    config.robot_type = robot_type
    trajectory = np.array(x)
    ob = config.ob
    while True:
        u, predicted_trajectory = dwa_control(x, config, goal, ob)
        x = motion(x, u, config.dt)  # simulate robot
        trajectory = np.vstack((trajectory, x))  # store state history

        if show_animation:
            plt.cla()
            # for stopping simulation with the esc key.
            plt.gcf().canvas.mpl_connect(
                'key_release_event',
                lambda event: [exit(0) if event.key == 'escape' else None])
            plt.plot(predicted_trajectory[:, 0], predicted_trajectory[:, 1], "-g")
            plt.plot(x[0], x[1], "xr")
            plt.plot(goal[0], goal[1], "xb")
            plt.plot(ob[:, 0], ob[:, 1], "ok")
            plot_robot(x[0], x[1], x[2], config)
            plot_arrow(x[0], x[1], x[2])
            plt.axis("equal")
            plt.grid(True)
            plt.pause(0.0001)

        # check reaching goal
        dist_to_goal = math.hypot(x[0] - goal[0], x[1] - goal[1])
        if dist_to_goal <= config.robot_radius:
            print("Goal!!")
            break

    print("Done")
    if show_animation:
        plt.plot(trajectory[:, 0], trajectory[:, 1], "-r")
        plt.pause(0.0001)

    plt.show()


if __name__ == '__main__':
    main(robot_type=RobotType.rectangle)
    # main(robot_type=RobotType.circle)
2.2 测试结果
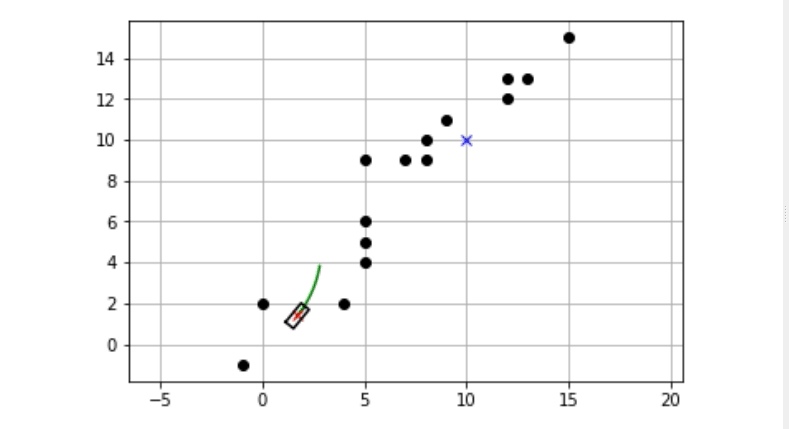 DWA仿真测试结果
3 示例2
在示例2中,我们将测试在ROS中封装好的DWA算法(A*/Dijstra+AMCL+DWA)。
3.1 准备
sudo apt install ros-melodic-turtlebot3*
sudo apt install ros-melodic-gmapping
sudo apt install ros-melodic-navigation


3.2 建图
3.2.1 启动ROS
roscore

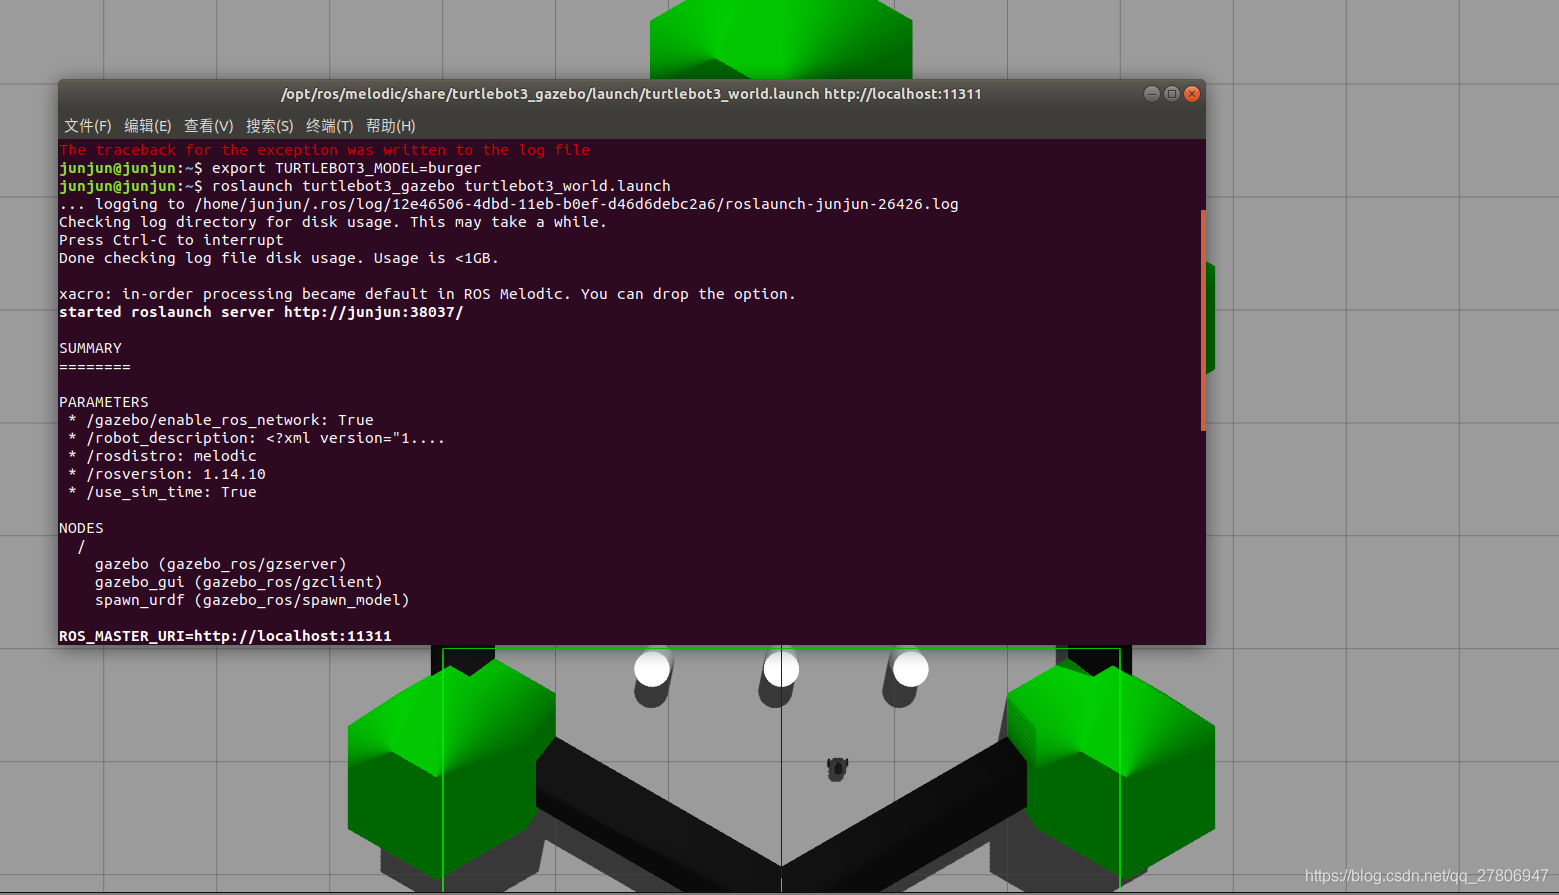
3.2.2 启动仿真环境
export TURTLEBOT3_MODEL=burger
roslaunch turtlebot3_gazebo turtlebot3_world.launch
3.2.3 启动键盘控制
export TURTLEBOT3_MODEL=burger
roslaunch turtlebot3_teleop turtlebot3_teleop_key.launch

3.2.4 启动SLAM算法
export TURTLEBOT3_MODEL=burger
roslaunch turtlebot3_slam turtlebot3_slam.launch slam_methods:=gmapping

3.2.5 建图和保存
rosrun map_server map_saver -f ~/map
 地图
地图
 地图的相关参数
3.3 定位和导航
3.3.1 启动仿真环境
export TURTLEBOT3_MODEL=burger
roslaunch turtlebot3_gazebo turtlebot3_world.launch
3.3.2 启动导航程序
export TURTLEBOT3_MODEL=burger
roslaunch turtlebot3_navigation turtlebot3_navigation.launch map_file:=$HOME/map.yaml
3.2.3 launch文件分析
move_base.launch默认的局部路径规划算法是DWA,默认的定位算法是AMCL。

3.2.4 测试结果
 DWA仿真测试结果
本文内容由网友自发贡献,版权归原作者所有,本站不承担相应法律责任。如您发现有涉嫌抄袭侵权的内容,请联系:hwhale#tublm.com(使用前将#替换为@)