不进行异常处理
1、runAsync() 无返回值 supplyAsync() 有返回值

根据idea的提示和变量的范型也能看出来,runAsync() 是不返回值的,而supplyAsync则会把比较的结果返回出去.
2、thenApply()、thenAccept()、thenRun按顺序执行异步任务
如果一个异步任务的完成需要依赖前一个异步任务的完成,那么可以使用这三个方法,不需要先调用get()方法获取返回值后再执行.
这三个方法的区别:

代码示例

执行结果:

thenApply和thenApplyAsync的区别
我们发现这三个方法都有一个对应的带有后缀Async的方法.
那么带Async和不带Async有什么不同呢?用thenApply和thenApplyAsync来比较,这两个方法区别就在于谁去执行这个任务.
如果使用thenApplyAsync,那么执行的线程是从ForkJoinPool.commonPool()中获取不同的线程进行执行.
如果使用thenApply,则需要分情况讨论:
- supplyAsync方法执行速度特别快,那么thenApply任务就是主线程进行执行
- supplyAsync方法执行速度特别慢,那么就和supplyAsync执行线程一样.
        System.out.println("-------------");
        CompletableFuture<String> supplyAsyncWithSleep = CompletableFuture.supplyAsync(()->{
            try {
                Thread.sleep(10000);
            } catch (InterruptedException e) {
                e.printStackTrace();
            }
            return "supplyAsyncWithSleep Thread Id : " + Thread.currentThread();
        });
        CompletableFuture<String> thenApply = supplyAsyncWithSleep
            .thenApply(name -> name + "------thenApply Thread Id : " + Thread.currentThread());
        CompletableFuture<String> thenApplyAsync = supplyAsyncWithSleep
            .thenApplyAsync(name -> name + "------thenApplyAsync Thread Id : " + Thread.currentThread());
        System.out.println("Main Thread Id: "+ Thread.currentThread());
        System.out.println(thenApply.get());
        System.out.println(thenApplyAsync.get());
        System.out.println("-------------No Sleep");
        CompletableFuture<String> supplyAsyncNoSleep = CompletableFuture.supplyAsync(()->{
            return "supplyAsyncNoSleep Thread Id : " + Thread.currentThread();
        });
        CompletableFuture<String> thenApplyNoSleep = supplyAsyncNoSleep
            .thenApply(name -> name + "------thenApply Thread Id : " + Thread.currentThread());
        CompletableFuture<String> thenApplyAsyncNoSleep = supplyAsyncNoSleep
            .thenApplyAsync(name -> name + "------thenApplyAsync Thread Id : " + Thread.currentThread());
        System.out.println("Main Thread Id: "+ Thread.currentThread());
        System.out.println(thenApplyNoSleep.get());
        System.out.println(thenApplyAsyncNoSleep.get());
执行结果

3、thenCompose()、thenCombine()
thenCompose():可以用于组合多个CompletableFuture,将前一个结果作为下一个计算的参数,他们之间存在先后顺序
thenCombine():两个任务是并行执行的,最后将结果汇总.
CompletableFuture<String> thenCompose = CompletableFuture.supplyAsync(() -> "hello").thenCompose(s -> CompletableFuture.supplyAsync(()-> s + "world"));
System.out.println("thenCompose = " + thenCompose.get());
CompletableFuture<String> hello = CompletableFuture.supplyAsync(() -> "hello");
CompletableFuture<String> world = CompletableFuture.supplyAsync(() -> "world");
CompletableFuture<String> thenCombine = hello.thenCombine(world ,(h,w)-> h + w);
System.out.println("thenCombine = " + thenCombine.get());
执行结果:

其中我们能看到thenCombine、thenCompose其实就是组合了两个异步操作,那么如何做到组合任意多个异步操作呢?
allOf():等待所有CompletableFuture完成以后才会运行回调函数
anyOf():只要其中一个CompletableFuture完成,那么就会执行回调函数.注意此时其他的任务也就不执行了.
CompletableFuture<String> hello = CompletableFuture.supplyAsync(() -> "hello");
CompletableFuture<String> world = CompletableFuture.supplyAsync(() -> "world");
CompletableFuture<String> statement = CompletableFuture.supplyAsync(() -> "I have two cats!");
CompletableFuture.allOf(hello, world, statement);
System.out.println("hello.get() = " + hello.get());
System.out.println("world.get() = " + world.get());
System.out.println("statement.get() = " + statement.get());
CompletableFuture<String> hello1 = CompletableFuture.supplyAsync(() -> "hello");
CompletableFuture<String> world1 = CompletableFuture.supplyAsync(() -> "world");
CompletableFuture<String> statement1 = CompletableFuture.supplyAsync(() -> "I have two cats!");
CompletableFuture<Object> objectCompletableFuture = CompletableFuture.anyOf(hello1, world1, statement1);
System.out.println("voidCompletableFuture.get() = " + objectCompletableFuture.get());
**
异常处理
**
1、whenComplete、whenCompleteAsync,当CompletableFuture完成计算结果后,我们可能需要对结果进行一些处理.
CompletableFuture.supplyAsync(() -> "hello ")
            .thenApply(s -> s + "world!")
            .whenComplete((result, e) -> System.out.println(result));
执行结果
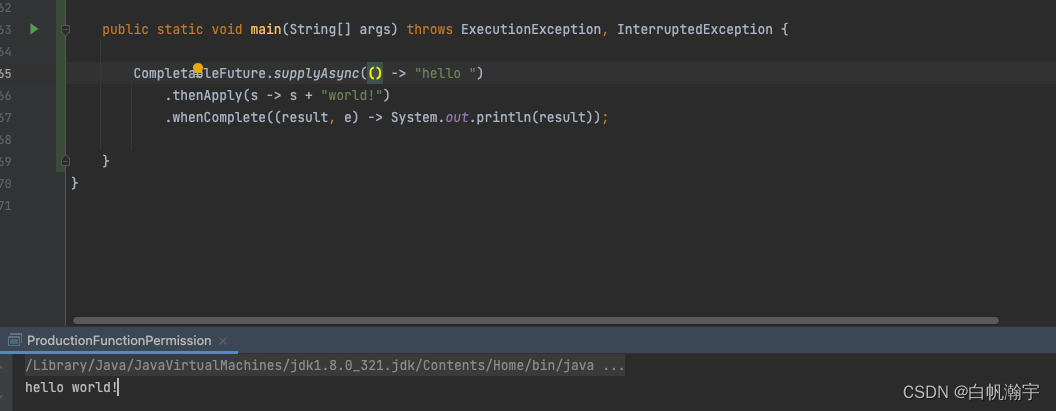
可以看到,当线程执行完成的时候,直接打印出了线程运行的结果.
并且可以看到whenComplete其实是有两个值的,一个是结果值,一个是异常信息
CompletableFuture.supplyAsync(() -> {
            int i = 10 / 0;
           return  "hello ";
        }).thenApply(s -> s + "world!")
            .whenComplete((result, e) -> {
                System.out.println(result);
                System.out.println(e);
            });

2、exceptionally()
CompletableFuture<String> exceptionallyCompletable = CompletableFuture.supplyAsync(() -> {
            int i = 10 / 0;
            return "hello ";
        }).exceptionally(e -> {
            System.out.println(e);
            return "你的小主已下线";
        });
        String exceptionally = exceptionallyCompletable.get();
        System.out.println("exceptionally = " + exceptionally);
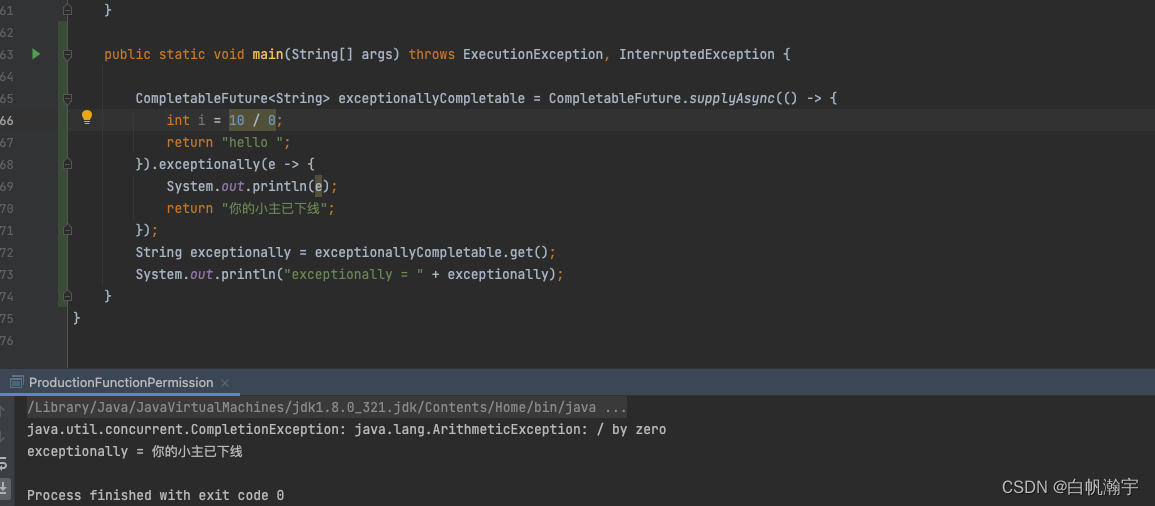
通过上面的代码和返回值可以看出,其可以接收值是异常信息,也能够返回自定义返回值.
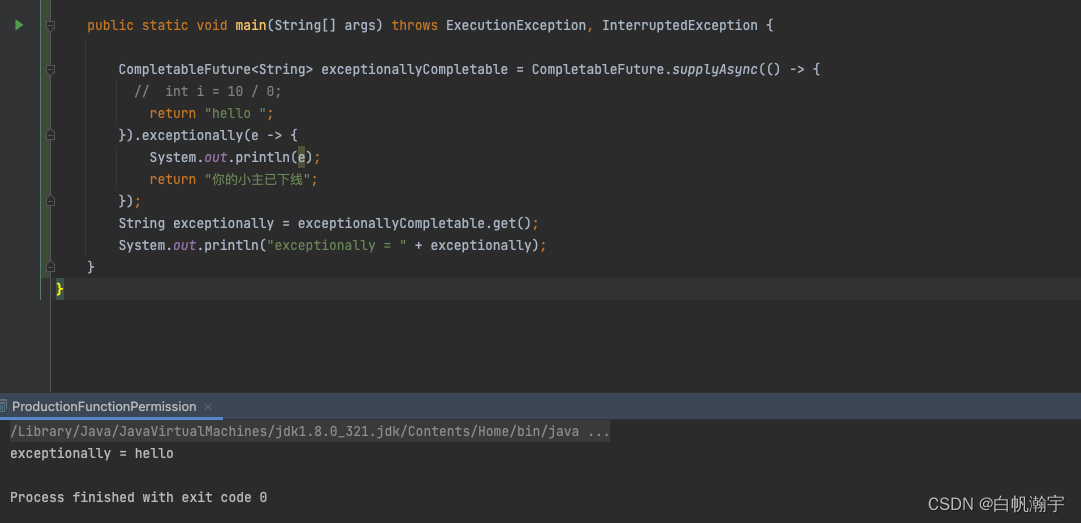
没有异常的时候,是不会执行exceptionally()里的方法.
CompletableFuture<String> exceptionallyCompletable = CompletableFuture.supplyAsync(() -> {
return "hello ";
}).exceptionally(e -> {
System.out.println(e);
return "你的小主已下线";
});
String exceptionally = exceptionallyCompletable.get();
System.out.println("exceptionally = " + exceptionally);
}
3、handle()
调用handle()方法也能够捕捉到异常并且自定义返回值,但是和exceptionally方法不同的一点是handle()方法无论是否发生异常均会被调用.这点和whenComplete很像.
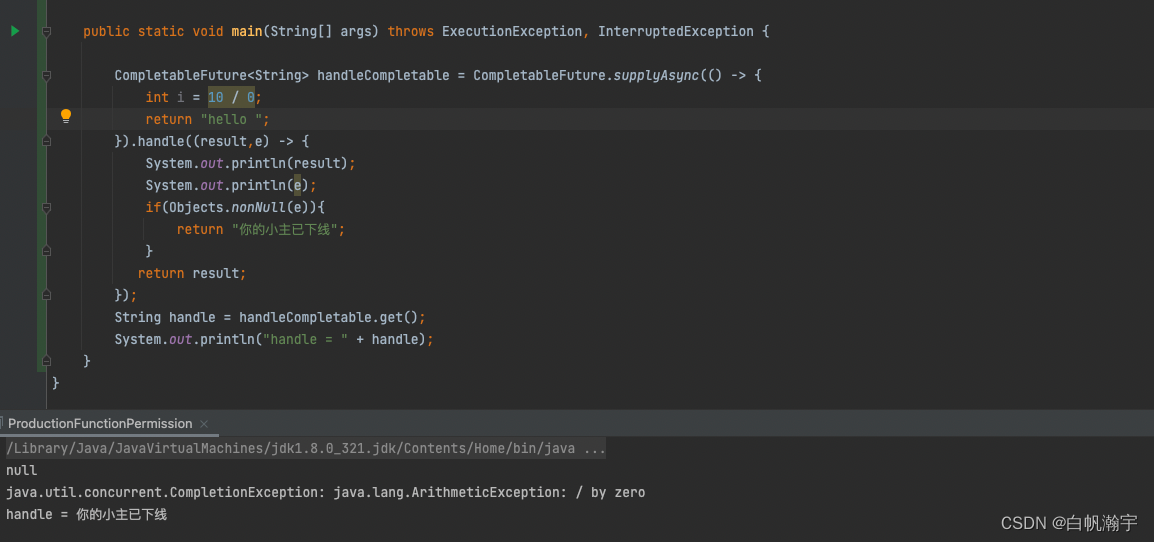
CompletableFuture<String> handleCompletable = CompletableFuture.supplyAsync(() -> {
return "hello ";
}).handle((result,e) -> {
System.out.println(result);
System.out.println(e);
if(Objects.nonNull(e)){
return "你的小主已下线";
}
return result;
});
String handle = handleCompletable.get();
System.out.println("handle = " + handle);

本文内容由网友自发贡献,版权归原作者所有,本站不承担相应法律责任。如您发现有涉嫌抄袭侵权的内容,请联系:hwhale#tublm.com(使用前将#替换为@)