PX4模块设计之二:uORB消息代理
- 1. uORB模块接口
- 1.1. uORB服务接口
- 1.2. uORB消息注册/去注册接口
- 1.3. uORB消息发布接口
- 1.4. uORB消息订阅/去订阅接口
- 1.5. uORB辅助功能接口
- 2. Hello World with uORB
- 2.1. px4_simple_app工程结构
- 2.2. px4_simple_app之Hello World
- 2.3. px4_simple_app之uORB
- 2.4. px4_simple_app之CMakeList.txt
- 2.5. px4_simple_app之Kconfig
- 3. 测试应用(SITL)
- 4. 参考资料
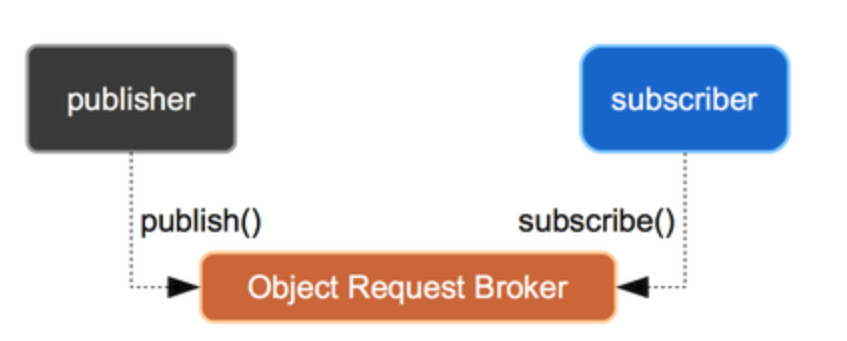
uORB(Micro Object Request Broker,微对象请求代理器)是PX4中非常重要且关键的一个模块,通过异步publish/subscribe的消息传递方式,用于各个模块之间的数据交互。
这个使我想到了11年的时候,接触的CORBA, Common Object Request Broker。度娘了一圈(包括Google),发现这个uORB是PX4的特殊模块,也没有被抽象出来(比如:Nuttx,MAVLink,Coap,Mqtt等能独立抽象出来)。
In distributed computing, an object request broker (ORB) is a middleware which allows program calls to be made from one computer to another via a computer network, providing location transparency through remote procedure calls. ORBs promote interoperability of distributed object systems, enabling such systems to be built by piecing together objects from different vendors, while different parts communicate with each other via the ORB.
其实对象模型更多考虑是解耦(松耦合模块设计),当然这个和我们前面PX4开源软件框架简明简介的框架设计原则是非常吻合的。
既然这样先对这个模块进行下了解,关于内部实现细节和模块性能这方面我们暂放一边。
1. uORB模块接口
接口文件定义:
platforms\common\uORB\uORB.h
1.1. uORB服务接口
int uorb_start(void); //启动服务

int uorb_status(void); //服务状态查询,命令行打印状态

int uorb_top(char **topic_filter, int num_filters); //uORB动态情况查询,类似top
1.2. uORB消息注册/去注册接口
orb_advert_t orb_advertise(const struct orb_metadata *meta, const void *data); //注册uORB主题(缓存1个消息)

orb_advert_t orb_advertise_queue(const struct orb_metadata *meta, const void *data, unsigned int queue_size); //注册uORB主题(缓存queue_size个消息)

orb_advert_t orb_advertise_multi(const struct orb_metadata *meta, const void *data, int *instance); //注册多实例uORB主题(每个实例缓存1个消息)

orb_advert_t orb_advertise_multi_queue(const struct orb_metadata *meta, const void *data, int *instance, unsigned int queue_size);  //注册多实例uORB主题(每个实例缓存queue_size个消息)

int orb_unadvertise(orb_advert_t handle); //去注册uORB主题
1.3. uORB消息发布接口
int	orb_publish(const struct orb_metadata *meta, orb_advert_t handle, const void *data); //发布uORB消息

int orb_publish_auto(const struct orb_metadata *meta, orb_advert_t *handle, const void *data, int *instance); //整合注册uORB主题+发布uORB消息的函数(支持多实例)
1.4. uORB消息订阅/去订阅接口
int	orb_subscribe(const struct orb_metadata *meta); //订阅uORB主题

int	orb_subscribe_multi(const struct orb_metadata *meta, unsigned instance); //订阅uORB主题(针对特定主题)

int	orb_unsubscribe(int handle); //去订阅uORB主题
1.5. uORB辅助功能接口
int	orb_copy(const struct orb_metadata *meta, int handle, void *buffer); //获取uORB主题消息数据

int	orb_check(int handle, bool *updated); //用来检查一个主题在发布者上一次更新数据后,有没有订阅者调用过ob_copy来接收、处理过

int	orb_exists(const struct orb_metadata *meta, int instance); //检测一个主题是否存在

int	orb_group_count(const struct orb_metadata *meta); //检查有多少个实例

int	orb_set_interval(int handle, unsigned interval); //设置订阅的最小时间间隔。如果设置了,则在这间隔内发布的数据将订阅不到;需要注意的是,设置后,第一次的数据订阅还是由最初设置的频率来获取。

int	orb_get_interval(int handle, unsigned *interval); //获取订阅的最小时间间隔

char *orb_get_c_type(unsigned char short_type); //ctype类型检查

void orb_print_message_internal(const struct orb_metadata *meta, const void *data, bool print_topic_name); //内部debug函数
2. Hello World with uORB
PX4是提供了一个完整的飞控解决方案。什么叫完整,不仅仅是结果,还会提供过程,甚至是为什么。所以这个【Hello World with uORB】的示例代码,已经有了。
-不仅开源,还专业,哈哈!!!
注1:完整代码详见链接。
注2:关于自定义消息这块内容,后面我们会找机会介绍,先了解这个模块和简单应用。
2.1. px4_simple_app工程结构
这个就是完整的Hello World任务工程。为什么这里叫任务工程(是我自己随便叫的),主要原因:
- PX4代码主要是跑在两种OS上(Nuttx or Unix), Nuttx任务对应linux线程;
- PX4代码在Nuttx上主要是启动多个任务
- PX4代码在Unix上主要是启动一个进程下的多个线程(对应Nuttx任务)
- PX4代码采用CMakeLists.txt和MODULE的方式来对应用层进行打包
src\examples\px4_simple_app\
 ├──> px4_simple_app.c
 ├──> CMakeLists.txt
 └──> Kconfig
2.2. px4_simple_app之Hello World
这里是Hello World代码,很熟悉吧!类似C语言Linux应用程序之Helloworld入门
54 __EXPORT int px4_simple_app_main(int argc, char *argv[]);
55
56 int px4_simple_app_main(int argc, char *argv[])
57 {
58 	PX4_INFO("Hello Sky!");
2.3. px4_simple_app之uORB
示例代码中使用了以下API
- orb_subscribe
- orb_set_interval
- orb_advertise
- orb_copy
- orb_publish
60 	/* subscribe to vehicle_acceleration topic */
61 	int sensor_sub_fd = orb_subscribe(ORB_ID(vehicle_acceleration));
62 	/* limit the update rate to 5 Hz */
63 	orb_set_interval(sensor_sub_fd, 200);
64
65 	/* advertise attitude topic */
66 	struct vehicle_attitude_s att;
67 	memset(&att, 0, sizeof(att));
68 	orb_advert_t att_pub = orb_advertise(ORB_ID(vehicle_attitude), &att);
69
70 	/* one could wait for multiple topics with this technique, just using one here */
71 	px4_pollfd_struct_t fds[] = {
72 		{ .fd = sensor_sub_fd,   .events = POLLIN },
73 		/* there could be more file descriptors here, in the form like:
74 		 * { .fd = other_sub_fd,   .events = POLLIN },
75 		 */
76 	};
77
78 	int error_counter = 0;
79
80 	for (int i = 0; i < 5; i++) {
81 		/* wait for sensor update of 1 file descriptor for 1000 ms (1 second) */
82 		int poll_ret = px4_poll(fds, 1, 1000);
83
84 		/* handle the poll result */
85 		if (poll_ret == 0) {
86 			/* this means none of our providers is giving us data */
87 			PX4_ERR("Got no data within a second");
88
89 		} else if (poll_ret < 0) {
90 			/* this is seriously bad - should be an emergency */
91 			if (error_counter < 10 || error_counter % 50 == 0) {
92 				/* use a counter to prevent flooding (and slowing us down) */
93 				PX4_ERR("ERROR return value from poll(): %d", poll_ret);
94 			}
95
96 			error_counter++;
97
98 		} else {
99
100			if (fds[0].revents & POLLIN) {
101				/* obtained data for the first file descriptor */
102				struct vehicle_acceleration_s accel;
103				/* copy sensors raw data into local buffer */
104				orb_copy(ORB_ID(vehicle_acceleration), sensor_sub_fd, &accel);
105				PX4_INFO("Accelerometer:\t%8.4f\t%8.4f\t%8.4f",
106					 (double)accel.xyz[0],
107					 (double)accel.xyz[1],
108					 (double)accel.xyz[2]);
109
110				/* set att and publish this information for other apps
111				 the following does not have any meaning, it's just an example
112				*/
113				att.q[0] = accel.xyz[0];
114				att.q[1] = accel.xyz[1];
115				att.q[2] = accel.xyz[2];
116
117				orb_publish(ORB_ID(vehicle_attitude), att_pub, &att);
118			}
119
120			/* there could be more file descriptors here, in the form like:
121			 * if (fds[1..n].revents & POLLIN) {}
122			 */
123		}
124	}
125
126	PX4_INFO("exiting");
2.4. px4_simple_app之CMakeList.txt
px4_add_module() 方法根据模块描述生成静态库。
- MODULE块是模块的唯一固件名称(按照惯例,模块名称的前缀是src之后的父路径)
- MAIN块列出了模块的入口点,它将命令注册到 NuttX,以便可以从 PX4 shell 或 SITL 控制台调用它。
33 px4_add_module(
34 	MODULE examples__px4_simple_app
35 	MAIN px4_simple_app
36	SRCS
37 		px4_simple_app.c
38 	DEPENDS
39 	)
2.5. px4_simple_app之Kconfig
Kconfig文件里面定义了:
- 任务的名称: px4_simple_app
- Kconfig符号:EXAMPLES_PX4_SIMPLE_APP
- 默认选择:n
- 该任务的描述
1 menuconfig EXAMPLES_PX4_SIMPLE_APP
2 	bool "px4_simple_app"
3 	default n
4 	---help---
5 		Enable support for px4_simple_app
3. 测试应用(SITL)
这里就用SITL来做下测试效果。
注:自己的KakuteF7还有BetaFlight,目前懒得动bootloader。
由于SITL代码编译和有硬件目标板的Kconfig配置有些差异,无法使用命令:
$ make px4_sitl menuconfig
我们查下build工程下的boardconfig文件,看下这个文件是否已经选中编译我们的这个任务模块(449行):
436 #
437 # examples
438 #
439 CONFIG_EXAMPLES_DYN_HELLO=y
440 CONFIG_EXAMPLES_FAKE_GPS=y
441 # CONFIG_EXAMPLES_FAKE_GYRO is not set
442 CONFIG_EXAMPLES_FAKE_IMU=y
443 CONFIG_EXAMPLES_FAKE_MAGNETOMETER=y
444 CONFIG_EXAMPLES_FIXEDWING_CONTROL=y
445 CONFIG_EXAMPLES_HELLO=y
446 # CONFIG_EXAMPLES_HWTEST is not set
447 # CONFIG_EXAMPLES_MATLAB_CSV_SERIAL is not set
448 CONFIG_EXAMPLES_PX4_MAVLINK_DEBUG=y
449 CONFIG_EXAMPLES_PX4_SIMPLE_APP=y
450 CONFIG_EXAMPLES_ROVER_STEERING_CONTROL=y
451 CONFIG_EXAMPLES_UUV_EXAMPLE_APP=y
452 CONFIG_EXAMPLES_WORK_ITEM=y
453 # end of examples
整体构建下代码,并运行仿真环境:
$ make px4_sitl jmavsim
在仿真pxh命令提示下,help看下内部支持的命令是否含有px4_simple_app
pxh> help
Builtin Commands:
  actuator_test
  airship_att_control
  airspeed_selector
  attitude_estimator_q
  battery_simulator
  camera_feedback
  camera_trigger
  cdev_test
  commander
  commander_tests
  control_allocator
  controllib_test
  dataman
  dyn
  ekf2
  ex_fixedwing_control
  failure
  fake_gps
  fake_imu
  fake_magnetometer
  flight_mode_manager
  fw_att_control
  fw_autotune_attitude_control
  fw_pos_control_l1
  gimbal
  gps
  gyro_calibration
  gyro_fft
  hello
  hrt_test
  land_detector
  landing_target_estimator
  led_control
  list_files
  list_tasks
  listener
  load_mon
  local_position_estimator
  logger
  mag_bias_estimator
  manual_control
  mavlink
  mavlink_tests
  mc_att_control
  mc_autotune_attitude_control
  mc_hover_thrust_estimator
  mc_pos_control
  mc_rate_control
  mixer
  motor_test
  navigator
  param
  perf
  pwm
  pwm_out_sim
  px4_mavlink_debug
  px4_simple_app
  rc_tests
  rc_update
  replay
  rover_pos_control
  rover_steering_control
  rpm_simulator
  sd_bench
  send_event
  sensor_baro_sim
  sensor_gps_sim
  sensor_mag_sim
  sensors
  shutdown
  sih
  simulator
  sleep
  system_time
  temperature_compensation
  tests
  tone_alarm
  tune_control
  uorb
  uorb_tests
  uuv_att_control
  uuv_example_app
  uuv_pos_control
  ver
  vtol_att_control
  work_item_example
  work_queue
  wqueue_test
在仿真pxh命令提示下运行:
pxh> px4_simple_app
INFO  [px4_simple_app] Hello Sky!
INFO  [px4_simple_app] Accelerometer:	  0.0373	 -0.0432	 -9.7909
INFO  [px4_simple_app] Accelerometer:	  0.0652	 -0.0592	 -9.7908
INFO  [px4_simple_app] Accelerometer:	  0.0738	 -0.0068	 -9.7628
INFO  [px4_simple_app] Accelerometer:	  0.0282	 -0.0097	 -9.8224
INFO  [px4_simple_app] Accelerometer:	  0.0637	 -0.0293	 -9.7856
INFO  [px4_simple_app] exiting
不过这里有一点可能看不到了,因为orb_publish(ORB_ID(vehicle_attitude), att_pub, &att);混在在很多仿真模拟数据里面了。有兴趣可以研改下代码,将这个ACC的值放大到很大,显示一个差异。
具体QGroundControl的验证方法可以参考:PX4开发环境搭建–模拟器编译及QGroundControl & RC遥控模拟配置
4. 参考资料
【1】uORB Messaging
【2】First Application Tutorial (Hello Sky)
本文内容由网友自发贡献,版权归原作者所有,本站不承担相应法律责任。如您发现有涉嫌抄袭侵权的内容,请联系:hwhale#tublm.com(使用前将#替换为@)