在本文中,我们将研究使用 Python 和 OpenCV 检测和估计 ArUco 标记的方向。

首先,我们将从生成 ArUco 标记开始。你可以使用特定网站一个一个地创建单个标签,也可以使用我的程序生成整个页面的标记。
一旦你创建了一些标记,我将向你展示另一个检测这些标记的程序。该程序还可以确定这些 ArUco 标记的位姿轴(位姿代表位置和姿态)。
我在这里编写的代码是用 Python 编写的,但是对于更高级的检测和姿态估计应用程序,你可能希望使用 C++ 来实现它们。
生成 ArUco 标记
如果你想一个一个地创建 ArUco 标记,那么你可以使用 Oleg Kalachev 的这个网站:https://chev.me/arucogen/。该网站提供了一个简单的界面,如下所示:
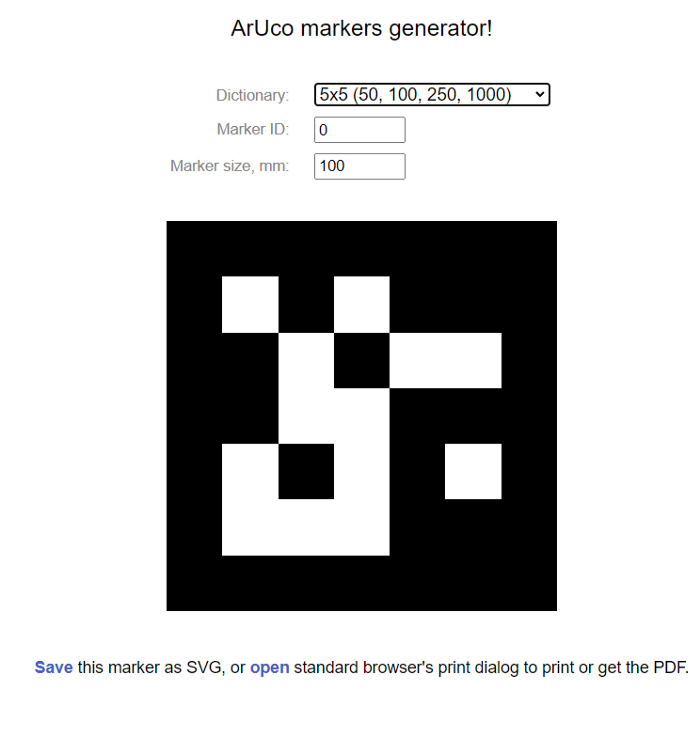
选择 ArUco 字典、标记的 id 和大小。然后下载标记并打印出来。
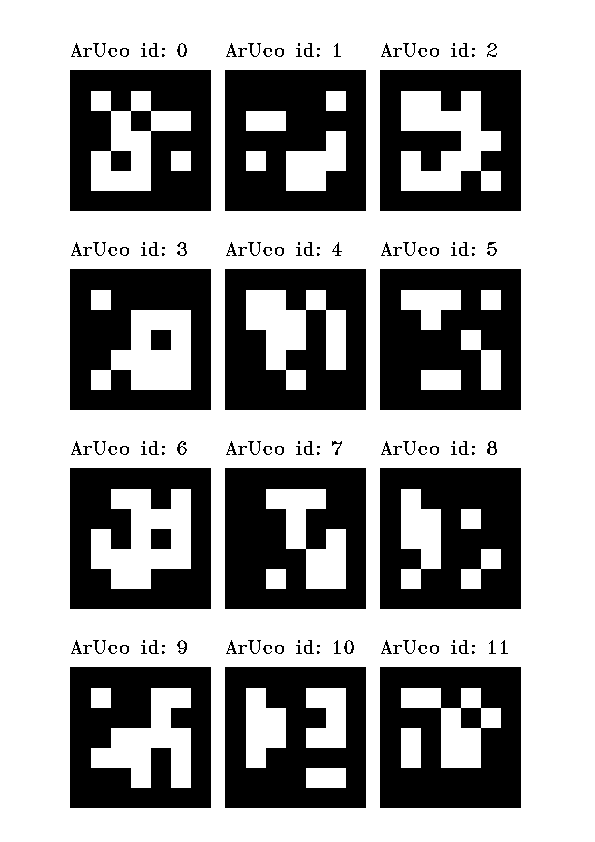
由于想用 ArUco 标记打印整个页面,所以这个网站对这个没有帮助。
现在,OpenCV 提供了两个名为cv.aruco.GridBoard.create()和cv.aruco.GridBoard.draw()的函数——创建并随后绘制一整页的 ArUco 标记。
你可以在此处阅读有关这些功能的更多信息:https://docs.opencv.org/4.x/de/d05/classcv_1_1aruco_1_1GridBoard.html
然而,在尝试这些功能时,对结果不满意。打印时 ArUco 标记的大小不正确,一些标记未正确放置在页面边界内,并且无法添加标记的 id。
因此,决定编写自己的程序来生成 ArUco 标记页面。你可以在下面找到它:
import argparse
import cv2
import sys
import numpy as np

ap = argparse.ArgumentParser()
ap.add_argument("-o", "--output", required=True, help="path to output image containing ArUCo tag")
ap.add_argument("-i", "--id", type=int, required=True, help="ID of first ArUCo tag to generate")
ap.add_argument("-t", "--type", type=str, default="DICT_ARUCO_ORIGINAL", help="type of ArUCo tag to generate")
ap.add_argument("-d", "--dpi", type=str, default="72", help="the DPI of the output print")
ap.add_argument("-s", "--size", type=int, default=50, help="the size in mm of the ArUco tag")
ap.add_argument("-m", "--margin", type=int, default=5, help="the size in mm of the margins between the ArUco tags")
ap.add_argument("-x", "--x", type=int, default=3, help="number of ArUco tags in the X direction")
ap.add_argument("-y", "--y", type=int, default=4, help="number of ArUco tags in the Y direction")
ap.add_argument("--write-id", default=True, action=argparse.BooleanOptionalAction, help="write the id of the tag or not")
args = vars(ap.parse_args())

ARUCO_DICT = {
 "DICT_4X4_50": cv2.aruco.DICT_4X4_50,
 "DICT_4X4_100": cv2.aruco.DICT_4X4_100,
 "DICT_4X4_250": cv2.aruco.DICT_4X4_250,
 "DICT_4X4_1000": cv2.aruco.DICT_4X4_1000,
 "DICT_5X5_50": cv2.aruco.DICT_5X5_50,
 "DICT_5X5_100": cv2.aruco.DICT_5X5_100,
 "DICT_5X5_250": cv2.aruco.DICT_5X5_250,
 "DICT_5X5_1000": cv2.aruco.DICT_5X5_1000,
 "DICT_6X6_50": cv2.aruco.DICT_6X6_50,
 "DICT_6X6_100": cv2.aruco.DICT_6X6_100,
 "DICT_6X6_250": cv2.aruco.DICT_6X6_250,
 "DICT_6X6_1000": cv2.aruco.DICT_6X6_1000,
 "DICT_7X7_50": cv2.aruco.DICT_7X7_50,
 "DICT_7X7_100": cv2.aruco.DICT_7X7_100,
 "DICT_7X7_250": cv2.aruco.DICT_7X7_250,
 "DICT_7X7_1000": cv2.aruco.DICT_7X7_1000,
 "DICT_ARUCO_ORIGINAL": cv2.aruco.DICT_ARUCO_ORIGINAL,
 "DICT_APRILTAG_16h5": cv2.aruco.DICT_APRILTAG_16h5,
 "DICT_APRILTAG_25h9": cv2.aruco.DICT_APRILTAG_25h9,
 "DICT_APRILTAG_36h10": cv2.aruco.DICT_APRILTAG_36h10,
 "DICT_APRILTAG_36h11": cv2.aruco.DICT_APRILTAG_36h11
}

if ARUCO_DICT.get(args["type"], None) is None:
 print("[INFO] ArUCo tag of '{}' is not supported".format(args["type"]))
 sys.exit(0)

arucoDict = cv2.aruco.Dictionary_get(ARUCO_DICT[args["type"]])
tag_type = args["type"]

A4_width = 210
A4_height = 297

x = args["x"]
y = args["y"]
size = args["size"]
margin = args["margin"]
text_size = 8

write_id = args["write_id"]

if not(write_id):
 text_size = 0

if x < 1 or y < 1:
 print(f"[INFO] Please make sure that the grid contains at least one tag - i.e. (x > 0) and (y > 0). Currently, x = {x} and y = {y}.")
 sys.exit(0)

rest_x = A4_width - (x * size + (x - 1) * margin)
rest_y = A4_height - (y * size + y * text_size + (y - 1) * margin)

stop = False

if rest_x < 0:
 print(f"[INFO] Please ensure that the grid fits on the page. Consider reducing the number of tags in the x-direction. Currently, x = {x}.")
 stop = True

if rest_y < 0:
 print(f"[INFO] Please ensure that the grid fits on the page. Consider reducing the number of tags in the y-direction. Currently, y = {y}.")
 stop = True

if stop:
 sys.exit(0)

half_rest_x = int(np.floor(rest_x/2))
half_rest_y = int(np.floor(rest_y/2))

A4_DICT = {
 "72": (595, 842),
 "96": (794, 1123)
}

if A4_DICT.get(args["dpi"], None) is None:
 print("[INFO] A4 print of {} DPI is not supported. Please try one of the following: 72, 96.".format(args["dpi"]))
 sys.exit(0)

dpi = A4_DICT[args["dpi"]]

page = np.ones((dpi[1],dpi[0],3), dtype="uint8")*255

multiplier = np.min([dpi[0]/A4_width, dpi[1]/A4_height])

size_m = int(np.floor(size * multiplier))
text_size_m = int(np.floor(text_size * multiplier))
margin_m = int(np.floor(margin * multiplier))
half_rest_x_m = int(np.floor(half_rest_x * multiplier))
half_rest_y_m = int(np.floor(half_rest_y * multiplier))

tag_id = args["id"]

print(f"[INFO] creating {x*y} tags from the {tag_type} dictionary. Starting with id:{tag_id}")
for i in range(0, y):
 for j in range(0, x):
  img = np.ones((size_m,size_m,3), dtype="uint8")*255
  i_val = half_rest_y_m + i*size_m + i*margin_m + 2*i*text_size_m
  j_val = half_rest_x_m + j*size_m + j*margin_m
  tag = np.zeros((size_m, size_m, 1), dtype="uint8")
  cv2.aruco.drawMarker(arucoDict, tag_id, size_m, tag, 1)
  if write_id:
   if "APRILTAG" in tag_type:
    text_string = f"April id: {tag_id}"
   else:
    text_string = f"ArUco id: {tag_id}"
   cv2.putText(page, text_string, (j_val, i_val-margin_m),
      fontFace=cv2.FONT_HERSHEY_TRIPLEX, fontScale=0.6, color=(0, 0, 0))
  page[i_val:i_val+size_m, j_val:j_val+size_m] = tag
  tag_id += 1

cv2.imwrite(args["output"], page)
cv2.imshow("ArUCo Tags Page", page)
cv2.waitKey(0)
这个程序的想法是生成一个 A4 页面,其中 ArUco 标记放置在网格上。几个输入参数决定了这个网格的大小:
标记/标签的尺寸,单位为 mm
标记之间的边距大小(以 mm 为单位)
X方向标签数
Y方向标签个数
标签的id是否应该写在标签上方
该程序将确定所提供的参数是否会生成一个正确保持在 A4 页面范围内的网格。如果不是这种情况,程序将输出错误消息。
除了上述参数,你还可以提供以下其他参数:
图像输出文件的名称
要放在页面上的第一个标签的 id
输出图像的 DPI
要生成的标记或标签的类型
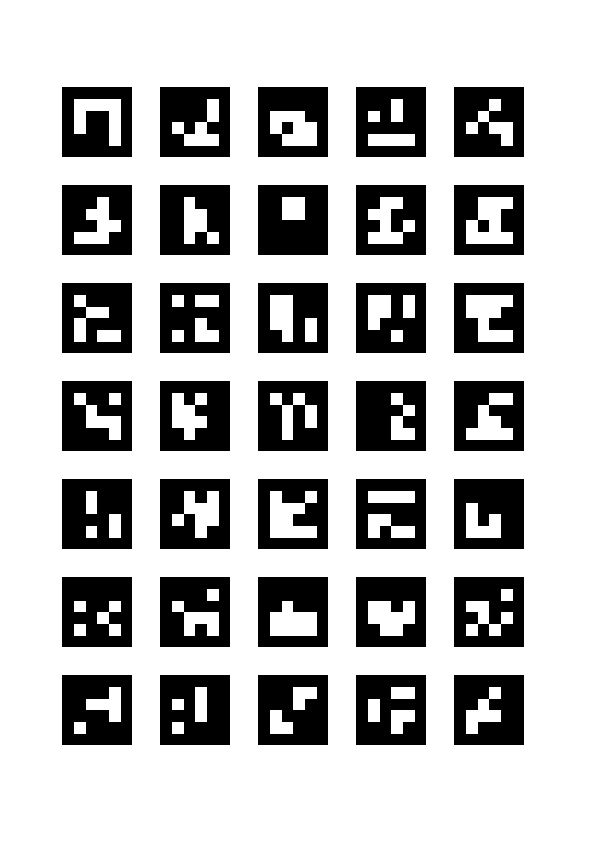
以下是一些如何生成带有标记的页面的示例:
python aruco_gen_page.py -o "aruco_markers.png" -i 0 -t "DICT_5X5_50" -d 72 --write-id -x 3 -y 4
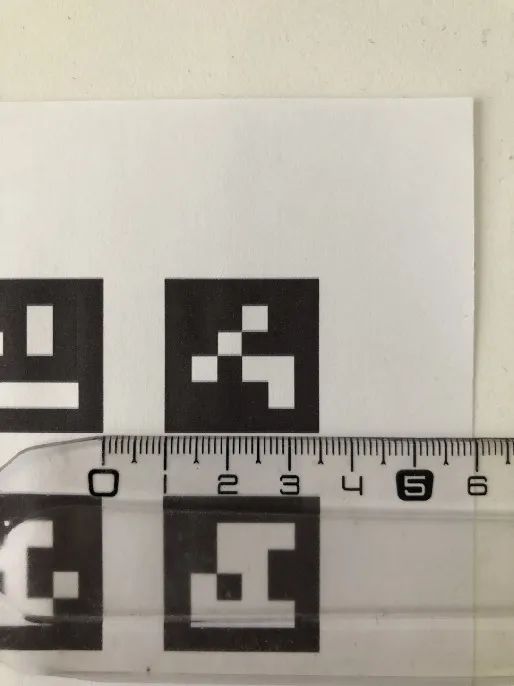
这将产生以下页面:
左侧是输出图像,右侧可以看到打印时默认尺寸(50 毫米)和边距(5 毫米)是正确的。
python aruco_gen_page.py -o "aruco_markers.png" -i 10 -t "DICT_4X4_50" -d 72 -s 25 -m 10 --no-write-id -x 5 -y7
它给出以下结果:
左边是输出图像,右边可以看到打印时尺寸(25mm)和边距(10mm)都是正确的。
为确保在使用 Windows 11 时正确打印生成的图像,最佳打印方法如下:
转到输出带有标记的图像的文件夹。然后右键单击该图标并选择“打印”。你将看到以下对话框(可能不是部分荷兰语,就像我的一样):
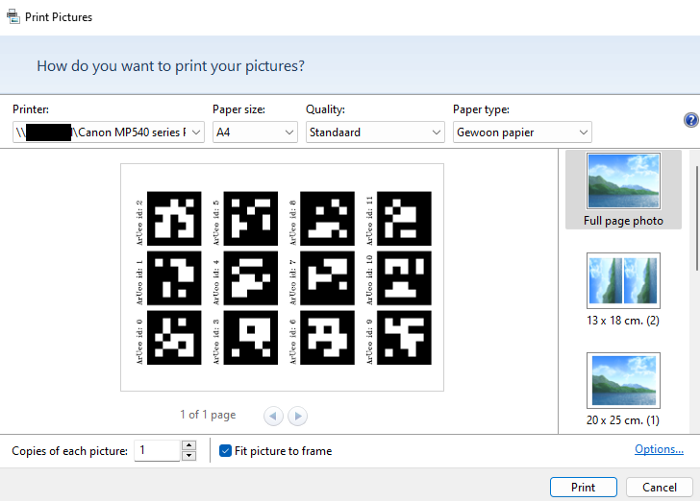
在这里选择你的打印机,将纸张设置为 A4,然后选择“标准”质量和“普通”纸(尽管我怀疑这些设置可能因打印机而异)。确保选中“整页照片”并选中“使图片适合框架”。
没有用其他操作系统测试过这个程序。
检测和估计我们的 ArUco 标记的姿势
在我们可以检测和估计标记的姿势之前,我们需要校准我们的相机。有关如何做到这一点,请参阅下面的文章。
https://betterprogramming.pub/how-to-calibrate-a-camera-using-python-and-opencv-23bab86ca194
校准相机后,你需要获取相机矩阵和畸变系数。正如我在文章中所展示的,我已将它们放在一个 JSON 文件中。
下面是用于检测和估计的程序。
from imutils.video import VideoStream
import argparse
import imutils
import time
import cv2
import sys
import json
import numpy as np


ap = argparse.ArgumentParser()
ap.add_argument("-t", "--type", type=str,
 default="DICT_ARUCO_ORIGINAL",
 help="type of ArUCo tag to detect")
args = vars(ap.parse_args())

ARUCO_DICT = {
 "DICT_4X4_50": cv2.aruco.DICT_4X4_50,
 "DICT_4X4_100": cv2.aruco.DICT_4X4_100,
 "DICT_4X4_250": cv2.aruco.DICT_4X4_250,
 "DICT_4X4_1000": cv2.aruco.DICT_4X4_1000,
 "DICT_5X5_50": cv2.aruco.DICT_5X5_50,
 "DICT_5X5_100": cv2.aruco.DICT_5X5_100,
 "DICT_5X5_250": cv2.aruco.DICT_5X5_250,
 "DICT_5X5_1000": cv2.aruco.DICT_5X5_1000,
 "DICT_6X6_50": cv2.aruco.DICT_6X6_50,
 "DICT_6X6_100": cv2.aruco.DICT_6X6_100,
 "DICT_6X6_250": cv2.aruco.DICT_6X6_250,
 "DICT_6X6_1000": cv2.aruco.DICT_6X6_1000,
 "DICT_7X7_50": cv2.aruco.DICT_7X7_50,
 "DICT_7X7_100": cv2.aruco.DICT_7X7_100,
 "DICT_7X7_250": cv2.aruco.DICT_7X7_250,
 "DICT_7X7_1000": cv2.aruco.DICT_7X7_1000,
 "DICT_ARUCO_ORIGINAL": cv2.aruco.DICT_ARUCO_ORIGINAL,
 "DICT_APRILTAG_16h5": cv2.aruco.DICT_APRILTAG_16h5,
 "DICT_APRILTAG_25h9": cv2.aruco.DICT_APRILTAG_25h9,
 "DICT_APRILTAG_36h10": cv2.aruco.DICT_APRILTAG_36h10,
 "DICT_APRILTAG_36h11": cv2.aruco.DICT_APRILTAG_36h11
}

detectgray = True
drawaxes = True

if ARUCO_DICT.get(args["type"], None) is None:
 print("[INFO] ArUCo tag of '{}' is not supported".format(
  args["type"]))
 sys.exit(0)

print("[INFO] detecting '{}' tags...".format(args["type"]))
arucoDict = cv2.aruco.Dictionary_get(ARUCO_DICT[args["type"]])
arucoParams = cv2.aruco.DetectorParameters_create()

print("[INFO] starting video stream...")
vs = VideoStream(src=0).start()
time.sleep(2.0)

with open('camera.json', 'r') as json_file:
 camera_data = json.load(json_file)
dist = np.array(camera_data["dist"])
mtx = np.array(camera_data["mtx"])

frame = vs.read()
h, w = frame.shape[:2]

newcameramtx, roi = cv2.getOptimalNewCameraMatrix(mtx, dist, (h, w), 0, (h, w))
mapx, mapy = cv2.initUndistortRectifyMap(mtx, dist, None, newcameramtx, (w, h), cv2.CV_32FC1)
x, y, w1, h1 = roi
yh1 = y + h1
xw1 = x + w1

while True:
 frame = vs.read()

 dst1 = cv2.remap(frame, mapx, mapy, cv2.INTER_LINEAR)
 frame = dst1[y:yh1, x:xw1]

 if detectgray:
  gray = cv2.cvtColor(frame, cv2.COLOR_BGR2GRAY)
  (corners, ids, rejected) = cv2.aruco.detectMarkers(gray, arucoDict, parameters=arucoParams)
 else:
  (corners, ids, rejected) = cv2.aruco.detectMarkers(frame, arucoDict, parameters=arucoParams)

 if len(corners) > 0:
  if drawaxes:
   for i in range(0, len(ids)):
    rvec, tvec, markerPoints = cv2.aruco.estimatePoseSingleMarkers(corners[i], 0.02, mtx, dist)
    cv2.drawFrameAxes(frame, mtx, dist, rvec, tvec, 0.02)

  ids = ids.flatten()
  cv2.aruco.drawDetectedMarkers(frame, corners, ids)

 cv2.imshow("Frame", frame)
 key = cv2.waitKey(1) & 0xFF

 if key == ord("q"):
  break

cv2.destroyAllWindows()
vs.stop()
首先,从 JSON 文件中加载相机矩阵和畸变系数。
接下来,从摄像头读取一帧以确定视频流中图像的宽度和高度。
然后,使用 OpenCV 函数cv2.getOptimatlNewCameraMatrix()和cv2.unitUndistortRectifyMap()确定感兴趣区域roi,mapx和mapy参数。
在无限循环中,我们从视频流中读取一帧。使用我们刚刚找到的mapx和mapy参数重新映射的。此外,只裁剪图像以包含感兴趣的区域。
现在我们可以开始使用 OpenCV 函数 cv2.aruco.detectMarkers()检测标记。还包括使用当前图像帧的灰度版本的可能性。
然后,如果检测到一些标记(通过它们的角来标记),我们可以使用函数 cv2.aruco.drawDetectedMarkers()在视频帧中的标记周围绘制一个框,包括 id。
或者,我们还可以使用cv2.estimatePoseSingleMarkers()和cv2.aruco.drawFrameAxes()绘制显示帧中每个标记姿态的轴。
最后,使用cv2.imshow()我们在屏幕上的 GUI 中显示框架。
下面是来自 GUI 的两个屏幕截图,显示程序正确地确定了姿势的轴和我们之前生成的页面上的每个标记的 id。
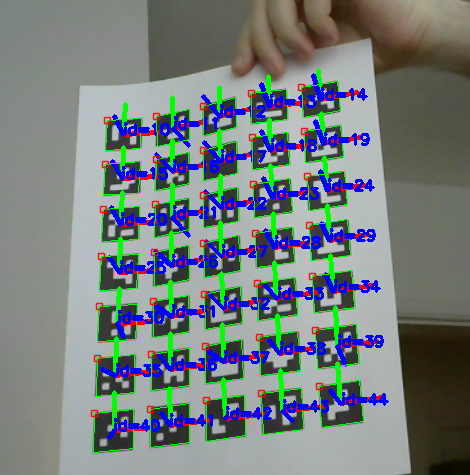
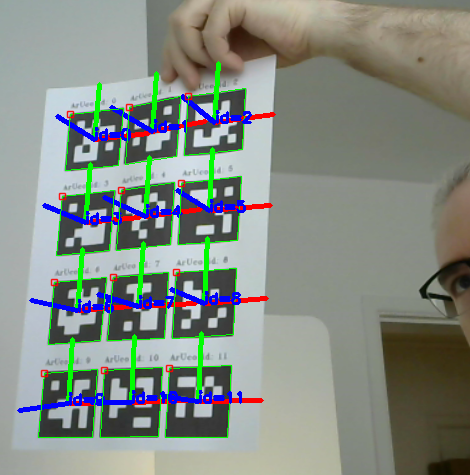
当相对静止或轻微移动页面时,会检测到大部分或所有标记。另一方面,如果将页面更快地移过相机,那么在某些时候,将不会检测到任何标记。猜测是,我们所做的 Python 实现运行速度不够快,程序无法“跟随镜头”。
如果这是正确的,并且如果我们需要检测 ArUco 标记以供例如自动驾驶汽车使用,那么应该用 C++ 实现更快地工作。
参考
https://pyimagesearch.com/2020/12/14/generating-aruco-markers-with-opencv-and-python/
https://pyimagesearch.com/2020/12/21/detecting-aruco-markers-with-opencv-and-python/
https://programming.vip/docs/3d-pose-estimation-using-aruco-tag-in-python.html
https://www.programcreek.com/python/example/89319/cv2.initUndistortRectifyMap
☆ END ☆
如果看到这里,说明你喜欢这篇文章,请转发、点赞。微信搜索「uncle_pn」,欢迎添加小编微信「 woshicver」,每日朋友圈更新一篇高质量博文。
↓扫描二维码添加小编↓
