图像语义分割 DEEPLAB V3+的代码走读

2023-05-16

概述

GITHUB路径:
https://github.com/tensorflow/models/tree/master/research/deeplab
论文:
https://arxiv.org/abs/1802.02611
相对于DEEPLAB V3,有如下的修改:
1.网络层使用XCEPTION替换RESNET,性能更好
2.加入ENCODE-DECODE模块。
训练建议的参数:

python deeplab/train.py \
    --logtostderr \
    --training_number_of_steps=30000 \
    --train_split="train" \
    --model_variant="xception_65" \
    --atrous_rates=6 \
    --atrous_rates=12 \
    --atrous_rates=18 \
    --output_stride=16 \
    --decoder_output_stride=4 \
    --train_crop_size=513 \
    --train_crop_size=513 \
    --train_batch_size=1 \
    --dataset="pascal_voc_seg" \
    --tf_initial_checkpoint=${PATH_TO_INITIAL_CHECKPOINT} \
    --train_logdir=${PATH_TO_TRAIN_DIR} \
    --dataset_dir=${PATH_TO_DATASET}

网络

网络整体框架:
这里写图片描述
说实话,封装的过于完美,导致很难看懂。。。
调用链:
train.py:
_build_deeplab->model.multi_scale_logits
model.py:
multi_scale_logits->_get_logits->extract_features->feature_extractor.extract_features
feature_extractor.py:
extract_features->get_network

基础网络

基础网络层在CORE目录里实现。
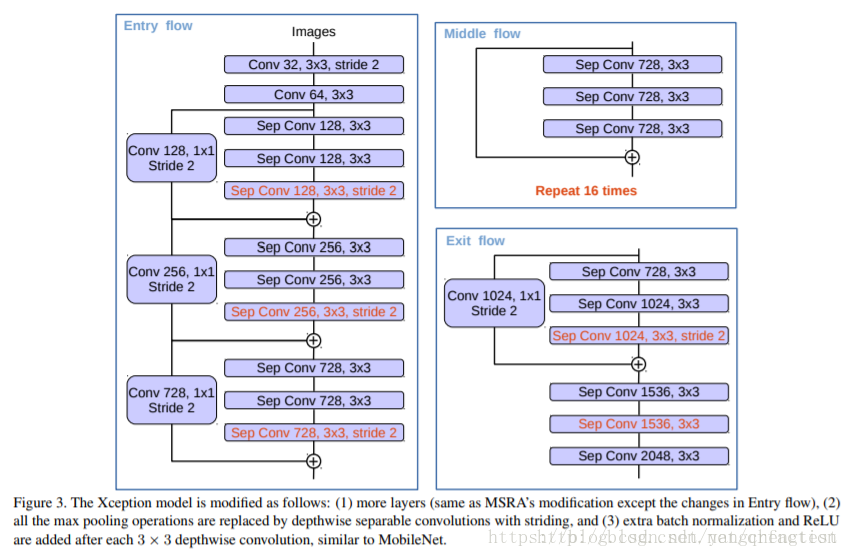
这里主要看一下XCEPTION-65的实现和XCEPTION的区别。
先上图:
这是XCEPTION模型:
这里写图片描述
这是DEEPLAB使用的XCEPTION模型:
这里写图片描述

模型基础配置在:
xception.py的函数xception_65中实现。
但是有很多的细节。
除了基础模型上的改动,DEEPLAB在V2之后的核心思想是空洞卷积和ASPP。
空洞卷积以及网络的STRIDE是在:
xception.py的stack_blocks_dense函数中实现

  # The current_stride variable keeps track of the effective stride of the
  # activations. This allows us to invoke atrous convolution whenever applying
  # the next residual unit would result in the activations having stride larger
  # than the target output_stride.
  current_stride = 1

  # The atrous convolution rate parameter.
  rate = 1

  for block in blocks:
    with tf.variable_scope(block.scope, 'block', [net]) as sc:
      for i, unit in enumerate(block.args):
        if output_stride is not None and current_stride > output_stride:
          raise ValueError('The target output_stride cannot be reached.')
        with tf.variable_scope('unit_%d' % (i + 1), values=[net]):
          # If we have reached the target output_stride, then we need to employ
          # atrous convolution with stride=1 and multiply the atrous rate by the
          # current unit's stride for use in subsequent layers.
          if output_stride is not None and current_stride == output_stride:
            net = block.unit_fn(net, rate=rate, **dict(unit, stride=1))
            rate *= unit.get('stride', 1)
          else:
            net = block.unit_fn(net, rate=1, **unit)
            current_stride *= unit.get('stride', 1)

      # Collect activations at the block's end before performing subsampling.
      net = slim.utils.collect_named_outputs(outputs_collections, sc.name, net)

ASPP

DEEPLAB V3+的ASPP代码在:
model.py的extract_features函数中实现。
从网络整体框架可以看到:
需要对基础的网络的FEATURE做相应的处理整合。
ASPP默认也是使用separable_conv做ASPP。

        # Merge branch logits.
        concat_logits = tf.concat(branch_logits, 3)
        concat_logits = slim.conv2d(
            concat_logits, depth, 1, scope=CONCAT_PROJECTION_SCOPE)
        concat_logits = slim.dropout(
            concat_logits,
            keep_prob=0.9,
            is_training=is_training,
            scope=CONCAT_PROJECTION_SCOPE + '_dropout')

最后做一层1*1卷积加一层DROPOUT,ASPP所有网络的深度都是depth = 256。

DECODER

回到model.py的_get_logits函数

  if model_options.decoder_output_stride is not None:
    if model_options.crop_size is None:
      height = tf.shape(images)[1]
      width = tf.shape(images)[2]
    else:
      height, width = model_options.crop_size
    decoder_height = scale_dimension(height,
                                     1.0 / model_options.decoder_output_stride)
    decoder_width = scale_dimension(width,
                                    1.0 / model_options.decoder_output_stride)
    features = refine_by_decoder(
        features,
        end_points,
        decoder_height=decoder_height,
        decoder_width=decoder_width,
        decoder_use_separable_conv=model_options.decoder_use_separable_conv,
        model_variant=model_options.model_variant,
        weight_decay=weight_decay,
        reuse=reuse,
        is_training=is_training,
        fine_tune_batch_norm=fine_tune_batch_norm)

看一下
decoder的节点定义

    'xception_65': {
        DECODER_END_POINTS: [
            'entry_flow/block2/unit_1/xception_module/'
            'separable_conv2_pointwise',
        ],

entry_flow/block2/unit_1/xception_module/separable_conv2_pointwise
对应的结构:
xception_block(‘entry_flow/block2’,
depth_list=[256, 256, 256],
skip_connection_type=’conv’,
activation_fn_in_separable_conv=False,
regularize_depthwise=regularize_depthwise,
num_units=1,
stride=2),
LOW-LEVEL FEATURES使用的是entry_flow的第二层特征。

使用如下的代码,做低层特征的1*1卷积

  for i, name in enumerate(feature_list):
            decoder_features_list = [decoder_features]

            # MobileNet variants use different naming convention.
            if 'mobilenet' in model_variant:
              feature_name = name
            else:
              feature_name = '{}/{}'.format(
                  feature_extractor.name_scope[model_variant], name)
            decoder_features_list.append(
                slim.conv2d(
                    end_points[feature_name],
                    48,
                    1,
                    scope='feature_projection' + str(i)))

使用下面的代码做基础网络的4*UNSAMPLE

            # Resize to decoder_height/decoder_width.
            for j, feature in enumerate(decoder_features_list):
              decoder_features_list[j] = tf.image.resize_bilinear(
                  feature, [decoder_height, decoder_width], align_corners=True)
              h = (None if isinstance(decoder_height, tf.Tensor)
                   else decoder_height)
              w = (None if isinstance(decoder_width, tf.Tensor)
                   else decoder_width)
              decoder_features_list[j].set_shape([None, h, w, None])

最后与论文中的图稍有不同的是默认decoder_use_separable_conv=TRUE,没有使用3*3的卷积,而是二层的split_separable_conv2d

This operation differs from tf.layers.separable_conv2d as this operation
applies activation function between depthwise and pointwise conv2d.

decoder_depth = 256
            if decoder_use_separable_conv:
              decoder_features = split_separable_conv2d(
                  tf.concat(decoder_features_list, 3),
                  filters=decoder_depth,
                  rate=1,
                  weight_decay=weight_decay,
                  scope='decoder_conv0')
              decoder_features = split_separable_conv2d(
                  decoder_features,
                  filters=decoder_depth,
                  rate=1,
                  weight_decay=weight_decay,
                  scope='decoder_conv1')
            else:
              num_convs = 2
              decoder_features = slim.repeat(
                  tf.concat(decoder_features_list, 3),
                  num_convs,
                  slim.conv2d,
                  decoder_depth,
                  3,
                  scope='decoder_conv' + str(i))

最后回到
model.py的multi_scale_logits函数

    # Resize the logits to have the same dimension before merging.
    for output in sorted(outputs_to_logits):
      outputs_to_logits[output] = tf.image.resize_bilinear(
          outputs_to_logits[output], [logits_height, logits_width],
          align_corners=True)

返回4*的UNSAMPLE结果。

本文内容由网友自发贡献,版权归原作者所有,本站不承担相应法律责任。如您发现有涉嫌抄袭侵权的内容,请联系:hwhale#tublm.com(使用前将#替换为@)

图像语义分割 DEEPLAB V3+的代码走读 的相关文章

  • SPI协议读取FLASH【FPGA】

    SPI协议读取FLASH FPGA 一 SPI协议1 SPI简介2 SPI物理层3 SPI协议层CPOL CPHA 及通讯模式 4 SPI 基本通讯过程5 通讯的起始和停止信号6 数据有效性 二 Flash1 状态寄存器1 WIP xff0
  • 基于FPGA的图像边缘检测

    基于FPGA的图像边缘检测 一 图像处理算法1 灰度转换2 高斯滤波3 二值化4 Sobel 二 项目框架1 摄像头配置模块2 图像处理模块3 数据缓存模块4 其它模块 三 部分代码1 数据采集模块2 读写控制模块 四 参考五 源码 简介
  • 基本认证_摘要认证_HTTPS

    1 HTTP基本认证 HTTP提供了一个原生的质询 响应 xff08 challenge response xff09 框架 Web应用程序收到一条HTTP请求报文时 xff0c 服务器没有按照请求执行动作 xff0c 而是以一个 认证质询
  • 什么是奇校验(Odd Parity),什么是偶校验(Even Parity)?

  • 2021-03-08

    今天在网上安装PR xff0c 网上下载的安装器把电脑默认装了一大堆垃圾工具 xff0c 依次删除后突然发现谷歌浏览器主页被篡改了 xff0c 随后用360等工具修复 xff0c 均提示无异常 通过浏览器设置和重置主页后仍然无效 xff0c
  • 2021-03-08

    大疆无人机自己动手更换电芯的注意事项 xff0c 当电池多电芯出现均大压差且调整数据无效后 xff0c 或发现某块或多块电芯鼓包 xff0c 说明电芯已经老化 xff0c 寿命用尽 xff0c 就需要更换电芯了 xff0c 厂家为保护消费者
  • can't run '/etc/init.d/rcS': No such file or directory 最终解决方法

    drivers rtc hctosys c unable to open rtc device rtc0 end request I O error dev mtdblock2 sector 256 isofs fill super bre
  • Ubuntu下的CuteCom串口详细调试教程

    I MX6ULL嵌入式开发学习 串口调试 一 Ubuntu下的串口调试助手安装 嵌入式开发学习过程中学习到串口调试这一章 xff0c 以前在Win10操作时都有相对应的串口调试界面 xff0c 安装个串口驱动在电脑设备端口里面看到COM3时
  • STM32 串口

    文章目录 USART 通信协议RS 232与TTL电平 串口通信数据包组成USART功能框图讲解引脚寄存器状态寄存器 USART SR 数据寄存器 USART DR 控制寄存器 USART CR 波特比率寄存器 USART BRR 发送过程
  • printf二进制数据

    基于之前这篇文章的代码改进了下 xff1a http blog csdn net xzongyuan article details 28889063 之前打印的数字没有补0 我打印了内存信息 xff0c 结果是这样的 xff0c 不能对齐
  • 分析MySQL数据类型的长度

    分析MySQL数据类型的长度 MySQL有几种数据类型可以限制类型的 34 长度 34 xff0c 有CHAR Length VARCHAR Length TINYINT Length SMALLINT Length MEDIUMINT L
  • 为vscode配置clangd

    目录 安装clangd 后端安装clangd 前端修改基础配置生成compile commands json文件基本效果补全warning提醒自动修改存在问题 注意事项 clangd能提供更好的补全和提示 xff0c 自带检查一些warni
  • 论文笔记(十九)RGB-D Object Tracking: A Particle Filter Approach on GPU

    RGB D Object Tracking A Particle Filter Approach on GPU 文章概括摘要1 介绍2 贡献3 粒子滤波器4 可能性评估5 实施细节6 实验A 物体模型B 合成序列C 真实序列 7 结论8 鸣
  • Ubuntu 命令行 访问网页

    安装w3m 1 进入 root apt get install w3m 2 测试是否成功 xff1a w3m https blog csdn net x xx xxx xxxx article details 92574331
  • 代码管理中Trunk、Branches、Tags的区别和联系

    我们可以将这三者想象成一棵树的组成部分 trunk为树干branches为树枝tags为整棵树 trunk用于主线开发 branches用于定制版本 修复bugs 并行开发等使用 tags用于存放release版本 xff0c 阶段性代码
  • linux使用curl请求(带参数)

    1 2 3 curl G d 34 c 61 amp a 61 34 http www net index php
  • 惯导系列(二):滤波相关的算法

    前言 我又消失了一段时间 xff0c 这段时间研究了惯性导航有关的算法 xff0c 整理了不少博客 xff0c 字数比较多 xff0c 图片比较多 学到了很多知识 目录 前言 本节介绍 一 Mahony算法 1 1 PID控制算法 1 2
  • STM32 CAN 设置多个过滤器接收多ID方法

    1 标识符列表模式 xff0c 32位模式下 void MX CAN Init void 这里是实现了两个地址的接收 一个是用来接收广播信息 一个用来接收私有地址 如果想实现多个地址可以添加多个过滤器组 stm32103 有0 13 共14
  • linux下运行动态库问题 cannot open shared object file: No such file or directory

    如果动态库不在同一级目录下 xff0c 则需要将以上文件的目录加载到动态库搜索路径中 xff0c 设置的方式有以下几种 一 将动态库路径加入到LD LIBRARY PATH环境变量 1 在终端输入 xff1a export LD LIBRA
  • 几个串口通信协议的整理

    一 UART UART是一个大家族 xff0c 其包括了RS232 RS499 RS423 RS422和RS485等接口标准规范和总线标准规范 它们的主要区别在于其各自的电平范围不相同 嵌入式设备中常常使用到的是TTL TTL转RS232的

随机推荐

  • 单片机中断的过程

    1 根据响应的中断源的中断优先级 使相应的优先级状态触发器置1 xff1b 2 把当前程序计数器PC的内容压入堆栈 xff0c 保护断点 xff0c 寻找中断源 xff1b 3 执行硬件中断服务子程序调用 xff1b 4 清除相应的中断请求
  • Ruby学习札记(3)- Ruby中gem的安装与卸载

    Ruby 学习札记 3 Ruby 中 gem 的安装与卸载 在 Ruby 中有 gem 包这种概念 xff0c 类似 PHP 中的 pear xff0c 相当于一种插件 具体可以 Google 一下 xff08 1 xff09 查看已经安装
  • 【linux】ubuntu20.04 运行软件 提示找不到过时的库 libQtCore.so.4、libQtGui.so.4、libpng12.so.0

    先上结果 1 nxView运行起来 环境 硬件 xff1a Jetson Xavier NX 套件 系统 xff1a Ubuntu 20 04 软件 xff1a nxView 43 libQtCore so 4 解决 0 现象 运行软件提示
  • rtt相关问题总结

    1 总结RT Thread的启动流程 xff08 启动文件部分跳过 xff09 关中断 rt hw interrupt disable 板级初始化 xff1a 需在该函数内部进行系统堆的初始化 rt hw board init 打印 RT
  • FTP 客户端C实现

    使用 Socket 通信实现 FTP 客户端程序 FTP 概述 文件传输协议 xff08 FTP xff09 作为网络共享文件的传输协议 xff0c 在网络应用软件中具有广泛的应用 FTP的目标是提高文件的共享性和可靠高效地传送数据 在传输
  • Qt编写串口通信程序全程图文讲解

    说明 我们的编程环境是windows xp下 xff0c 在Qt Creator中进行 xff0c 如果在Linux下或直接用源码编写 xff0c 程序稍有不同 xff0c 请自己改动 在Qt中并没有特定的串口控制类 xff0c 现在大部分
  • VLC播放器调试经验总结

    一 前言 在使用VS学习VLC源码时 xff0c 可以打断点分析变量数据 xff0c 跟踪代码流程 xff0c 方便我们理解源码 但是在定位音视频卡顿 延时等疑难问题时 xff0c 这一招就不管用了 xff0c 因为打上断点就会导致实时计算
  • http协议如何解决粘包问题

    在讲粘包问题之前 xff0c 首先得明白这个包是应用层的数据包 当数据在传输层时 xff0c 由于TCP是面向字节流的 xff0c 所以它看到的数据是按照顺序一个个放在缓冲区中的 xff0c 而对于应用层而言 xff0c 看到的只是一连串的
  • ROS- 解决 sudo rosdep init和update 出现的错误

    大家在使用ROS时都需要执行sudo rosdep init 方法和rosdep update方法 但是在执行rosdep init时会提示如下错误 ERROR cannot download default sources list fr
  • 如何用MQTT网关快速接入阿里云IOT

    深圳市钡铼技术有限公司推出的BL102 xff0c 是采集西门子 xff0c 欧姆龙 xff0c 三菱 xff0c 台达 xff0c AB xff0c 施耐德等主流PLC及Modbus xff0c DT L645协议设备数据 xff0c 简
  • 闫刚 qgc模块mavlinklog实现过程

    mavlink log qml部分 这样logController就和LogDownloadController进行了绑定 AnalyzeView qml Rectangle span class token punctuation spa
  • 初识TVM--TVM的编译与安装

    TVM是什么 xff1f Apache incubating TVM is an open deep learning compiler stack for CPUs GPUs and specialized accelerators It
  • iOS上简单推送通知(Push Notification)的实现

    iOS上简单推送通知 xff08 Push Notification xff09 的实现 根据这篇很好的教程 xff08 http www raywenderlich com 3443 apple push notification ser
  • Android学习记录(十三) http之digest鉴权之填坑6.0。

    背景 xff1a android 6 0 1 的手机发现使用webdav下载文件实效 xff0c httpclient execute get的时候出现 xff1a CrashHandler java lang ArrayIndexOutO
  • 开源视频播放器IjkPlayer使用记录之(三)--播放视频从上次播放的时间点播放。

    方法 xff1a 1 在关闭视频的时候 xff0c 使用getCurrentPosition 获取当前的时间点 2 使用SharedPreferences记录当前的时间点 3 重新播放时 xff0c 获取该时间点 xff0c 使用seekt
  • 开源视频播放器IjkPlayer使用记录之(四)--多音轨的探路之旅

    前言 xff1a 在视频播放中 xff0c 我们经常会遇到多音轨的资源文件 xff0c 比如某个mkv文件同时支持英语 国语 xff0c 那么最好是能够进行音轨的切换 在IjkPlayer中并没有支持多音轨的代码 xff0c 所以在移植的过
  • KERAS-YOLOV3的代码走读

    KERAS YOLOV3的代码走读 GITHUB地址 xff1a https github com qqwweee keras yolo3 YOLOV3的论文中文翻译 xff1a https zhuanlan zhihu com p 349
  • KERAS-YOLOV3的数据增强

    前言 上篇KERAS YOLOV3的代码走读 https blog csdn net yangchengtest article details 80664415 有数据增强的内容没有看明白 这篇来介绍一下 简介 数据增强的方法主要有 xf
  • 基于KITTI数据集的KERAS-YOLOV3实践

    数据整理 KERAS YOLOV3的GITHUB地址 xff1a https github com yangchengtest keras yolo3 该项目支持的数据结构 xff1a One row for one image Row f
  • 图像语义分割 DEEPLAB V3+的代码走读

    概述 GITHUB路径 xff1a https github com tensorflow models tree master research deeplab 论文 xff1a https arxiv org abs 1802 0261