前言
继上一篇博客中谈到使用Changchang Wu的SiftGPU,使用GLSL语言在Windows系统下的编译方法http://blog.csdn.net/qq_36007951/article/details/78472349,测试代码中尚未涉及两幅图片的特征点匹配。
今天介绍继续使用GLSL语言,在SiftGPU中对两幅图像进行特征点匹配方法,经本人验证,在图片分辨率没有那么大的情况下,匹配速度会比Lowe算法的快。
个人编译环境:Windows 8.1,Visual Studio2010,OPENCV2.4.9
在你下载的SiftGPU文件夹中找到.....\SiftGPU\msvc\TestWin,在TestWin文件夹中可以看到一些测试的工程,
其中解决方案SimpleSIFT才是我们需要的,将其中的部分代码提取出来即可。
以下是我个人稍微修改了的代码,仅供大家参考。
// siftGPU-match.cpp : 定义控制台应用程序的入口点。
//

#include "StdAfx.h"

//标准C++
#include <iostream>
#include <vector>


// OpenCV图像
#include <opencv2/highgui/highgui.hpp>
#include <opencv2/core/core.hpp>
#include "opencv2/imgproc/imgproc.hpp"
#include "opencv2/features2d/features2d.hpp"
#include "opencv2/nonfree/nonfree.hpp"

// OpenGL
#include <Windows.h>
#include <GL/gl.h>

// SiftGPU模块
#include "SiftGPU.h"


// boost库中计时函数
#include <boost/timer.hpp>


#pragma comment(lib,"devil.lib")
//#pragma comment(lib,"ilu.lib")
//#pragma comment(lib,"ilut.lib")

using namespace cv;
using namespace std;


int main()
{
	   SiftGPU  *sift = new SiftGPU;
    SiftMatchGPU *matcher = new SiftMatchGPU(4096);
	   vector<float > descriptors1(1), descriptors2(1);
    vector<SiftGPU::SiftKeypoint> keys1(1), keys2(1);

    int num1 = 0, num2 = 0;

    //process parameters
    //The following parameters are default in V340
    //-m,       up to 2 orientations for each feature (change to single orientation by using -m 1)
    //-s        enable subpixel subscale (disable by using -s 0)


    char * argv[] = {"-fo", "-1",  "-v", "1"};//
    //-fo -1    staring from -1 octave
    //-v 1      only print out # feature and overall time
    //-loweo    add a (.5, .5) offset
    //-tc <num> set a soft limit to number of detected features

    //NEW:  parameters for  GPU-selection
    //1. CUDA.                   Use parameter "-cuda", "[device_id]"
    //2. OpenGL.				 Use "-Display", "display_name" to select monitor/GPU (XLIB/GLUT)
	//   		                 on windows the display name would be something like \\.\DISPLAY4

    //
    //You use CUDA for nVidia graphic cards by specifying
    //-cuda   : cuda implementation (fastest for smaller images)
    //          CUDA-implementation allows you to create multiple instances for multiple threads
	//          Checkout src\TestWin\MultiThreadSIFT
    /

    //
    Two Important Parameters///
    // First, texture reallocation happens when image size increases, and too many
    // reallocation may lead to allocatoin failure.  You should be careful when using
    // siftgpu on a set of images with VARYING imag sizes. It is recommended that you
    // preset the allocation size to the largest width and largest height by using function
    // AllocationPyramid or prameter '-p' (e.g. "-p", "1024x768").

    // Second, there is a parameter you may not be aware of: the allowed maximum working
    // dimension. All the SIFT octaves that needs a larger texture size will be skipped.
    // The default prameter is 2560 for the unpacked implementation and 3200 for the packed.
    // Those two default parameter is tuned to for 768MB of graphic memory. You should adjust
    // it for your own GPU memory. You can also use this to keep/skip the small featuers.
    // To change this, call function SetMaxDimension or use parameter "-maxd".
	//
	// NEW: by default SiftGPU will try to fit the cap of GPU memory, and reduce the working
	// dimension so as to not allocate too much. This feature can be disabled by -nomc
    //


    int argc = sizeof(argv)/sizeof(char*);
    sift->ParseParam(argc, argv);

    ///
    //Only the following parameters can be changed after initialization (by calling ParseParam).
    //-dw, -ofix, -ofix-not, -fo, -unn, -maxd, -b
    //to change other parameters at runtime, you need to first unload the dynamically loaded libaray
    //reload the libarary, then create a new siftgpu instance


    //Create a context for computation, and SiftGPU will be initialized automatically
    //The same context can be used by SiftMatchGPU
    if(sift->CreateContextGL() != SiftGPU::SIFTGPU_FULL_SUPPORTED) return 0;

	boost::timer timer1;
    if(sift->RunSIFT("640-1.jpg"))
    {
        //Call SaveSIFT to save result to file, the format is the same as Lowe's
        //sift->SaveSIFT("../data/800-1.sift"); //Note that saving ASCII format is slow

        //get feature count
        num1 = sift->GetFeatureNum();

        //allocate memory
        keys1.resize(num1);    descriptors1.resize(128*num1);

        //reading back feature vectors is faster than writing files
        //if you dont need keys or descriptors, just put NULLs here
        sift->GetFeatureVector(&keys1[0], &descriptors1[0]);
        //this can be used to write your own sift file.
    }
		cout<<"siftgpu::runsift(1) cost time="<<timer1.elapsed()<<endl;
    //You can have at most one OpenGL-based SiftGPU (per process).
    //Normally, you should just create one, and reuse on all images.
		timer1.restart();
    if(sift->RunSIFT("800-1.jpg"))
    {
        num2 = sift->GetFeatureNum();
        keys2.resize(num2);    descriptors2.resize(128*num2);
        sift->GetFeatureVector(&keys2[0], &descriptors2[0]);
    }
		cout<<"siftgpu::runsift(2) cost time="<<timer1.elapsed()<<endl;
    //Testing code to check how it works when image size varies
    //sift->RunSIFT("../data/256.jpg");sift->SaveSIFT("../data/256.sift.1");
    //sift->RunSIFT("../data/1024.jpg"); //this will result in pyramid reallocation
    //sift->RunSIFT("../data/256.jpg"); sift->SaveSIFT("../data/256.sift.2");
    //two sets of features for 256.jpg may have different order due to implementation

    //*************************************************************************
    /compute descriptors for user-specified keypoints (with or without orientations)

    //Method1, set new keypoints for the image you've just processed with siftgpu
    //say vector<SiftGPU::SiftKeypoint> mykeys;
    //sift->RunSIFT(mykeys.size(), &mykeys[0]);
    //sift->RunSIFT(num2, &keys2[0], 1);         sift->SaveSIFT("../data/640-1.sift.2");
    //sift->RunSIFT(num2, &keys2[0], 0);        sift->SaveSIFT("../data/640-1.sift.3");

    //Method2, set keypoints for the next coming image
    //The difference of with method 1 is that method 1 skips gaussian filtering
    //SiftGPU::SiftKeypoint mykeys[100];
    //for(int i = 0; i < 100; ++i){
    //    mykeys[i].s = 1.0f;mykeys[i].o = 0.0f;
    //    mykeys[i].x = (i%10)*10.0f+50.0f;
    //    mykeys[i].y = (i/10)*10.0f+50.0f;
    //}
    //sift->SetKeypointList(100, mykeys, 0);
    //sift->RunSIFT("../data/800-1.jpg");                    sift->SaveSIFT("../data/800-1.sift.2");
    //### for comparing with method1:
    //sift->RunSIFT("../data/800-1.jpg");
    //sift->RunSIFT(100, mykeys, 0);                          sift->SaveSIFT("../data/800-1.sift.3");
    //*********************************************************************************


    //**********************GPU SIFT MATCHING*********************************
    //**************************select shader language*************************
    //SiftMatchGPU will use the same shader lanaguage as SiftGPU by default
    //Before initialization, you can choose between glsl, and CUDA(if compiled).
    //matcher->SetLanguage(SiftMatchGPU::SIFTMATCH_CUDA); // +i for the (i+1)-th device

    //Verify current OpenGL Context and initialize the Matcher;
    //If you don't have an OpenGL Context, call matcher->CreateContextGL instead;
    matcher->VerifyContextGL(); //must call once

    //Set descriptors to match, the first argument must be either 0 or 1
    //if you want to use more than 4096 or less than 4096
    //call matcher->SetMaxSift() to change the limit before calling setdescriptor
	boost::timer timer;
    matcher->SetDescriptors(0, num1, &descriptors1[0]); //image 1
	cout<<"siftgpu::match1 cost time="<<timer.elapsed()<<endl;

	timer.restart();
    matcher->SetDescriptors(1, num2, &descriptors2[0]); //image 2
	cout<<"siftgpu::match2 cost time="<<timer.elapsed()<<endl;

    //match and get result.
    int (*match_buf)[2] = new int[num1][2];
    //use the default thresholds. Check the declaration in SiftGPU.h
    int num_match = matcher->GetSiftMatch(num1, match_buf);
    std::cout << num_match << " sift matches were found;\n";

	//Mat img1=imread("640-1.jpg");
	//Mat img2=imread("800-1.jpg");
	//	drawMatches(img1, keys1(1),         //第一幅图像和它的特征点
	//	img2, key_points2,      //第二幅图像和它的特征点
	//	matches,       //匹配器算子
	//	img_matches,      //匹配输出图像
	//	Scalar(255, 0, 255));     //用红色色直线连接两幅图像中的特征点

    //enumerate all the feature matches
    for(int i  = 0; i < num_match; ++i)
    {
        //How to get the feature matches:
        //SiftGPU::SiftKeypoint & key1 = keys1[match_buf[i][0]];
        //SiftGPU::SiftKeypoint & key2 = keys2[match_buf[i][1]];
        //key1 in the first image matches with key2 in the second image
    }

    //*****************GPU Guided SIFT MATCHING***************
    //example: define a homography, and use default threshold 32 to search in a 64x64 window
    //float h[3][3] = {{0.8f, 0, 0}, {0, 0.8f, 0}, {0, 0, 1.0f}};
    //matcher->SetFeatureLocation(0, &keys1[0]); //SetFeatureLocaiton after SetDescriptors
    //matcher->SetFeatureLocation(1, &keys2[0]);
    //num_match = matcher->GetGuidedSiftMatch(num1, match_buf, h, NULL);
    //std::cout << num_match << " guided sift matches were found;\n";
    //if you can want to use a Fundamental matrix, check the function definition

    // clean up..
    delete[] match_buf;
	return 0;
}
最终运行结果:
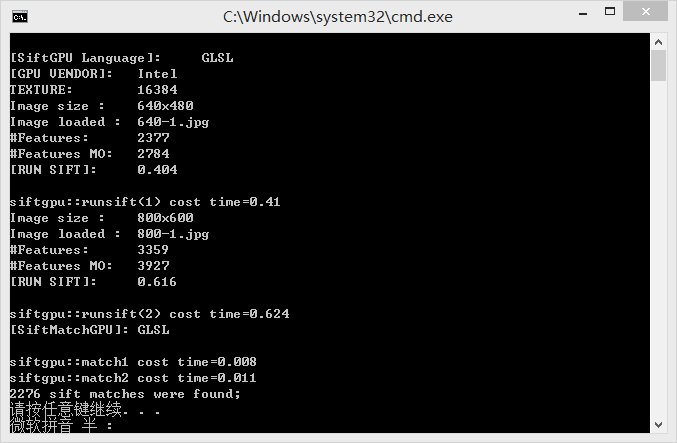
可以看到,在计算sift,和match上花费的时间很少。
本文内容由网友自发贡献,版权归原作者所有,本站不承担相应法律责任。如您发现有涉嫌抄袭侵权的内容,请联系:hwhale#tublm.com(使用前将#替换为@)