官方参考文档
https://support.huaweicloud.com/usermanual-A200dk_3000/atlas200dk_02_0024.html
务必保证配置时版本(20.0.0)一致!!!
1.配置开发环境(自己电脑)
若不在自己电脑上进行开发可以略过这个步骤,例如通过vscode进行远程开发,好用!
1.1.利用脚本快速配置
https://gitee.com/ascend/tools/tree/master/faster_install/for_1.7x.0.0
选择20.0版本
2.配置Atlas200DK
2.1.制作SD卡
一定要按照说明用root用户创建文件夹并且用cp拷贝需要的文件进去!!!!
不知道root密码的可以用下面命令重设
sudo passwd root
https://support.huaweicloud.com/usermanual-A200dk_3000/atlas200dk_02_0011.html
1.0.12.alpha版本: https://support.huaweicloud.com/environment-deployment-Atlas200DK1012/atlased_04_0010.html
c++环境准备和依赖安装
https://gitee.com/ascend/samples/tree/master/cplusplus/environment
缺失acl.h
https://bbs.huaweicloud.com/forum/thread-127320-1-1.html
export DDK_PATH=$HOME/Ascend/ascend-toolkit/latest/arm64-linux_gcc7.3.0
重新执行
cmake ../../../src -DCMAKE_CXX_COMPILER=aarch64-linux-gnu-g++ -DCMAKE_SKIP_RPATH=TRUE
可以写入.zshrc
1.0.12版本为:export DDK_PATH=$HOME/Ascend/ascend-toolkit/latest/arm64-linux
2.2.连接开发版
2.2.1.查看USB虚拟网卡
当通过USB线连接到虚拟机上后,执行以下命令可以查看到虚拟网卡。
ifconfig
enp0s20f0u1: flags=4163<UP,BROADCAST,RUNNING,MULTICAST>  mtu 1500
        inet6 fe80::129b:4364:6360:ca75  prefixlen 64  scopeid 0x20<link>
        ether 7a:76:dc:7e:c2:27  txqueuelen 1000  (Ethernet)
        RX packets 8  bytes 803 (803.0 B)
        RX errors 0  dropped 0  overruns 0  frame 0
        TX packets 16  bytes 3148 (3.1 KB)
        TX errors 0  dropped 0 overruns 0  carrier 0  collisions 0
其中enp0s20f0u1就是虚拟网卡。
2.2.2.配置虚拟网卡ip
由于通过USB连接时,开发板默认IP为192.168.1.2,所以这里我们只需要配置虚拟网卡ip为192.168.1.x即可。可按照如下命令进行netplan设置。
切换为root用户,并安装VIM。
su root
apt-get install vim
打开netplan的配置文件,按照以下格式进行配置填写。
vim /etc/netplan/01-network-manager-all.yaml
# Let NetworkManager manage all devices on this system
network:
  version: 2
  renderer: NetworkManager
  ethernets:
     enp0s20f0u1: #配置的网卡名称,使用ifconfig -a查看得到
       dhcp4: no #dhcp4关闭
       addresses: [192.168.1.223/8] #设置本机IP及掩码
       gateway4: 255.255.255.0 #设置网关
       nameservers:
         addresses: [114.114.114.114]
注1:要注意缩进,netplan内容和python一样,对缩进有严格要求,如果缩进格式不对,则配置会失败。
注2:这里的配置网卡名称,需要根据自己连接的情况看,不一定是enp0s20f0u1。
配置完成后执行以下命令,使配置生效。
netplan apply
执行以下命令切换回普通用户。
exit
如下图所示,再使用ifconfig查看,此时已经有ip了。
enp0s20f0u1: flags=4163<UP,BROADCAST,RUNNING,MULTICAST>  mtu 1500
        inet 192.168.1.223  netmask 255.0.0.0  broadcast 192.255.255.255
        inet6 fe80::7876:dcff:fe7e:c227  prefixlen 64  scopeid 0x20<link>
        ether 7a:76:dc:7e:c2:27  txqueuelen 1000  (Ethernet)
        RX packets 14  bytes 1241 (1.2 KB)
        RX errors 0  dropped 0  overruns 0  frame 0
        TX packets 183  bytes 39769 (39.7 KB)
        TX errors 0  dropped 0 overruns 0  carrier 0  collisions 0
2.2.3.登录开发板
在普通用户下通过ssh指令,登录开发板(密码为Mind@123)。
ssh HwHiAiUser@192.168.1.2
2.2.4.将动态链接库路径添加到开发板的 ldconfig 文件中
切换到root用户下搜索 libascendcl.so 所在的路径:
su root
find / -name libascendcl.so
路径如下
/home/HwHiAiUser/Ascend/acllib/lib64/libascendcl.so
打开ld.so.conf.d文件
vim /etc/ld.so.conf.d/mind_so.conf
添加路径到此文件中
/usr/lib64
/home/HwHiAiUser/Ascend/acllib/lib64/
添加完成后,执行 ldconfig
执行以下命令,退出开发板。
exit
exit
3.验证配置是否成功
参考如下博文的例子进行验证
https://gitee.com/ascend/samples/tree/master/cplusplus/level2_simple_inference/2_object_detection/YOLOV3_coco_detection_video
4.额外配置可选
4.1.配置远程登录桌面
https://bbs.huaweicloud.com/forum/thread-29830-1-1.html
可能出现的问题
执行sudo systemctl restart xrdp,报错如下
A dependency job for xrdp.service failed. see journalctl -xe for details
- 执行命令
sudo rm /lib/systemd/system/xrdp.service /lib/systemd/system/xrdp-sesman.service - 重启设备
- 执行
sudo systemctl status xrdp检查是否运行成功如下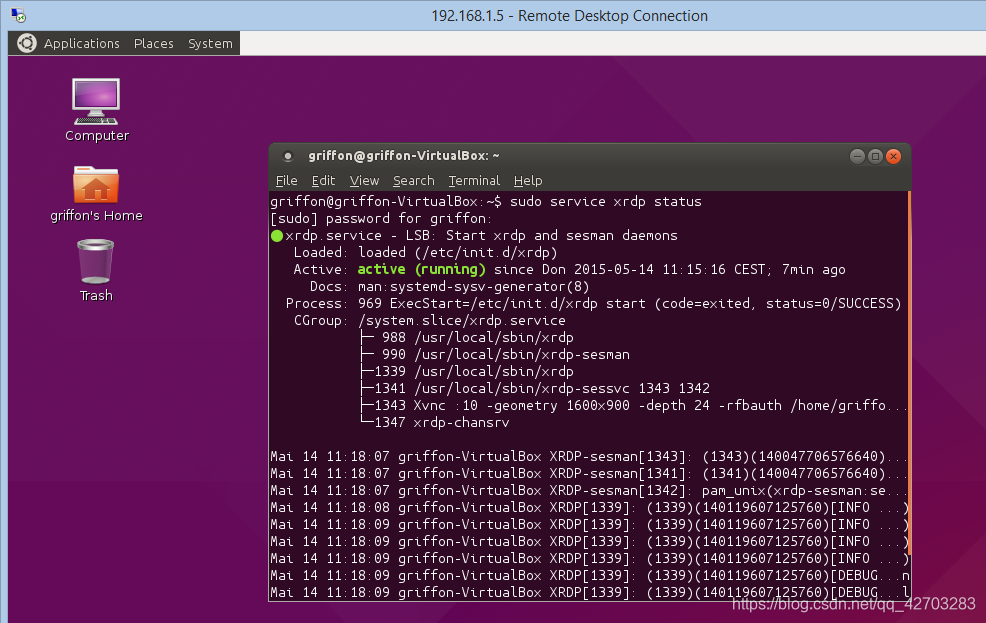
参考:https://c-nergy.be/blog/?p=8316
4.2.通过网线连接开发版
4.2.1.查看网口网卡
当通过网线连接到虚拟机上后,执行以下命令可以查看到网卡。
ifconfig
eno1: flags=4099<UP,BROADCAST,MULTICAST>  mtu 1500
        ether 3c:52:82:e4:93:ef  txqueuelen 1000  (Ethernet)
        RX packets 0  bytes 0 (0.0 B)
        RX errors 0  dropped 0  overruns 0  frame 0
        TX packets 0  bytes 0 (0.0 B)
        TX errors 0  dropped 0 overruns 0  carrier 0  collisions 0
其中eno1就是网卡。
4.2.2.配置开发环境端网卡IP
前面配置的USB虚拟网卡的IP为192.168.1.2,不应与改IP冲突,因此设置网线网卡的IP为192.168.2.2
按照如下命令进行netplan设置。
打开netplan的配置文件,按照以下格式进行配置填写。
sudo gedit /etc/netplan/01-network-manager-all.yaml
# Let NetworkManager manage all devices on this system
network:
  version: 2
  renderer: NetworkManager
  ethernets:
     enp0s20f0u1: #配置的网卡名称,使用ifconfig -a查看得到
       dhcp4: no #dhcp4关闭
       addresses: [192.168.1.223/8] #设置本机IP及掩码
       gateway4: 255.255.255.0 #设置网关
       nameservers:
         addresses: [114.114.114.114]
     eno1: #配置的网卡名称,使用ifconfig -a查看得到
       dhcp4: no #dhcp4关闭
       addresses: [192.168.2.223/8] #设置本机IP及掩码
       gateway4: 255.255.255.0 #设置网关
       nameservers:
         addresses: [114.114.114.114]
注1:要注意缩进,netplan内容和python一样,对缩进有严格要求,如果缩进格式不对,则配置会失败。
注2:这里的配置网卡名称,需要根据自己连接的情况看,不一定是eno1。
配置完成后执行以下命令,使配置生效。
sudo netplan apply
如下图所示,再使用ifconfig查看,此时已经有ip了。
eno1: flags=4163<UP,BROADCAST,RUNNING,MULTICAST>  mtu 1500
        inet 192.168.2.223  netmask 255.0.0.0  broadcast 192.255.255.255
        inet6 fe80::3e52:82ff:fee4:93ef  prefixlen 64  scopeid 0x20<link>
        ether 3c:52:82:e4:93:ef  txqueuelen 1000  (Ethernet)
        RX packets 9  bytes 1065 (1.0 KB)
        RX errors 0  dropped 0  overruns 0  frame 0
        TX packets 54  bytes 7103 (7.1 KB)
        TX errors 0  dropped 0 overruns 0  carrier 0  collisions 0
若显示如,重新拔插一下atlas端的网线即可,正常应该亮绿灯
eno1: flags=4099<UP,BROADCAST,MULTICAST>  mtu 1500
        ether 3c:52:82:e4:93:ef  txqueuelen 1000  (Ethernet)
        RX packets 0  bytes 0 (0.0 B)
        RX errors 0  dropped 0  overruns 0  frame 0
        TX packets 0  bytes 0 (0.0 B)
        TX errors 0  dropped 0 overruns 0  carrier 0  collisions 0
4.2.3.配置Atals200DK网线网卡IP
还是先通过USB虚拟网卡连接Atlas200DK
ssh HwHiAiUser@192.168.1.2
打开netplan的配置文件,按照以下格式进行配置填写。
sudo vim /etc/netplan/01-netcfg.yaml
network:
  version: 2
#  renderer: NetworkManager
  renderer: networkd
  ethernets:
    eth0:
            #dhcp4: yes
      dhcp4: no
      addresses: [192.168.2.2/24]
      gateway4: 255.255.255.0

    usb0:
      dhcp4: no
      addresses: [192.168.1.2/24]
      gateway4: 192.168.0.1
配置完成后执行以下命令,使配置生效。
sudo netplan apply
如下图所示,再使用ifconfig查看,此时已经有ip了。
eth0: flags=4163<UP,BROADCAST,RUNNING,MULTICAST>  mtu 1500
        inet 192.168.2.2  netmask 255.255.255.0  broadcast 192.168.2.255
        ether 10:c3:ab:c9:f3:f6  txqueuelen 1000  (Ethernet)
        RX packets 107  bytes 12330 (12.3 KB)
        RX errors 0  dropped 22  overruns 0  frame 0
        TX packets 23  bytes 2514 (2.5 KB)
        TX errors 0  dropped 0 overruns 0  carrier 0  collisions 0
        device interrupt 69
4.2.4.登录开发板
拔掉USB,在普通用户下通过ssh指令,登录开发板(密码为Mind@123)。
ssh HwHiAiUser@192.168.2.2
若可以登录则配置成功
以上配置应该会导致网口无法正常联网,若无法联网则注释掉对应netplan里的配置即可
4.3.配置开发环境
https://support.huaweicloud.com/environment-deployment-Atlas200DK1012/atlased_04_0017.html
4.3.1. python 安装
https://support.huaweicloud.com/cann503installguide/install_024.html
4.3.2. 开发包安装
依据
https://support.huaweicloud.com/environment-deployment-Atlas200DK1012/atlased_04_0017.html
5.其他的使用技巧
5.1.更改SD卡分区
https://blog.csdn.net/weixin_41018348/article/details/82592057?utm_medium=distribute.pc_relevant_t0.none-task-blog-BlogCommendFromMachineLearnPai2-1.control&depth_1-utm_source=distribute.pc_relevant_t0.none-task-blog-BlogCommendFromMachineLearnPai2-1.control
5.2.复制文件到开发版
scp $HOME/ascend_ddk/arm/lib/libpresenteragent.so HwHiAiUser@192.168.1.2:/home/HwHiAiUser
5.2.启用sudo
不需要每次都进root但其实本质一样,不过感觉更好区分一点
su root
vim /etc/sudoers
添加一句
HwHiAiUser ALL=(ALL:ALL) ALL
5.3.连接网络
sudo vim /etc/netplan/01-netcfg.yaml
修改为如下
network:
  version: 2
#  renderer: NetworkManager
  renderer: networkd
  ethernets:
    eth0:
      dhcp4: yes
      #addresses: [192.168.0.2/24]
      #gateway4: 192.168.0.1
      #nameservers:
      #      addresses: [255.255.0.0]

    usb0:
      dhcp4: no
      addresses: [192.168.1.2/24]
      gateway4: 192.168.0.1
保存重启Atlas
5.4.更换为清华源
sudo vim /etc/apt/sources.list
修改如下
#deb http://ports.ubuntu.com/ubuntu-ports/ bionic main
#deb http://ports.ubuntu.com/ubuntu-ports/ bionic-security main
#deb http://ports.ubuntu.com/ubuntu-ports/ bionic-updates main

deb http://mirrors.tuna.tsinghua.edu.cn/ubuntu-ports/ bionic main multiverse restricted universe
deb http://mirrors.tuna.tsinghua.edu.cn/ubuntu-ports/ bionic-security main multiverse restricted universe
deb http://mirrors.tuna.tsinghua.edu.cn/ubuntu-ports/ bionic-updates main multiverse restricted universe
一定所有源(main multiverse restricted universe)都打开,否则安装ros会缺少依赖
5.5.安装ROS
sudo sh -c '. /etc/lsb-release && echo "deb http://mirrors.tuna.tsinghua.edu.cn/ros/ubuntu/ `lsb_release -cs` main" > /etc/apt/sources.list.d/ros-latest.list'
sudo apt install curl # if you haven't already installed curl
curl -s https://raw.githubusercontent.com/ros/rosdistro/master/ros.asc | sudo apt-key add -
sudo apt update
若出现错误
W: GPG error: http://mirrors.tuna.tsinghua.edu.cn/ros/ubuntu bionic Release: The following signatures couldn't be verified because the public key is not available: NO_PUBKEY F42ED6FBAB17C654
E: The repository 'http://mirrors.tuna.tsinghua.edu.cn/ros/ubuntu bionic Release' is not signed.
N: Updating from such a repository can't be done securely, and is therefore disabled by default.
N: See apt-secure(8) manpage for repository creation and user configuration details.
不用管
sudo apt-get install -y gnupg2 # 或 gnupg
sudo apt update
sudo apt install ros-melodic-ros-base
Environment setup
echo "source /opt/ros/melodic/setup.bash" >> ~/.bashrc
source ~/.bashrc
Dependencies for building packages
sudo apt install python-rosdep build-essential
sudo rosdep init
rosdep update
5.6.安装VINS依赖
Ceres-Solver
# CMake
sudo apt-get install cmake
# google-glog + gflags
sudo apt-get install libgoogle-glog-dev libgflags-dev
# BLAS & LAPACK
sudo apt-get install libatlas-base-dev
# Eigen3
sudo apt-get install libeigen3-dev
# SuiteSparse and CXSparse (optional)
sudo apt-get install libsuitesparse-dev
ceres-solver-2.0.0.tar.gz下载链接: https://codeload.github.com/ceres-solver/ceres-solver/tar.gz/refs/tags/2.0.0
tar zxf ceres-solver-2.0.0.tar.gz
cd ceres-solver-2.0.0
mkdir ceres-bin
cd ceres-bin
cmake ..
make -j3
make test
# Optionally install Ceres, it can also be exported using CMake which
# allows Ceres to be used without requiring installation, see the documentation
# for the EXPORT_BUILD_DIR option for more information.
sudo make install
ROS依赖
sudo apt-get install ros-melodic-cv-bridge ros-melodic-tf ros-melodic-message-filters ros-melodic-image-transport ros-melodic-nav-msgs ros-melodic-visualization-msgs
Sophus
git clone https://github.com/strasdat/Sophus.git
cd Sophus
git checkout a621ff  #版本回溯
修改sophus/so2.cpp中对应为
SO2::SO2()
{
  unit_complex_.real(1.0);
  unit_complex_.imag(0.0);
}
继续
mkdir build && cd build && cmake .. && sudo make install
5.7.使用FastGit代替Git
关于 FastGit 的使用,本质上与 git 有关。正常的面向 GitHub 的 clone 命令可能如下:
git clone https://github.com/author/repo
对于使用 FastGit 的情况,我们使用如下命令:
git clone https://hub.fastgit.org/author/repo
正如您所见, FastGit 仅仅是 GitHub 的代理,所以我们仅需要替代远程地址。
当然,您也可以直接修改 git 的配置,完全使用 FastGit 替换指向 GitHub 的链接:
git config --global url."https://hub.fastgit.org/".insteadOf "https://github.com/"
撤回操作:
打开home下的.gitconfig文件,把对应替换代码删除
5.8.增加虚拟内存
有时候编译会显示运存不够,因为默认没有分配swap空间
增加2G虚拟内存
sudo dd if=/dev/zero of=/swap bs=1024 count=2048000
sudo mkswap /swap
sudo swapon /swap
free查看,swap不再为0 编译完成后可以swapoff /swap
永久挂载虚拟内存: https://cloud.tencent.com/developer/article/1835500
例:
sudo swapon --show
NAME           TYPE      SIZE USED PRIO
/swapfile      file        2G   2G   -2
/dev/nvme0n1p5 partition 6.8G 3.2G   -3
假设新加挂载位置:/dev/nvme0n1p5
sudo echo '/dev/nvme0n1p5 none swap sw 0 0' | sudo tee -a /etc/fstab
5.9.安装zsh
安装ohmyzsh
sh -c "$(wget https://raw.github.com/ohmyzsh/ohmyzsh/master/tools/install.sh -O -)"
在.zshrc文末添加
echo "source /opt/ros/melodic/setup.zsh" >> ~/.zshrc
source ~/.zshrc
安装zsh-autosuggestions
git clone https://github.com/zsh-users/zsh-autosuggestions.git $ZSH_CUSTOM/plugins/zsh-autosuggestions
3.编辑~/.zshrc文件
找到plugins=(git)这一行,然后再添加autosuggestions,最后为:
plugins=(git zsh-autosuggestions)
zsh配置文件
链接: https://pan.baidu.com/s/1KYgbyVsWlyO_xwxPQWf85w?pwd=skyx 提取码: skyx 复制这段内容后打开百度网盘手机App,操作更方便哦
# If you come from bash you might have to change your $PATH.
# export PATH=$HOME/bin:/usr/local/bin:$PATH

# Path to your oh-my-zsh installation.
export ZSH="/home/flood/.oh-my-zsh"

# Set name of the theme to load --- if set to "random", it will
# load a random theme each time oh-my-zsh is loaded, in which case,
# to know which specific one was loaded, run: echo $RANDOM_THEME
# See https://github.com/ohmyzsh/ohmyzsh/wiki/Themes
ZSH_THEME="agnoster"

# Set list of themes to pick from when loading at random
# Setting this variable when ZSH_THEME=random will cause zsh to load
# a theme from this variable instead of looking in $ZSH/themes/
# If set to an empty array, this variable will have no effect.
# ZSH_THEME_RANDOM_CANDIDATES=( "robbyrussell" "agnoster" )

# Uncomment the following line to use case-sensitive completion.
# CASE_SENSITIVE="true"

# Uncomment the following line to use hyphen-insensitive completion.
# Case-sensitive completion must be off. _ and - will be interchangeable.
# HYPHEN_INSENSITIVE="true"

# Uncomment the following line to disable bi-weekly auto-update checks.
# DISABLE_AUTO_UPDATE="true"

# Uncomment the following line to automatically update without prompting.
# DISABLE_UPDATE_PROMPT="true"

# Uncomment the following line to change how often to auto-update (in days).
# export UPDATE_ZSH_DAYS=13

# Uncomment the following line if pasting URLs and other text is messed up.
# DISABLE_MAGIC_FUNCTIONS="true"

# Uncomment the following line to disable colors in ls.
# DISABLE_LS_COLORS="true"

# Uncomment the following line to disable auto-setting terminal title.
# DISABLE_AUTO_TITLE="true"

# Uncomment the following line to enable command auto-correction.
# ENABLE_CORRECTION="true"

# Uncomment the following line to display red dots whilst waiting for completion.
# Caution: this setting can cause issues with multiline prompts (zsh 5.7.1 and newer seem to work)
# See https://github.com/ohmyzsh/ohmyzsh/issues/5765
# COMPLETION_WAITING_DOTS="true"

# Uncomment the following line if you want to disable marking untracked files
# under VCS as dirty. This makes repository status check for large repositories
# much, much faster.
# DISABLE_UNTRACKED_FILES_DIRTY="true"

# Uncomment the following line if you want to change the command execution time
# stamp shown in the history command output.
# You can set one of the optional three formats:
# "mm/dd/yyyy"|"dd.mm.yyyy"|"yyyy-mm-dd"
# or set a custom format using the strftime function format specifications,
# see 'man strftime' for details.
# HIST_STAMPS="mm/dd/yyyy"

# Would you like to use another custom folder than $ZSH/custom?
# ZSH_CUSTOM=/path/to/new-custom-folder

# Which plugins would you like to load?
# Standard plugins can be found in $ZSH/plugins/
# Custom plugins may be added to $ZSH_CUSTOM/plugins/
# Example format: plugins=(rails git textmate ruby lighthouse)
# Add wisely, as too many plugins slow down shell startup.
plugins=(git zsh-autosuggestions)

source $ZSH/oh-my-zsh.sh

# User configuration

# export MANPATH="/usr/local/man:$MANPATH"

# You may need to manually set your language environment
# export LANG=en_US.UTF-8

# Preferred editor for local and remote sessions
# if [[ -n $SSH_CONNECTION ]]; then
#   export EDITOR='vim'
# else
#   export EDITOR='mvim'
# fi

# Compilation flags
# export ARCHFLAGS="-arch x86_64"

# Set personal aliases, overriding those provided by oh-my-zsh libs,
# plugins, and themes. Aliases can be placed here, though oh-my-zsh
# users are encouraged to define aliases within the ZSH_CUSTOM folder.
# For a full list of active aliases, run `alias`.
#
# Example aliases
# alias zshconfig="mate ~/.zshrc"
# alias ohmyzsh="mate ~/.oh-my-zsh"

# fix: zsh unable to recognise *
setopt no_nomatch

#vpn
export http_proxy=http://127.0.0.1:8889
export https_proxy=http://127.0.0.1:8889

alias sss="source ./devel/setup.zsh"

source /opt/ros/melodic/setup.zsh

#PKG_CONFIG_PATH=$PKG_CONFIG_PATH:/usr/local/lib/pkgconfig
#export PKG_CONFIG_PATH

# CUDA Version
export PATH=/usr/local/cuda-11.4/bin:$PATH
export LD_LIBRARY_PATH=/usr/local/cuda-11.4/lib64:$LD_LIBRARY_PATH

export LD_LIBRARY_PATH=$LD_LIBRARY_PATH:/home/flood/Softwares/TensorRT-8.2.3.0/lib

#conda activate open-mmlab

# >>> conda initialize >>>
# !! Contents within this block are managed by 'conda init' !!
__conda_setup="$('/home/flood/anaconda3/bin/conda' 'shell.zsh' 'hook' 2> /dev/null)"
if [ $? -eq 0 ]; then
    eval "$__conda_setup"
else
    if [ -f "/home/flood/anaconda3/etc/profile.d/conda.sh" ]; then
        . "/home/flood/anaconda3/etc/profile.d/conda.sh"
    else
        export PATH="/home/flood/anaconda3/bin:$PATH"
    fi
fi
unset __conda_setup
# <<< conda initialize <<<
terminator美化配置
sudo apt install powerline
链接: https://pan.baidu.com/s/16O5Djtc7Pu0rS0elA60H2w?pwd=gs66 提取码: gs66 复制这段内容后打开百度网盘手机App,操作更方便哦
[global_config]
  suppress_multiple_term_dialog = True
[keybindings]
[profiles]
  [[default]]
    background_color = "#002b36"
    background_darkness = 0.91
    background_type = transparent
    cursor_color = "#e0f0f1"
    font = Noto Mono for Powerline 11
    foreground_color = "#eeeeec"
    show_titlebar = False
    palette = "#2e3436:#cc241d:#98971a:#729fcf:#3465a4:#b16286:#689d6a:#eeeeec:#888a85:#fb4934:#b8bb26:#204a87:#83a598:#d3869b:#8ec07c:#ebdbb2"
[layouts]
  [[default]]
    [[[child1]]]
      parent = window0
      type = Terminal
    [[[window0]]]
      parent = ""
      type = Window
[plugins]
5.10.终端代理
https://zhuanlan.zhihu.com/p/46973701
5.11. libroscpp.so: cannot open shared object file: No such file or directory
因为在bashrc/zshrc里添加的
export LD_LIBRARY_PATH=${install_path}/atc/lib64
没有将历史LD_LIBRARY_PATH涵盖
改为
export LD_LIBRARY_PATH=$LD_LIBRARY_PATH:${install_path}/atc/lib64
5.11. NPU 管理 (CPU管理)
https://support.huawei.com/enterprise/zh/doc/EDOC1100206826/dd03bec6
Atlas200 默认分配4核给npu,导致程序运行时最多只能使用4核,可以根据需求进行调整:https://support.huawei.com/enterprise/zh/doc/EDOC1100206826/4217ac46
sudo npu-smi set -t aicpu-config -i 0 -c 0 -d 2
最少需要分配2个核心给npu,否则失败
5.12.Ubuntu 终端下Nethogs 命令查看网络带宽
sudo apt-get install nethogs
使用:sudo nethogs enp0s20f0u2
5.13. Backward-cpp
https://zhuanlan.zhihu.com/p/397148839
sudo apt-get install libdw-dev
wget https://raw.githubusercontent.com/bombela/backward-cpp/master/backward.hpp sudo mv backward.hpp /usr/include
target_link_libraries(dw_test
        dw
        )
#define BACKWARD_HAS_DW 1
#include "backward.hpp"
namespace backward{
    backward::SignalHandling sh;
}
5.14. sudo apt update 时间报错
(invalid for another 1609d 7h 32min 23s). Updates for this repository will not be applied.
临时更新一下时间就好
sudo date -s 2022/5/26
时间不能超过当前时间,可以设置为前一个月的时间
本文内容由网友自发贡献,版权归原作者所有,本站不承担相应法律责任。如您发现有涉嫌抄袭侵权的内容,请联系:hwhale#tublm.com(使用前将#替换为@)