前言:
2017.11.18:根据实践过程整理出第一版。
2018.01.05:更新对 pkgconfig 的说明。
----
今天在跑一个faster-rcnn的案例(https://pjreddie.com/darknet/yolo/)涉及到编译 openCV,于是又再一次编译并配置一次 OpenCV。OpenCV的编译过程需要一点时间,重要的是在编译的时候会出现一些常见的问题。整理下来有助于以后的再次使用。
值得一提的是,如果你只是使用一些深度学习框架(如,tensorflow 或者 keras 等)需要用到 opencv 的话(import cv2),只需要直接安装 opencv-python 即可。安装命令如下所示:
pip install opencv-python
ubuntu 系统下更多软件的安装和配置请参考:http://blog.csdn.net/houchaoqun_xmu/article/details/72461592
使用 ubuntu 的同志们请注意,很多情况要区分你输入的命令有没有加 “sudo”。比如说,你在安装 anaconda2 的过程中都是在“未使用sudo”的前提下进行安装(bash Anaconda2-4.3.1-Linux-x86_64.sh),此时系统中有两个python2环境。第一个是 ubuntu 系统自带的python2.7,你可以使用 sudo python 进入命令行模式;还有一个就是你刚刚安装的 Anaconda 中的 python,你可以直接键入命令 “python” 就可以直接进入命令行模式。
关键来了,如果你现在需要安装 tensorflow,你想使用 pip 命令直接安装。那么,你使用 " pip install -I tensorflow==0.12.1 " 和 “ sudo pip install -I tensorflow==0.12.1” 是完全不一样的, 它们分别使用了Anaconda和ubuntu系统自带的pip。其中,Anaconda 中集成了很多python相关的工具包,而系统自带的是没有的。在后续的使用中,要千万区分好是否使用 sudo。
参考网址:
opencv 对应的 github 地址:https://github.com/opencv/opencv/tree/3.3.0
OpenCV在Ubuntu下的安装:http://www.linuxidc.com/Linux/2016-07/132879.htm
Ubuntu16.04下安装OpenCV3.2.0:https://www.cnblogs.com/arkenstone/p/6490017.html
安装步骤:
part1:所需的相关插件、工具包
sudo apt-get install build-essential # 搭建C/C++编译环境
sudo apt-get install cmake git libgtk2.0-dev pkg-config libavcodec-dev libavformat-dev libswscale-dev # 关联库
sudo apt-get install python-dev python-numpy libtbb2 libtbb-dev libjpeg-dev libpng-dev libtiff-dev libjasper-dev libdc1394-22-dev # 关联库
part2:OpenCV 安装
1)到 github 下载 OpenCV 源码:
git clone https://github.com/opencv/opencv.git
2)在根目录下创建一个新目录(mkdir my_build_dir),目的是存放 cmake 生成的文件
3)执行如下命令进行 cmake(注意根据实际情况修改命令中相应的路径)
cmake .. -DCMAKE_BUILD_TYPE=my_build_dir -DCMAKE_INSTALL_PREFIX=/home/hcq/document/opencv
如果遇到如下问题,请先将根目录下的 “CMakeCache.txt” 文件删掉,再重新执行一遍上述命令。
hcq@hcq-home:~/document/opencv$ cmake .
CMake Error at CMakeLists.txt:11 (message):


  FATAL: In-source builds are not allowed.

         You should create a separate directory for build files.


-- Configuring incomplete, errors occurred!
cmake 成功后,提示如下所示:
hcq@hcq-home:~/document/opencv/my_build_dir$ cmake .. -DCMAKE_BUILD_TYPE=Release -DCMAKE_INSTALL_PREFIX=/home/hcq/document/opencv
-- The CXX compiler identification is GNU 5.4.0
-- The C compiler identification is GNU 5.4.0
-- Check for working CXX compiler: /usr/bin/c++
-- Check for working CXX compiler: /usr/bin/c++ -- works
-- Detecting CXX compiler ABI info
-- Detecting CXX compiler ABI info - done
-- Detecting CXX compile features
-- Detecting CXX compile features - done
-- Check for working C compiler: /usr/bin/cc
-- Check for working C compiler: /usr/bin/cc -- works
-- Detecting C compiler ABI info
-- Detecting C compiler ABI info - done
-- Detecting C compile features
-- Detecting C compile features - done
-- Performing Test HAVE_CXX11 (check file: cmake/checks/cxx11.cpp)
-- Performing Test HAVE_CXX11 - Failed
-- Found PythonInterp: /usr/bin/python2.7 (found suitable version "2.7.12", minimum required is "2.7")
-- Found PythonLibs: /usr/lib/x86_64-linux-gnu/libpython2.7.so (found suitable exact version "2.7.12")
Traceback (most recent call last):
  File "<string>", line 1, in <module>
ImportError: No module named numpy.distutils
-- Found PythonInterp: /home/hcq/anaconda3/bin/python3 (found suitable version "3.6.3", minimum required is "3.4")
-- Could NOT find PythonLibs (missing:  PYTHON_LIBRARIES PYTHON_INCLUDE_DIRS) (Required is exact version "3.6.3")
-- Looking for ccache - not found
-- Performing Test HAVE_CXX_FSIGNED_CHAR
-- Performing Test HAVE_CXX_FSIGNED_CHAR - Success

... ... ... (此处省略一大部分提示信息)

--   Python 2:
--     Interpreter:                 /usr/bin/python2.7 (ver 2.7.12)
--
--   Python 3:
--     Interpreter:                 /home/hcq/anaconda3/bin/python3 (ver 3.6.3)
--
--   Python (for build):            /usr/bin/python2.7
--     Pylint:                      /home/hcq/anaconda3/bin/pylint (ver: 1.7.4, checks: 111)
--
--   Java:
--     ant:                         NO
--     JNI:                         NO
--     Java wrappers:               NO
--     Java tests:                  NO
--
--   Matlab:                        Matlab not found or implicitly disabled
--
--   Documentation:
--     Doxygen:                     NO
--
--   Tests and samples:
--     Tests:                       YES
--     Performance tests:           YES
--     C/C++ Examples:              NO
--
--   Install path:                  /home/hcq/document/opencv
--
--   cvconfig.h is in:              /home/hcq/document/opencv/my_build_dir
-- -----------------------------------------------------------------
--
-- Configuring done
-- Generating done
-- Build files have been written to: /home/hcq/document/opencv/my_build_dir
cmake 成功后,my_build_dir 目录生成如下所示的相关文件:
hcq@hcq-home:~/document/opencv/my_build_dir$ ll
total 1144
drwxrwxr-x 15 hcq hcq   4096 11月 17 20:42 ./
drwxrwxr-x 16 hcq hcq   4096 11月 17 20:31 ../
drwxrwxr-x  7 hcq hcq   4096 11月 17 20:42 3rdparty/
drwxrwxr-x  9 hcq hcq   4096 11月 17 20:42 apps/
drwxrwxr-x  2 hcq hcq   4096 11月 17 20:42 bin/
-rw-rw-r--  1 hcq hcq 349266 11月 17 20:42 CMakeCache.txt
-rw-rw-r--  1 hcq hcq   1942 11月 17 20:42 CMakeConfig-CUDA_CONFIGCMAKE.cmake
-rw-rw-r--  1 hcq hcq  41567 11月 17 20:41 CMakeDownloadLog.txt
drwxrwxr-x 13 hcq hcq   4096 11月 17 20:42 CMakeFiles/
-rw-rw-r--  1 hcq hcq   4771 11月 17 20:42 cmake_install.cmake
-rw-rw-r--  1 hcq hcq   1174 11月 17 20:41 cmake_uninstall.cmake
-rw-rw-r--  1 hcq hcq 387001 11月 17 20:42 CMakeVars.txt
-rw-r--r--  1 hcq hcq  11643 11月 17 20:42 CPackConfig.cmake
-rw-r--r--  1 hcq hcq  11983 11月 17 20:42 CPackSourceConfig.cmake
-rw-rw-r--  1 hcq hcq    431 11月 17 20:42 CTestTestfile.cmake
-rw-rw-r--  1 hcq hcq     70 11月 17 20:41 custom_hal.hpp
-rw-rw-r--  1 hcq hcq   5171 11月 17 20:42 cvconfig.h
-rw-rw-r--  1 hcq hcq    582 11月 17 20:42 cv_cpu_config.h
drwxrwxr-x  3 hcq hcq   4096 11月 17 20:42 data/
drwxrwxr-x  3 hcq hcq   4096 11月 17 20:42 doc/
drwxrwxr-x  3 hcq hcq   4096 11月 17 20:42 include/
drwxrwxr-x  2 hcq hcq   4096 11月 17 20:31 junk/
drwxrwxr-x  2 hcq hcq   4096 11月 17 20:42 lib/
-rw-rw-r--  1 hcq hcq 163514 11月 17 20:42 Makefile
drwxrwxr-x 38 hcq hcq   4096 11月 17 20:42 modules/
drwxrwxr-x  2 hcq hcq   4096 11月 17 20:42 opencv2/
-rw-rw-r--  1 hcq hcq  14588 11月 17 20:42 OpenCVConfig.cmake
-rw-rw-r--  1 hcq hcq    418 11月 17 20:42 OpenCVConfig-version.cmake
-rw-rw-r--  1 hcq hcq   4303 11月 17 20:42 OpenCVGenPkgConfig.info.cmake
-rw-rw-r--  1 hcq hcq  20232 11月 17 20:42 OpenCVModules.cmake
-rw-rw-r--  1 hcq hcq    122 11月 17 20:41 opencv_tests_config.hpp
-rw-rw-r--  1 hcq hcq  28238 11月 17 20:42 pylint.cmake
-rw-rw-r--  1 hcq hcq    572 11月 17 20:18 pylintrc
drwxrwxr-x  5 hcq hcq   4096 11月 17 20:41 test-reports/
drwxrwxr-x  2 hcq hcq   4096 11月 17 20:42 unix-install/
-rw-rw-r--  1 hcq hcq   8216 11月 17 20:42 version_string.tmp
4)在 “opencv/my_build_dir” 目录下执行如下命令,此时需要等待编译一段时间。
make -j8 # 本人的PC上有8个线程
5)“opencv/my_build_dir” 目录下执行如下命令
sudo make -j8 install
make 成功后,提示如下所示:
-- Installing: /home/hcq/document/opencv/share/OpenCV/haarcascades/haarcascade_frontalface_alt_tree.xml
-- Installing: /home/hcq/document/opencv/share/OpenCV/haarcascades/haarcascade_frontalface_default.xml
-- Installing: /home/hcq/document/opencv/share/OpenCV/haarcascades/haarcascade_licence_plate_rus_16stages.xml
-- Installing: /home/hcq/document/opencv/share/OpenCV/haarcascades/haarcascade_lefteye_2splits.xml
-- Installing: /home/hcq/document/opencv/share/OpenCV/haarcascades/haarcascade_frontalcatface.xml
-- Installing: /home/hcq/document/opencv/share/OpenCV/haarcascades/haarcascade_eye.xml
-- Installing: /home/hcq/document/opencv/share/OpenCV/haarcascades/haarcascade_righteye_2splits.xml
-- Installing: /home/hcq/document/opencv/share/OpenCV/haarcascades/haarcascade_eye_tree_eyeglasses.xml
-- Installing: /home/hcq/document/opencv/share/OpenCV/haarcascades/haarcascade_russian_plate_number.xml
-- Installing: /home/hcq/document/opencv/share/OpenCV/haarcascades/haarcascade_frontalcatface_extended.xml
-- Installing: /home/hcq/document/opencv/share/OpenCV/haarcascades/haarcascade_smile.xml
-- Installing: /home/hcq/document/opencv/share/OpenCV/haarcascades/haarcascade_upperbody.xml
-- Installing: /home/hcq/document/opencv/share/OpenCV/haarcascades/haarcascade_frontalface_alt2.xml
-- Installing: /home/hcq/document/opencv/share/OpenCV/haarcascades/haarcascade_profileface.xml
-- Installing: /home/hcq/document/opencv/share/OpenCV/haarcascades/haarcascade_fullbody.xml
-- Installing: /home/hcq/document/opencv/share/OpenCV/haarcascades/haarcascade_frontalface_alt.xml
-- Installing: /home/hcq/document/opencv/share/OpenCV/lbpcascades/lbpcascade_profileface.xml
-- Installing: /home/hcq/document/opencv/share/OpenCV/lbpcascades/lbpcascade_silverware.xml
-- Installing: /home/hcq/document/opencv/share/OpenCV/lbpcascades/lbpcascade_frontalface_improved.xml
-- Installing: /home/hcq/document/opencv/share/OpenCV/lbpcascades/lbpcascade_frontalcatface.xml
-- Installing: /home/hcq/document/opencv/share/OpenCV/lbpcascades/lbpcascade_frontalface.xml
-- Installing: /home/hcq/document/opencv/bin/opencv_traincascade
-- Set runtime path of "/home/hcq/document/opencv/bin/opencv_traincascade" to "/home/hcq/document/opencv/lib:/usr/local/cuda-8.0/lib64"
-- Installing: /home/hcq/document/opencv/bin/opencv_createsamples
-- Set runtime path of "/home/hcq/document/opencv/bin/opencv_createsamples" to "/home/hcq/document/opencv/lib:/usr/local/cuda-8.0/lib64"
-- Installing: /home/hcq/document/opencv/bin/opencv_annotation
-- Set runtime path of "/home/hcq/document/opencv/bin/opencv_annotation" to "/home/hcq/document/opencv/lib:/usr/local/cuda-8.0/lib64"
-- Installing: /home/hcq/document/opencv/bin/opencv_visualisation
-- Set runtime path of "/home/hcq/document/opencv/bin/opencv_visualisation" to "/home/hcq/document/opencv/lib:/usr/local/cuda-8.0/lib64"
-- Installing: /home/hcq/document/opencv/bin/opencv_interactive-calibration
-- Set runtime path of "/home/hcq/document/opencv/bin/opencv_interactive-calibration" to "/home/hcq/document/opencv/lib:/usr/local/cuda-8.0/lib64"
-- Installing: /home/hcq/document/opencv/bin/opencv_version
-- Set runtime path of "/home/hcq/document/opencv/bin/opencv_version" to "/home/hcq/document/opencv/lib:/usr/local/cuda-8.0/lib64"
6)配置 library:
- 打开/etc/ld.so.conf.d/opencv.conf,在末尾加入 /usr/local/lib(有可能是个空文件)
- 执行命令:sudo ldconfig
- 编辑 /etc/bash.bashrc,加入如下路径:
PKG_CONFIG_PATH=$PKG_CONFIG_PATH:/usr/local/lib/pkgconfig
export PKG_CONFIG_PATH
(2018.01.05 更新)说明:要先看看 /usr/local/lib/pkgconfig 这个路径下有没有 pkgconfig,本人使用的是 Anaconda2 的python,所以 pkgconfig 的路径在 /home/gtx/opencv/lib/pkgconfig。也就是说,我使用的路径如下:
# added by hcq 20180104
# opencv
PKG_CONFIG_PATH=$PKG_CONFIG_PATH:/home/gtx/opencv/lib/pkgconfig
export PKG_CONFIG_PATH
7)安装完毕,测试 OpenCV
cd opencv/samples/ # 切换到 opencv/samples 目录下
sudo cmake . # 在samples目录下进行 cmake
如果在 cmake 的过程中出现如下问题,则需要修改 samples 目录下的 CMakeLists.txt 文件:
CMake Error at CMakeLists.txt:55 (find_package):
  By not providing "FindOpenCV.cmake" in CMAKE_MODULE_PATH this project has
  asked CMake to find a package configuration file provided by "OpenCV", but
  CMake did not find one.

  Could not find a package configuration file provided by "OpenCV" with any
  of the following names:

    OpenCVConfig.cmake
    opencv-config.cmake

  Add the installation prefix of "OpenCV" to CMAKE_PREFIX_PATH or set
  "OpenCV_DIR" to a directory containing one of the above files.  If "OpenCV"
  provides a separate development package or SDK, be sure it has been
  installed.


-- Configuring incomplete, errors occurred!
CMakeLists.txt 修改后如下所示:
cmake_minimum_required(VERSION 2.8)

project(samples C CXX)
option(BUILD_EXAMPLES "Build samples" ON)

# add by hcq 20171118
set(OpenCV_DIR /home/hcq/document/opencv/my_build_dir)

find_package(OpenCV REQUIRED)
重新 cmake 成功后,提示如下所示:
hcq@hcq-home:~/document/opencv/samples$ sudo cmake .
-- Found OpenCV: /home/hcq/document/opencv/my_build_dir (found version "3.3.1")
-- OpenCL samples are skipped: OpenCL SDK is required
-- Configuring done
-- Generating done
-- Build files have been written to: /home/hcq/document/opencv/samples
继续进行 make 编译:
sudo make -j8 # 在 samples 目录下进行编译
编译成功的提示如下所示:
-- OpenCL samples are skipped: OpenCL SDK is required
-- Configuring done
-- Generating done
-- Build files have been written to: /home/hcq/document/opencv/samples
Scanning dependencies of target example_phase_corr
Scanning dependencies of target example_kmeans
Scanning dependencies of target example_ffilldemo
Scanning dependencies of target example_convexhull
Scanning dependencies of target example_detect_blob
Scanning dependencies of target example_intelperc_capture
Scanning dependencies of target cpp-tutorial-pnp_detection
Scanning dependencies of target example_connected_components
[  0%] Building CXX object cpp/CMakeFiles/example_kmeans.dir/kmeans.cpp.o
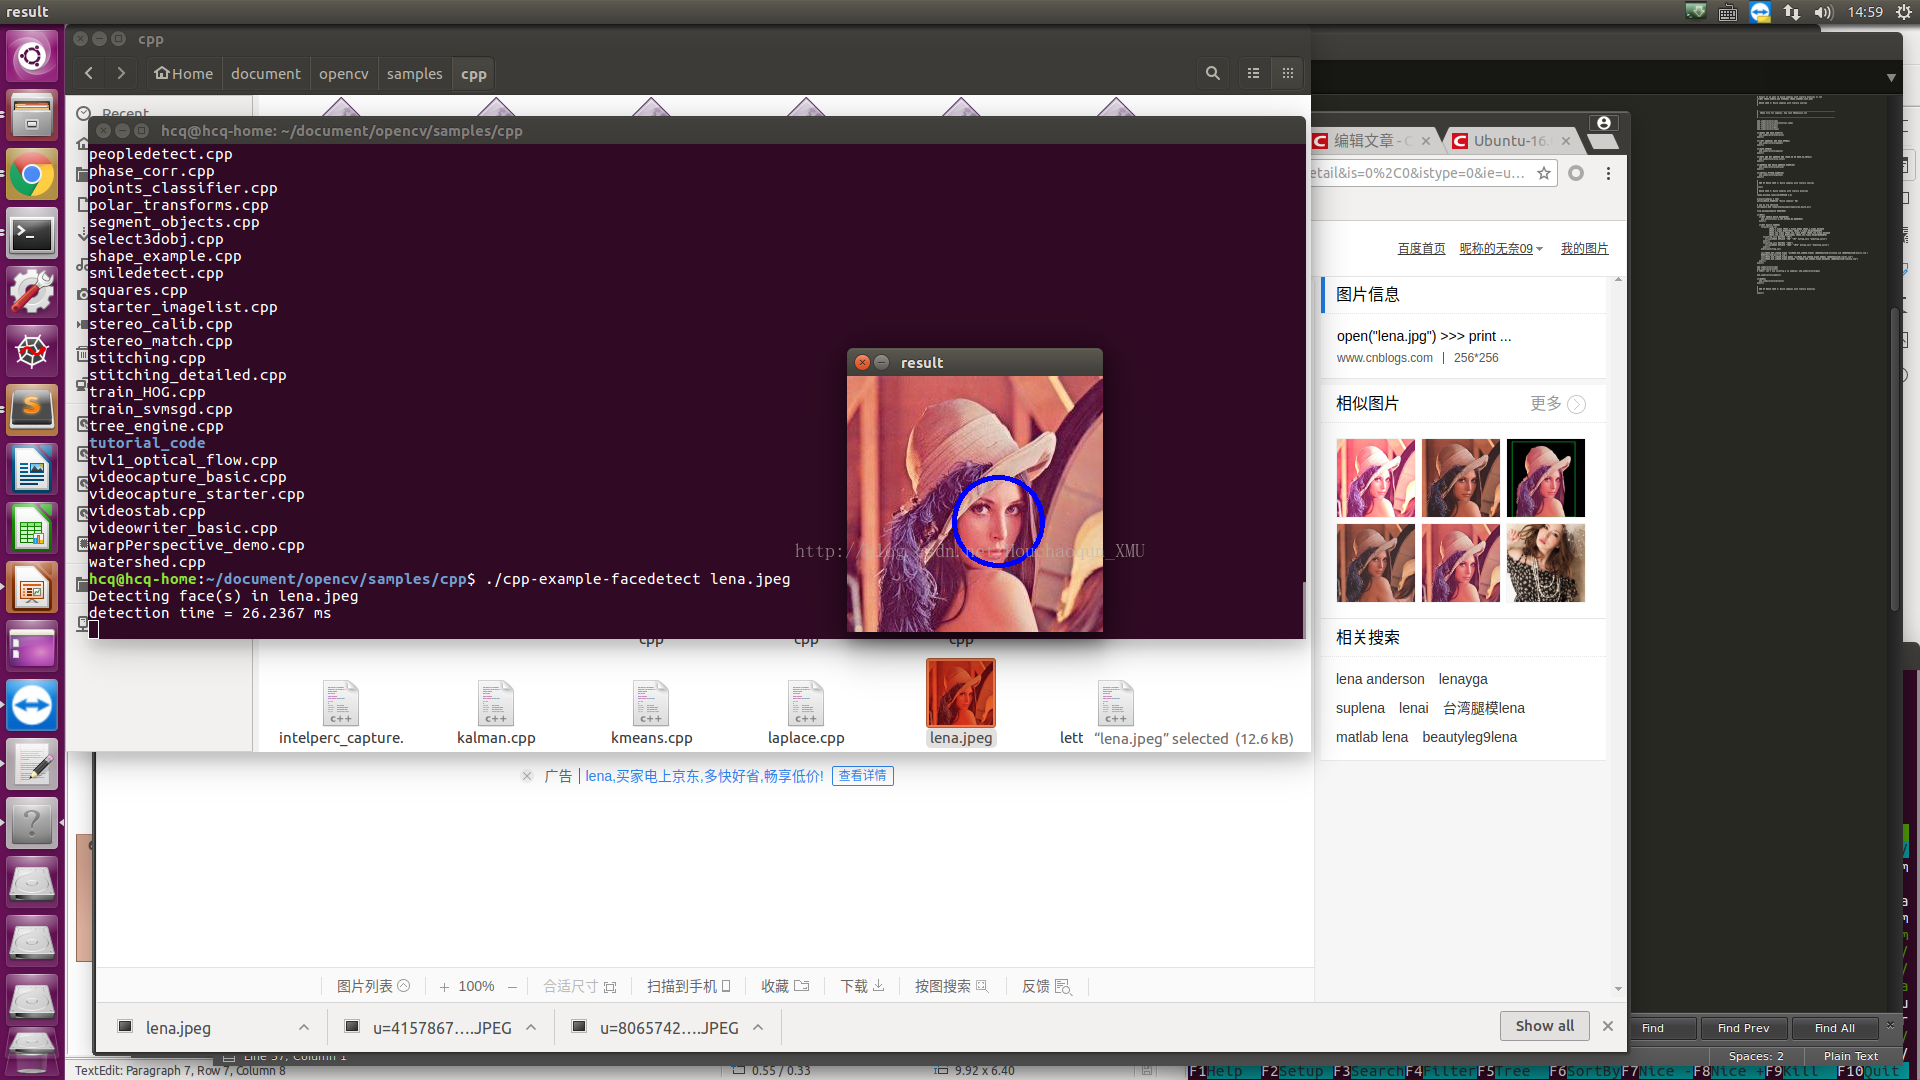
进入 samples/cpp 目录,执行如下命令进行测试:
./cpp-example-facedetect lena.jpeg
(注意,lena.jpeg 图片可以直接到百度下载,然后放到 samples/cpp 目录下)
测试成功后,效果如下图所示:
遇到的问题及其解决方案:
hcq@hcq-home:~/document/opencv$ cmake .
CMake Error at CMakeLists.txt:11 (message):


  FATAL: In-source builds are not allowed.

         You should create a separate directory for build files.


-- Configuring incomplete, errors occurred!
解决方案:https://stackoverflow.com/questions/45518317/in-source-builds-are-not-allowed-in-cmake
hcq@hcq-home:~/document/opencv/samples$ sudo cmake .
-- The C compiler identification is GNU 5.4.0
-- The CXX compiler identification is GNU 5.4.0
-- Check for working C compiler: /usr/bin/cc
-- Check for working C compiler: /usr/bin/cc -- works
-- Detecting C compiler ABI info
-- Detecting C compiler ABI info - done
-- Detecting C compile features
-- Detecting C compile features - done
-- Check for working CXX compiler: /usr/bin/c++
-- Check for working CXX compiler: /usr/bin/c++ -- works
-- Detecting CXX compiler ABI info
-- Detecting CXX compiler ABI info - done
-- Detecting CXX compile features
-- Detecting CXX compile features - done
CMake Error at CMakeLists.txt:55 (find_package):
  By not providing "FindOpenCV.cmake" in CMAKE_MODULE_PATH this project has
  asked CMake to find a package configuration file provided by "OpenCV", but
  CMake did not find one.

  Could not find a package configuration file provided by "OpenCV" with any
  of the following names:

    OpenCVConfig.cmake
    opencv-config.cmake

  Add the installation prefix of "OpenCV" to CMAKE_PREFIX_PATH or set
  "OpenCV_DIR" to a directory containing one of the above files.  If "OpenCV"
  provides a separate development package or SDK, be sure it has been
  installed.


-- Configuring incomplete, errors occurred!
See also "/home/hcq/document/opencv/samples/CMakeFiles/CMakeOutput.log".
解决方案:
http://blog.csdn.net/brightming/article/details/50402399
(注意:本文是新建一个名为 “my_build_dir” 目录,而不是 Release)