OpenMMLab Playground
概况
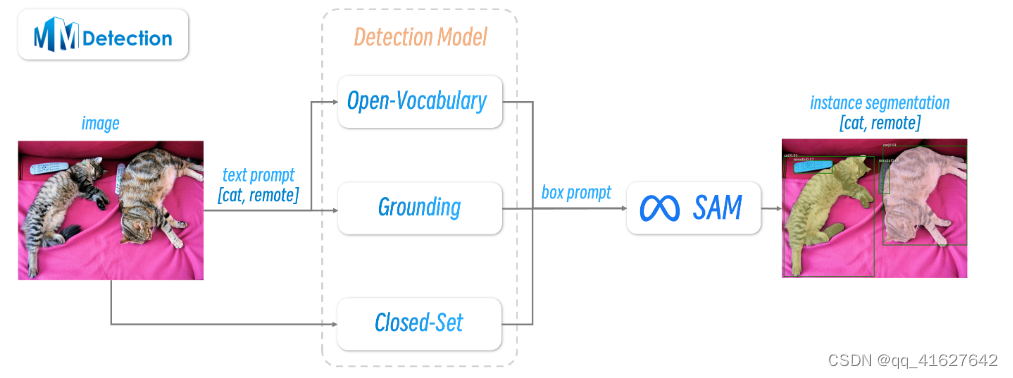
当前通用目标检测的研究方向正在朝着大型多模态模型发展。除了图像输入之外,最近的研究成果还结合了文本模式来提高性能。添加文本模态后,通用检测算法的一些非常好的属性开始出现,例如:
可以利用大量易于访问的文本数据进行联合训练。
轻松实现开放集目标检测,从而实现真正通用的检测任务。
可以与 NLP 中的优秀模型一起使用来创建一些有趣且有用的功能。
从目前来看,通用物体检测可以分为两大类:
(1)闭集目标检测,只能检测训练集中出现的固定数量类别的目标
(2)开放集目标检测,还可以检测不在训练集中的对象和类别
随着多模态算法的流行,开放集目标检测成为一个新的研究领域,其中有三个热门方向:
(1)零样本目标检测(Zero-Shot Object Detection),也称为零样本目标检测,强调测试集中的目标类别不在训练集中。
(2)开放词汇对象检测(Open-Vocabulary Object Detection),检测目标图像中出现的具有给定类别列表的所有对象。
(3)接地对象检测(Grounding Object Detection),通过目标图像中出现的给定文本描述来预测对象的位置。
这三个方向在实践中并不能完全区分,只是一般意义上的不同。基于以上描述,我们提供了多种模型的推理和评估脚本,与Segment Anything配合使用,实现了以下功能:
(1)支持 MMDet 中经典的 Closed-Set 对象检测模型,与 SAM 模型配合使用,以进行自动检测和实例分割,例如 Faster R-CNN 和 DINO。
(2)支持 Open-Vocabulary 检测模型(如 Detic)与 SAM 模型配合使用,以进行自动检测和实例分割。
(3)支持 Grounding 物体检测模型与 SAM 模型配合使用,进行自动检测和实例分割,例如 Grounding DINO 和 GLIP。
(4)支持跨所有模型的分布式检测和分段评估以及自动 COCO JSON 导出,以实现用户友好的自定义数据评估。
File Introduction(代码介绍)
(1)detector_sam_demo.py:用于对单个图像和图像文件夹进行检测和实例分割。
(2)coco_style_eval.py:用于对给定的 COCO JSON 进行推理、评估和导出。
(3)browse_coco_json.py:用于可视化导出的 COCO JSON。
(4)images2coco.py:用于基于用户自己的图像文件夹的自定义和未注释的 COCO 风格 JSON。此 JSON 可以用作coco_style_eval.py.
环境搭建
conda create -n mmdetsam python=3.8 -y
conda activate mmdetsam

pip install torch==1.9.1+cu111 torchvision==0.10.1+cu111 -f https://download.pytorch.org/whl/torch_stable.html

pip install torch==1.9.1+cu102 torchvision==0.10.1+cu102  torchaudio===0.9.1 -f https://download.pytorch.org/whl/torch_stable.html -i http://mirrors.aliyun.com/pypi/simple/ --trusted-host mirrors.aliyun.com

# CUDA 10.2
conda install pytorch==1.9.1 torchvision==0.10.1 torchaudio==0.9.1 cudatoolkit=10.2 -c pytorch

pip3 install torch==1.8.2+cu102 torchvision==0.9.2+cu102 torchaudio===0.8.2 -f https://download.pytorch.org/whl/lts/1.8/torch_lts.html  -i http://mirrors.aliyun.com/pypi/simple/ --trusted-host mirrors.aliyun.com

pip install torch==1.10.0+cu102 torchvision==0.11.0+cu102 torchaudio==0.10.0 -f https://download.pytorch.org/whl/torch_stable.html -i http://mirrors.aliyun.com/pypi/simple/ --trusted-host mirrors.aliyun.com
import torch

if torch.cuda.is_available():
    print("GPU 可用")
else:
    print("GPU 不可用")
pip install mmengine -i http://mirrors.aliyun.com/pypi/simple/ --trusted-host mirrors.aliyun.com


git clone https://github.com/open-mmlab/playground.git
cd playground
功能介绍
该项目包含了许多优秀的开源算法,以减轻环境安装的负担。如果您不想使用某部分功能,可以跳过相应部分。我们的项目可以分为以下三个部分。
1 开放词汇+SAM(Open-Vocabulary + SAM)
将开放词汇目标检测器与 SAM 模型结合使用。目前我们支持 Detic。
依赖安装
pip install -U openmim  -i http://mirrors.aliyun.com/pypi/simple/ --trusted-host mirrors.aliyun.com
mim install "mmcv>=2.0.0"  -i http://mirrors.aliyun.com/pypi/simple/ --trusted-host mirrors.aliyun.com

# build from source
git clone https://github.com/open-mmlab/mmdetection.git
cd mmdetection;
pip install -e .; cd ..

pip install git+https://github.com/facebookresearch/segment-anything.git
pip install git+https://github.com/openai/CLIP.git
验证mmdetection安装成功
python demo/image_demo.py demo/demo.jpg rtmdet_tiny_8xb32-300e_coco.py --weights rtmdet_tiny_8xb32-300e_coco_20220902_112414-78e30dcc.pth --device cpu
Demonstration
cd mmdet_sam
# download weights
mkdir ../models
wget -P ../models/ https://download.openmmlab.com/mmdetection/v3.0/detic/detic_centernet2_swin-b_fpn_4x_lvis-coco-in21k/detic_centernet2_swin-b_fpn_4x_lvis-coco-in21k_20230120-0d301978.pth
wget -P ../models/ https://dl.fbaipublicfiles.com/segment_anything/sam_vit_h_4b8939.pth
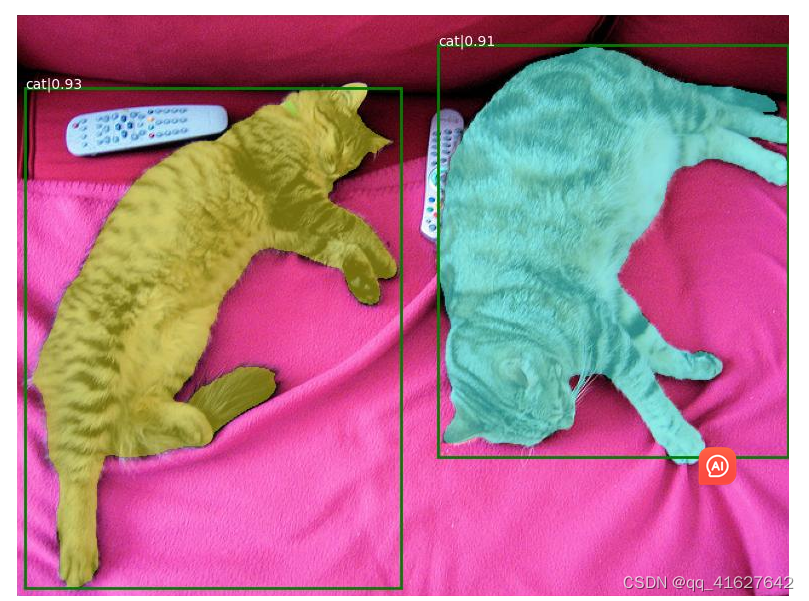
####input a single image
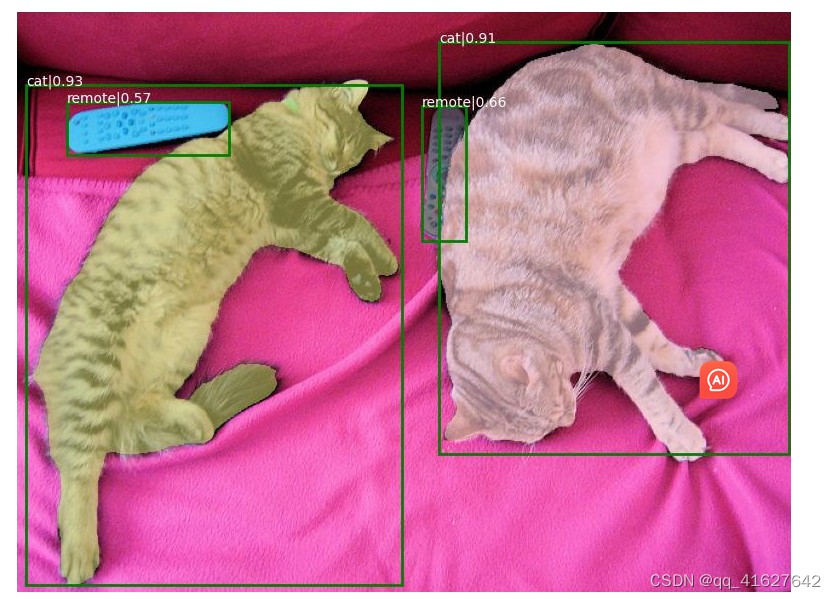
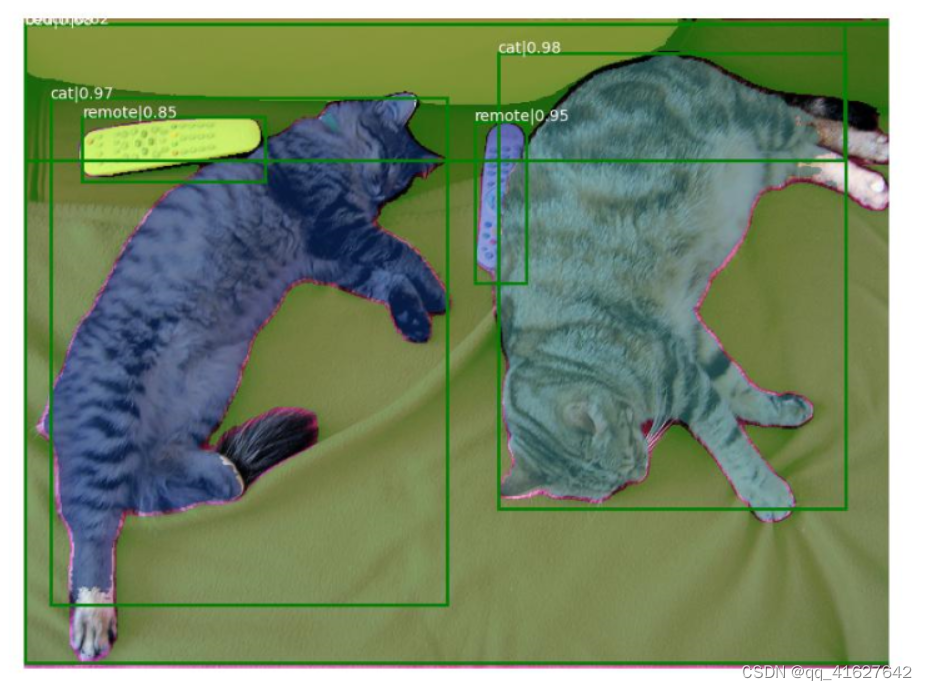
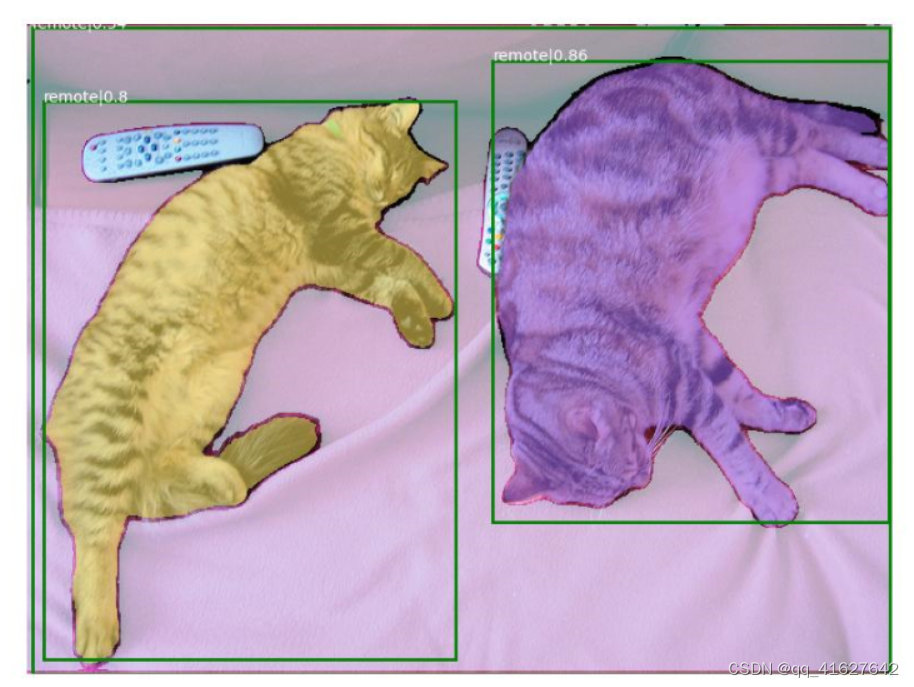
python detector_sam_demo.py ../images/cat_remote.jpg \
configs/Detic_LI21k_CLIP_SwinB_896b32_4x_ft4x_max-size.py \
../models/detic_centernet2_swin-b_fpn_4x_lvis-coco-in21k_20230120-0d301978.pth \
-t cat \
--sam-device cpu
python detector_sam_demo.py ../images/cat_remote.jpg configs/Detic_LI21k_CLIP_SwinB_896b32_4x_ft4x_max-size.py ../models/detic_centernet2_swin-b_fpn_4x_lvis-coco-in21k_20230120-0d301978.pth -t cat
我们还可以通过编辑–test-prompt来检测遥控器。请注意,您必须使用空白区域并.分隔不同的类别。
# input a single image
python detector_sam_demo.py ../images/cat_remote.jpg \
    configs/Detic_LI21k_CLIP_SwinB_896b32_4x_ft4x_max-size.py \
    ../models/detic_centernet2_swin-b_fpn_4x_lvis-coco-in21k_20230120-0d301978.pth \
    -t "cat . remote" \
    --sam-device cpu
python detector_sam_demo.py ../images/cat_remote.jpg configs/Detic_LI21k_CLIP_SwinB_896b32_4x_ft4x_max-size.py ../models/detic_centernet2_swin-b_fpn_4x_lvis-coco-in21k_20230120-0d301978.pth -t "cat . remote" --sam-device cpu
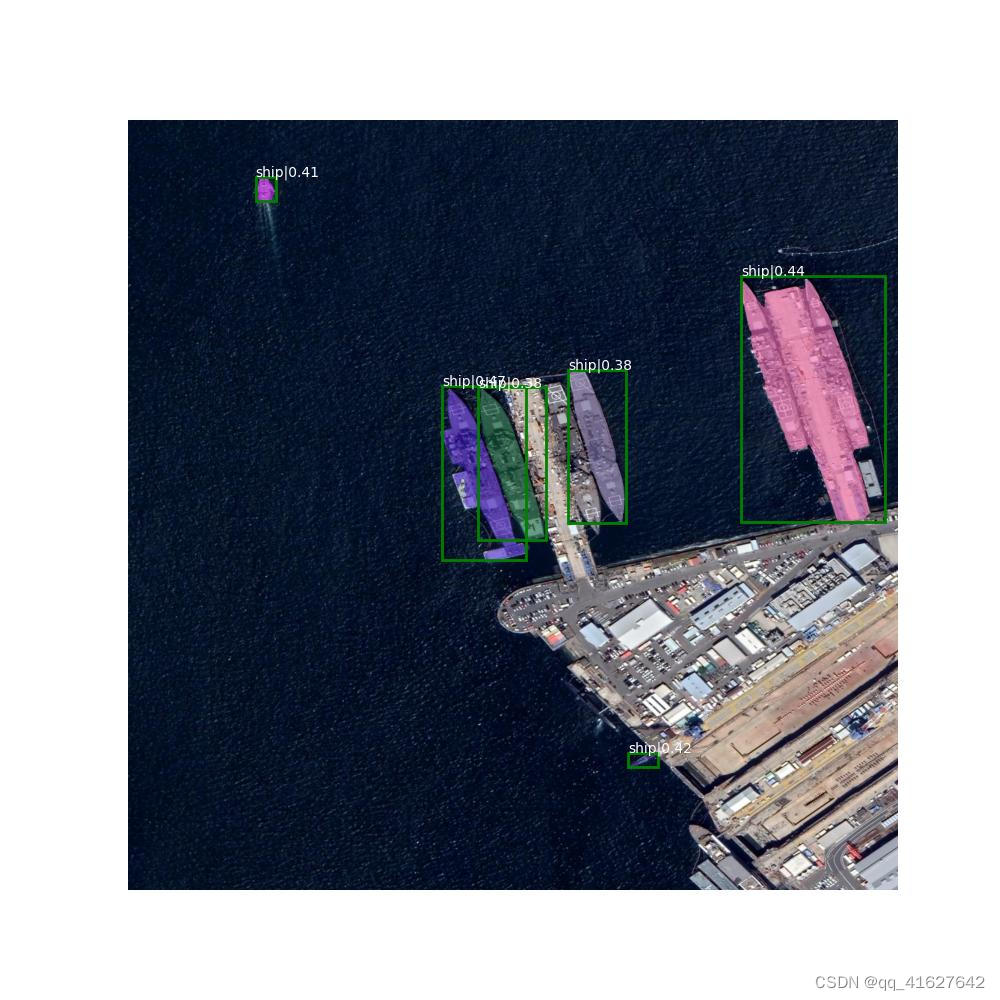
python detector_sam_demo.py ../images/hengxuhe-20190411___1920___1920_24.jpg configs/Detic_LI21k_CLIP_SwinB_896b32_4x_ft4x_max-size.py ../models/detic_centernet2_swin-b_fpn_4x_lvis-coco-in21k_20230120-0d301978.pth -t ship
您还可以使用以下命令对文件夹运行推理:
# input a folder
python detector_sam_demo.py ../images configs/Detic_LI21k_CLIP_SwinB_896b32_4x_ft4x_max-size.py ../models/detic_centernet2_swin-b_fpn_4x_lvis-coco-in21k_20230120-0d301978.pth -t "cat . remote" --sam-device cpu
如果您的 GPU 的显存只能支持运行一种模型,您可以使用以下方法–cpu-off-load来确保每次 GPU 上都只运行一种模型:
# input a folder
python detector_sam_demo.py ../images \
    configs/Detic_LI21k_CLIP_SwinB_896b32_4x_ft4x_max-size.py \
    ../models/detic_centernet2_swin-b_fpn_4x_lvis-coco-in21k_20230120-0d301978.pth \
    -t "cat . remote" \
    --cpu-off-load
我们还通过使用支持 CPU 推理–det-device cpu 。
由于 Detic 包含掩模结果,因此我们添加了一个附加参数–use-detic-mask。这允许我们只运行 Detic,而不运行 SAM 模型。
# input a folder
python detector_sam_demo.py ../images \
    configs/Detic_LI21k_CLIP_SwinB_896b32_4x_ft4x_max-size.py \
    ../models/detic_centernet2_swin-b_fpn_4x_lvis-coco-in21k_20230120-0d301978.pth \
    -t "cat . remote" \
    --det-device cpu \
    --use-detic-mask
# input a folder
python detector_sam_demo.py ../images configs/Detic_LI21k_CLIP_SwinB_896b32_4x_ft4x_max-size.py ../models/detic_centernet2_swin-b_fpn_4x_lvis-coco-in21k_20230120-0d301978.pth -t "cat . remote" --det-device cpu --use-detic-mask
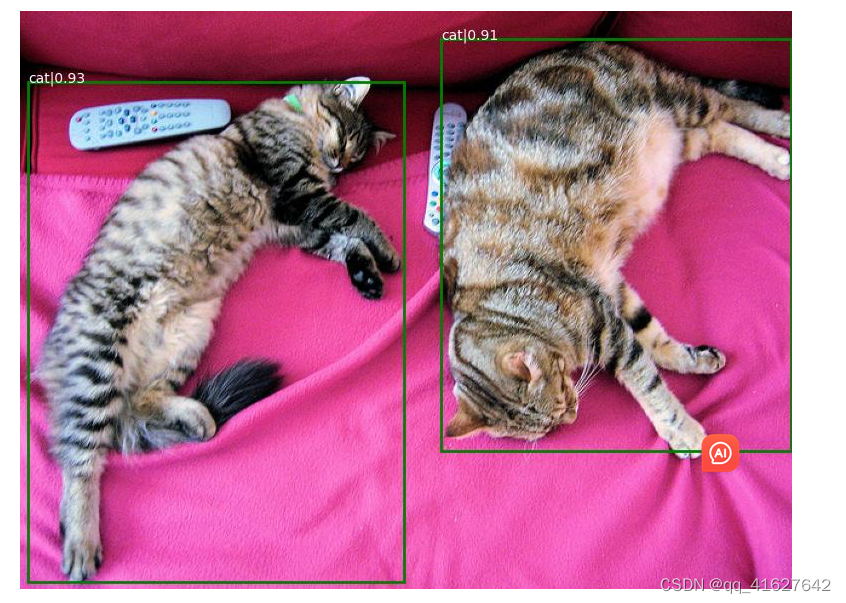
如果您只想可视化结果,可以使用 set–only-det来运行而不使用 SAM 模型。
# input a sinle image
python detector_sam_demo.py ../images/cat_remote.jpg \
    configs/Detic_LI21k_CLIP_SwinB_896b32_4x_ft4x_max-size.py \
    ../models/detic_centernet2_swin-b_fpn_4x_lvis-coco-in21k_20230120-0d301978.pth \
    -t "cat" \
    --only-det
2 MMdet models + SAM
将 MMDet 模型与 SAM 模型结合使用来执行实例分割任务。目前支持所有 MMDet 模型。
依赖安装
pip install -U openmim
mim install "mmcv>=2.0.0"

# build from source(安装的是v3.1.0)
git clone https://github.com/open-mmlab/mmdetection.git
cd mmdetection; pip install -e .; cd ..
Demonstration
您可以运行我们在上面的 Detic 部分中介绍的所有功能。唯一的区别是您不需要设置–text-prompt。这里我们演示一些经典用法。
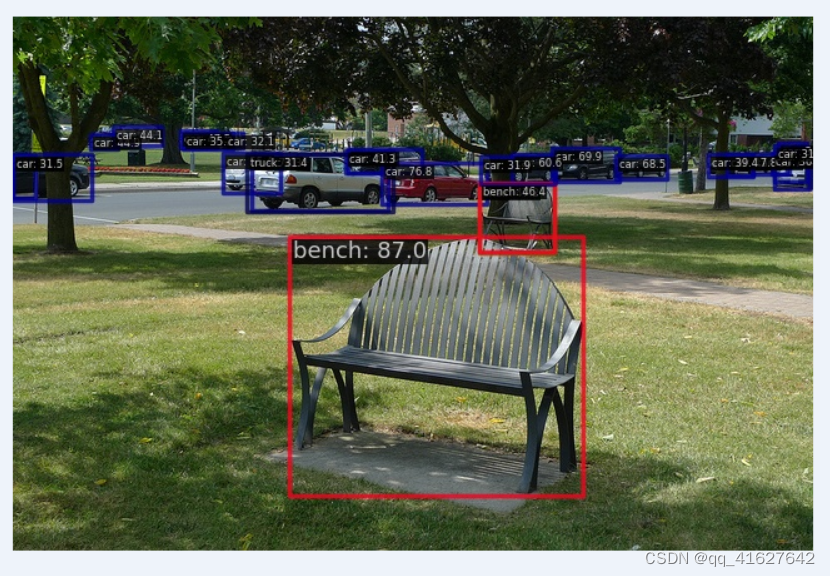
Faster R-CNN models
cd mmdet_sam

mkdir ../models
wget -P ../models/ https://download.openmmlab.com/mmdetection/v2.0/faster_rcnn/faster_rcnn_r50_fpn_2x_coco/faster_rcnn_r50_fpn_2x_coco_bbox_mAP-0.384_20200504_210434-a5d8aa15.pth

# input a single image
python detector_sam_demo.py ../images/cat_remote.jpg \
    ../mmdetection/configs/faster_rcnn/faster-rcnn_r50_fpn_2x_coco.py \
    ../models/faster_rcnn_r50_fpn_2x_coco_bbox_mAP-0.384_20200504_210434-a5d8aa15.pth \
    --sam-device cpu
python detector_sam_demo.py ../images/cat_remote.jpg ../mmdetection/configs/faster_rcnn/faster-rcnn_r50_fpn_2x_coco.py ../models/faster_rcnn_r50_fpn_2x_coco_bbox_mAP-0.384_20200504_210434-a5d8aa15.pth --sam-device cpu
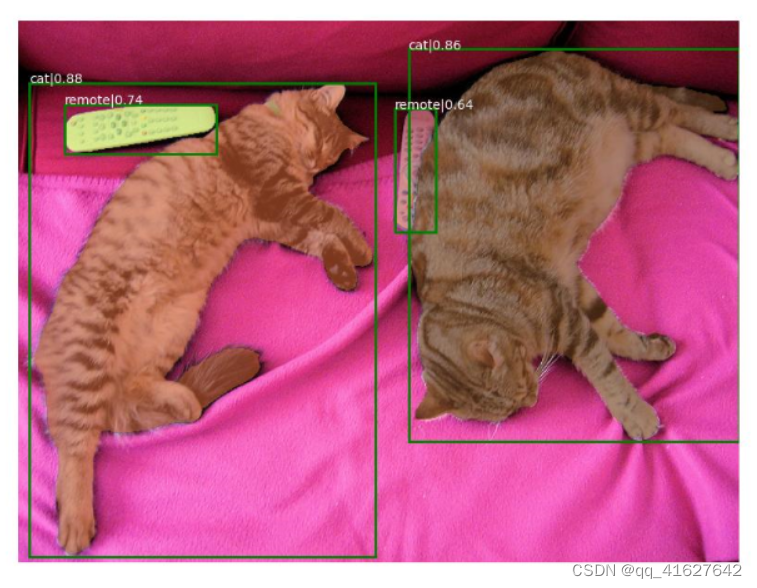
运行结果:目前看来先检测后分割会存在分割目标不全的问题。
DINO models
cd mmdet_sam

mkdir ../models
wget -P ../models/ https://download.openmmlab.com/mmdetection/v3.0/dino/dino-5scale_swin-l_8xb2-12e_coco/dino-5scale_swin-l_8xb2-12e_coco_20230228_072924-a654145f.pth

# input a single image
python detector_sam_demo.py ../images/cat_remote.jpg \
    ../mmdetection/configs/dino/dino-5scale_swin-l_8xb2-12e_coco.py \
    dino-5scale_swin-l_8xb2-12e_coco_20230228_072924-a654145f.pth  \
    --sam-device cpu
python detector_sam_demo.py ../images/cat_remote.jpg ../mmdetection/configs/dino/dino-5scale_swin-l_8xb2-12e_coco.py ../models/dino-5scale_swin-l_8xb2-12e_coco_20230228_072924-a654145f.pth --sam-device cpu
python detector_sam_demo.py ../images/0000249_01514_d_0000005.jpg../mmdetection/runs/train/dino/dino-4scale_r50_8xb2-12e_coco.py ../mmdetection/runs/train/dino/epoch_88.pth --sam-device cpu
3 Grounding models + SAM
将接地物体检测器与 SAM 模型结合使用来执行实例分割任务。目前我们支持 Grounding DINO 和 GLIP。
依赖安装
Grounding DINO:
cd playground
pip install git+https://github.com/facebookresearch/segment-anything.git
pip install git+https://github.com/IDEA-Research/GroundingDINO.git  -i http://mirrors.aliyun.com/pypi/simple/ --trusted-host mirrors.aliyun.com
# Please make sure your PyTorch, GCC and NVCC are all compatible to build CUDA ops successfully
GLIP:
cd playground

pip install git+https://github.com/facebookresearch/segment-anything.git
pip install einops shapely timm yacs tensorboardX ftfy prettytable pymongo transformers nltk inflect scipy pycocotools opencv-python matplotlib

git clone https://github.com/microsoft/GLIP.git
cd GLIP;
python setup.py build develop --user # Please make sure your PyTorch, GCC and NVCC are all compatible to build CUDA ops successfully
Demonstration
GroundingDINO
不过,用法与 Detic 部分相同,我们在这里仅演示部分功能。
cd mmdet_sam
mkdir ../models
wget -P ../models/ https://github.com/IDEA-Research/GroundingDINO/releases/download/v0.1.0-alpha/groundingdino_swint_ogc.pth
# input a single image
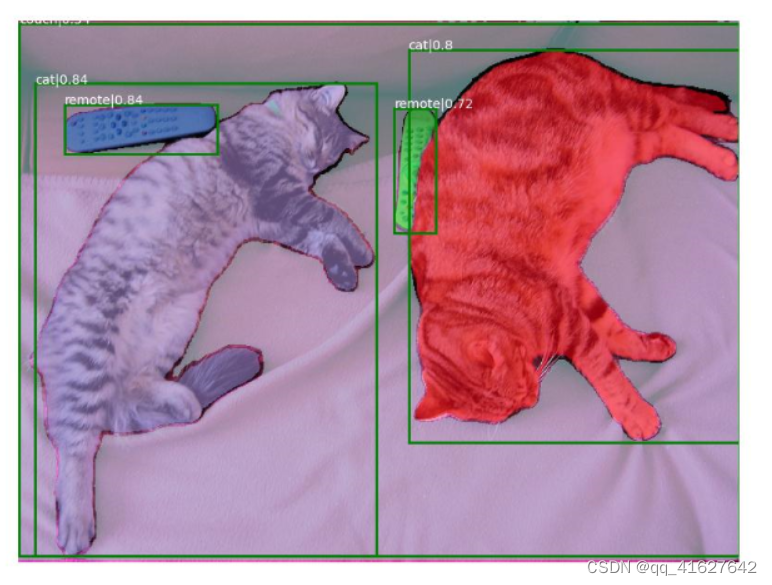
python detector_sam_demo.py ../images/cat_remote.jpg \
configs/GroundingDINO_SwinT_OGC.py \
../models/groundingdino_swint_ogc.pth \
-t "cat . remote" \
--sam-device cpu
python detector_sam_demo.py ../images/cat_remote.jpg configs/GroundingDINO_SwinT_OGC.py ../models/groundingdino_swint_ogc.pth -t "cat . remote" --sam-device cpu
结果将outputs/cat_remote.jpg如下生成:
GLIP
cd mmdet_sam

mkdir ../models
wget -P ../models/ https://penzhanwu2bbs.blob.core.windows.net/data/GLIPv1_Open/models/glip_a_tiny_o365.pth

# input a single image
python detector_sam_demo.py ../images/cat_remote.jpg \
    configs/glip_A_Swin_T_O365.yaml \
    ../models/glip_a_tiny_o365.pth \
    -t "cat . remote" \
    --sam-device cpu
python detector_sam_demo.py ../images/cat_remote.jpg configs/glip_A_Swin_T_O365.yaml ../models/glip_a_tiny_o365.pth -t "cat" --sam-device cpu
python detector_sam_demo.py ../images/cat_remote.jpg /media/lhy/SAM/playground-main/GLIP/configs/pretrain/glip_Swin_L.yaml ../models/glip_large_model.pth -t "cat . remote" --sam-device cpu
4 COCO JSON评估
我们支持coco_style_eval.py分布式和非分布式方式运行。默认情况下,该脚本在按如下格式组织的 COCO Val2017 数据集上运行:
├── ${COCO_DATA_ROOT}
│ ├── annotations
│ ├──── instances_val2017.json
│ ├── val2017
cd mmdet_sam

# non-distributed
python coco_style_eval.py ${COCO_DATA_ROOT} \
    configs/Detic_LI21k_CLIP_SwinB_896b32_4x_ft4x_max-size.py \
    ../models/detic_centernet2_swin-b_fpn_4x_lvis-coco-in21k_20230120-0d301978.pth \
    -t coco_cls_name.txt

# distributed on eight cards on one machine
bash ./dist_coco_style_eval.sh 8 ${COCO_DATA_ROOT} \
    configs/Detic_LI21k_CLIP_SwinB_896b32_4x_ft4x_max-size.py \
    ../models/detic_centernet2_swin-b_fpn_4x_lvis-coco-in21k_20230120-0d301978.pth \
    -t coco_cls_name.txt
6 Custom dataset
Data prepare
使用以下命令下载 cat 数据集:
cd playground

wget https://download.openmmlab.com/mmyolo/data/cat_dataset.zip
mkdir data
unzip cat_dataset.zip -d data/cat
rm cat_dataset.zip
Note:,Need to replace 1 cat with cat in cat/class_with_id.txt
使用images2coco.py脚本生成无标签的json文件:
cd mmdet_sam
python images2coco.py ../data/cat/images ../data/cat/class_with_id.txt cat_coco.json
推理
这里我们以GroundingDINO和SAM模型为例进行推理,得到预测json文件:
python coco_style_eval.py ../data/cat/ \
      configs/GroundingDINO_SwinT_OGC.py \
      ../models/groundingdino_swint_ogc.pth \
      -t ../data/cat/class_with_id.txt \
      --data-prefix images \
      --ann-file annotations/cat_coco.json \
      --out-dir ../cat_pred \
      --sam-device cpu
MMRotate-SAM概况
结合SAM和弱监督水平盒检测实现旋转盒检测,从此告别对旋转盒进行标注的繁琐任务!
我们提供了一套基于MMRotate和SAM的应用程序。其特点包括:
支持使用 SAM 进行零样本旋转目标检测。
在单个图像上执行基于 SAM 的零样本面向对象检测推理。
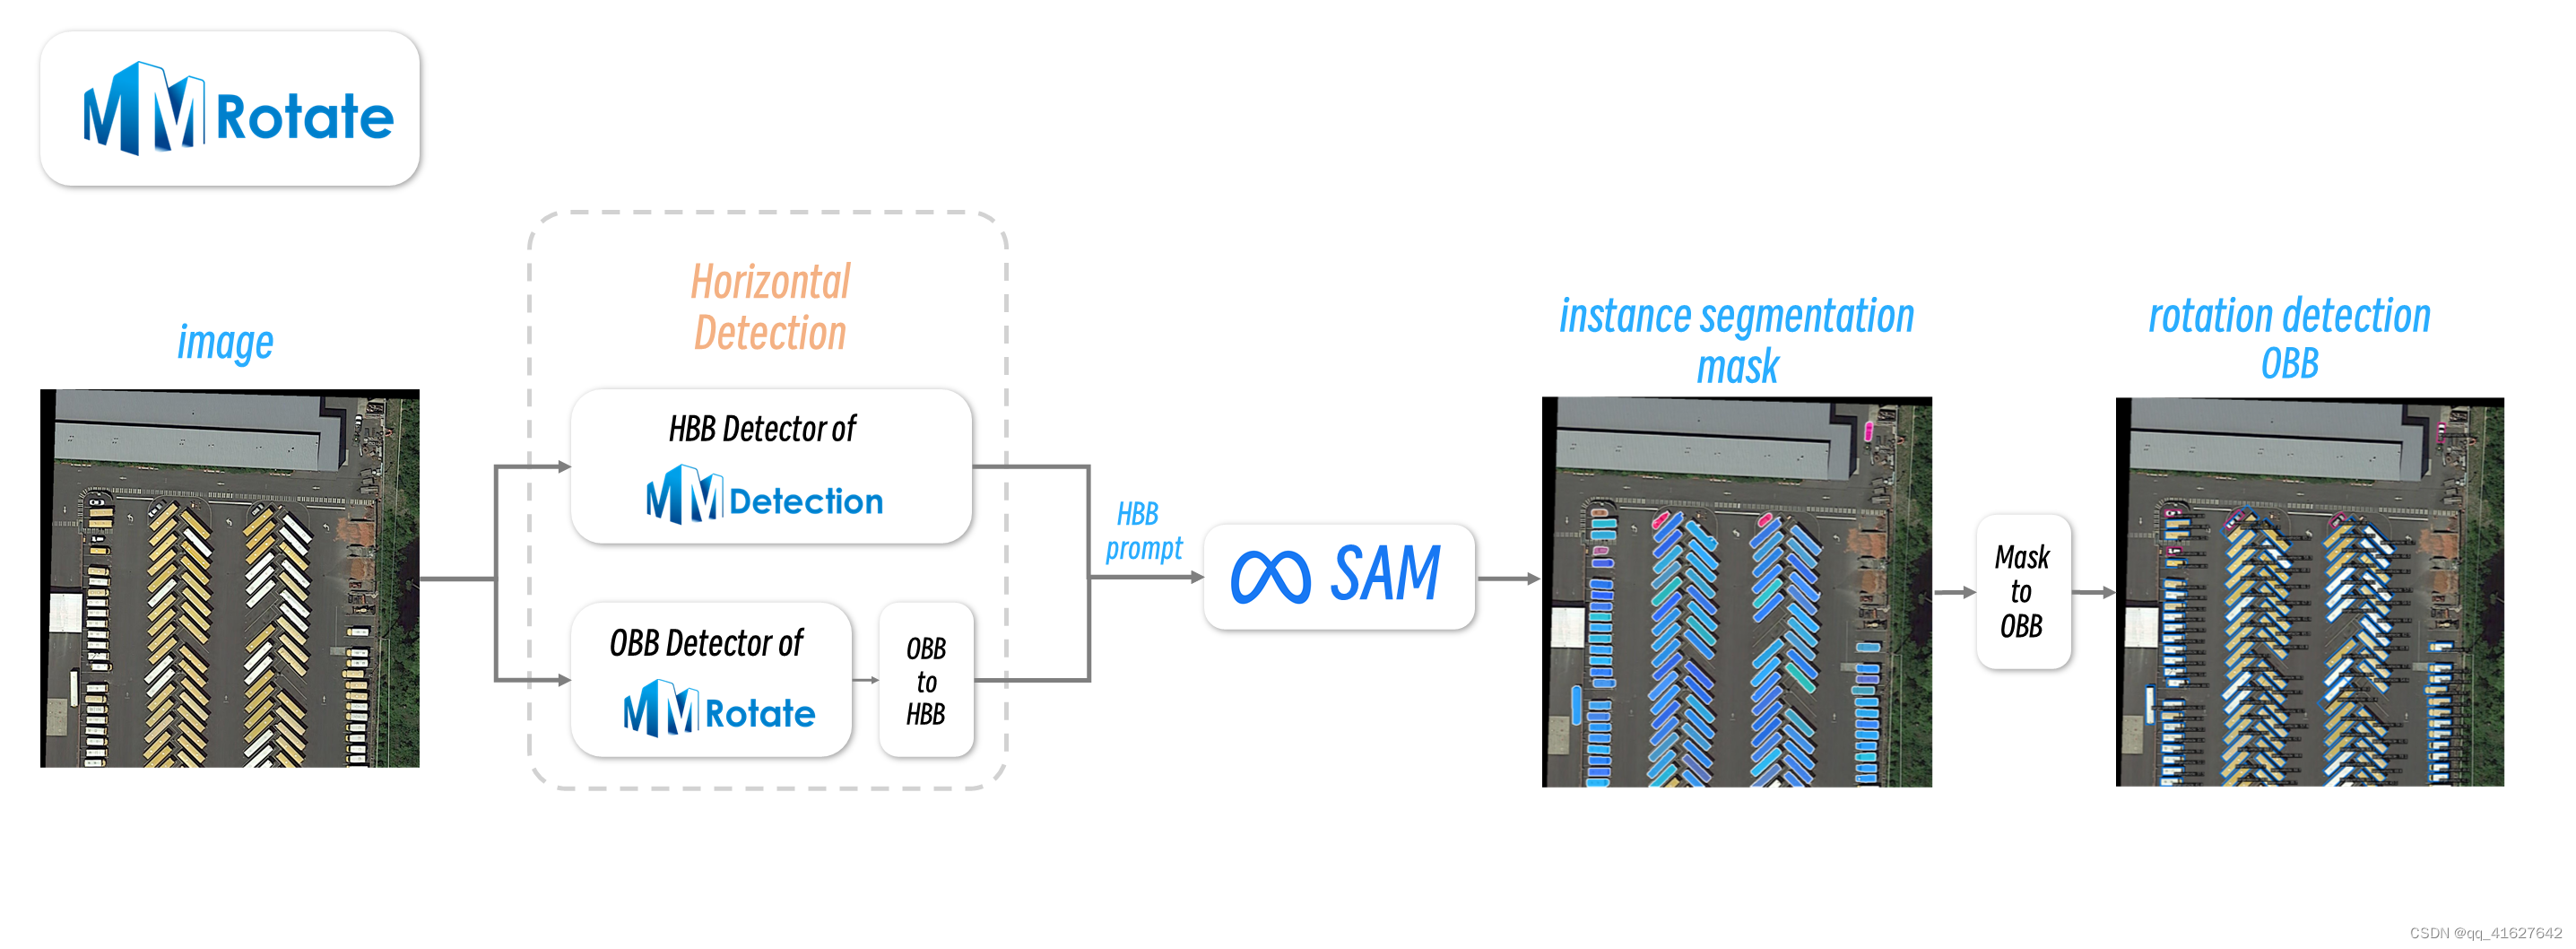
项目文件夹包含MMRotate和SAM相关的代码。
脚本说明:
eval_zero-shot-oriented-detection_dota.py使用 SAM 实施面向零样本的目标检测。它向 SAM 提示来自水平物体检测器的预测框。
demo_zero-shot-oriented-detection.py使用 SAM 进行零样本定向物体检测的推理单图像。
data_builder保存数据集、数据加载器的配置信息和进程。
eval_zero-shot-oriented-detection_dota.py implement Zero-shot Oriented Object Detection with SAM. It prompts SAM with predicted boxes from a horizontal object detector.
demo_zero-shot-oriented-detection.py inference single image for Zero-shot Oriented Object Detection with SAM.
data_builder holds configuration information and process of dataset, dataloader.
pip install opencv-python pycocotools matplotlib onnxruntime onnx -i http://mirrors.aliyun.com/pypi/simple/ --trusted-host mirrors.aliyun.com
您还可以选择从源代码安装MMRotate
git clone https://github.com/open-mmlab/mmrotate.git
cd mmrotate; pip install -e .; cd ..
用法
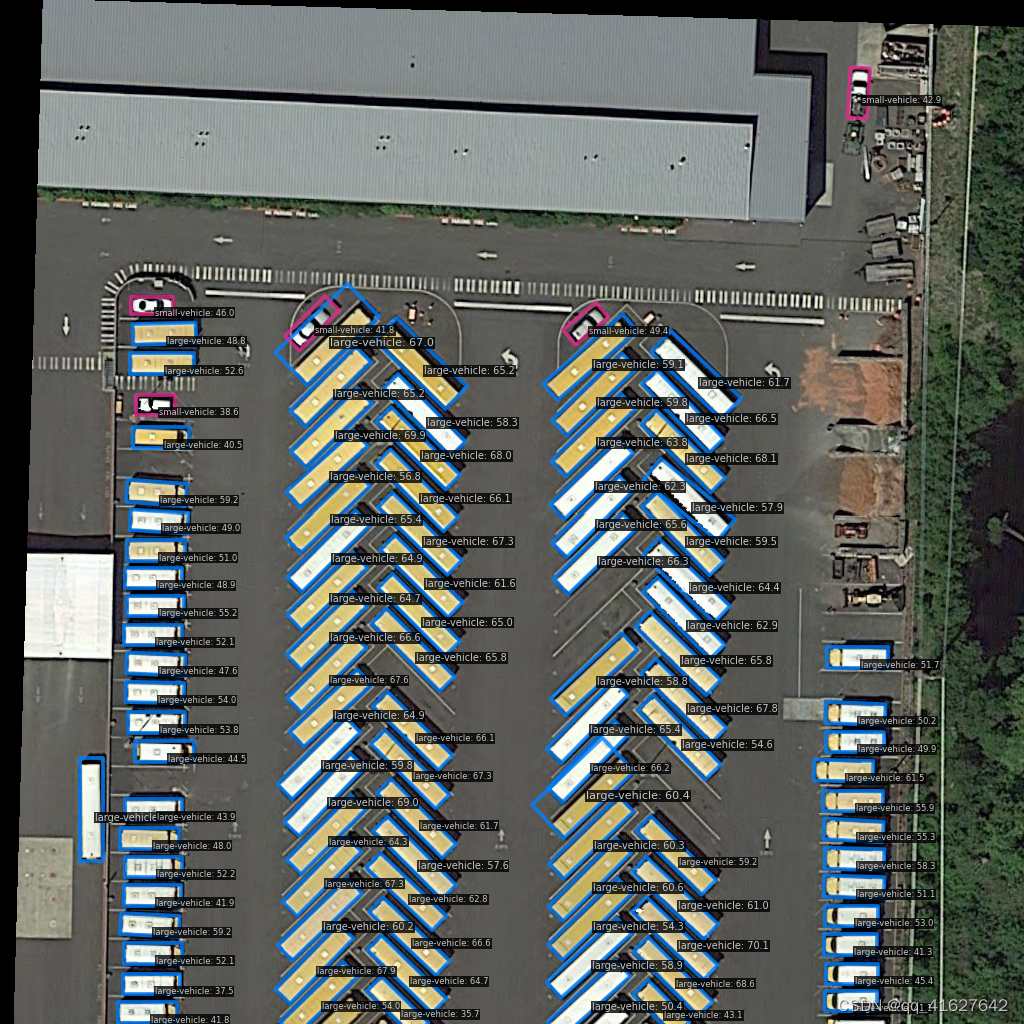
用单张图像推理MMRotate-SAM并获得可视化结果。
# download weights
cd mmrotate_sam

mkdir ../models
wget -P ../models https://dl.fbaipublicfiles.com/segment_anything/sam_vit_b_01ec64.pth
wget -P ../models https://download.openmmlab.com/mmrotate/v0.1.0/rotated_fcos/rotated_fcos_sep_angle_r50_fpn_1x_dota_le90/rotated_fcos_sep_angle_r50_fpn_1x_dota_le90-0be71a0c.pth

# demo
python demo_zero-shot-oriented-detection.py \
    ../mmrotate/data/split_ss_dota/test/images/P0006__1024__0___0.png \
    ../mmrotate/configs/rotated_fcos/rotated-fcos-hbox-le90_r50_fpn_1x_dota.py \
    ../models/rotated_fcos_sep_angle_r50_fpn_1x_dota_le90-0be71a0c.pth \
    --sam-type "vit_b" --sam-weight ../models/sam_vit_b_01ec64.pth --out-path output.png
评估DOTA数据集上的定量评价指标。
python eval_zero-shot-oriented-detection_dota.py \
    ../mmrotate/configs/rotated_fcos/rotated-fcos-hbox-le90_r50_fpn_1x_dota.py \
    ../models/rotated_fcos_sep_angle_r50_fpn_1x_dota_le90-0be71a0c.pth \
    --sam-type "vit_b" --sam-weight ../models/sam_vit_b_01ec64.pth
Open-Tracking概况
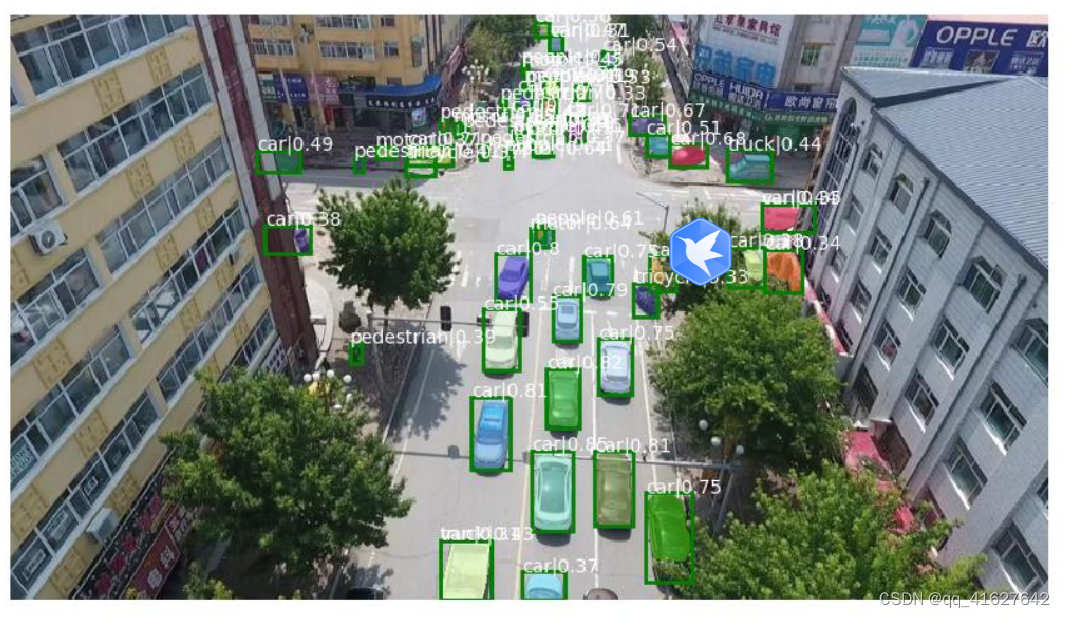
我们提供了一种基于开放对象检测并利用运动信息(卡尔曼滤波器)进行多对象跟踪的方法。
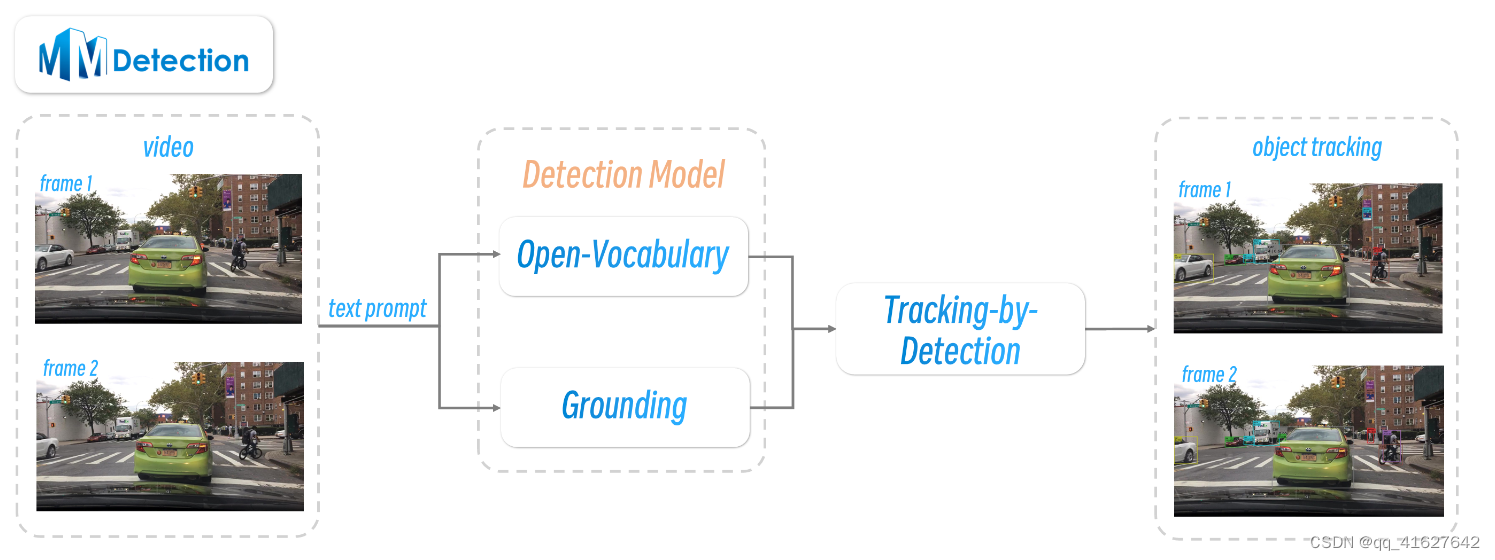
借助开放对象检测和利用运动信息(卡尔曼滤波器),可以执行多对象跟踪。由于时间限制,目前仅支持GroundingDINO、GLIP、Detic结合ByteTrack进行追踪。

参数说明
tracking_demo.py:用于视频或图像文件夹上的多对象跟踪推理。
基础开发环境设置
pip install -U openmim
mim install "mmcv>=2.0.0"

# build from source
cd playground
git clone -b tracking https://github.com/open-mmlab/mmdetection.git
cd mmdetection; pip install -e .; cd ..
pip install lap seaborn
Grounding Dino Dependencies Installation
cd playground
pip install git+https://github.com/IDEA-Research/GroundingDINO.git
如果由于网络原因无法使用pip下载,可以选择以下方法代替。
git clone git+https://github.com/IDEA-Research/GroundingDINO.git
cd GroundingDINO
python setup.py install
GLIP 依赖项安装
cd playground
pip install einops shapely timm yacs tensorboardX ftfy prettytable pymongo transformers nltk inflect scipy pycocotools opencv-python matplotlib

git clone https://github.com/microsoft/GLIP.git
cd GLIP; python setup.py build develop --user; cd ..
SAM Dependencies Installation
pip install git+https://github.com/facebookresearch/segment-anything.git
If you can’t use pip to download due to network reasons, you can choose the following method instead.
git clone git+https://github.com/facebookresearch/segment-anything.git
cd segment-anything
python setup.py install
获取演示视频和图片
cd playground
wget https://download.openmmlab.com/playground/mmtracking/tracking_demo.zip
unzip tracking_demo.zip
下载权重
mkdir ../models
wget -P ../models/ https://download.openmmlab.com/mmdetection/v3.0/detic/detic_centernet2_swin-b_fpn_4x_lvis-coco-in21k/detic_centernet2_swin-b_fpn_4x_lvis-coco-in21k_20230120-0d301978.pth
wget -P ../models/ https://dl.fbaipublicfiles.com/segment_anything/sam_vit_h_4b8939.pth
wget -P ../models/ https://penzhanwu2bbs.blob.core.windows.net/data/GLIPv1_Open/models/glip_a_tiny_o365.pth
wget -P ../models/ https://github.com/IDEA-Research/GroundingDINO/releases/download/v0.1.0-alpha2/groundingdino_swinb_cogcoor.pth
模型推理演示
仅使用 GroundingDINO 作为示例。
MOT
cd mmtracking_open_detection

# input a video
python tracking_demo.py "../tracking_demo/mot_challenge_track.mp4" "configs/GroundingDINO_SwinB.cfg.py" "../models/groundingdino_swinb_cogcoor.pth"  --text-prompt "person . rider . car . truck . bus . train . motorcycle . bicycle ." --out-dir "outputs/mot_challenge" --init_track_thr 0.35 --obj_score_thrs_high 0.3

# input a images folder
python tracking_demo.py "../tracking_demo/bdd_val_track" "configs/GroundingDINO_SwinB.cfg.py" "../models/groundingdino_swinb_cogcoor.pth"  --text-prompt "person . rider . car . truck . bus . train . motorcycle . bicycle ." --out-dir "outputs/bdd100k" --fps 30
MOTS
cd mmtracking_open_detection

# input a images folder
python tracking_demo.py "../tracking_demo/bdd_val_track" "configs/GroundingDINO_SwinB.cfg.py" "../models/groundingdino_swinb_cogcoor.pth"  --text-prompt "person . rider . car . truck . bus . train . motorcycle . bicycle ." --out-dir "outputs/bdd100k" --fps 30 --mots
MMagic-SAM概述
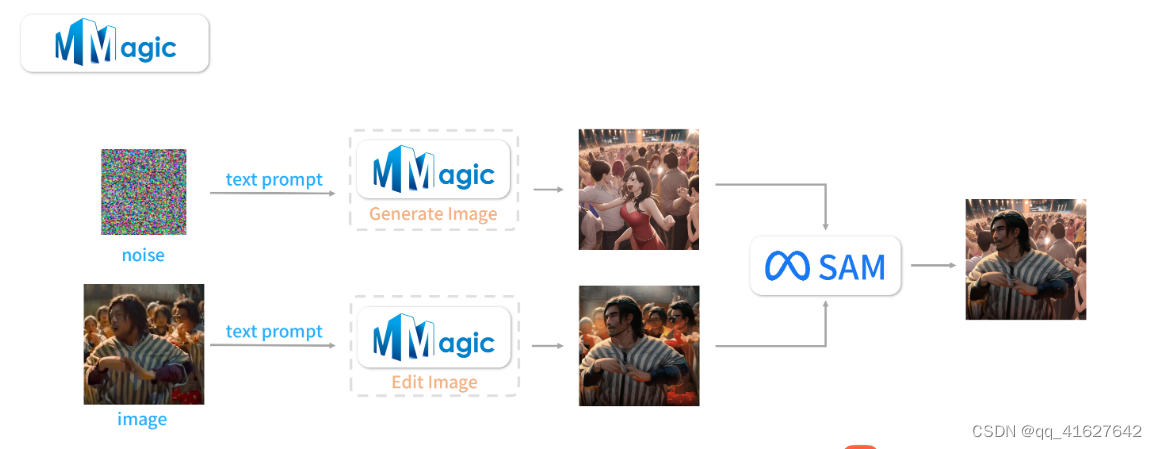
我们提供了一套基于MMEditing和SAM的应用程序。其特点包括:
使用 MMEditing 界面生成图像。
将 SAM 生成的蒙版与 MMEditing 的图像编辑功能相结合,创建新图片。
# create env and install torch
conda create -n mmedit-sam python=3.8 -y
conda activate mmedit-sam
pip install torch==1.12.1+cu113 torchvision==0.13.1+cu113 --extra-index-url https://download.pytorch.org/whl/cu113

# install mmagic
pip install openmim
mim install mmengine "mmcv>=2.0.0"
git clone -b dev-1.x https://github.com/open-mmlab/mmagic.git
pip install -e ./mmagic

# install sam
pip install git+https://github.com/facebookresearch/segment-anything.git

# you may need ffmpeg to get frames or make video
sudo apt install ffmpeg
使用 SAM 播放 controlnet 动画
找到您要编辑的视频剪辑并获取帧
mkdir -p inputs/demo_video
ffmpeg -i your_video.mp4 inputs/demo_video/%04d.jpg
运行脚本。
python play_controlnet_animation_sam.py
使用输出帧制作视频。
ffmpeg -r 10 -i results/final_frames/%04d.jpg -b:v 30M -vf fps=10 results/final_frames.mp4

我们通过以下步骤得到最终的视频:
(1)将输入视频分割成帧
(2)通过MMagic的推理API调用controlnet动画模型修改视频的每一帧,使其成为AI动画
(3)使用MMagic中的稳定扩散生成符合动画内容语义的背景图像
(4)使用SAM预测动画中人物的面具
(5)将动画中的背景替换为我们生成的背景图片
MMOCR-SAM概述
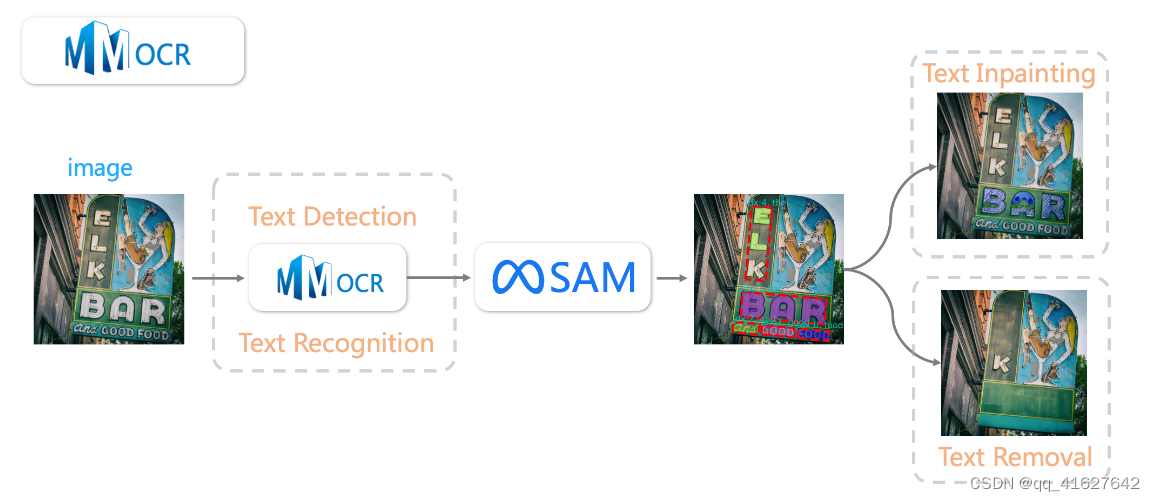
该项目是从OCR-SAM迁移而来的,它结合了 MMOCR 和 Segment Anything。我们提供了一套基于MMOCR和SAM的应用程序。其特点包括:
支持端到端文本检测和识别,能够分割每个文本字符。
由扩散模型和 Gradio 驱动的引人注目的文本删除和文本修复 WebUI 演示。
安装
conda create -n ocr-sam python=3.8 -y
conda activate ocr-sam
pip install torch==1.12.1+cu113 torchvision==0.13.1+cu113 --extra-index-url https://download.pytorch.org/whl/cu113

pip install -U openmim
mim install mmengine
mim install mmocr
mim install 'mmcv==2.0.0rc4'
mim install 'mmdet==3.0.0rc5'
mim install 'mmcls==1.0.0rc5'

pip install git+https://github.com/facebookresearch/segment-anything.git
pip install -r requirements.txt

pip install gradio
pip install diffusers
pip install pytorch-lightning==2.0.1.post0
下载检查点
我们以 Swin Transformer V2 作为骨干,结合多个场景文本数据集(例如 HierText、TextOCR)重新训练 DBNet++。Google Drive (1G)上的 DBNet++ 检查点。
mkdir checkpoints
mkdir checkpoints/mmocr
mkdir checkpoints/sam
mkdir checkpoints/ldm
mv db_swin_mix_pretrain.pth checkpoints/mmocr
将其余检查点下载到相关路径(如果已完成,请忽略以下内容):
# mmocr recognizer ckpt
wget -O checkpoints/mmocr/abinet_20e_st-an_mj_20221005_012617-ead8c139.pth https://download.openmmlab.com/mmocr/textrecog/abinet/abinet_20e_st-an_mj/abinet_20e_st-an_mj_20221005_012617-ead8c139.pth

# sam ckpt, more details: https://github.com/facebookresearch/segment-anything#model-checkpoints
wget -O checkpoints/sam/sam_vit_h_4b8939.pth https://dl.fbaipublicfiles.com/segment_anything/sam_vit_h_4b8939.pth

# ldm ckpt
wget -O checkpoints/ldm/last.ckpt https://heibox.uni-heidelberg.de/f/4d9ac7ea40c64582b7c9/?dl=1