CentOS7.2安装配置scylladb

2023-05-16

scylladb号称世界上最快的nosql数据库,它使用c++语言编写,运用了seastar框架,和cassandra,dynamodb数据库相似,但是据说性能是cassandra的10倍以上,这里在centos7.2上通过yum方式安装。

先给出一个scylladb通过cqlsh命令进入命令行的截图,感受一下scylladb和cassandra是多么的神奇相似:

scylladb官方网站上快速开始中说明,如果需要通过二进制方式安装,需要通过邮箱注册一下scylla账户,然后点击邮箱的链接,会给出scylladb安装的repo文件。

1、安装epel-release扩展包,如果已经安装可以跳过。


yum install epel-release  

2、使用邮箱注册scylladb账户,然后点击邮箱中确认邮件,即可继续获得scylla的安装repo。


curl -o /etc/yum.repos.d/scylla.repo -L 
http://repositories.scylladb.com/scylla/repo/f8bb7a46e42927231ac3445eb3d7fba4/centos/scylladb-2.1.repo  

3、开始安装scylladb


yum install scylla -y  

4、启动scylladb配置,按照提示一步一步回答yes or no

scylla_setup


[root@server scylla]# scylla_setup 
Skip any of the following steps by answering 'no'
Do you want to run kernel version check?
Answer yes to have this script verify that the currently installed kernel is qualified to run Scylla; 
answer no to skip this check.
[YES/no]yes
This is a supported kernel version.
Do you want to verify ScyllaDB packages installed?
Answer yes to have this script check that ScyllaDB is already installed; answer no to skip this check.
[YES/no]yes
Do you want to enable ScyllaDB services?
Answer yes to automatically start Scylla when the node boots; answer no to skip this step.
[YES/no]no
Do you want to setup NTP?
Answer yes to enable time synchronization at boot time. This keeps time right on the node. Answer no to
 do nothing.
[YES/no]no
Do you want to setup RAID and XFS?
It is recommended to use RAID0 and XFS for Scylla data. If you select yes, you will be prompt to choose which 
unmounted disks to use for Scylla data. Selected disks will be formatted in the process.
[YES/no]yes
Are you sure you want to setup RAID and XFS?
If you choose Yes, selected drive will be reformated, erasing existing data in the process.
[YES/no]no
Do you want to setup coredump?
Answer yes to enable core dumps; this allows to do post-mortem analysis of Scylla state after a crash. Answer
 no to do nothing.
[YES/no]yes
kernel.core_pattern = |/usr/lib/systemd/systemd-coredump %p %u %g %s %t %e
Do you want to setup sysconfig?
Answer yes to do system wide configuration customized for Scylla. Answer no to do nothing.
[YES/no]yes
Please select NIC from following list: 
docker0 eno1 veth2c42a5a veth86bc926
> eno1
Do you want to optimize NIC queue settings?
Answer yes to enable network card optimization and improve performance. Answer no to skip this optimization.
[YES/no]yes
Setting parameters on /etc/sysconfig/scylla-server
Do you want to setup IO configuration?
Answer yes to let iotune study what are your disks IO profile and adapt Scylla to it. Answer no to skip 
this action.
[YES/no]yes
Generating evaluation file sized 10GB...10GB written in 134 seconds

Refining search for maximum. So far, 288 IOPS
Maximum throughput: 288 IOPS
Recommended --max-io-requests: 51
Written the above values to /etc/scylla.d/io.conf
Do you want to install node exporter and export Prometheus data from the node?
Answer yes to install it; answer no to skip this installation.
[YES/no]  % Total    % Received % Xferd  Average Speed   Time    Time     Time  Current
                                 Dload  Upload   Total   Spent    Left  Speed
100   628    0   628    0     0    847      0 --:--:-- --:--:-- --:--:--   847
100 3925k  100 3925k    0     0   325k      0  0:00:12  0:00:12 --:--:--  788k
node_exporter-0.14.0.linux-amd64/
node_exporter-0.14.0.linux-amd64/LICENSE
node_exporter-0.14.0.linux-amd64/NOTICE
node_exporter-0.14.0.linux-amd64/node_exporter
Created symlink from /etc/systemd/system/multi-user.target.wants/node-exporter.service to 
/usr/lib/systemd/system/node-exporter.service.
node_exporter successfully installed
Do you want to setup CPU scaling governor?
Answer yes to set CPU scaling governor to performance at boot time. Answer no to do nothing.
[YES/no]yes
This computer doesn't supported CPU scaling configuration.
Do you want to enable fstrim service?
Answer yes to run fstrim on your SSD. Answer no to do nothing.
[YES/no]yes
ScyllaDB setup finished.  

5、配置成功,即可启动scylla服务。


systemctl start scylla-server  

6、启动cqlsh,进入命令行界面,就是前面刚开始给大家展示的界面。

先创建一个keyspace,这里keyspace就好比mysql的数据库名。后面创建表就是在keyspace中创建。

create keyspace domestic with replication = {'class':'SimpleStrategy','replication_factor':2}

class是副本策略,replication_factor是副本数。

注意,这里'class','replication_factor'均是使用的单引号,如果不小心写成了双引号,会报错no viable alternative at input ':'。

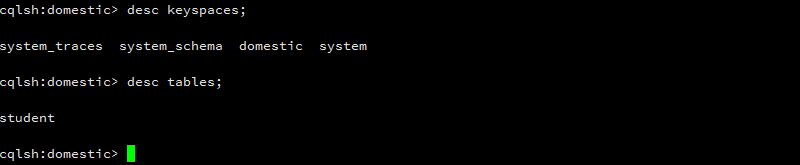
可以通过desc命令查看keyspace,table。desc keyspaces 和 desc tables
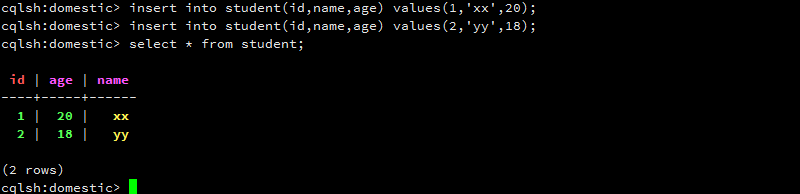
向表中插入数据,并查询。

本文内容由网友自发贡献,版权归原作者所有,本站不承担相应法律责任。如您发现有涉嫌抄袭侵权的内容,请联系:hwhale#tublm.com(使用前将#替换为@)

CentOS7.2安装配置scylladb 的相关文章

  • flink快速入门及采坑记录

    apache flink作为第四代mapreduce计算框架 xff0c 已经得到越来越多的应用 xff0c 这里介绍如何快速入门 xff0c 以及记录一个内存错误的问题 1 安装jdk 2 下载flink 并解压 wget https m
  • 没有为扩展名.py找到关联文件解决办法

    如题 xff0c 在win7上安装python3 5之后 xff0c 通过pip install awscli命令行 xff0c 最后执行aws命令时总是先提示一句 34 没有为扩展名 py找到关联文件 34 xff0c 然后显示执行结果
  • No configuration found for this host:tier1

    flume启动时 xff0c 如果没有通过参数 name 或者 n 指定代理 xff0c 那么默认使用tier1作为代理名称 xff0c 启动成功后 xff0c 不会报错 xff0c 但是可能会提示如题警告 flume conf配置文件默认
  • linux下通过pip安装最新uwsgi

    通过yum install uwsgi 安装的uwsgi在进行测试的时候 xff0c 发现版本是2 0 15 但是启动uwsgi测试的时候报参数错误 xff0c 后来改用pip安装 先yum remove uwsgi删除老的uwsgi 就成
  • 将原有python复制到anaconda虚拟环境后,可以激活但是不显示的问题

    第一步参考 如何在已安装Python条件下 xff0c 安装Anaconda xff0c 并将原有Python添加到Anaconda中 amazingym 博客园 发现conda info e 不显示环境 xff0c 但是用文件夹名称可以顺
  • pip更改国内源

    默认情况下 xff0c pip安装一个工具 xff0c 是通过使用官方的源 https pypi python org simple xff0c 速度上是一个很大的问题 xff0c 例如 xff0c 安装tensorflow 默认第一个下载
  • win7+vmware12+mac10.10安装过程

    win7 43 vmware12安装mac10 11 10 12 10 13均失败 xff0c 最终安装mac10 10成功 xff0c 不知道是不是硬件不支持 这里记录一下mac10 10虚拟机安装的过程 默认情况下 xff0c vmwa
  • mac虚拟机安装之后需要做这些

    一 让mac使用体验更好 mac虚拟机安装完成之后 xff0c 需要让系统用起来顺畅 xff0c 鼠标滑动平稳 xff0c 需要安装vmware tools工具 这里需要下载vmwaretools镜像 我这里名字叫 VMware 43 To
  • mac系统pip安装package路径问题

    默认情况下 xff0c 通过pip安装会提示Permission Denied 这时候通过sudo pip install xxx可以安装 xff0c 但是安装的路径不是系统默认的路径 xff0c 再次通过pip list列出已经安装过的工
  • xcrun: error: invalid active developer path解决办法

    mac下如果安装过xcode 之后又卸载 xff0c 再使用git等命令时就提示错误 invalid active path Applications Xcode app Contents Developer 一般情况可以通过xcode s
  • Hue安装与配置

    Hue是cloudera提供的hadoop ui 利用它可以很直观的操作和查看hadoop生态应用 一般安装cloudera manager之后会自动带有hue管理界面 xff0c 通过http hueserver 8888即可访问 另外
  • aapt查看apk应用信息

    aapt是Android asset package tools 利用aapt命令可以很方便的查看app包信息 linux下安装配置aapt 先下载aapt 然后放入 usr bin目录 xff0c 并改变权限为可执行文件 aapt帮助 以
  • Git-TortoiseGit使用报错:cannot spawn xxx\bin\ssh.exe: No such file or directory fatal

    一般开发都是用eclipse自带的git插件提交代码 xff0c 今天试了一把TortoiseGit的提交 结果报错 查看TortoiseGit gt Settings xff1a 发现这里环境变量和设置的环境变量不一致 xff0c 猜测是
  • windows+spark本地运行环境搭建

    spark作为一个内存mapreduce框架 xff0c 速度是hadoop的10倍甚至100倍 windows下可以通过简单设置 xff0c 搭建本地运行环境 1 下载spark预编译版本 xff0c spark运行环境依赖jdk sca
  • git clone 报错:Peer reports incompatible or unsupported protocol version解决办法

    git通过git clone下载github上的资源到机器上 xff0c 结果出现如题所示的错误 root 64 server data git clone https github com pingcap tidb docker comp
  • explian使用介绍

    1 xff09 id列数字越大越先执行 xff0c 如果说数字一样大 xff0c 那么就从上往下依次执行 xff0c id列为null的就表是这是一个结果集 xff0c 不需要使用它来进行查询 2 xff09 select type列常见的
  • centos7安装rustup

    rust安装 xff0c 因为被墙的原因 xff0c 在国内几乎很难安装 xff0c 需要通过代理安装 但是rustup却很容易 xff0c 一般在linux下 xff0c 通过官方指定的下列语句 xff0c 基本可以安装rustup cu
  • TiDB在Centos7上通过源码编译安装

    这里难以编译安装的是tikv tidb的三大部分tidb pd tikv中tidb pd均是采用go语言编写 xff0c 安装go语言包即可编译 xff0c 唯独tikv是采用rust语言写的 xff0c 他的编译是最复杂的 而且编译环境非
  • Cloudera Manager 5.12.0图文详解安装过程

    这里介绍的是cdh5的离线安装方式 xff0c 需要的文件提前准备好 xff0c 安装过程会快一些 安装前提 xff1a 机器配置内存一定要高 xff0c 我这里安装的虚拟机均是redhat7 xff1a 内存分别是6G 4G 4G 准备的
  • Failed to get D-Bus connection: Operation not permitted

    docker容器centos7中 xff0c 通过systemctl start service出现下错误 Failed to get D Bus connection Operation not permitted docker中的容器启

随机推荐

  • C++中如何求数组长度

    C 43 43 中没有直接提供求数组长度的方法 xff0c 提供了sizeof begin end 等方法 xff0c 可以供求数组长度使用 可以通过两种方式来求数组长度 xff0c 这里使用模版类 一个是使用sizeof 做除法 xff0
  • IDEA+scala插件开发spark程序

    spark由scala语言编写 xff0c 开发spark程序 xff0c 自然也少不了scala环境 xff0c 这里介绍如何利用Intellij IDEA开发spark 1 环境准备 jdk scala idea这些对于本文来说都已经默
  • hadoop-3.0.1源码编译需要注意的事项

    这次尝试了一下源码编译最新的hadoop3 0 1 xff0c 发现了几个和原来不太一样的地方 记录下来 xff1a 1 需要的jdk不再是原来的1 7 xff0c 直接jdk1 8就编译通过了 xff1b 2 以前安装需要安装编译依赖cm
  • hadoop-3.0.1单节点安装部署

    hadoop 3 0 1编译上和原来有不同的地方 xff0c 部署时 xff0c 也有一些需要注意的地方 安装部署过程一笔带过 xff1a a 设置免秘钥登录 b 设置jdk环境变量 c 配置编译好的hadoop环境变量 xff0c HAD
  • Dll动态链接库创建与隐式链接方式使用

    C 43 43 动态链接库的背景 xff1a windows操作系统诞生以来 xff0c dll就作为win操作系统的基础 xff0c 通常情况下dll不能直接运行 xff0c 也无法接收消息 xff0c 只能供其他可执行程序或者dll来调
  • def模块定义方式创建动态链接库与动态加载使用dll

    前面介绍了通过宏定义 declspec dllexport 的方式创建动态链接库 xff0c 需要定义头文件和宏 xff0c 定义函数时需要使用宏定义 xff0c 这种方式过于繁琐 xff0c 这里介绍使用模块定义文件的方式创建动态链接库
  • Echarts-图表根据值的不同展示成不同的颜色

    series name 39 直接访问 39 type 39 bar 39 barWidth 39 60 39 data 10 52 200 334 390 330 220 itemStyle normal color function p
  • error: no default toolchain configured

    当我们在windows上通过msi方式安装过rust之后 xff0c 运行rustc或者cargo命令行命令时 xff0c 出现如题所示的错误 stackoverflow上有一个issue 说过这个问题 最后的解决办法是通过rustup命令
  • hive启动报错汇总以及解决办法

    1 Relative path in absolute URI system java io tmpdir 7D 7Bsystem user name 7D p span style font size 12px 需要将hive site
  • Hive使用JsonSerDe格式化json数据

    hive默认使用分隔符如空格 xff0c 分号 xff0c 34 34 xff0c 制表符 t来格式化数据记录 xff0c 对于复杂数据类型如json nginx日志等 xff0c 就没有办法拆分了 xff0c 这时候需要更加强大的SerD
  • ClassNotFoundException: org.apache.spark.sql.hive.thriftserver.SparkSQLCLIDriver解决办法

    我们通过源码编译的spark 2 3 0来启动spark sql进行sql操作 xff0c 结果出现如下错误 xff1a Spark assembly has been built with Hive including Datanucle
  • centos7源码编译安装lua:lua5.1升级lua5.3

    我们通过yum安装的lua默认是5 1版本 xff0c 如果不符合我们有的程序需要 xff0c 可以通过源码编译安装最新版lua 过程记录如下 下载 gt 解压 gt 编译三步曲 wget http www lua org ftp lua
  • linux下通过md5sum和sha1sum来校验下载文件的正确性

    在linux下 xff0c 我们经常通过wget curl等命令在某官方网站下载一个zip或者tar gz格式文件 xff0c 有时候 xff0c 我们不会去关注这个下载文件后面的md5值和sha1值 xff0c 这两个值其实有很大的用处
  • centos7源码安装git-2.3.0踩坑记录

    下载源码 gt 解压 gt 编译三步曲 我这里下载的是xz格式的文件 xff0c 第一步需要xz解压为tar格式文件 xff0c 然后通过tar xf命令解压 wget https mirrors edge kernel org pub s
  • adb与aapt获取安卓手机app的versionCode

    adb命令通常可以查看app包名以及app包的位置 xff0c 但是无法获取详细信息 xff0c 如版本号 这里结合aapt可执行程序来获取app的versionCode 这里以新浪微博app为例 xff0c 另外 xff0c 这里介绍的过
  • 我的第一个Android WebView实例

    以前做前端开发的时候 xff0c 经常遇到需要把H5页面直接在app里面打开的情况 xff0c 比如论坛 抽奖活动 秒杀活动等 xff0c 将H5嵌入WebView的做法 xff0c 可以减少客户端开发 xff0c 升级等 xff0c 小功
  • DENIED Redis is running in protected mode报错解决办法

    如下所示 xff0c 程序连接redis报错 xff0c 根据错误信息 xff0c redis运行在受保护模式 xff0c 需要redis命令行下作设置 config set protected mode no redis clients
  • Linux 之 nano 编辑器的使用

    在Linux操作系统中 xff0c 有很多的文本编辑器 xff0c 最为重要的就是vi文本编辑器 xff0c 下面来介绍一个简单的nano文本编辑器 nano的使用简单 xff0c 我们可以直接加上文件名就能够打开一个旧文件或新文件 xff
  • 蓝桥杯单片机开发板-定时器中断

    位定义及符号变量定义 span class token macro property span class token directive hash span span class token directive keyword inclu
  • CentOS7.2安装配置scylladb

    scylladb号称世界上最快的nosql数据库 xff0c 它使用c 43 43 语言编写 xff0c 运用了seastar框架 xff0c 和cassandra dynamodb数据库相似 xff0c 但是据说性能是cassandra的