代码和效果图
先上能够正常显示页码页脚的Python代码和效果图,之后再解释原理和思路
from docx import Document
from docx.shared import Pt
from docx.oxml import OxmlElement
from docx.enum.text import WD_PARAGRAPH_ALIGNMENT
from docx.oxml.ns import qn


# 添加页脚,格式为:第 n 页 共 m 页
def Footer(doc, font_name, font_size):
    # 添加一个节(Section)并获取页脚
    section = doc.sections[0]
    footer = section.footer

    # 在页脚添加一个段落
    paragraph = footer.paragraphs[0]
    paragraph.alignment = WD_PARAGRAPH_ALIGNMENT.CENTER  # 设置居中对齐

    # 添加文本 "第"
    run1 = paragraph.add_run('第 ')
    font1 = run1.font
    font1.name = font_name
    font1.size = Pt(font_size)   # 设置字体大小
    run1._element.rPr.rFonts.set(qn("w:eastAsia"), font_name)

    # 添加页码相关的字段
    run2 = paragraph.add_run('')
    fldChar2 = OxmlElement('w:fldChar')
    fldChar2.set(qn('w:fldCharType'), 'begin')
    run2._element.append(fldChar2)

    run3 = paragraph.add_run('')
    fldChar3 = OxmlElement('w:instrText')
    fldChar3.text = 'PAGE'
    font3 = run3.font
    font3.name = 'Times New Roman'
    font3.size = Pt(font_size)   # 设置字体大小
    run3._element.append(fldChar3)

    run4 = paragraph.add_run('')
    fldChar4 = OxmlElement('w:fldChar')
    fldChar4.set(qn('w:fldCharType'), 'separate')
    run4._element.append(fldChar4)

    run5 = paragraph.add_run('')
    fldChar5 = OxmlElement('w:fldChar')
    fldChar5.set(qn('w:fldCharType'), 'end')
    run5._element.append(fldChar5)

    # 添加文本 "页,共"
    run6 = paragraph.add_run(' 页 共 ')
    font6 = run6.font
    font6.name = font_name
    font6.size = Pt(font_size)   # 设置字体大小
    run6._element.rPr.rFonts.set(qn("w:eastAsia"), font_name)

    # 添加页数字段
    run7 = paragraph.add_run('')
    fldChar7 = OxmlElement('w:fldChar')
    fldChar7.set(qn('w:fldCharType'), 'begin')
    run7._element.append(fldChar7)

    run8 = paragraph.add_run('')
    fldChar8 = OxmlElement('w:instrText')
    fldChar8.text = 'NUMPAGES'
    font8 = run8.font
    font8.name = 'Times New Roman'
    font8.size = Pt(font_size)   # 设置字体大小
    run8._element.append(fldChar8)

    run9 = paragraph.add_run('')
    fldChar9 = OxmlElement('w:fldChar')
    fldChar9.set(qn('w:fldCharType'), 'separate')
    run9._element.append(fldChar9)

    run10 = paragraph.add_run('')
    fldChar10 = OxmlElement('w:fldChar')
    fldChar10.set(qn('w:fldCharType'), 'end')
    run10._element.append(fldChar10)

    # 添加文本 "页"
    run11 = paragraph.add_run(' 页')
    font11 = run11.font
    font11.name = font_name
    font11.size = Pt(font_size)   # 设置字体大小
    run11._element.rPr.rFonts.set(qn("w:eastAsia"), font_name)


# 创建一个新的 Word 文档
doc = Document()

Footer(doc=doc, font_name=u'宋体', font_size=10.5)

# 保存文档
doc.save('output_with_footer.docx')

原理和代码思路
由于我在查阅了网上的一些资料后,发现现有的自定义
动态
页码方法都是基于word源码来操作,官方API并没有给出对应的可用函数。
所以本文也是基于word源码对页码进行自定义,让其能够显示
总页数
以及
当前页数
,并自定义页码格式(第 n 页 共 m 页),同时也要能够对字体属性进行设置,例如字体名、字体大小等。
-
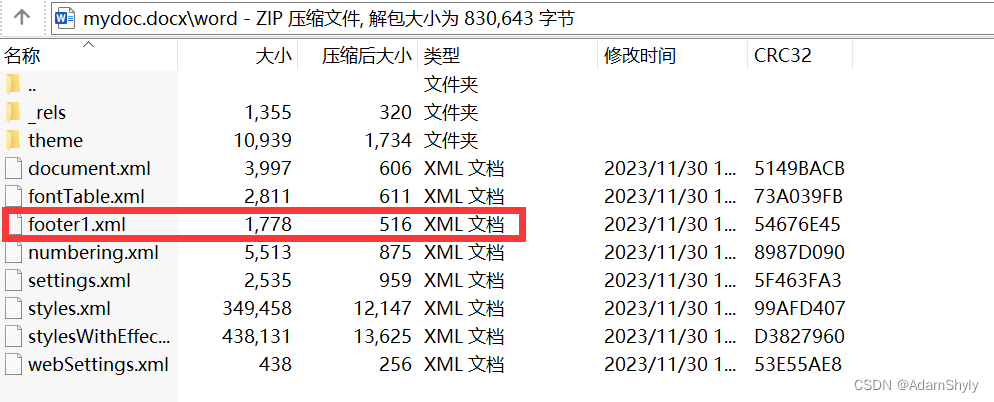
首先通过7zip或winrar等压缩软件打开一个已经设置完页码页脚格式的word文档,在word文件夹下可以看到一个名为"footer1.xml"的XML文件
-
该文件的
<x:sdt>
标签可以先不看,可以将其当作HTML中的
<div>
来看待,直接看
<w:p>
标签,
p
代表paragraph。
1)
<w:pPr>
中的
pPr
代表paragraphProperty(段落属性),可以看到标签中有个
w:val="center"
,可以推测出这是代表
段落居中
的意思。
2)后面的一系列
<w:r>
都是表示
run对象
,
<w:rPr>
表示run对象的属性,可以用来设置文本字体属性;而
<w:t>
表示
text文本元素
。
3)
<w:t>
标签可以用来自定义页码输出格式,例如:
第 n 页 共 m 页
中除去当前页码和总页码的
文字部分
。
 <w:p w14:paraId="2AE76781" w14:textId="1395F2F5" w:rsidR="00F1630B" w:rsidRDefault="00F1630B">
   <w:pPr>
        <w:pStyle w:val="a5"/>
        <w:jc w:val="center"/>
    </w:pPr>
    <w:r w:rsidRPr="004D7EB2">
        <w:rPr>
            <w:rFonts w:ascii="宋体" w:eastAsia="宋体" w:hAnsi="宋体" w:hint="eastAsia"/>
        </w:rPr>
        <w:t>第</w:t>
    </w:r>
    <w:r w:rsidRPr="004D7EB2">
        <w:rPr>
            <w:rFonts w:ascii="宋体" w:eastAsia="宋体" w:hAnsi="宋体"/>
        </w:rPr>
        <w:t xml:space="preserve"></w:t>
    </w:r>
    <w:r w:rsidRPr="004D7EB2">
        <w:rPr>
            <w:rFonts w:ascii="Times New Roman" w:hAnsi="Times New Roman" w:cs="Times New Roman"/>
            <w:sz w:val="24"/>
            <w:szCs w:val="24"/>
        </w:rPr>
        <w:fldChar w:fldCharType="begin"/>
    </w:r>
    <w:r w:rsidRPr="004D7EB2">
        <w:rPr>
            <w:rFonts w:ascii="Times New Roman" w:hAnsi="Times New Roman" w:cs="Times New Roman"/>
        </w:rPr>
        <w:instrText>PAGE</w:instrText>
    </w:r>
    <w:r w:rsidRPr="004D7EB2">
        <w:rPr>
            <w:rFonts w:ascii="Times New Roman" w:hAnsi="Times New Roman" w:cs="Times New Roman"/>
            <w:sz w:val="24"/>
            <w:szCs w:val="24"/>
        </w:rPr>
        <w:fldChar w:fldCharType="separate"/>
    </w:r>
    <w:r w:rsidRPr="004D7EB2">
        <w:rPr>
            <w:rFonts w:ascii="Times New Roman" w:hAnsi="Times New Roman" w:cs="Times New Roman"/>
            <w:lang w:val="zh-CN"/>
        </w:rPr>
        <w:t>2</w:t>
    </w:r>
    <w:r w:rsidRPr="004D7EB2">
        <w:rPr>
            <w:rFonts w:ascii="Times New Roman" w:hAnsi="Times New Roman" w:cs="Times New Roman"/>
            <w:sz w:val="24"/>
            <w:szCs w:val="24"/>
        </w:rPr>
        <w:fldChar w:fldCharType="end"/>
    </w:r>
    <w:r w:rsidRPr="004D7EB2">
        <w:rPr>
            <w:rFonts w:ascii="宋体" w:eastAsia="宋体" w:hAnsi="宋体"/>
        </w:rPr>
        <w:t xml:space="preserve"></w:t>
    </w:r>
    <w:r w:rsidRPr="004D7EB2">
        <w:rPr>
            <w:rFonts w:ascii="宋体" w:eastAsia="宋体" w:hAnsi="宋体" w:hint="eastAsia"/>
        </w:rPr>
        <w:t>页,共</w:t>
    </w:r>
    <w:r w:rsidRPr="004D7EB2">
        <w:rPr>
            <w:rFonts w:ascii="宋体" w:eastAsia="宋体" w:hAnsi="宋体"/>
            <w:lang w:val="zh-CN"/>
        </w:rPr>
        <w:t xml:space="preserve"></w:t>
    </w:r>
    <w:r w:rsidRPr="004D7EB2">
        <w:rPr>
            <w:rFonts w:ascii="Times New Roman" w:hAnsi="Times New Roman" w:cs="Times New Roman"/>
            <w:lang w:val="zh-CN"/>
        </w:rPr>
        <w:fldChar w:fldCharType="begin"/>
    </w:r>
    <w:r w:rsidRPr="004D7EB2">
        <w:rPr>
            <w:rFonts w:ascii="Times New Roman" w:hAnsi="Times New Roman" w:cs="Times New Roman"/>
            <w:lang w:val="zh-CN"/>
        </w:rPr>
        <w:instrText>NUMPAGES</w:instrText>
    </w:r>
    <w:r w:rsidRPr="004D7EB2">
        <w:rPr>
            <w:rFonts w:ascii="Times New Roman" w:hAnsi="Times New Roman" w:cs="Times New Roman"/>
            <w:lang w:val="zh-CN"/>
        </w:rPr>
        <w:fldChar w:fldCharType="separate"/>
    </w:r>
    <w:r w:rsidRPr="004D7EB2">
        <w:rPr>
            <w:rFonts w:ascii="Times New Roman" w:hAnsi="Times New Roman" w:cs="Times New Roman"/>
            <w:lang w:val="zh-CN"/>
        </w:rPr>
        <w:t>2</w:t>
    </w:r>
    <w:r w:rsidRPr="004D7EB2">
        <w:rPr>
            <w:rFonts w:ascii="Times New Roman" w:hAnsi="Times New Roman" w:cs="Times New Roman"/>
            <w:lang w:val="zh-CN"/>
        </w:rPr>
        <w:fldChar w:fldCharType="end"/>
    </w:r>
    <w:r w:rsidR="004D7EB2" w:rsidRPr="004D7EB2">
        <w:rPr>
            <w:rFonts w:ascii="宋体" w:eastAsia="宋体" w:hAnsi="宋体"/>
        </w:rPr>
        <w:t xml:space="preserve"></w:t>
    </w:r>
    <w:r w:rsidRPr="004D7EB2">
        <w:rPr>
            <w:rFonts w:ascii="宋体" w:eastAsia="宋体" w:hAnsi="宋体" w:hint="eastAsia"/>
        </w:rPr>
        <w:t>页</w:t>
    </w:r>
</w:p>
4)经过不断测试后发现,页码标签框架为
-
<w:fldChar w:fldCharType="begin"/>
-
<w:instrText>PAGE</w:instrText>
(当前页码)
-
<w:fldChar w:fldCharType="separate"/>
-
<w:fldChar w:fldCharType="end"/>
-
<w:fldChar w:fldCharType="begin"/>
-
<w:instrText>NUMPAGES</w:instrText>
(总页数)
-
<w:fldChar w:fldCharType="separate"/>
-
<w:fldChar w:fldCharType="end"/>
5)所以在Python代码中只需要对第四点的页码标签进行生成即可。