一/ 百度easydl数据标注 脚本
1 官方标注工具,链接如下,由lableme改进而形成
GitHub - Baidu-AIP/Easyyibiao
2 官网数据导入格式三种分别为:
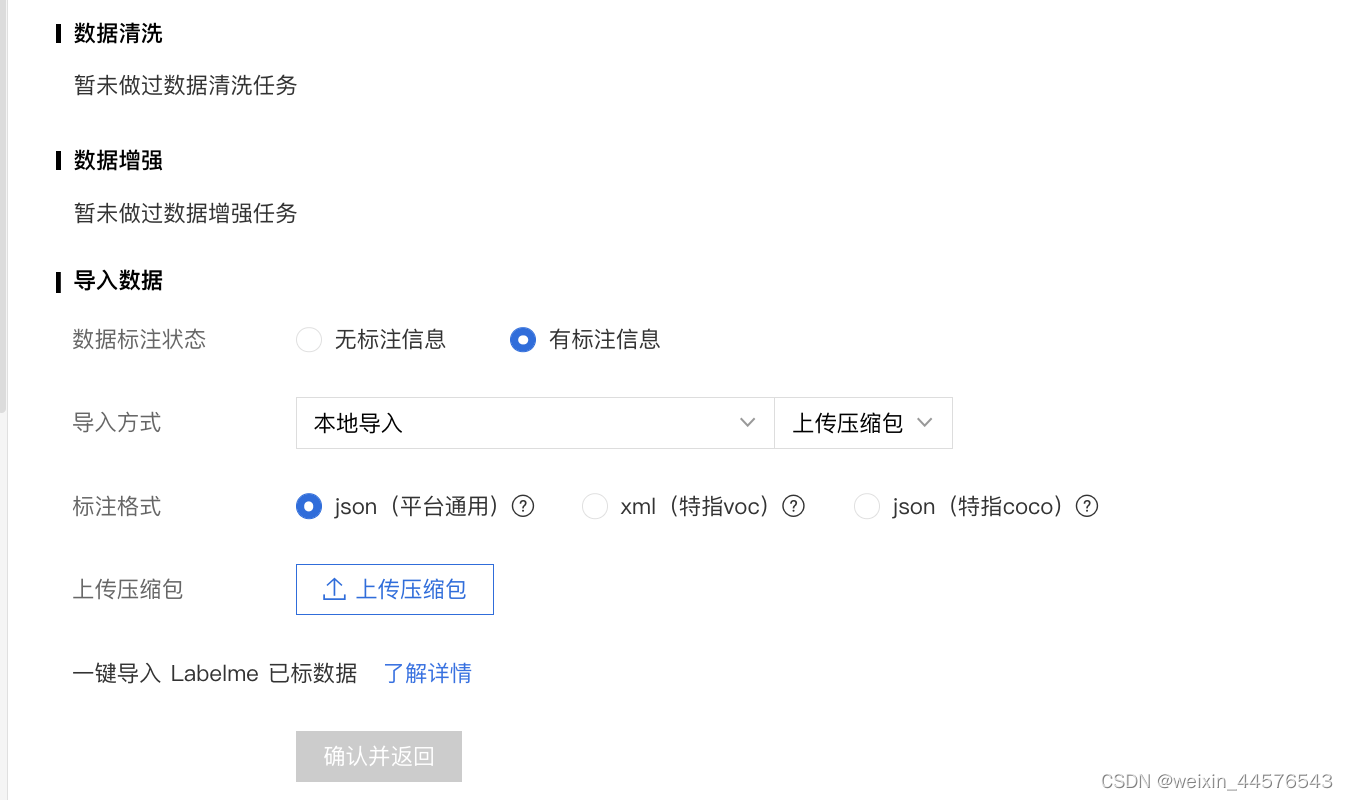
布局如图所示

2.1json 通用格式 .json
{"labels": [{"y1": 579, "x2": 466, "x1": 328, "y2": 718, "name": "other","meta":{"points":[{"y": 718,"x": 400},{"y": 626,"x": 328},{"y": 579,"x": 393},{"y": 672,"x": 466}]}}]}
2.2 xml ,这个比较好扩展 object节点,复制增加即可
<?xml version="1.0" encoding="utf-8"?>
<annotation>
    <filename>00036.jpg</filename>
    <segmented>0</segmented>
    <owner>
        <name>Lmars, Wuhan University</name>
        <flickrid>I do not know</flickrid>
    </owner>
    <folder>RSDS2016</folder>
    <object>
        <name>other</name>
        <pose>Left</pose>
        <truncated>1</truncated>
        <difficult>0</difficult>
        <quad>
            <x1>400</x1>
            <y1>718</y1>
            <x2>328</x2>
            <y2>626</y2>
            <x3>393</x3>
            <y3>579</y3>
            <x4>466</x4>
            <y4>672</y4>
        </quad>
        <bbox>
            <x1>328</x1>
            <y1>579</y1>
            <x2>466</x2>
            <y2>718</y2>
        </bbox>
    </object>
</annotation>
2.3 coco json
{"info": {"contributor": "nihao", "data_created": "2021", "version": "1.0", "year": 2021}, "licenses": "licenses", "image_nums": 1, "images": [{"file_name": "00036.jpg", "id": 1, "width": 1024, "height": 768}], "categories": [{"id": 1, "name": "other", "supercategory": "other"}], "annotations": [{"category_id": 1, "bbox":[328, 579, 138, 139],"area": 9430, "segmentation": [[400, 718, 328, 626, 393, 579, 466, 672]], "iscrowd": 0, "image_id": 1, "id": 1, "shape": "quad"}]}
3 接下来,通过程序自动生成xml文件
txt2xml.py

import os
from lxml.etree import Element, SubElement, tostring

def txt_xml(img_name, txt_path, img_xml, xml_path):
    #读取txt的信息
    clas=[]
    imh, imw = 800, 800
    txt_img=os.path.join(txt_path,img_name)
    with open(txt_img,"r") as f:
        for line in f.readlines():
            line = line.strip('\n')
            list = line.split(" ")
            clas.append(list)       # [0, x1, y1, x2, y2]

    node_root = Element('annotation')
    node_folder = SubElement(node_root, 'folder')
    node_folder.text = '1'
    # filename
    node_filename = SubElement(node_root, 'filename')
    node_filename.text = img_name.split(".")[0]+".jpg"
    # path
    node_path = SubElement(node_root, 'path')
    node_path.text = str(txt_img).split('.')[0] + '.jpg'
    # source
    node_source = SubElement(node_root, 'source')
    node_database = SubElement(node_source, 'database')
    node_database.text = 'Unknown'
    # size
    # node_size = SubElement(node_root, 'size')
    # node_width = SubElement(node_size, 'width')
    # node_width.text = str(imw)
    # node_height = SubElement(node_size, 'height')
    # node_height.text = str(imh)
    # node_depth = SubElement(node_size, 'depth')
    # node_depth.text = '3'
    # segmented
    node_segmented = SubElement(node_root, 'segmented')
    node_segmented.text = '0'
    # object
    for i in range(len(clas)):
        node_object = SubElement(node_root, 'object')
        node_name = SubElement(node_object, 'name')
        node_name.text = 'other'
        node_pose=SubElement(node_object, 'pose')
        node_pose.text="Left"
        node_truncated=SubElement(node_object, 'truncated')
        node_truncated.text="1"
        node_difficult = SubElement(node_object, 'difficult')
        node_difficult.text = '0'
        # bndbox
        node_bndbox = SubElement(node_object, 'quad')
        x1 = SubElement(node_bndbox, 'x1')
        x1.text = str(clas[i][1])
        y1 = SubElement(node_bndbox, 'y1')
        y1.text = str(clas[i][2])

        x2 = SubElement(node_bndbox, 'x2')
        x2.text = str(clas[i][3])
        y2 = SubElement(node_bndbox, 'y2')
        y2.text = str(clas[i][4])
        x3 = SubElement(node_bndbox, 'x3')
        x3.text = str(clas[i][5])
        y3 = SubElement(node_bndbox, 'y3')
        y3.text = str(clas[i][6])
        x4 = SubElement(node_bndbox, 'x4')
        x4.text = str(clas[i][7])
        y4 = SubElement(node_bndbox, 'y4')
        y4.text = str(clas[i][8])
    xml = tostring(node_root, pretty_print=True)  # 格式化显示,该换行的换行
    img_newxml = os.path.join(xml_path, img_xml)
    file_object = open(img_newxml, 'wb')
    file_object.write(xml)
    file_object.close()

if __name__ == "__main__":
    #标注文件夹所在位置
    txt_path=r"temp"
    #txt转化成xml格式后存放的文件夹
    xml_path=r"temp1"
    if not os.path.exists(xml_path):
        os.mkdir(xml_path)
    for img_name in os.listdir(txt_path):
        print(img_name)
        img_xml=img_name.split(".")[0]+".xml"
        txt_xml(img_name, txt_path, img_xml, xml_path)

最终效果图

参考 yolo图像检测数据集格式转换:xml 与 txt格式相互转换_uncle_ll的博客-CSDN博客_yolo数据集txt格式
二/ 利用PIL 模块生成相应的图片 字符图片
参考link :https://github.com/mpcabd/python-arabic-reshaper
https://github.com/MichalBusta/E2E-MLT
效果:

pip install --upgrade arabic-reshaper
conda install -c mpcabd arabic-reshaper
pip install --upgrade arabic-reshaper python-bidi pillow
代码
#产生阿拉伯文图片
import arabic_reshaper

text_to_be_reshaped = '2023 06 14/2022 06 16'
text_to_be_reshaped1='JXG'
text_to_be_reshaped2='14 06 2023/16 06 2022 X21'

reshaped_text = arabic_reshaper.reshape(text_to_be_reshaped)

'''
At this stage the text is reshaped, all letters are in their correct form
based on their surroundings, but if you are going to print the text in a
left-to-right context, which usually happens in libraries/apps that do not
support Arabic and/or right-to-left text rendering, then you need to use
get_display from python-bidi.
Note that this is optional and depends on your usage of the reshaped text.
'''
from bidi.algorithm import get_display
bidi_text = get_display(reshaped_text)

# At this stage the text in bidi_text can be easily rendered in any library
# that doesn't support Arabic and/or right-to-left, so use it as you'd use
# any other string. For example if you're using PIL.ImageDraw.text to draw
# text over an image you'd just use it like this...

from PIL import Image, ImageDraw, ImageFont

# We load Arial since it's a well known font that supports Arabic Unicode
# font = ImageFont.truetype('Arial', 40)
font = ImageFont.truetype('/PaddleOCR/StyleText/fonts/arabic.ttf', 50)
font1= ImageFont.truetype('PaddleOCR/StyleText/fonts/en_standard.ttf',40)
image = Image.new('RGBA', (800, 600), (255,255,255,0))
image_draw = ImageDraw.Draw(image)
image_draw.text((350,10), text_to_be_reshaped1, fill=(255,255,255,200), font=font1)
image_draw.text((10,10), bidi_text, fill=(255,255,255,200), font=font)
image_draw.text((10,70), text_to_be_reshaped2, fill=(255,255,255,200), font=font1)


# image.show()
image.save("temp.png")
本文内容由网友自发贡献,版权归原作者所有,本站不承担相应法律责任。如您发现有涉嫌抄袭侵权的内容,请联系:hwhale#tublm.com(使用前将#替换为@)