ROS_Python编程 之 案例代码核心解析(第一版)
通过Handsfree mini机器人平台配套的中级教程,我对ros_python编程实现 传感器数据读取、运动控制 的知识做以下归纳:
文章目录
- ROS_Python编程 之 案例代码核心解析(第一版)
- 1. 传感器数据读取
- 1.1 获取机器人底层硬件基本信息并打印
- 1.2 获取IMU数据,并转化成欧拉角打印
- 1.3 获取激光雷达数据并打印
- 1.4 获取摄像头数据,并用opencv_python库显示
- 2. 控制机器人移动
- 2.1 控制机器人直线运动
- 2.2 控制机器人转向运动
- 2.3 编写一个键盘遥控程序
1. 传感器数据读取
1.1 获取机器人底层硬件基本信息并打印
import rospy
from handsfree_msgs.msg import robot_state
def callback(data):
rospy.loginfo("the embedded system_time: %fus",data.system_time)
rospy.loginfo("the embedded cpu temperature is: %f",data.cpu_temperature)
rospy.loginfo("the battery voltage is: %f",data.battery_voltage)
rospy.loginfo("the battery power remain is: percent %f",data.power_remain*100)
rospy.loginfo("——————————————————————————————————————— \n\r")
def sub_state():
rospy.init_node('sub_state', anonymous=True)
rospy.Subscriber("/handsfree/robot_state", robot_state, callback)
rospy.spin()
if __name__ == '__main__':
sub_state()
精髓:rospy.Subscriber("/handsfree/robot_state", robot_state, callback)
其中,话题订阅者Subscriber对象的构造函数的第二个参数是所要订阅的话题类型
1.2 获取IMU数据,并转化成欧拉角打印
import rospy
import tf
from tf.transformations import *
from sensor_msgs.msg import Imu
def callback(data):
(r,p,y) = tf.transformations.euler_from_quaternion((data.orientation.x,data.orientation.y,data.orientation.z,data.orientation.w))
rospy.loginfo("Pitch = %f,Roll = %f, Yaw = %f",r*180/3.1415926,p*180/3.1415926,y*180/3.1415926)
def get_imu():
rospy.init_node('get_imu', anonymous=True)
rospy.Subscriber("/handsfree/imu", Imu, callback)
rospy.spin()
if __name__ == '__main__':
get_imu()
精髓:(r,p,y)= tf.transformations.euler_from_quaternion((data.orientation.x,data.orientation.y,data.orientation.z,data.orientation.w))
其中,ros中欧拉角与四元数的互相转化可以如下实现:
pos = Pose()
q = tf.transformations.quaternion_from_euler(0, 0, point.z)
pos.orientation.x = q[0]
pos.orientation.y = q[1]
pos.orientation.z = q[2]
pos.orientation.w = q[3]
(r, p, y) = tf.transformations.euler_from_quaternion([msg.orientation.x, msg.orientation.y, msg.orientation.z, msg.orientation.w])
sell.fill_euler_msg(msg, r, p, y)
1.3 获取激光雷达数据并打印
激光雷达数据是指雷达通过发射激光束探测目标的位置后,将接收到的从目标反射回来的信号(目标回波)与发射信号进行比较,作适当处理后,就可获得目标的有关信息。一般,激光雷达的驱动程序会将其封装好通过topic发布出来。
import rospy
from sensor_msgs.msg import LaserScan
def callback(data):
rospy.loginfo("the angle_min is %f",data.angle_min)
rospy.loginfo("the angle_max is %f",data.angle_max)
rospy.loginfo("the scan data is ")
for i in range(0, len(data.ranges)):
print data.ranges[i]
print "\n"
def sub_state():
rospy.init_node('sub_scan', anonymous=True)
rospy.Subscriber("/scan", LaserScan, callback)
rospy.spin()
if __name__ == '__main__':
sub_state()
1.4 获取摄像头数据,并用opencv_python库显示
摄像头数据就是图像,是指摄像头获取的彩色rgb图像和深度depth图像等,一般都将其封装在摄像头驱动之中,直接调用即可
import cv2
import rospy
from sensor_msgs.msg import Image
from cv_bridge import CvBridge, CvBridgeError
def callback(data):
try:
cv_image = CvBridge().imgmsg_to_cv2(data, "bgr8")
except CvBridgeError as e:
print(e)
(rows,cols,channels) = cv_image.shape
cv2.imshow("Image window", cv_image)
cv2.waitKey(30)
def get_photo():
rospy.init_node('get_photo', anonymous=True)
rospy.Subscriber("/camera/rgb/image_raw", Image, callback)
rospy.spin()
if __name__ == '__main__':
get_photo()
精髓:cv_image = CvBridge().imgmsg_to_cv2(data, "bgr8")
其中,CvBridge用于连接ros信息和opencv信息
2. 控制机器人移动
2.1 控制机器人直线运动
handsfree mini 机器人工控机自带的ros系统一共有两份代码,分别是 linear_move.py 和 linear_move_by_srv.py
- linear_move.py 是通过改变代码的参数配置来传参
- linear_move_by_srv.py 是通过调用Service接口来传参
其中,linear_move.py 源码如下:
import tf
import math
import rospy
import geometry_msgs.msg
class LinearMove(object):
def __init__(self):
self.frame_base = rospy.get_param('~base_frame', '/base_link')
self.frame_odom = rospy.get_param('~odom_frame', '/odom')
self.velocity_topic = rospy.get_param('~vel_topic', '/mobile_base/mobile_base_controller/cmd_vel')
self.tolerance_distance = rospy.get_param('~tolerance', 0.08)
self.speed_linear = rospy.get_param('~speed_linear', 0.1)
self.rate_pub = rospy.get_param('~velocity_pub_rate', 10)
self.rate = rospy.Rate(self.rate_pub)
self.vel_pub = rospy.Publisher(self.velocity_topic,
geometry_msgs.msg.Twist,
queue_size=1)
self.tf_listener = tf.TransformListener()
rospy.on_shutdown(self.brake)
try:
self.tf_listener.waitForTransform(self.frame_odom,
self.frame_base,
rospy.Time(0),
rospy.Duration(5.0))
except (tf.LookupException, tf.ConnectivityException, tf.ExtrapolationException):
rospy.logerr('tf catch exception when robot waiting for transform......')
exit(-1)
def move_to_target(self, dis_to_move=0):
"""
to make robot move forward/back dis_to_move meters
:param: dis_to_move: the distance make robot move, >0 means move forward, <0 means move back
:type: float
:return:
"""
self.robot_start_pos = self.__get_robot_pos()
rospy.logdebug("****************************************************************************")
rospy.logdebug("robot current position is x = %f, y = %f, try to move forward/back %f Meter"
%(self.robot_start_pos.x, self.robot_start_pos.y, dis_to_move))
rospy.logdebug("****************************************************************************")
while self.__is_robot_arrived(dis_to_move) is not True:
self.__move_robot(direction=(1 if dis_to_move > 0 else -1))
self.rate.sleep()
self.brake()
rospy.loginfo('arrived the target point')
def __is_robot_arrived(self, dis_to_move):
"""
to check has the robot arrived target position
:param: dis_to_move: the distance thar robot needs to move forward/back
:type: float
:return: False --- robot has not arrived the target position
True --- robot has arrived the target position
"""
robot_cur_pos = self.__get_robot_pos()
dis_moved = math.sqrt(math.pow((robot_cur_pos.x - self.robot_start_pos.x), 2) +
math.pow((robot_cur_pos.y - self.robot_start_pos.y), 2))
dis_need_move = math.fabs(dis_to_move) - dis_moved
return False if math.fabs(dis_need_move) > self.tolerance_distance else True
def __move_robot(self, direction=1):
"""
send velocity to robot according to the direction
:param: direction: when direction = 1: make robot move forward
when direction = -1: make robot move back
:type: int
:return:
"""
move_cmd = geometry_msgs.msg.Twist()
move_cmd.linear.x = math.copysign(self.speed_linear, direction)
self.vel_pub.publish(move_cmd)
def __get_robot_pos(self):
"""
to get current position(x,y,z) of robot
:return: A geometry_msgs.msg.Point type store robot's position (x,y,z)
"""
try:
(trans, rot) = self.tf_listener.lookupTransform(self.frame_odom,
self.frame_base,
rospy.Time(0))
except (tf.Exception, tf.ConnectivityException, tf.LookupException):
rospy.logerr('tf catch exception when robot looking up transform')
exit(-1)
return geometry_msgs.msg.Point(*trans)
def brake(self):
"""
send command to stop the robot
:return:
"""
self.vel_pub.publish(geometry_msgs.msg.Twist())
if __name__ == '__main__':
rospy.init_node('LinearMove')
t_dis = rospy.get_param('~t_dis', 0.2)
if t_dis == 0.0:
rospy.logerr('no target distance set!')
exit(-1)
rospy.loginfo('try to move %f meters'%t_dis)
LinearMove().move_to_target(dis_to_move=t_dis)
self.vel_pub = rospy.Publisher(self.velocity_topic,geometry_msgs.msg.Twist,
queue_size=1)
geometry_msgs.msg.Twist 是一种消息类,原始定义如下:
Vector3  linear
Vector3  angular
紧凑定义如下:
geometry_msgs/Vector3 linear
geometry_msgs/Vector3 angular
self.tf_listener = tf.TransformListener()
self.tf_listener.waitForTransform(self.frame_odom,
self.frame_base,
rospy.Time(0),
rospy.Duration(5.0))
通过监听tf,可以避免繁琐的旋转矩阵的计算,而直接获取相关信息。在监听中,最常用的两个函数是:tf.TransformListener.lookupTransform() 和 tf.TransformListener.transformPoint()。
- tf.TransformListener.lookupTransform():
(1)功能:获得从第一个坐标系到第二个坐标系转变的位姿关系,包括旋转和平移;rospy.Time(0)指最近时刻存储的数据,不可以改成rospy.Time.now(),rospy.Time.now()指现在时刻,因为监听数据需要进行缓存,无法实时检测,会有几毫秒的延迟
(2)参数与返回值:第一个参数是第一个坐标系,第二个参数是第二个坐标系,第三个参数是需要进行转变的时间;返回值 (trans, rot) 分别是 translation平移 和 rotation旋转,其中rot是四元数(quaternion)形式
(3)实例函数:
def __get_robot_pos(self):
try:
(trans, rot) = self.tf_listener.lookupTransform(self.frame_odom,
self.frame_base,
rospy.Time(0))
except (tf.Exception, tf.ConnectivityException, tf.LookupException):
rospy.logerr('tf catch exception when robot looking up transform')
exit(-1)
return geometry_msgs.msg.Point(*trans)
- tf.TransformListener.transformPoint():
(1)功能:可以将一个坐标系下的点的坐标转换到另一个坐标系下
(2)参数:
listener_.transformPoint("PTAM_world",m_normal_pose,pose_PTAM_world);
另外,linear_move_by_srv.py 源码的精髓如下:
service_move_dis = rospy.Service('move_distance', handsfree_srv.SpecialMove, callback_linear_move)
2.2 控制机器人转向运动
通过python程序控制机器人沿z轴左右转动即偏航,代码与直线运动代码差不多,handsfree mini 机器人工控机自带的ros系统一共有三份代码,分别是 radian_turn.py,radian_turn_by_srv.py 和 radian_turn_direct_by_srv.py
- radian_turn.py 是通过改变代码的参数配置来传参
- radian_turn_by_srv.py 和 radian_turn_direct_by_srv.py 是通过调用Service接口来传参
- radian_turn.py 和 radian_turn_by_srv.py 只会在-180~180度之间旋转(如:如果运行这两个代码,并传递参数6.28,机器人是不会动的,而运行 radian_turn_direct_by_srv.py,机器人会转一圈)
- 逆时针旋转,角度为正;顺时针旋转,角度为负
其中,radian_turn.py 的主要函数如下:
def __get_robot_pos(self):
try:
trans, rot = self.tf_listener.lookupTransform(self.frame_odom,
self.frame_base,
rospy.Time(0))
except (tf.Exception, tf.ConnectivityException, tf.LookupException):
rospy.logerr('tf catch exception when robot looking up transform')
exit(-1)
return tf.transformations.euler_from_quaternion(rot)[2]
def __turn_robot(self, turn_direction=1):
"""
send velocity command to robot according to the direction
:param: direction: when direction = 1: make robot turn in clockwise
when direction = -1: make robot turn in counterclockwise
:type: int
:return:
"""
move_cmd = geometry_msgs.msg.Twist()
move_cmd.angular.z = math.copysign(self.speed_radian, turn_direction)
self.vel_pub.publish(move_cmd)
def turn_to_target(self, radian_to_turn=0.0):
robot_start_yaw = (self.__get_robot_pos() + math.pi*2) % (math.pi*2)
target_yaw = math.copysign(math.fabs(radian_to_turn)%(math.pi*2), radian_to_turn)+robot_start_yaw
target_yaw = (target_yaw + math.pi*2) % (math.pi*2)
radian_to_move = target_yaw - robot_start_yaw
if radian_to_move < -math.pi or math.pi < radian_to_move:
direction = 1 if radian_to_move < -math.pi else -1
else:
direction = 1 if radian_to_move > 0 else -1
self.brake()
rospy.logdebug("****************************************************************************")
rospy.logdebug("the robot's Yaw = %f, try to turn to Yaw = %f, the direction = %d"
%(robot_start_yaw, target_yaw, direction))
rospy.logdebug("****************************************************************************")
while self.__is_robot_arrived(target_yaw) is not True:
self.__turn_robot(turn_direction=direction)
self.rate.sleep()
self.brake()
rospy.loginfo('arrived the target radian!')
知识学习:欧拉角的理解
旋转永远是做游戏的难点和混乱点,表示旋转有很多种方式,比如简单的欧拉角、较复杂的四元数、更复杂的矩阵。
欧拉角是表达旋转的最简单方式,形式上是一个三维向量,其值分别代表物体绕坐标系三轴(x,y,z)的旋转角度。显然,不同的旋转顺序定义会产生不同的旋转结果,所以一般引擎都会规定自己的旋转顺序。
绕三轴的旋转值pitch,yaw,roll说法来自航空界,分别翻译为:pitch(俯仰角),yaw(偏航角),roll(翻滚角),
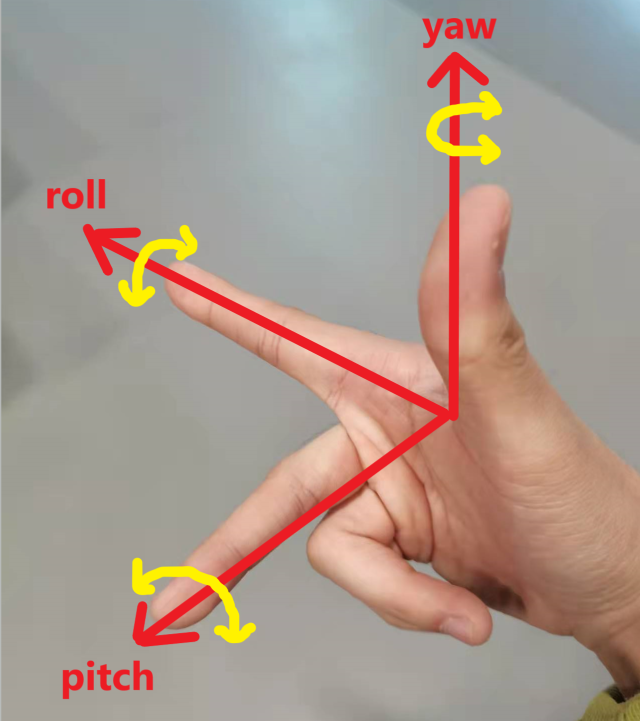
注意:pitch,yaw,roll与x,y,z没有明确固定的对应顺序,只是人为定义而已,因此可能存在差异!!!
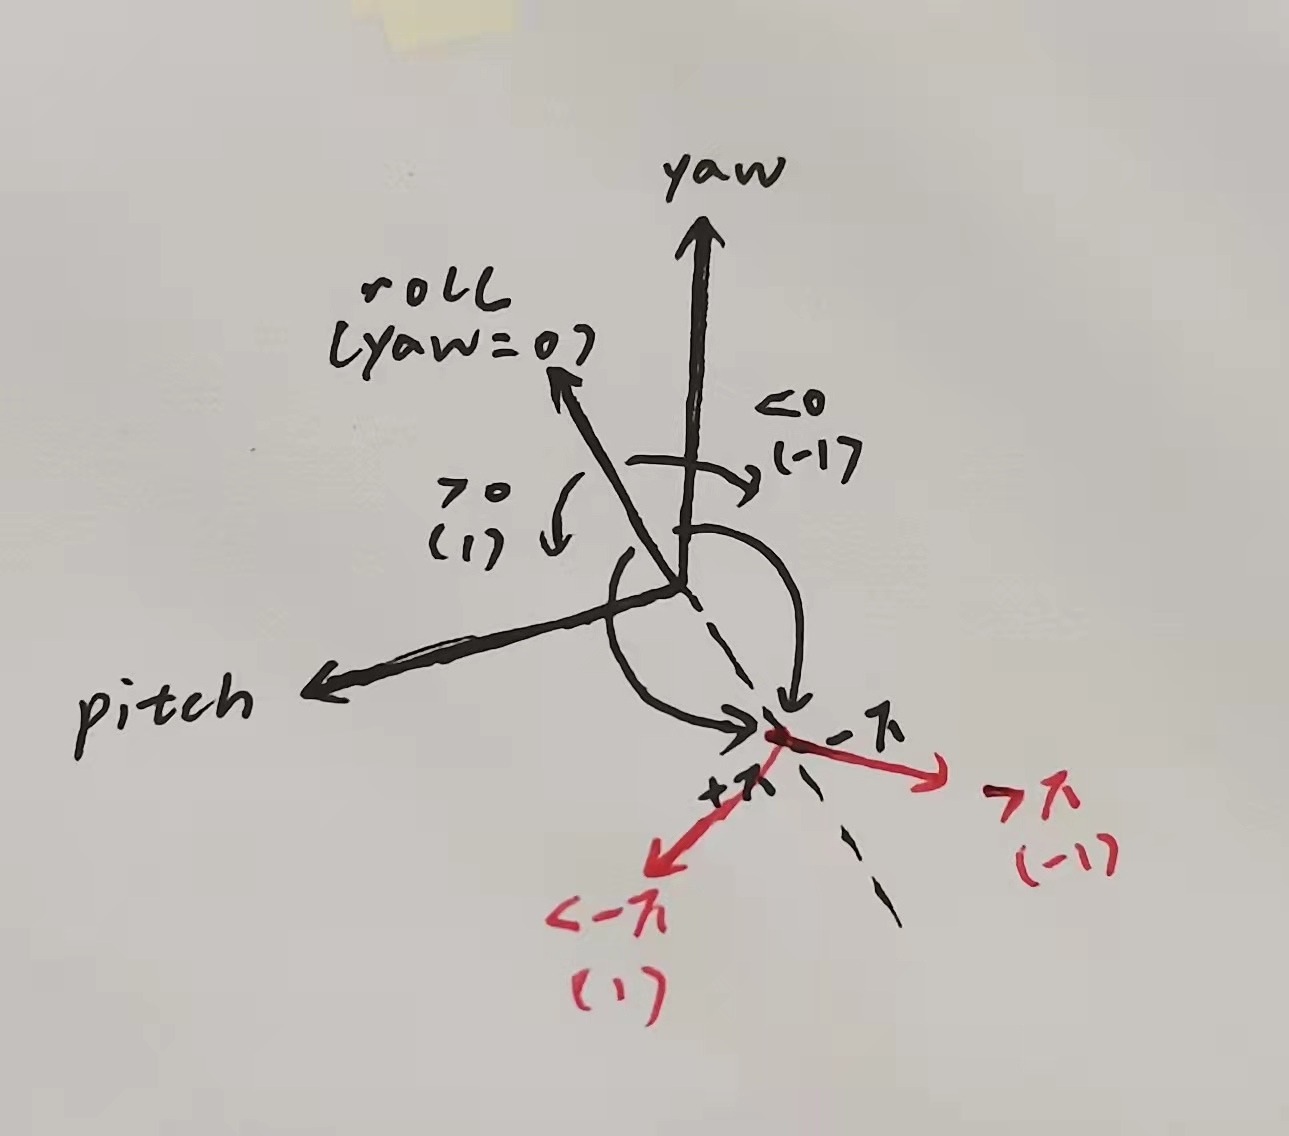
另外,pitch角度值介于[-90,90]【万向锁】,yaw角度值介于[-180,180]【越过180°、-180°前后,最近转动方向相反(参考下文精髓4配图)】
而 handsfree mini 机器人工控机自带ros系统中,target_yaw 对应 move_cmd.angular.z
return tf.transformations.euler_from_quaternion(rot)[2]
def turn_to_target(self, radian_to_turn=0.0):
robot_start_yaw = (self.__get_robot_pos() + math.pi*2) % (math.pi*2)
def turn_to_target(self, radian_to_turn=0.0):
target_yaw = math.copysign(math.fabs(radian_to_turn)%(math.pi*2), radian_to_turn)+robot_start_yaw
radian_to_move = target_yaw-robot_start_yaw
if radian_to_move < -math.pi or math.pi < radian_to_move:
direction = 1 if radian_to_move < -math.pi else -1
else:
direction = 1 if radian_to_move > 0 else -1
radian_turn_direct_by_srv.py 的精髓如下:
def callback_turn_radian(req):
radian_to_turn=req.target_radian_turn
while radian_to_turn > 3.14:
radian_to_turn = radian_to_turn - 3.14;
turn_radian.turn_to_target(3.14)
while radian_to_turn < -3.14:
radian_to_turn = radian_to_turn + 3.14;
turn_radian.turn_to_target(-3.14)
turn_radian.turn_to_target(radian_to_turn)
return handsfree_srv.SpecialTurnResponse(True)
2.3 编写一个键盘遥控程序
到目前为止,我陆陆续续亲自接触过几台机器人小车,比如racecar、spark、mini等,在诸多源码中,键盘遥控程序是从不缺席的。反观这些源码,可以发现键盘遥控程序几乎都大同小异。因此,我在此注解一下 handsfree mini 机器人的键盘遥控程序,以后需要编写键盘遥控程序时均可参考。
import roslib
import rospy
from geometry_msgs.msg import Twist
import sys, select, termios, tty
msg = """
Reading from the keyboard and Publishing to Twist!
---------------------------
Moving around:
u i o
j k l
m , .
For Holonomic mode (strafing), hold down the shift key:
---------------------------
U I O
J K L
M < >
t : up (+z)
b : down (-z)
anything else : stop
q/z : increase/decrease max speeds by 10%
w/x : increase/decrease only linear speed by 10%
e/c : increase/decrease only angular speed by 10%
CTRL-C to quit
"""
moveBindings = {
'i':(1,0,0,0),
'o':(1,0,0,-1),
'j':(0,0,0,1),
'l':(0,0,0,-1),
'u':(1,0,0,1),
',':(-1,0,0,0),
'.':(-1,0,0,1),
'm':(-1,0,0,-1),
'O':(1,-1,0,0),
'I':(1,0,0,0),
'J':(0,1,0,0),
'L':(0,-1,0,0),
'U':(1,1,0,0),
'<':(-1,0,0,0),
'>':(-1,-1,0,0),
'M':(-1,1,0,0),
't':(0,0,1,0),
'b':(0,0,-1,0),
}
speedBindings={
'q':(1.1,1.1),
'z':(.9,.9),
'w':(1.1,1),
'x':(.9,1),
'e':(1,1.1),
'c':(1,.9),
}
def getKey():
tty.setraw(sys.stdin.fileno())
select.select([sys.stdin], [], [], 0)
key = sys.stdin.read(1)
termios.tcsetattr(sys.stdin, termios.TCSADRAIN, settings)
return key
speed = 0.30
turn = 0.6
def vels(speed,turn):
return "currently:\tspeed %s\tturn %s " % (speed,turn)
if __name__ == "__main__":
settings = termios.tcgetattr(sys.stdin)
pub = rospy.Publisher('/mobile_base/mobile_base_controller/cmd_vel', Twist, queue_size = 1)
rospy.init_node('teleop_twist_keyboard')
x = 0
y = 0
z = 0
th = 0
status = 0
try:
print msg
print vels(speed,turn)
while(1):
key = getKey()
if key in moveBindings.keys():
x = moveBindings[key][0]
y = moveBindings[key][1]
z = moveBindings[key][2]
th = moveBindings[key][3]
elif key in speedBindings.keys():
speed = speed * speedBindings[key][0]
turn = turn * speedBindings[key][1]
print vels(speed,turn)
if (status == 14):
print msg
status = (status + 1) % 15
x = 0
y = 0
z = 0
th = 0
else:
x = 0
y = 0
z = 0
th = 0
if (key == '\x03'):
break
twist = Twist()
twist.linear.x = x*speed; twist.linear.y = y*speed; twist.linear.z = z*speed;
twist.angular.x = 0; twist.angular.y = 0; twist.angular.z = th*turn
pub.publish(twist)
except:
print e
finally:
twist = Twist()
twist.linear.x = 0; twist.linear.y = 0; twist.linear.z = 0
twist.angular.x = 0; twist.angular.y = 0; twist.angular.z = 0
pub.publish(twist)
termios.tcsetattr(sys.stdin, termios.TCSADRAIN, settings)
moveBindings = {
'i':(1,0,0,0),
'o':(1,0,0,-1),
'j':(0,0,0,1),
'l':(0,0,0,-1),
'u':(1,0,0,1),
',':(-1,0,0,0),
'.':(-1,0,0,1),
'm':(-1,0,0,-1),
'O':(1,-1,0,0),
'I':(1,0,0,0),
'J':(0,1,0,0),
'L':(0,-1,0,0),
'U':(1,1,0,0),
'<':(-1,0,0,0),
'>':(-1,-1,0,0),
'M':(-1,1,0,0),
't':(0,0,1,0),
'b':(0,0,-1,0),
}
speedBindings={
'q':(1.1,1.1),
'z':(.9,.9),
'w':(1.1,1),
'x':(.9,1),
'e':(1,1.1),
'c':(1,.9),
}
def getKey():
tty.setraw(sys.stdin.fileno())
select.select([sys.stdin], [], [], 0)
key = sys.stdin.read(1)
termios.tcsetattr(sys.stdin, termios.TCSADRAIN, settings)
return key
本文内容由网友自发贡献,版权归原作者所有,本站不承担相应法律责任。如您发现有涉嫌抄袭侵权的内容,请联系:hwhale#tublm.com(使用前将#替换为@)