首先介绍nano板子上的i2c相关的硬件信息:

- 安装所需要的i2c库
sudo apt-get install l -y i2c-tools
- 完成nano中io与i2c设备的硬件接线。
本次案例使用的是PCA9685和MPU6050,这两个设备的SCL和SDA直连,其次完成与nano主板上IO连接,看图:

VCC ---接Nano引脚第17脚
GND ---接Nano 引脚第25脚
SCL ---接Nano 引脚第5脚(GEN2_I2C_SCL)
SDA ---接Nano 引脚第3脚(GEN2_I2C_SDA)
3.检测硬件地址:
sudo i2cdetect -y -r -a 1
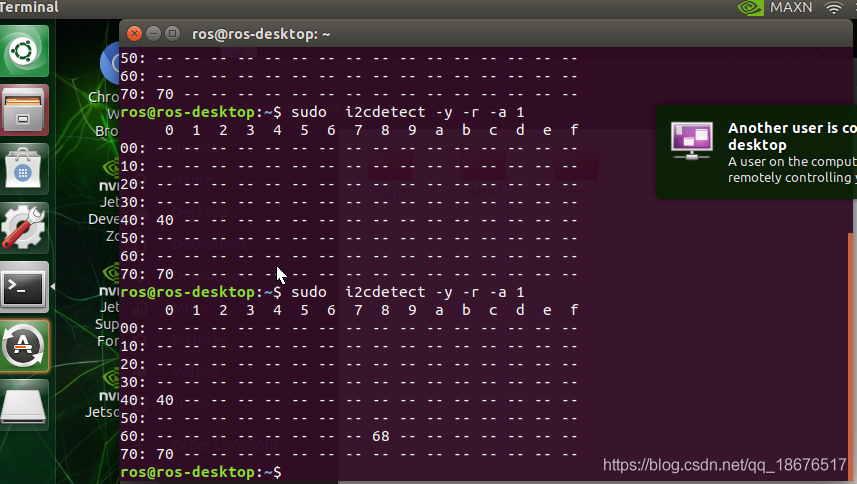 可以看到连接在i2c总线上的设备地址号
- 程序实现对i2c设备的访问:
"""This program handles the communication over I2C
between a Jetson Nano and a MPU-6050 Gyroscope / Accelerometer combo.
Made by: Dennis/TW
Released under the MIT License
Copyright 2019
"""

import smbus
import time


class mpu6050:
    # Global Variables
    GRAVITIY_MS2 = 9.80665
    address = None
    bus = smbus.SMBus(1)

    # Scale Modifiers
    ACCEL_SCALE_MODIFIER_2G = 16384.0
    ACCEL_SCALE_MODIFIER_4G = 8192.0
    ACCEL_SCALE_MODIFIER_8G = 4096.0
    ACCEL_SCALE_MODIFIER_16G = 2048.0

    GYRO_SCALE_MODIFIER_250DEG = 131.0
    GYRO_SCALE_MODIFIER_500DEG = 65.5
    GYRO_SCALE_MODIFIER_1000DEG = 32.8
    GYRO_SCALE_MODIFIER_2000DEG = 16.4

    # Pre-defined ranges
    ACCEL_RANGE_2G = 0x00
    ACCEL_RANGE_4G = 0x08
    ACCEL_RANGE_8G = 0x10
    ACCEL_RANGE_16G = 0x18

    GYRO_RANGE_250DEG = 0x00
    GYRO_RANGE_500DEG = 0x08
    GYRO_RANGE_1000DEG = 0x10
    GYRO_RANGE_2000DEG = 0x18

    # MPU-6050 Registers
    PWR_MGMT_1 = 0x6B
    PWR_MGMT_2 = 0x6C

    SELF_TEST_X = 0x0D
    SELF_TEST_Y = 0x0E
    SELF_TEST_Z = 0x0F
    SELF_TEST_A = 0x10

    ACCEL_XOUT0 = 0x3B
    ACCEL_XOUT1 = 0x3C
    ACCEL_YOUT0 = 0x3D
    ACCEL_YOUT1 = 0x3E
    ACCEL_ZOUT0 = 0x3F
    ACCEL_ZOUT1 = 0x40

    TEMP_OUT0 = 0x41
    TEMP_OUT1 = 0x42

    GYRO_XOUT0 = 0x43
    GYRO_XOUT1 = 0x44
    GYRO_YOUT0 = 0x45
    GYRO_YOUT1 = 0x46
    GYRO_ZOUT0 = 0x47
    GYRO_ZOUT1 = 0x48

    ACCEL_CONFIG = 0x1C
    GYRO_CONFIG = 0x1B

    def __init__(self, address):
        self.address = address

        # Wake up the MPU-6050 since it starts in sleep mode
        self.bus.write_byte_data(self.address, self.PWR_MGMT_1, 0x00)

    # I2C communication methods

    def read_i2c_word(self, register):
        """Read two i2c registers and combine them.

        register -- the first register to read from.
        Returns the combined read results.
        """
        # Read the data from the registers
        high = self.bus.read_byte_data(self.address, register)
        low = self.bus.read_byte_data(self.address, register + 1)

        value = (high << 8) + low

        if (value >= 0x8000):
            return -((65535 - value) + 1)
        else:
            return value

    # MPU-6050 Methods

    def get_temp(self):
        """Reads the temperature from the onboard temperature sensor of the MPU-6050.

        Returns the temperature in degrees Celcius.
        """
        # Get the raw data
        raw_temp = self.read_i2c_word(self.TEMP_OUT0)

        # Get the actual temperature using the formule given in the
        # MPU-6050 Register Map and Descriptions revision 4.2, page 30
        actual_temp = (raw_temp / 340) + 36.53

        # Return the temperature
        return actual_temp

    def set_accel_range(self, accel_range):
        """Sets the range of the accelerometer to range.

        accel_range -- the range to set the accelerometer to. Using a
        pre-defined range is advised.
        """
        # First change it to 0x00 to make sure we write the correct value later
        self.bus.write_byte_data(self.address, self.ACCEL_CONFIG, 0x00)

        # Write the new range to the ACCEL_CONFIG register
        self.bus.write_byte_data(self.address, self.ACCEL_CONFIG, accel_range)

    def read_accel_range(self, raw=False):
        """Reads the range the accelerometer is set to.

        If raw is True, it will return the raw value from the ACCEL_CONFIG
        register
        If raw is False, it will return an integer: -1, 2, 4, 8 or 16. When it
        returns -1 something went wrong.
        """
        # Get the raw value
        raw_data = self.bus.read_byte_data(self.address, self.ACCEL_CONFIG)

        if raw is True:
            return raw_data
        elif raw is False:
            if raw_data == self.ACCEL_RANGE_2G:
                return 2
            elif raw_data == self.ACCEL_RANGE_4G:
                return 4
            elif raw_data == self.ACCEL_RANGE_8G:
                return 8
            elif raw_data == self.ACCEL_RANGE_16G:
                return 16
            else:
                return -1

    def get_accel_data(self, g=False):
        """Gets and returns the X, Y and Z values from the accelerometer.

        If g is True, it will return the data in g
        If g is False, it will return the data in m/s^2
        Returns a dictionary with the measurement results.
        """
        # Read the data from the MPU-6050
        x = self.read_i2c_word(self.ACCEL_XOUT0)
        y = self.read_i2c_word(self.ACCEL_YOUT0)
        z = self.read_i2c_word(self.ACCEL_ZOUT0)

        accel_scale_modifier = None
        accel_range = self.read_accel_range(True)

        if accel_range == self.ACCEL_RANGE_2G:
            accel_scale_modifier = self.ACCEL_SCALE_MODIFIER_2G
        elif accel_range == self.ACCEL_RANGE_4G:
            accel_scale_modifier = self.ACCEL_SCALE_MODIFIER_4G
        elif accel_range == self.ACCEL_RANGE_8G:
            accel_scale_modifier = self.ACCEL_SCALE_MODIFIER_8G
        elif accel_range == self.ACCEL_RANGE_16G:
            accel_scale_modifier = self.ACCEL_SCALE_MODIFIER_16G
        else:
            print("Unkown range - accel_scale_modifier set to self.ACCEL_SCALE_MODIFIER_2G")
            accel_scale_modifier = self.ACCEL_SCALE_MODIFIER_2G

        x = x / accel_scale_modifier
        y = y / accel_scale_modifier
        z = z / accel_scale_modifier

        if g is True:
            return {'x': x, 'y': y, 'z': z}
        elif g is False:
            x = x * self.GRAVITIY_MS2
            y = y * self.GRAVITIY_MS2
            z = z * self.GRAVITIY_MS2
            return {'x': x, 'y': y, 'z': z}

    def set_gyro_range(self, gyro_range):
        """Sets the range of the gyroscope to range.

        gyro_range -- the range to set the gyroscope to. Using a pre-defined
        range is advised.
        """
        # First change it to 0x00 to make sure we write the correct value later
        self.bus.write_byte_data(self.address, self.GYRO_CONFIG, 0x00)

        # Write the new range to the ACCEL_CONFIG register
        self.bus.write_byte_data(self.address, self.GYRO_CONFIG, gyro_range)

    def read_gyro_range(self, raw=False):
        """Reads the range the gyroscope is set to.

        If raw is True, it will return the raw value from the GYRO_CONFIG
        register.
        If raw is False, it will return 250, 500, 1000, 2000 or -1. If the
        returned value is equal to -1 something went wrong.
        """
        # Get the raw value
        raw_data = self.bus.read_byte_data(self.address, self.GYRO_CONFIG)

        if raw is True:
            return raw_data
        elif raw is False:
            if raw_data == self.GYRO_RANGE_250DEG:
                return 250
            elif raw_data == self.GYRO_RANGE_500DEG:
                return 500
            elif raw_data == self.GYRO_RANGE_1000DEG:
                return 1000
            elif raw_data == self.GYRO_RANGE_2000DEG:
                return 2000
            else:
                return -1

    def get_gyro_data(self):
        """Gets and returns the X, Y and Z values from the gyroscope.

        Returns the read values in a dictionary.
        """
        # Read the raw data from the MPU-6050
        x = self.read_i2c_word(self.GYRO_XOUT0)
        y = self.read_i2c_word(self.GYRO_YOUT0)
        z = self.read_i2c_word(self.GYRO_ZOUT0)

        gyro_scale_modifier = None
        gyro_range = self.read_gyro_range(True)

        if gyro_range == self.GYRO_RANGE_250DEG:
            gyro_scale_modifier = self.GYRO_SCALE_MODIFIER_250DEG
        elif gyro_range == self.GYRO_RANGE_500DEG:
            gyro_scale_modifier = self.GYRO_SCALE_MODIFIER_500DEG
        elif gyro_range == self.GYRO_RANGE_1000DEG:
            gyro_scale_modifier = self.GYRO_SCALE_MODIFIER_1000DEG
        elif gyro_range == self.GYRO_RANGE_2000DEG:
            gyro_scale_modifier = self.GYRO_SCALE_MODIFIER_2000DEG
        else:
            print("Unkown range - gyro_scale_modifier set to self.GYRO_SCALE_MODIFIER_250DEG")
            gyro_scale_modifier = self.GYRO_SCALE_MODIFIER_250DEG

        x = x / gyro_scale_modifier
        y = y / gyro_scale_modifier
        z = z / gyro_scale_modifier

        return {'x': x, 'y': y, 'z': z}

    def get_all_data(self):
        """Reads and returns all the available data."""
        temp = self.get_temp()
        accel = self.get_accel_data()
        gyro = self.get_gyro_data()

        return [accel, gyro, temp]


if __name__ == "__main__":
    mpu = mpu6050(0x68)
    mpu.set_accel_range(mpu.ACCEL_RANGE_2G)
    mpu.set_gyro_range(mpu.GYRO_RANGE_1000DEG)
    print(mpu.get_temp())
    while 1:

        accel_data = mpu.get_accel_data()
        ax = 2*9.8*accel_data['x']/32768
        ay = 2*9.8*accel_data['y']/32768
        az = 2 * 9.8 * accel_data['z'] / 32768
        ax = round(ax, 2)
        ay = round(ay, 2)
        az = round(az, 2)
        print("accel_data:" + "  " + str(ax) + "    " +
              str(ay) + "  " + str(az))
        gyro_data = mpu.get_gyro_data()
        # 角速度
        gx = 1000*gyro_data['x']/32768
        gy = 1000 * gyro_data['y'] / 32768
        gz = 1000 * gyro_data['z'] / 32768
        gx = round(gx, 2)
        gy = round(gy, 2)
        gz = round(gz, 2)
        print("jiao rate:" + "  " + str(gx) + "   " +
              str(gy) + "  " + str(gz))
        time.sleep(1)
PCA9685代码案例:
在原基础上增加了用于控制电机pwm的函数,
 setMotoPluse(channel, pulse)
 #参数1:通道 参数2:高电平时间(0-4095)
#!/usr/bin/python

import time
import math
import smbus


# ============================================================================
# Raspi PCA9685 16-Channel PWM Servo Driver
# ============================================================================

class PCA9685:
    # Registers/etc.
    __SUBADR1 = 0x02
    __SUBADR2 = 0x03
    __SUBADR3 = 0x04
    __MODE1 = 0x00
    __PRESCALE = 0xFE
    __LED0_ON_L = 0x06
    __LED0_ON_H = 0x07
    __LED0_OFF_L = 0x08
    __LED0_OFF_H = 0x09
    __ALLLED_ON_L = 0xFA
    __ALLLED_ON_H = 0xFB
    __ALLLED_OFF_L = 0xFC
    __ALLLED_OFF_H = 0xFD

    def __init__(self, address=0x40, debug=False):
        self.bus = smbus.SMBus(1)
        self.address = address
        self.debug = debug
        if (self.debug):
            print("Reseting PCA9685")
        self.write(self.__MODE1, 0x00)

    def write(self, reg, value):
        "Writes an 8-bit value to the specified register/address"
        self.bus.write_byte_data(self.address, reg, value)
        if (self.debug):
            # print("I2C: Write 0x%02X to register 0x%02X" % (value, reg))
            pass
    def read(self, reg):
        "Read an unsigned byte from the I2C device"
        result = self.bus.read_byte_data(self.address, reg)
        if (self.debug):
            print("I2C: Device 0x%02X returned 0x%02X from reg 0x%02X" % (self.address, result & 0xFF, reg))
        return result

    def setPWMFreq(self, freq):
        "Sets the PWM frequency"
        prescaleval = 25000000.0  # 25MHz
        prescaleval /= 4096.0  # 12-bit
        prescaleval /= float(freq)
        prescaleval -= 1.0
        if (self.debug):
            print("Setting PWM frequency to %d Hz" % freq)
            print("Estimated pre-scale: %d" % prescaleval)
        prescale = math.floor(prescaleval + 0.5)
        if (self.debug):
            print("Final pre-scale: %d" % prescale)

        oldmode = self.read(self.__MODE1)
        newmode = (oldmode & 0x7F) | 0x10  # sleep
        self.write(self.__MODE1, newmode)  # go to sleep
        self.write(self.__PRESCALE, int(math.floor(prescale)))
        self.write(self.__MODE1, oldmode)
        time.sleep(0.005)
        self.write(self.__MODE1, oldmode | 0x80)

    def setPWM(self, channel, on, off):
        "Sets a single PWM channel"
        self.write(self.__LED0_ON_L + 4 * channel, on & 0xFF)
        self.write(self.__LED0_ON_H + 4 * channel, on >> 8)
        self.write(self.__LED0_OFF_L + 4 * channel, off & 0xFF)
        self.write(self.__LED0_OFF_H + 4 * channel, off >> 8)
        if (self.debug):
            # print("channel: %d  LED_ON: %d LED_OFF: %d" % (channel, on, off))
            pass

    def setServoPulse(self, channel, pulse):
        "Sets the Servo Pulse,The PWM frequency must be 50HZ"
        pulse = int(pulse * 4096 / 20000)  # PWM frequency is 50HZ,the period is 20000us
        self.setPWM(channel, 0, pulse)


    def setMotoPluse(self, channel, pulse):
        if pulse > 3000:
            self.setPWM(channel, 0, 3000)
        else:
            self.setPWM(channel, 0, pulse)

if __name__ == '__main__':

    pwm = PCA9685(0x40, debug=True)
    pwm.setPWMFreq(50)
    print("start the control")
    while True:
        for i in range(500, 2500, 10):
            pwm.setServoPulse(0, i)
            time.sleep(0.02)
        #
        # for i in range(2500, 500, -10):
        #     pwm.setServoPulse(0, i)
        #     time.sleep(0.02)
代码参考:
MPU6050
PCA9685
本文内容由网友自发贡献,版权归原作者所有,本站不承担相应法律责任。如您发现有涉嫌抄袭侵权的内容,请联系:hwhale#tublm.com(使用前将#替换为@)