说明
本文通过NodeHandle::subscribe和Publication::publish()源码作为入口,来分析PubNode、SubNode之间是网络连接是如何建立的,消息是如何发布的,topic队列到底是如何实现的。
源码目录
ros_comm/clients/roscpp: ROS Node和底层的RPC通讯协议实现,都是c++代码。
ros_comm/tools/rosmaster: ROS Master的功能代码,都是python代码。
ros_tutorials/turtlsim:小海龟的PubNode和SubNode。
源码分析
各个组件 init & start
各个组件是如何启动的
int main(int argc, char** argv)
{
  ros::init(argc, argv, "teleop_turtle");
}
开始前先看下ros::init中的主要初始化代码:这里初始化了网络工具、master服务工具、本Node管理工具、Log工具、参数服务工具
(源码文件:ros_comm/clients/roscpp/src/libros/init.cpp)
void ros::init(const M_string& remappings, const std::string& name, uint32_t options) {
network::init(remappings);
master::init(remappings);
this_node::init(name, remappings, options);
file_log::init(remappings);
param::init(remappings);
}
然后是NodeHanle创建(构造函数),并调用ros::start(),从而启动各个组件
(源码文件:ros_comm/clients/roscpp/src/libros/node_handle.cpp)
NodeHandle::NodeHandle(const NodeHandle& parent, const std::string& ns, const M_string& remappings)
: collection_(0)
{
  namespace_ = parent.getNamespace();
  construct(ns, false);
}
void NodeHandle::construct(const std::string& ns, bool validate_name) {
   ros::start();
}

void start() {
  param::param("/tcp_keepalive", TransportTCP::s_use_keepalive_, TransportTCP::s_use_keepalive_);
  PollManager::instance()->addPollThreadListener(checkForShutdown);
  XMLRPCManager::instance()->bind("shutdown", shutdownCallback);
  TopicManager::instance()->start();
  ServiceManager::instance()->start();
  ConnectionManager::instance()->start();
  PollManager::instance()->start();
  XMLRPCManager::instance()->start();
}
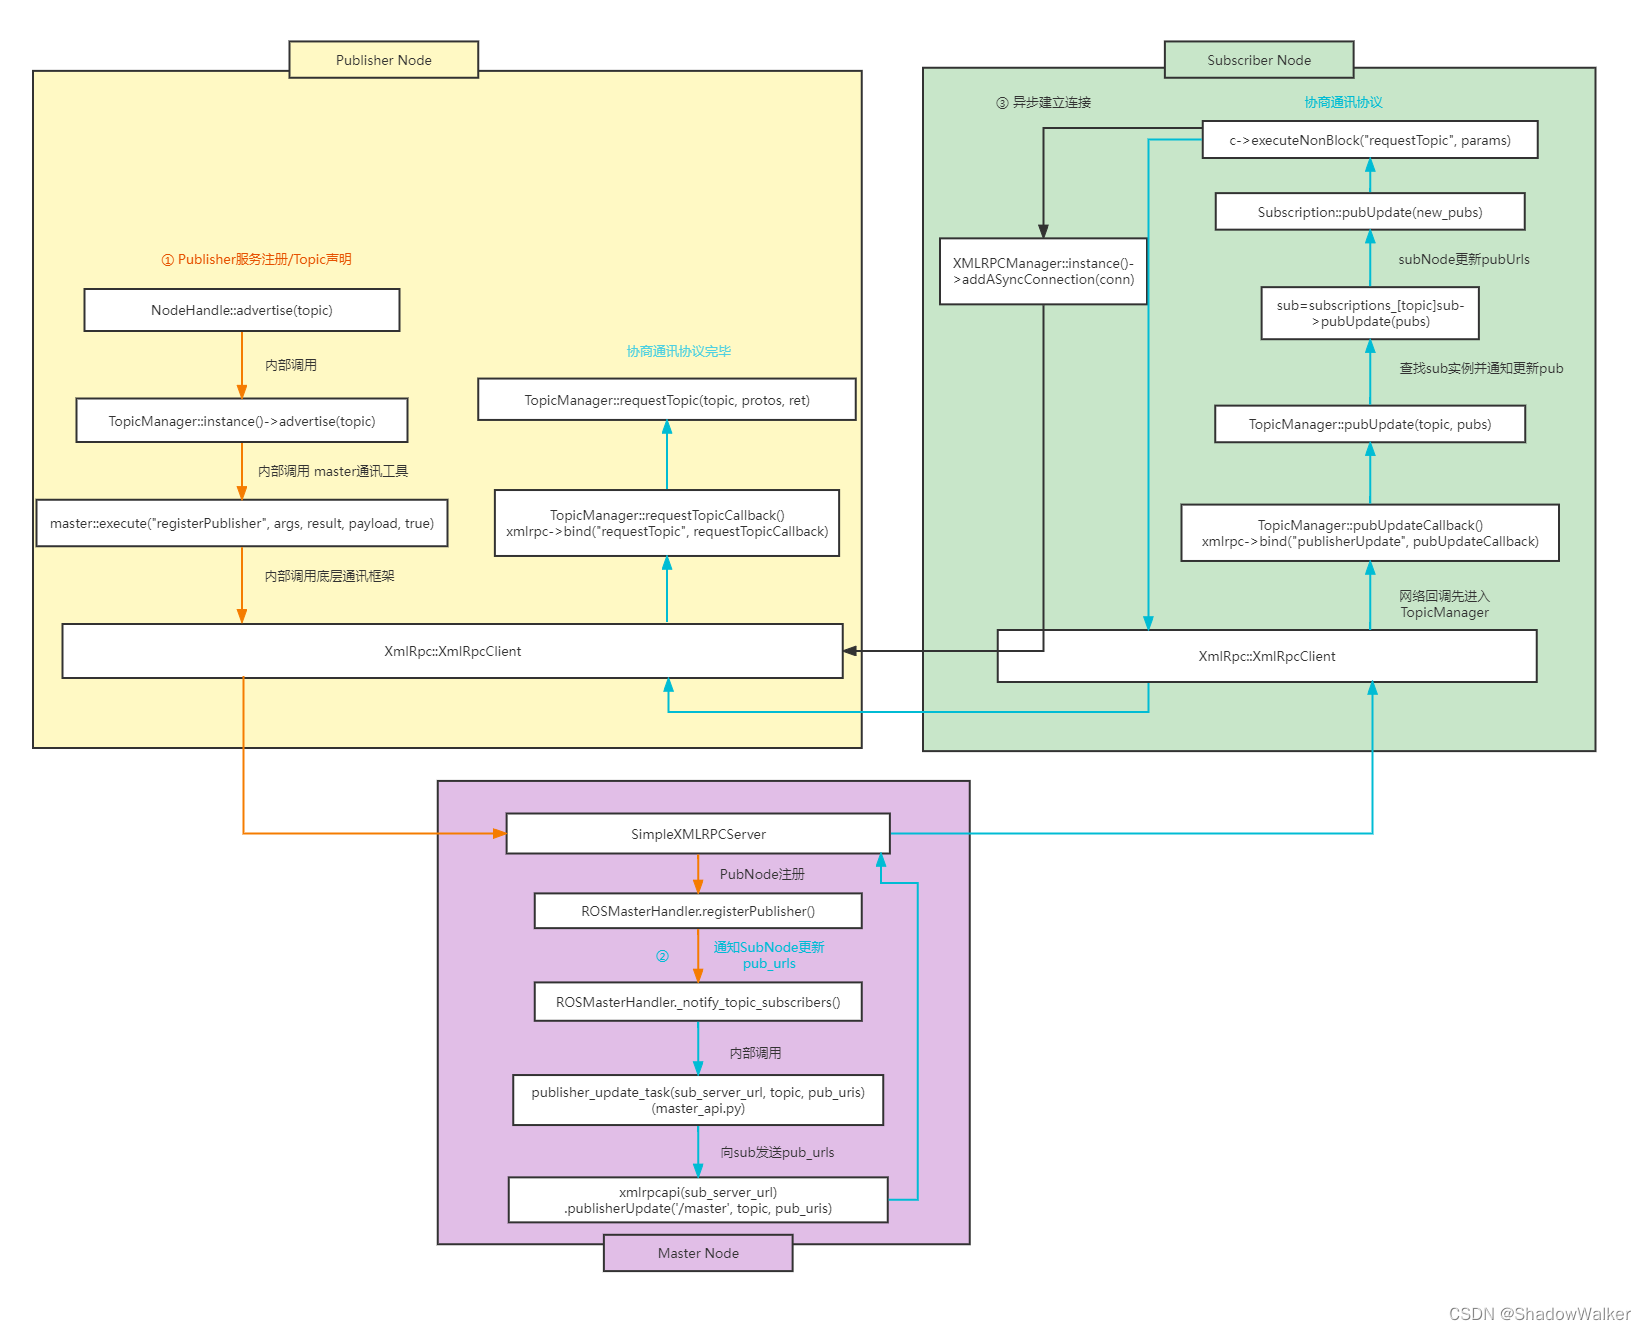
XMLRPCManager 是ROS中RPC通讯的基础工具,下面看一下主要的功能:这里注册了几个主要的XMLHTTP方法(如publisherUpdate)的处理函数(如pubUpdateCallback), XMLHTTP请求本Node的request会先进入这些设定的callback方法,这些callback进过初步解析参数然后调用本Node具体的实现方法。
(源码文件:ros_comm/clients/roscpp/src/libros/topic_manager.cpp)
void TopicManager::start()
{
  boost::mutex::scoped_lock shutdown_lock(shutting_down_mutex_);
  shutting_down_ = false;

  poll_manager_ = PollManager::instance();
  connection_manager_ = ConnectionManager::instance();
  xmlrpc_manager_ = XMLRPCManager::instance();

  xmlrpc_manager_->bind("publisherUpdate", boost::bind(&TopicManager::pubUpdateCallback, this, boost::placeholders::_1, boost::placeholders::_2));
  xmlrpc_manager_->bind("requestTopic", boost::bind(&TopicManager::requestTopicCallback, this, boost::placeholders::_1, boost::placeholders::_2));
  xmlrpc_manager_->bind("getBusStats", boost::bind(&TopicManager::getBusStatsCallback, this, boost::placeholders::_1, boost::placeholders::_2));
  xmlrpc_manager_->bind("getBusInfo", boost::bind(&TopicManager::getBusInfoCallback, this, boost::placeholders::_1, boost::placeholders::_2));
  xmlrpc_manager_->bind("getSubscriptions", boost::bind(&TopicManager::getSubscriptionsCallback, this, boost::placeholders::_1, boost::placeholders::_2));
  xmlrpc_manager_->bind("getPublications", boost::bind(&TopicManager::getPublicationsCallback, this, boost::placeholders::_1, boost::placeholders::_2));

  poll_manager_->addPollThreadListener(boost::bind(&TopicManager::processPublishQueues, this));
}
Subscriber注册过程分析(消息订阅)
假设:publisher先启动,然后再启动 subscriber
subscriber启动后,向Master注册自己,并订阅topic
velocity_sub_ = nh_.subscribe("cmd_vel", 1, &Turtle::velocityCallback, this);
然后进入Master的registerSubscriber方法,注册完成后Master返回了Publisher的服务地址(pub_uris )
def registerSubscriber(self, caller_id, topic, topic_type, caller_api):
@apivalidate([], ( is_topic('topic'), valid_type_name('topic_type'), is_api('caller_api')))
def registerSubscriber(self, caller_id, topic, topic_type, caller_api):
try:
self.ps_lock.acquire()
self.reg_manager.register_subscriber(topic, caller_id, caller_api)
if not topic in self.topics_types and topic_type != rosgraph.names.ANYTYPE:
self.topics_types[topic] = topic_type
mloginfo("+SUB [%s] %s %s",topic, caller_id, caller_api)
pub_uris = self.publishers.get_apis(topic)
finally:
self.ps_lock.release()
return 1, "Subscribed to [%s]"%topic, pub_uris
拿到pub_urils后进入Subscription.pubUpdate开始更新publisher的服务地址(与下图中的Subscriber Node中的pubUpdate 完全一致)
(源码文件:ros_comm/clients/roscpp/src/libros/topic_manager.cpp)
bool TopicManager::subscribe(const SubscribeOptions& ops){
SubscriptionPtr s(boost::make_shared<Subscription>(ops.topic, md5sum, datatype, ops.transport_hints));
s->addCallback(ops.helper, ops.md5sum, ops.callback_queue, ops.queue_size, ops.tracked_object, ops.allow_concurrent_callbacks);
registerSubscriber(s, ops.datatype)
}
bool TopicManager::registerSubscriber(const SubscriptionPtr& s, const string &datatype) {
XmlRpcValue args, result, payload;
args[0] = this_node::getName();
args[1] = s->getName();
args[2] = datatype;
args[3] = xmlrpc_manager_->getServerURI();
master::execute("registerSubscriber", args, result, payload, true);
vector<string> pub_uris;
for (int i = 0; i < payload.size(); i++)
{
if (payload[i] != xmlrpc_manager_->getServerURI())
{
pub_uris.push_back(string(payload[i]));
}
}
s->pubUpdate(pub_uris);
}
下面看一下SubNode如何更新pubUrls
(源码文件:ros_comm/clients/roscpp/src/libros/subscription.cpp)
bool Subscription::pubUpdate(const V_string& new_pubs) {
ROSCPP_LOG_DEBUG("Publisher update for [%s]: %s", name_.c_str(), ss.str().c_str());
subtractions.push_back(*spc);
additions.push_back(*up_i);
for (V_string::iterator i = additions.begin();
i != additions.end(); ++i)
{
retval &= negotiateConnection(*i);
}
}
bool Subscription::negotiateConnection(const std::string& xmlrpc_uri){
c->executeNonBlock("requestTopic", params)
PendingConnectionPtr conn(boost::make_shared<PendingConnection>(c, udp_transport, shared_from_this(), xmlrpc_uri));
XMLRPCManager::instance()->addASyncConnection(conn);
{
boost::mutex::scoped_lock pending_connections_lock(pending_connections_mutex_);
pending_connections_.insert(conn);
}
}
最后Subscriber就主动建立了与Publisher的连接。
Publisher注册过程分析(Topic声明/发布)
假设:subscriber先启动,然后再启动 publisher
初始化完成后,然后Publisher向master发布topic信息(即注册自己的id&topic&serverUrl信息)
ros::NodeHandle nh_;
twist_pub_ = nh_.advertise<geometry_msgs::Twist>("turtle1/cmd_vel", 1);
然后进入Master的registerPublisher方法,在注册过程中Master会通知(_notify_topic_subscribers)已订阅该topic的Subscriber(这里假设Subscriber先启动)Publisher的服务地址(pub_uris )。
如何进入的Master方法在《【ROS】源码分析-服务发现原理》中有讲解:master::execute("registerPublisher"
(源码文件:ros_comm/tools/rosmaster/src/rosmaster/master_api.py)
@apivalidate([], ( is_topic('topic'), valid_type_name('topic_type'), is_api('caller_api')))
def registerPublisher(self, caller_id, topic, topic_type, caller_api):
try:
self.ps_lock.acquire()
self.reg_manager.register_publisher(topic, caller_id, caller_api)
if topic_type != rosgraph.names.ANYTYPE or not topic in self.topics_types:
self.topics_types[topic] = topic_type
pub_uris = self.publishers.get_apis(topic)
sub_uris = self.subscribers.get_apis(topic)
self._notify_topic_subscribers(topic, pub_uris, sub_uris)
mloginfo("+PUB [%s] %s %s",topic, caller_id, caller_api)
sub_uris = self.subscribers.get_apis(topic)
finally:
self.ps_lock.release()
return 1, "Registered [%s] as publisher of [%s]"%(caller_id, topic), sub_uris
Subscriber得知pub_urls后会主动尝试与Publisher建立连接(与Subscriber注册过程中的pubUpdate完全一致),整个过程如下图所示:
Publisher发布消息过程分析
Subscriber从pubUpdate中开始一步建立与Publisher的网络连接通道(conn),主要过程如下图:
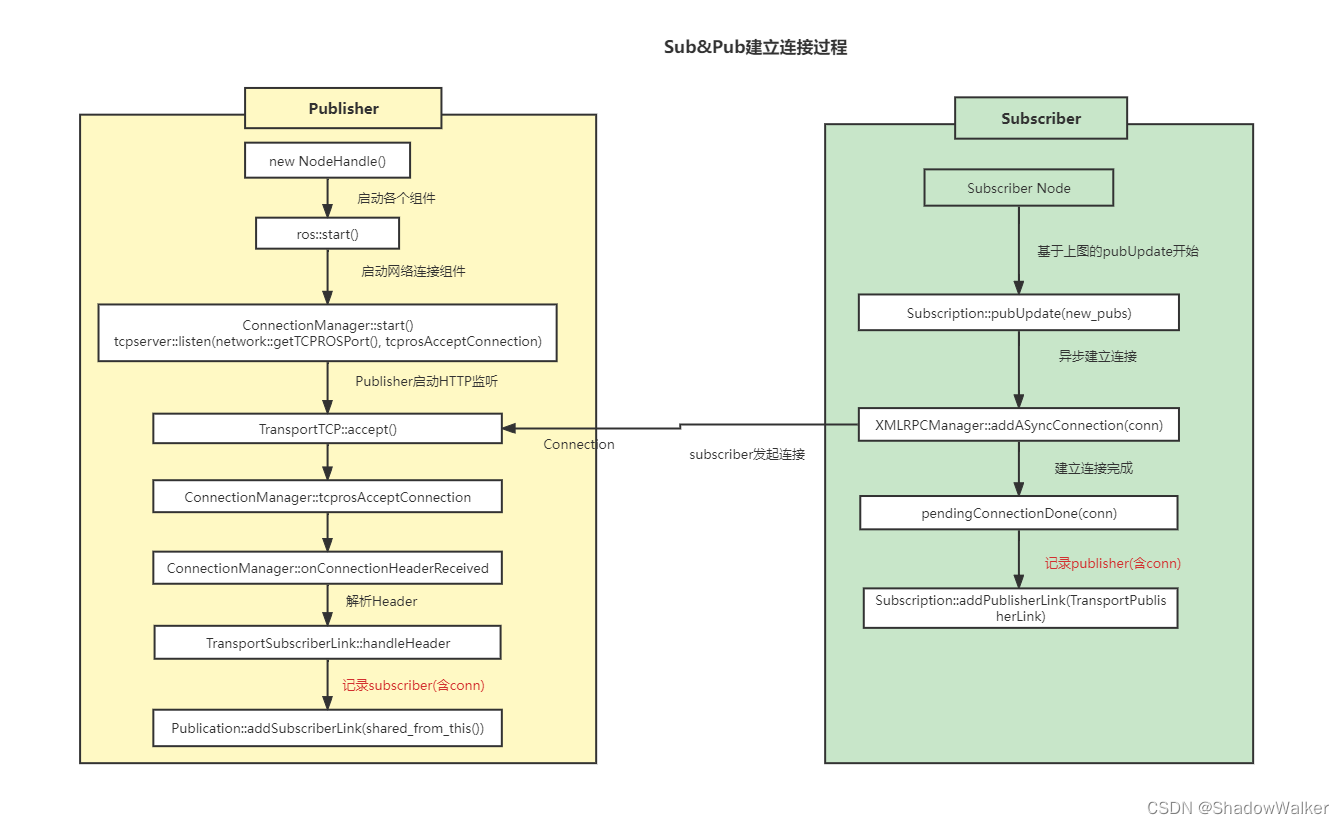
网络连接建立玩后,就是开始发布消息了
geometry_msgs::Twist twist;
twist.angular.z = a_scale_*angular_;
twist.linear.x = l_scale_*linear_;
twist_pub_.publish(twist);
- Publisher先发布消息到本地队列,然后poll_manager会轮训经本地队列中的消息发给Subscriber。
- Subscriber接收到消息后放到Callback本地队列,AsyncSpinner会轮训调度读取本地队列中的数据,并根据消息的type匹配出callback_func,然后进行回调。
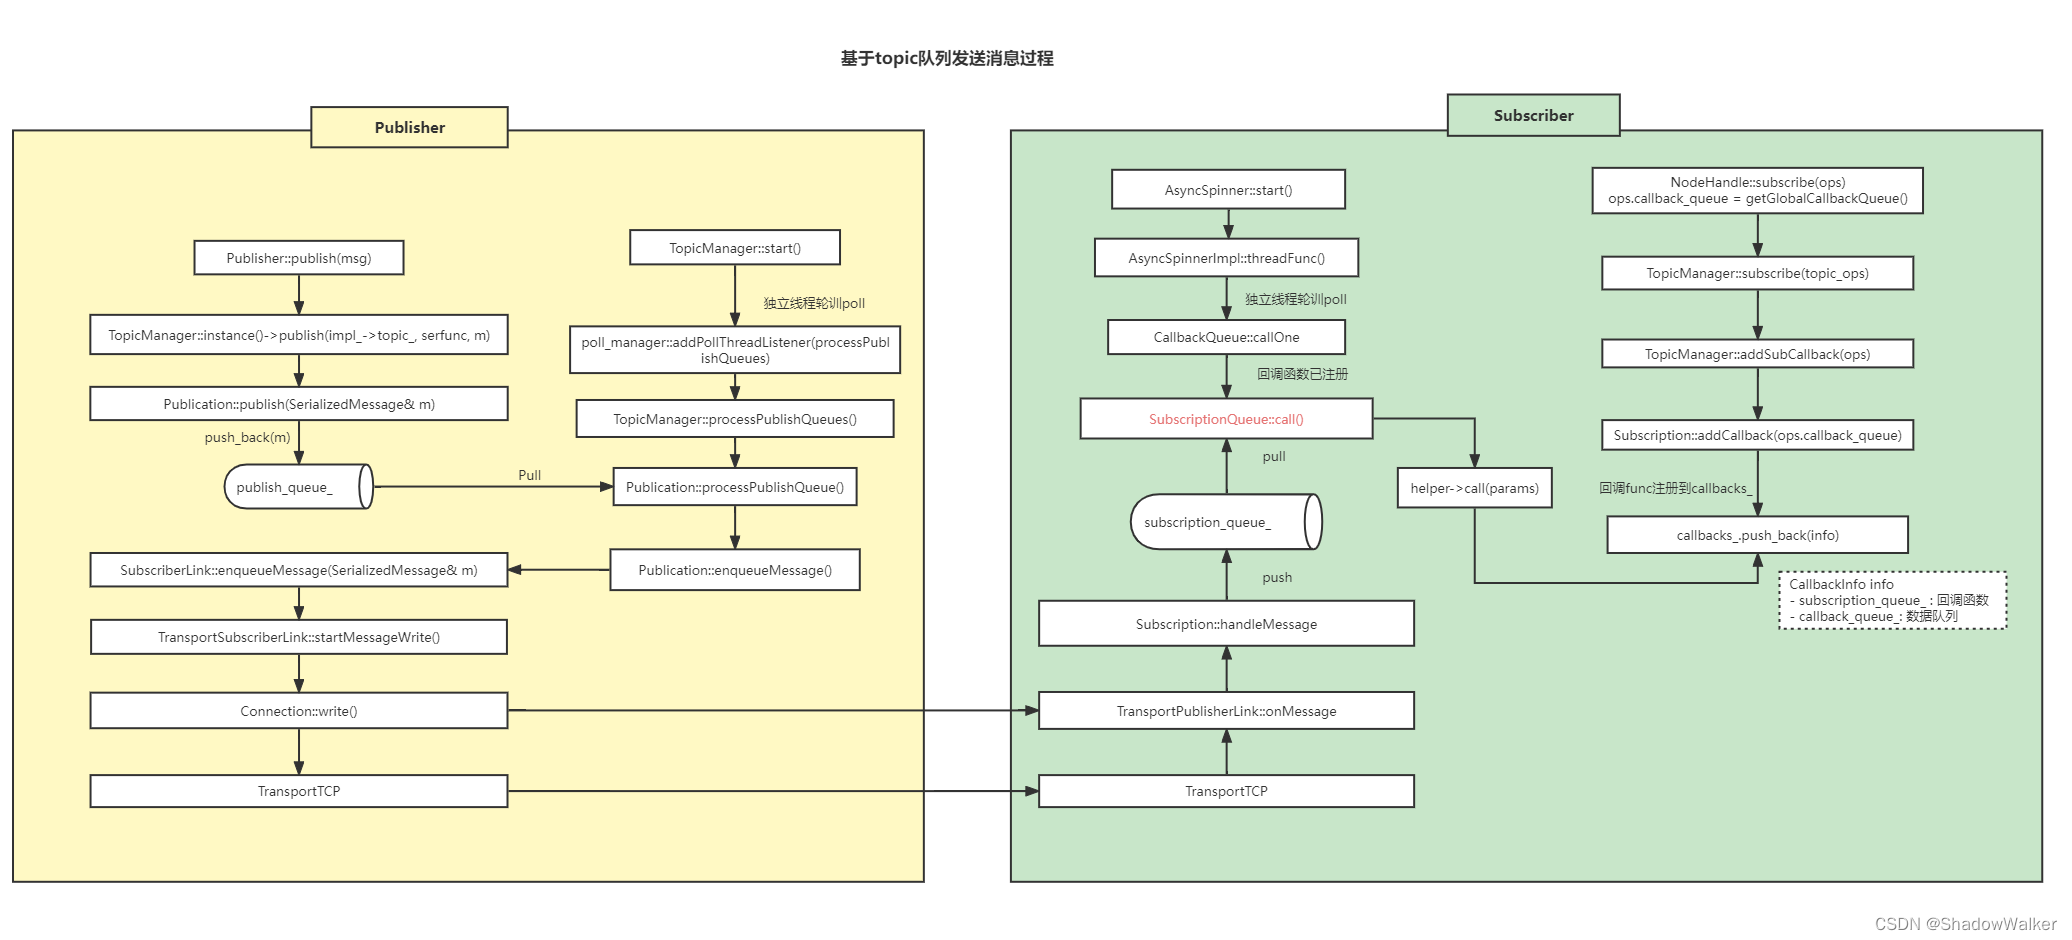
Topic消息队列实现是怎样的
在基于topic队列发送消息过程中的本地队列默认实现是
init.cpp
void ros::init(const M_string& remappings, const std::string& name, uint32_t options){
    g_global_queue.reset(new CallbackQueue);
}

CallbackQueue* getGlobalCallbackQueue()
{
  return g_global_queue.get();
}
callback_queue.h
class ROSCPP_DECL CallbackQueue : public CallbackQueueInterface
{
    struct CallbackInfo
   {
    CallbackInfo()
	    : removal_id(0)
	    , marked_for_removal(false)
	    {}
	    CallbackInterfacePtr callback;
	    uint64_t removal_id;
	    bool marked_for_removal;
	};

    typedef std::deque<CallbackInfo> D_CallbackInfo;
    D_CallbackInfo callbacks_;
}
publication.h
class ROSCPP_DECL Publication
{
  typedef std::vector<SerializedMessage> V_SerializedMessage;
  V_SerializedMessage publish_queue_;
}
所以Publisher/Subscriber本地队列是内存队列/列表(std::deque和std::vector)。
本文内容由网友自发贡献,版权归原作者所有,本站不承担相应法律责任。如您发现有涉嫌抄袭侵权的内容,请联系:hwhale#tublm.com(使用前将#替换为@)