参考:
1.《TensorFlow技术解析与实战》
2. http://blog.csdn.net/sparta_117/article/details/66965760
3. http://blog.csdn.net/HelloZEX/article/details/78537213
4. http://blog.csdn.net/gaohuazhao/article/details/72886450
5.http://blog.csdn.net/skeeee/article/details/16844937
###################################################
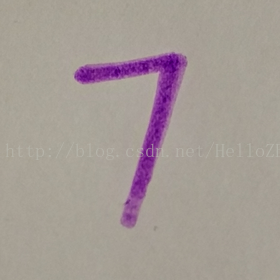
学习TF已经有一段时间了 ,《TensorFlow技术解析与实战》介绍的TF也还算详尽,参考众多大牛博客后,就跟着实现一遍识别自己手写数字的识别程序好了。学习过程就是在模仿中提高的嘛。手写原图:
内容如下:
- Tensorflow和MNIST简介
- CNN算法
- 训练程序
- 写数字,并用Opencv进行预处理
- 将图片输入网络进行识别
################################################
Tensorflow和MNIST简介:
TensorFlow™ 是一个采用数据流图,用于数值计算的开源软件库。它是一个不严格的“神经网络”库,可以利用它提供的模块搭建大多数类型的神经网络。它可以基于CPU或GPU运行,可以自动使用GPU,无需编写分配程序。主要支持Python编写,但是官方说也有C++使用界面。MNIST是一个巨大的手写数字数据集,被广泛应用于机器学习识别领域。MNIST有60000张训练集数据和10000张测试集数据,每一个训练元素都是28*28像素的手写数字图片。作为一个常见的数据集,MNIST经常被用来测试神经网络,也是比较基本的应用。
CNN卷积神经网络:
识别算法主要使用的是卷积神经网络算法(CNN)。
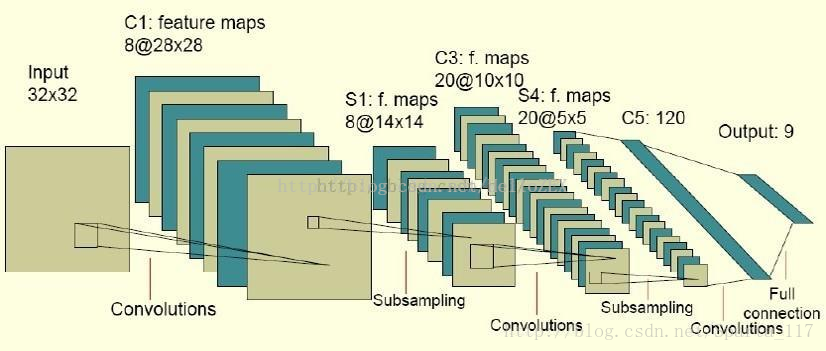
主要结构为:输入-卷积层-池化层-卷积层-池化层-全连接层-输出。
卷积
卷积其实可以看做是提取特征的过程。如果不使用卷积的话,整个网络的输入量就是整张图片,处理就很困难。
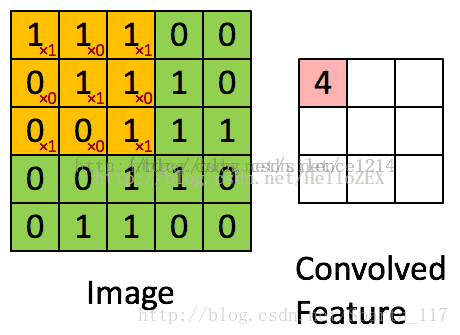
假设图中绿色5*5矩阵为原图片,黄色的3*3矩阵就是我们的过滤器,即卷积核。将黄色矩阵和绿色矩阵被覆盖的部分进行卷积计算,即每个元素相乘求和,便可得到这一部分的特征值,即图中的卷积特征。
然后,向右滑动黄色的矩阵,便可继续求下一部分的卷积特征值。而滑动的距离就是步长。
池化
池化是用来把卷积结果进行压缩,进一步减少全连接时的连接数。
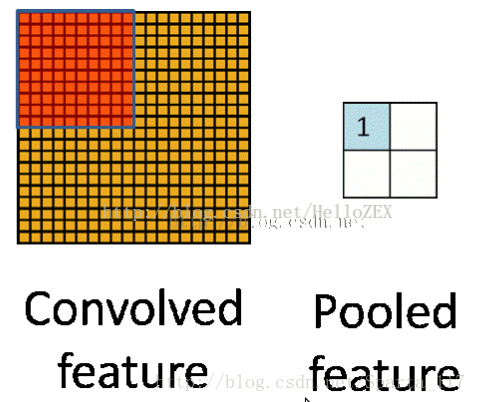
池化有两种:
一种是最大池化,在选中区域中找最大的值作为抽样后的值;
一种是平均值池化,把选中的区域中的平均值作为抽样后的值。
#############################################################
一、训练程序:
这里我就先把程序贴出来,主体和tensorflow教程上大致相同。值得注意的是其中的saver部分,将训练的权重和偏置保存下来,在评价程序中可以再次使用。
# -*- coding:utf-8 -*-
# ==============================================================================
# 20171115
# HelloZEX
# 卷积神经网络 实现手写数字识别
# 生成并保存模型
# ==============================================================================

from tensorflow.examples.tutorials.mnist import input_data
mnist = input_data.read_data_sets("MNIST_Labels_Images", one_hot=True)


import tensorflow as tf

sess = tf.InteractiveSession()


x = tf.placeholder(tf.float32, shape=[None, 784])
y_ = tf.placeholder(tf.float32, shape=[None, 10])
W = tf.Variable(tf.zeros([784,10]))
b = tf.Variable(tf.zeros([10]))


sess.run(tf.global_variables_initializer())

y = tf.matmul(x,W) + b

cross_entropy = tf.reduce_mean(
    tf.nn.softmax_cross_entropy_with_logits(labels=y_, logits=y))

train_step = tf.train.GradientDescentOptimizer(0.5).minimize(cross_entropy)

for _ in range(1000):
  batch = mnist.train.next_batch(100)
  train_step.run(feed_dict={x: batch[0], y_: batch[1]})
correct_prediction = tf.equal(tf.argmax(y,1), tf.argmax(y_,1))

accuracy = tf.reduce_mean(tf.cast(correct_prediction, tf.float32))

print(accuracy.eval(feed_dict={x: mnist.test.images, y_: mnist.test.labels}))

def weight_variable(shape):
  initial = tf.truncated_normal(shape, stddev=0.1)
  return tf.Variable(initial)

def bias_variable(shape):
  initial = tf.constant(0.1, shape=shape)
  return tf.Variable(initial)

def conv2d(x, W):
  return tf.nn.conv2d(x, W, strides=[1, 1, 1, 1], padding='SAME')

def max_pool_2x2(x):
  return tf.nn.max_pool(x, ksize=[1, 2, 2, 1],
                        strides=[1, 2, 2, 1], padding='SAME')

W_conv1 = weight_variable([5, 5, 1, 32])
b_conv1 = bias_variable([32])
x_image = tf.reshape(x, [-1,28,28,1])
h_conv1 = tf.nn.relu(conv2d(x_image, W_conv1) + b_conv1)
h_pool1 = max_pool_2x2(h_conv1)

W_conv2 = weight_variable([5, 5, 32, 64])
b_conv2 = bias_variable([64])
h_conv2 = tf.nn.relu(conv2d(h_pool1, W_conv2) + b_conv2)
h_pool2 = max_pool_2x2(h_conv2)

W_fc1 = weight_variable([7 * 7 * 64, 1024])
b_fc1 = bias_variable([1024])

h_pool2_flat = tf.reshape(h_pool2, [-1, 7*7*64])
h_fc1 = tf.nn.relu(tf.matmul(h_pool2_flat, W_fc1) + b_fc1)
keep_prob = tf.placeholder(tf.float32)
h_fc1_drop = tf.nn.dropout(h_fc1, keep_prob)
W_fc2 = weight_variable([1024, 10])
b_fc2 = bias_variable([10])

y_conv = tf.matmul(h_fc1_drop, W_fc2) + b_fc2
cross_entropy = tf.reduce_mean(
    tf.nn.softmax_cross_entropy_with_logits(labels=y_, logits=y_conv))
train_step = tf.train.AdamOptimizer(1e-4).minimize(cross_entropy)
correct_prediction = tf.equal(tf.argmax(y_conv,1), tf.argmax(y_,1))
accuracy = tf.reduce_mean(tf.cast(correct_prediction, tf.float32))

saver = tf.train.Saver()  # defaults to saving all variables

sess.run(tf.global_variables_initializer())
for i in range(20000):
  batch = mnist.train.next_batch(50)
  if i%100 == 0:
    train_accuracy = accuracy.eval(feed_dict={
        x:batch[0], y_: batch[1], keep_prob: 1.0})
    print("step %d, training accuracy %g"%(i, train_accuracy))

  train_step.run(feed_dict={x: batch[0], y_: batch[1], keep_prob: 0.5})
# 保存模型参数,注意把这里改为自己的路径
saver.save(sess, 'CKPT/model.ckpt')

print("test accuracy %g"%accuracy.eval(feed_dict={
    x: mnist.test.images, y_: mnist.test.labels, keep_prob: 1.0}))

print("Finish!")
注意模型存储位置!
##############################################
输出结果:
/usr/bin/python2.7 /home/zhengxinxin/Desktop/PyCharm/Spark/SparkMNIST/SparkMNIST_TF1.py
Extracting MNIST_Labels_Images/train-images-idx3-ubyte.gz
Extracting MNIST_Labels_Images/train-labels-idx1-ubyte.gz
Extracting MNIST_Labels_Images/t10k-images-idx3-ubyte.gz
Extracting MNIST_Labels_Images/t10k-labels-idx1-ubyte.gz
2017-11-15 16:28:43.205071: W tensorflow/core/platform/cpu_feature_guard.cc:45] The TensorFlow library wasn't compiled to use SSE4.1 instructions, but these are available on your machine and could speed up CPU computations.
2017-11-15 16:28:43.205098: W tensorflow/core/platform/cpu_feature_guard.cc:45] The TensorFlow library wasn't compiled to use SSE4.2 instructions, but these are available on your machine and could speed up CPU computations.
2017-11-15 16:28:43.205103: W tensorflow/core/platform/cpu_feature_guard.cc:45] The TensorFlow library wasn't compiled to use AVX instructions, but these are available on your machine and could speed up CPU computations.
2017-11-15 16:28:43.205106: W tensorflow/core/platform/cpu_feature_guard.cc:45] The TensorFlow library wasn't compiled to use AVX2 instructions, but these are available on your machine and could speed up CPU computations.
2017-11-15 16:28:43.205109: W tensorflow/core/platform/cpu_feature_guard.cc:45] The TensorFlow library wasn't compiled to use FMA instructions, but these are available on your machine and could speed up CPU computations.
0.9182
step 0, training accuracy 0.14
step 100, training accuracy 0.82
step 200, training accuracy 0.94
step 300, training accuracy 0.92
step 400, training accuracy 0.94
step 500, training accuracy 0.92
step 600, training accuracy 0.96
step 19600, training accuracy 1
step 19700, training accuracy 1
step 19800, training accuracy 1
step 19900, training accuracy 1
terminate called after throwing an instance of 'std::bad_alloc'
  what():  std::bad_alloc

Process finished with exit code 134 (interrupted by signal 6: SIGABRT)
########################################################
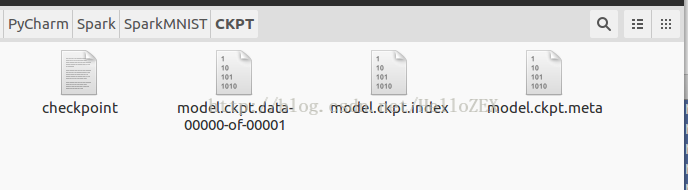
最后在CKPT文件夹中生成以下几个文件:
#########################################################
二、OpenCV处理手写原图:
下面我们就要对它进行预处理,缩小它的大小为28*28像素,并转变为灰度图,进行二值化处理。我使用的是Opencv对图像进行处理,也可以使用MATLAB等进行预处理。
图片预处理程序如下:(程序改编自 参考5,可以使用鼠标拖动选取框,对选取框中的图像进行处理)
#include <opencv2/core/core.hpp>
#include <opencv2/highgui/highgui.hpp>
#include <opencv2/imgproc/imgproc.hpp>
#include <stdio.h>

using namespace cv;
using namespace std;

cv::Mat org, dst, img, tmp;
void on_mouse(int event, int x, int y, int flags, void *ustc)//event鼠标事件代号,x,y鼠标坐标,flags拖拽和键盘操作的代号
{
	static Point pre_pt = cv::Point(-1, -1);//初始坐标
	static Point cur_pt = cv::Point(-1, -1);//实时坐标
	char temp[16];
	if (event == CV_EVENT_LBUTTONDOWN)//左键按下,读取初始坐标,并在图像上该点处划圆
	{
		org.copyTo(img);//将原始图片复制到img中
		sprintf(temp, "(%d,%d)", x, y);
		pre_pt = Point(x, y);
		putText(img, temp, pre_pt, FONT_HERSHEY_SIMPLEX, 0.5, Scalar(0, 0, 0, 255), 1, 8);//在窗口上显示坐标
		circle(img, pre_pt, 2, Scalar(255, 0, 0, 0), CV_FILLED, CV_AA, 0);//划圆
		imshow("img", img);
	}
	else if (event == CV_EVENT_MOUSEMOVE && !(flags & CV_EVENT_FLAG_LBUTTON))//左键没有按下的情况下鼠标移动的处理函数
	{
		img.copyTo(tmp);//将img复制到临时图像tmp上,用于显示实时坐标
		sprintf(temp, "(%d,%d)", x, y);
		cur_pt = Point(x, y);
		putText(tmp, temp, cur_pt, FONT_HERSHEY_SIMPLEX, 0.5, Scalar(0, 0, 0, 255));//只是实时显示鼠标移动的坐标
		imshow("img", tmp);
	}
	else if (event == CV_EVENT_MOUSEMOVE && (flags & CV_EVENT_FLAG_LBUTTON))//左键按下时,鼠标移动,则在图像上划矩形
	{
		img.copyTo(tmp);
		sprintf(temp, "(%d,%d)", x, y);
		cur_pt = Point(x, y);
		putText(tmp, temp, cur_pt, FONT_HERSHEY_SIMPLEX, 0.5, Scalar(0, 0, 0, 255));
		rectangle(tmp, pre_pt, cur_pt, Scalar(0, 255, 0, 0), 1, 8, 0);//在临时图像上实时显示鼠标拖动时形成的矩形
		imshow("img", tmp);
	}
	else if (event == CV_EVENT_LBUTTONUP)//左键松开,将在图像上划矩形
	{
		org.copyTo(img);
		sprintf(temp, "(%d,%d)", x, y);
		cur_pt = Point(x, y);
		putText(img, temp, cur_pt, FONT_HERSHEY_SIMPLEX, 0.5, Scalar(0, 0, 0, 255));
		circle(img, pre_pt, 2, Scalar(255, 0, 0, 0), CV_FILLED, CV_AA, 0);
		rectangle(img, pre_pt, cur_pt, Scalar(0, 255, 0, 0), 1, 8, 0);//根据初始点和结束点,将矩形画到img上
		imshow("img", img);
		img.copyTo(tmp);
		//截取矩形包围的图像,并保存到dst中
		int width = abs(pre_pt.x - cur_pt.x);
		int height = abs(pre_pt.y - cur_pt.y);
		if (width == 0 || height == 0)
		{
			printf("width == 0 || height == 0");
			return;
		}
		dst = org(Rect(min(cur_pt.x, pre_pt.x), min(cur_pt.y, pre_pt.y), width, height));
		cv::resize(dst, dst, Size(28, 28));
		cvtColor(dst, dst, CV_BGR2GRAY);
		threshold(dst, dst, 110, 255, CV_THRESH_BINARY);
		imwrite("T.png", dst);//注意将这里改为自己的处理结果存储地址
		namedWindow("dst");
		imshow("dst", dst);
		waitKey(0);
	}
}
int main()
{
	org = imread("7.jpg");//读取图片地址
	org.copyTo(img);
	org.copyTo(tmp);
	namedWindow("img");//定义一个img窗口
	setMouseCallback("img", on_mouse, 0);//调用回调函数
	imshow("img", img);
	cv::waitKey(0);
}
需要注意根据你手写图片的条件修改二值化阈值。
threshold(dst, dst, 110, 255, CV_THRESH_BINARY);
处理后的结果:

这就是28*28的二值化后的图片,这样的格式和我们MNIST数据集中的图片格式相同。只有这样,我们才能将图片输入到网络中进行识别。
##########################################################
三、将图片输入到网络进行识别:
前向传播的程序,最后softmax层分类的结果就是最后的识别结果啦。
# -*- coding:utf-8 -*-
# ==============================================================================
# 20171115
# HelloZEX
# 卷积神经网络 实现手写数字识别
# 读取模型并运用识别手写数字
# 如没有cv2,可以尝试 sudo pip install opencv-python
# ==============================================================================

from PIL import Image, ImageFilter
import tensorflow as tf
import matplotlib.pyplot as plt
#import cv2

def imageprepare():
    """
    This function returns the pixel values.
    The imput is a png file location.
    """
    file_name='Pictures/7.png'#导入自己的图片地址
    #in terminal 'mogrify -format png *.jpg' convert jpg to png
    im = Image.open(file_name).convert('L')

    im.save("Pictures/sample.png")
    plt.imshow(im)
    plt.show()
    tv = list(im.getdata()) #get pixel values

    #normalize pixels to 0 and 1. 0 is pure white, 1 is pure black.
    tva = [ (255-x)*1.0/255.0 for x in tv]
    #print(tva)
    return tva

    """
    This function returns the predicted integer.
    The imput is the pixel values from the imageprepare() function.
    """

    # Define the model (same as when creating the model file)
result=imageprepare()
x = tf.placeholder(tf.float32, [None, 784])
W = tf.Variable(tf.zeros([784, 10]))
b = tf.Variable(tf.zeros([10]))

def weight_variable(shape):
  initial = tf.truncated_normal(shape, stddev=0.1)
  return tf.Variable(initial)

def bias_variable(shape):
  initial = tf.constant(0.1, shape=shape)
  return tf.Variable(initial)

def conv2d(x, W):
  return tf.nn.conv2d(x, W, strides=[1, 1, 1, 1], padding='SAME')

def max_pool_2x2(x):
  return tf.nn.max_pool(x, ksize=[1, 2, 2, 1], strides=[1, 2, 2, 1], padding='SAME')

W_conv1 = weight_variable([5, 5, 1, 32])
b_conv1 = bias_variable([32])

x_image = tf.reshape(x, [-1,28,28,1])
h_conv1 = tf.nn.relu(conv2d(x_image, W_conv1) + b_conv1)
h_pool1 = max_pool_2x2(h_conv1)

W_conv2 = weight_variable([5, 5, 32, 64])
b_conv2 = bias_variable([64])

h_conv2 = tf.nn.relu(conv2d(h_pool1, W_conv2) + b_conv2)
h_pool2 = max_pool_2x2(h_conv2)

W_fc1 = weight_variable([7 * 7 * 64, 1024])
b_fc1 = bias_variable([1024])

h_pool2_flat = tf.reshape(h_pool2, [-1, 7*7*64])
h_fc1 = tf.nn.relu(tf.matmul(h_pool2_flat, W_fc1) + b_fc1)

keep_prob = tf.placeholder(tf.float32)
h_fc1_drop = tf.nn.dropout(h_fc1, keep_prob)

W_fc2 = weight_variable([1024, 10])
b_fc2 = bias_variable([10])

y_conv=tf.nn.softmax(tf.matmul(h_fc1_drop, W_fc2) + b_fc2)

init_op = tf.initialize_all_variables()


"""
Load the model2.ckpt file
file is stored in the same directory as this python script is started
Use the model to predict the integer. Integer is returend as list.

Based on the documentatoin at
https://www.tensorflow.org/versions/master/how_tos/variables/index.html
"""
saver = tf.train.Saver()
with tf.Session() as sess:
    sess.run(init_op)
    saver.restore(sess, "CKPT/model.ckpt")#这里使用了之前保存的模型参数
    #print ("Model restored.")

    prediction=tf.argmax(y_conv,1)
    predint=prediction.eval(feed_dict={x: [result],keep_prob: 1.0}, session=sess)
    print(h_conv2)

    print('recognize result:')
    print(predint[0])
运行中产生一个Figure1,叉掉他就继续运行。
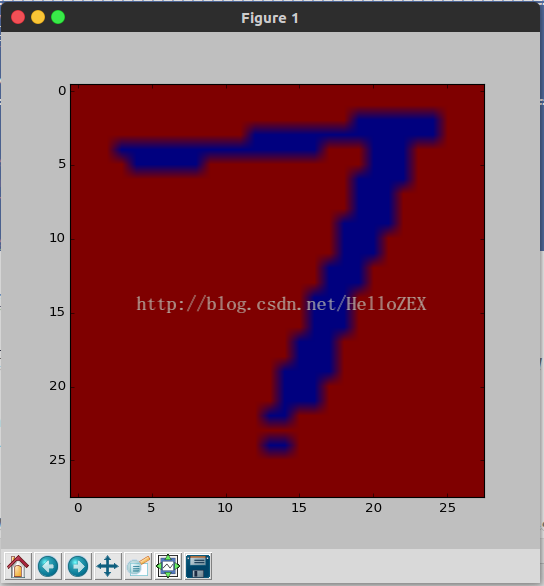
输出结果:
/usr/bin/python2.7 /home/zhengxinxin/Desktop/PyCharm/Spark/SparkMNIST/SparkMNIST_TF2.py
WARNING:tensorflow:From /home/zhengxinxin/Desktop/PyCharm/Spark/SparkMNIST/SparkMNIST_TF2.py:85: initialize_all_variables (from tensorflow.python.ops.variables) is deprecated and will be removed after 2017-03-02.
Instructions for updating:
Use `tf.global_variables_initializer` instead.
2017-11-15 19:09:12.008792: W tensorflow/core/platform/cpu_feature_guard.cc:45] The TensorFlow library wasn't compiled to use SSE4.1 instructions, but these are available on your machine and could speed up CPU computations.
2017-11-15 19:09:12.008817: W tensorflow/core/platform/cpu_feature_guard.cc:45] The TensorFlow library wasn't compiled to use SSE4.2 instructions, but these are available on your machine and could speed up CPU computations.
2017-11-15 19:09:12.008822: W tensorflow/core/platform/cpu_feature_guard.cc:45] The TensorFlow library wasn't compiled to use AVX instructions, but these are available on your machine and could speed up CPU computations.
2017-11-15 19:09:12.008825: W tensorflow/core/platform/cpu_feature_guard.cc:45] The TensorFlow library wasn't compiled to use AVX2 instructions, but these are available on your machine and could speed up CPU computations.
2017-11-15 19:09:12.008829: W tensorflow/core/platform/cpu_feature_guard.cc:45] The TensorFlow library wasn't compiled to use FMA instructions, but these are available on your machine and could speed up CPU computations.
Tensor("Relu_1:0", shape=(?, 14, 14, 64), dtype=float32)
recognize result:
7

Process finished with exit code 0
可以看到正确识别了手写数字。可喜可乐可喜可乐!!!!