1 Arbotix简介
- ArbotiX是一款控制电机、舵机的硬件控制板;
- 提供了相应的ROS功能包;
- 提供了一个差速控制器,通过接收速度控制指令,更新机器人的里程计状态。
一、安装Arbotix
git clone https://github.com/vanadiumlabs/arbotix_ros.git
如果出现fatal:连接GitHub失败的话请使用下方代码。
git clone https://gitclone.com/github.com/vanadiumlabs/arbotix_ros.git
二、配置启动文件
cd ~/catkin_ws/src/mbot_description/launch/xacro
sudo gedit  arbotix_mbot_with_camera_xacro.launch
写入以下代码
<launch>
	<arg name="model" default="$(find xacro)/xacro --inorder '$(find mbot_description)/urdf/xacro/mbot_with_camera.xacro'" />
	<arg name="gui" default="false" />

	<param name="robot_description" command="$(arg model)" />

    <!-- 设置GUI参数,显示关节控制插件 -->
	<param name="use_gui" value="$(arg gui)"/>

	<node name="arbotix" pkg="arbotix_python" type="arbotix_driver" output="screen">
        <rosparam file="$(find mbot_description)/config/fake_mbot_arbotix.yaml" command="load" />
        <param name="sim" value="true"/>
    </node>

    <!-- 运行joint_state_publisher节点,发布机器人的关节状态  -->
	<node name="joint_state_publisher" pkg="joint_state_publisher" type="joint_state_publisher" />

	<!-- 运行robot_state_publisher节点,发布tf  -->
	<node name="robot_state_publisher" pkg="robot_state_publisher" type="robot_state_publisher" />

    <!-- 运行rviz可视化界面 -->
	<node name="rviz" pkg="rviz" type="rviz" args="-d $(find mbot_description)/config/mbot_arbotix.rviz" required="true" />

</launch>
注意如果是Ubuntu20.04及对应noetci的ros版本的用户由于xacro官方同样进行了更新,以上适用于18.04但不适用于20.04用户,20.04用户请使用以下代码
<launch>
	<arg name="model" default="$(find xacro)/xacro '$(find mbot_description)/urdf/xacro/mbot_with_camera.xacro'" />
	<arg name="gui" default="false" />

	<param name="robot_description" command="$(arg model)" />


	<param name="use_gui" value="$(arg gui)"/>

	<node name="arbotix" pkg="arbotix_python" type="arbotix_driver" output="screen">
        <rosparam file="$(find mbot_description)/config/fake_mbot_arbotix.yaml" command="load" />
        <param name="sim" value="true"/>
    </node>


	<node name="joint_state_publisher_gui" pkg="joint_state_publisher_gui" type="joint_state_publisher_gui" />

	<node name="robot_state_publisher" pkg="robot_state_publisher" type="robot_state_publisher" />


	<node name="rviz" pkg="rviz" type="rviz" args="-d $(find mbot_description)/config/mbot_arbotix.rviz" required="true" />

</launch>
三、创建参数配置文件
~/catkin_ws/src/mbot_description/config/下fake_mbot_arbotix.yaml
这是一个参数配置文件,定义了一个controller。包括了控制器类型、控制的车体坐标系、轮子的间距、控制频率、PID以及加速度等参数
cd ~/catkin_ws/src/mbot_description/config
sudo gedit fake_mbot_arbotix.yaml
//写入以下代码
controllers: {
   base_controller: {
       type: diff_controller,
       base_frame_id: base_footprint,
       base_width: 0.26,
       ticks_meter: 4100,
       Kp: 12,
       Kd: 12,
       Ki: 0,
       Ko: 50,
       accel_limit: 1.0
    }
}
之后运行Arbotix
roslaunch mbot_description arbotix_mbot_with_camera_xacro.launch
碰到如下错误
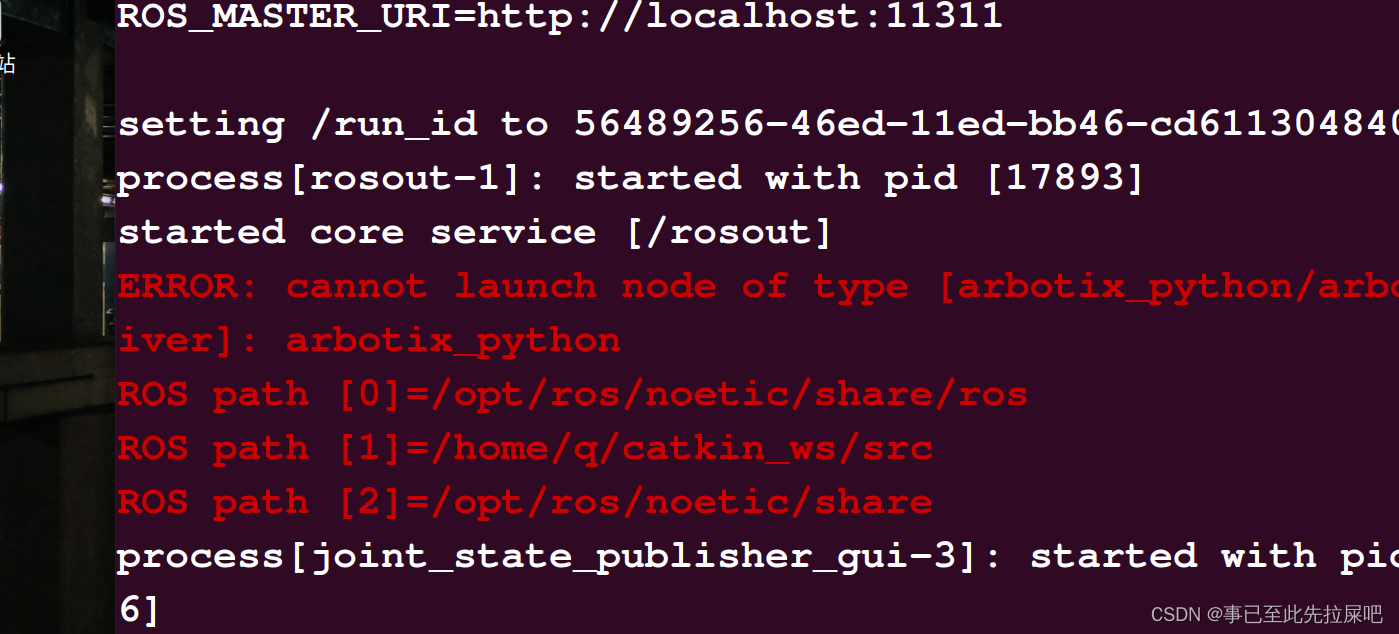
解决方法:
roscd arbotix_python
》》roscd: No such package/stack 'arbotix_python'
sudo apt-get install ros-noetic-arbotix
之后再运行Arbotxi即可
键盘控制
下面配置键盘控制
使用键盘控制机器模型运动其实也就是需要/com_vel节点发布去操控运动
所以我们首先要像创建小乌龟运动实例中一样创建一个键盘控制功能包
首先
cd ~/catkin_ws/src
catkin_create_pkg mbot_teleop std_msgs rospy roscpp
然后进行工作空间的编译
cd ~/catkin_ws
catkin_make
source devel/setup.bash
配置launch启动文件
下面mbot_teleop 功能包的创建请一步步确认操作无误,不然可能出现各种个性化问题
mkdir scripts
mkdir launch
sudo gedit CMakeLists.txt
//写入以下代码
cmake_minimum_required(VERSION 2.8.3)
project(mbot_teleop)

## Find catkin macros and libraries
## if COMPONENTS list like find_package(catkin REQUIRED COMPONENTS xyz)
## is used, also find other catkin packages
find_package(catkin REQUIRED COMPONENTS
  geometry_msgs
  roscpp
  rospy
)

## System dependencies are found with CMake's conventions
# find_package(Boost REQUIRED COMPONENTS system)


## Uncomment this if the package has a setup.py. This macro ensures
## modules and global scripts declared therein get installed
## See http://ros.org/doc/api/catkin/html/user_guide/setup_dot_py.html
# catkin_python_setup()

################################################
## Declare ROS messages, services and actions ##
################################################

## To declare and build messages, services or actions from within this
## package, follow these steps:
## * Let MSG_DEP_SET be the set of packages whose message types you use in
##   your messages/services/actions (e.g. std_msgs, actionlib_msgs, ...).
## * In the file package.xml:
##   * add a build_depend tag for "message_generation"
##   * add a build_depend and a run_depend tag for each package in MSG_DEP_SET
##   * If MSG_DEP_SET isn't empty the following dependency has been pulled in
##     but can be declared for certainty nonetheless:
##     * add a run_depend tag for "message_runtime"
## * In this file (CMakeLists.txt):
##   * add "message_generation" and every package in MSG_DEP_SET to
##     find_package(catkin REQUIRED COMPONENTS ...)
##   * add "message_runtime" and every package in MSG_DEP_SET to
##     catkin_package(CATKIN_DEPENDS ...)
##   * uncomment the add_*_files sections below as needed
##     and list every .msg/.srv/.action file to be processed
##   * uncomment the generate_messages entry below
##   * add every package in MSG_DEP_SET to generate_messages(DEPENDENCIES ...)

## Generate messages in the 'msg' folder
# add_message_files(
#   FILES
#   Message1.msg
#   Message2.msg
# )

## Generate services in the 'srv' folder
# add_service_files(
#   FILES
#   Service1.srv
#   Service2.srv
# )

## Generate actions in the 'action' folder
# add_action_files(
#   FILES
#   Action1.action
#   Action2.action
# )

## Generate added messages and services with any dependencies listed here
# generate_messages(
#   DEPENDENCIES
#   geometry_msgs
# )

################################################
## Declare ROS dynamic reconfigure parameters ##
################################################

## To declare and build dynamic reconfigure parameters within this
## package, follow these steps:
## * In the file package.xml:
##   * add a build_depend and a run_depend tag for "dynamic_reconfigure"
## * In this file (CMakeLists.txt):
##   * add "dynamic_reconfigure" to
##     find_package(catkin REQUIRED COMPONENTS ...)
##   * uncomment the "generate_dynamic_reconfigure_options" section below
##     and list every .cfg file to be processed

## Generate dynamic reconfigure parameters in the 'cfg' folder
# generate_dynamic_reconfigure_options(
#   cfg/DynReconf1.cfg
#   cfg/DynReconf2.cfg
# )

###################################
## catkin specific configuration ##
###################################
## The catkin_package macro generates cmake config files for your package
## Declare things to be passed to dependent projects
## INCLUDE_DIRS: uncomment this if you package contains header files
## LIBRARIES: libraries you create in this project that dependent projects also need
## CATKIN_DEPENDS: catkin_packages dependent projects also need
## DEPENDS: system dependencies of this project that dependent projects also need
catkin_package(
#  INCLUDE_DIRS include
#  LIBRARIES mrobot_teleop
#  CATKIN_DEPENDS geometry_msgs roscpp rospy
#  DEPENDS system_lib
)

###########
## Build ##
###########

## Specify additional locations of header files
## Your package locations should be listed before other locations
# include_directories(include)
include_directories(
  ${catkin_INCLUDE_DIRS}
)

## Declare a C++ library
# add_library(mrobot_teleop
#   src/${PROJECT_NAME}/mrobot_teleop.cpp
# )

## Add cmake target dependencies of the library
## as an example, code may need to be generated before libraries
## either from message generation or dynamic reconfigure
# add_dependencies(mrobot_teleop ${${PROJECT_NAME}_EXPORTED_TARGETS} ${catkin_EXPORTED_TARGETS})

## Declare a C++ executable
# add_executable(mrobot_teleop_node src/mrobot_teleop_node.cpp)

## Add cmake target dependencies of the executable
## same as for the library above
# add_dependencies(mrobot_teleop_node ${${PROJECT_NAME}_EXPORTED_TARGETS} ${catkin_EXPORTED_TARGETS})

## Specify libraries to link a library or executable target against
# target_link_libraries(mrobot_teleop_node
#   ${catkin_LIBRARIES}
# )

#############
## Install ##
#############

# all install targets should use catkin DESTINATION variables
# See http://ros.org/doc/api/catkin/html/adv_user_guide/variables.html

## Mark executable scripts (Python etc.) for installation
## in contrast to setup.py, you can choose the destination
# install(PROGRAMS
#   scripts/my_python_script
#   DESTINATION ${CATKIN_PACKAGE_BIN_DESTINATION}
# )

## Mark executables and/or libraries for installation
# install(TARGETS mrobot_teleop mrobot_teleop_node
#   ARCHIVE DESTINATION ${CATKIN_PACKAGE_LIB_DESTINATION}
#   LIBRARY DESTINATION ${CATKIN_PACKAGE_LIB_DESTINATION}
#   RUNTIME DESTINATION ${CATKIN_PACKAGE_BIN_DESTINATION}
# )

## Mark cpp header files for installation
# install(DIRECTORY include/${PROJECT_NAME}/
#   DESTINATION ${CATKIN_PACKAGE_INCLUDE_DESTINATION}
#   FILES_MATCHING PATTERN "*.h"
#   PATTERN ".svn" EXCLUDE
# )

## Mark other files for installation (e.g. launch and bag files, etc.)
# install(FILES
#   # myfile1
#   # myfile2
#   DESTINATION ${CATKIN_PACKAGE_SHARE_DESTINATION}
# )

#############
## Testing ##
#############

## Add gtest based cpp test target and link libraries
# catkin_add_gtest(${PROJECT_NAME}-test test/test_mrobot_teleop.cpp)
# if(TARGET ${PROJECT_NAME}-test)
#   target_link_libraries(${PROJECT_NAME}-test ${PROJECT_NAME})
# endif()

## Add folders to be run by python nosetests
# catkin_add_nosetests(test)
再创建package依赖包
sudo gedit package.xml
//写入以下内容
<?xml version="1.0"?>
<package>
  <name>mbot_teleop</name>
  <version>0.0.0</version>
  <description>The mbot_teleop package</description>

  <!-- One maintainer tag required, multiple allowed, one person per tag -->
  <!-- Example:  -->
  <!-- <maintainer email="jane.doe@example.com">Jane Doe</maintainer> -->
  <maintainer email="hcx@todo.todo">hcx</maintainer>


  <!-- One license tag required, multiple allowed, one license per tag -->
  <!-- Commonly used license strings: -->
  <!--   BSD, MIT, Boost Software License, GPLv2, GPLv3, LGPLv2.1, LGPLv3 -->
  <license>TODO</license>


  <!-- Url tags are optional, but mutiple are allowed, one per tag -->
  <!-- Optional attribute type can be: website, bugtracker, or repository -->
  <!-- Example: -->
  <!-- <url type="website">http://wiki.ros.org/mrobot_teleop</url> -->


  <!-- Author tags are optional, mutiple are allowed, one per tag -->
  <!-- Authors do not have to be maintianers, but could be -->
  <!-- Example: -->
  <!-- <author email="jane.doe@example.com">Jane Doe</author> -->


  <!-- The *_depend tags are used to specify dependencies -->
  <!-- Dependencies can be catkin packages or system dependencies -->
  <!-- Examples: -->
  <!-- Use build_depend for packages you need at compile time: -->
  <!--   <build_depend>message_generation</build_depend> -->
  <!-- Use buildtool_depend for build tool packages: -->
  <!--   <buildtool_depend>catkin</buildtool_depend> -->
  <!-- Use run_depend for packages you need at runtime: -->
  <!--   <run_depend>message_runtime</run_depend> -->
  <!-- Use test_depend for packages you need only for testing: -->
  <!--   <test_depend>gtest</test_depend> -->
  <buildtool_depend>catkin</buildtool_depend>
  <build_depend>geometry_msgs</build_depend>
  <build_depend>roscpp</build_depend>
  <build_depend>rospy</build_depend>
  <run_depend>geometry_msgs</run_depend>
  <run_depend>roscpp</run_depend>
  <run_depend>rospy</run_depend>


  <!-- The export tag contains other, unspecified, tags -->
  <export>
    <!-- Other tools can request additional information be placed here -->

  </export>
</package>
进入launch文件下
编写mbot_teleop.launch 启动文件
gedit mbot_teleop.launch
//写入以下内容
<launch>
  <node name="mbot_teleop" pkg="mbot_teleop" type="mbot_teleop.py" output="screen">
    <param name="scale_linear" value="0.1" type="double"/>
    <param name="scale_angular" value="0.4" type="double"/>
  </node>
</launch>
编写logitech.launch文件
<!--
  Driver for the logitech rumblepad2 joystick.

  Use the D pad while pressing and holding the left trigger button (5) to control.
-->
<launch>
  <!--  smooths inputs from cmd_vel_mux/input/teleop_raw to cmd_vel_mux/input/teleop -->
  <include file="$(find turtlebot_teleop)/launch/includes/velocity_smoother.launch.xml"/>

  <node pkg="turtlebot_teleop" type="turtlebot_teleop_joy" name="turtlebot_teleop_joystick">
    <param name="scale_angular" value="1.5"/>
    <param name="scale_linear" value="0.5"/>
    <remap from="turtlebot_teleop_joystick/cmd_vel" to="/cmd_vel"/>
  </node>

  <node pkg="joy" type="joy_node" name="joystick"/>

</launch>
之后进入scripts文件下
编写mbot_teleop.py文件
//以下是ros版本为kinetic 的代码

#!/usr/bin/env python
# -*- coding: utf-8 -*-
import rospy
from geometry_msgs.msg import Twist
import sys, select, termios, tty

msg = """
控制 zzx_run_robot!
---------------------------
控制:

   u    i    o

   j    k    l

   m    ,    .

q/z :           增加/降低最大速度 by 10%
w/x :           仅增加/降低 线速度 by 10%
e/c :           仅增加/降低 角速度 by 10%
空格,k :         立即停止
anything else : 缓慢停止

CTRL-C to 退出
"""

moveBindings = {
        'i':(1,0),
        'o':(1,-1),
        'j':(0,1),
        'l':(0,-1),
        'u':(1,1),
        ',':(-1,0),
        '.':(-1,1),
        'm':(-1,-1),
           }

speedBindings={
        'q':(1.1,1.1),
        'z':(.9,.9),
        'w':(1.1,1),
        'x':(.9,1),
        'e':(1,1.1),
        'c':(1,.9),
          }

def getKey():
    tty.setraw(sys.stdin.fileno())
    rlist, _, _ = select.select([sys.stdin], [], [], 0.1)
    if rlist:
        key = sys.stdin.read(1)
    else:
        key = ''

    termios.tcsetattr(sys.stdin, termios.TCSADRAIN, settings)
    return key

speed = 1
turn = 1

def vels(speed,turn):
    return "currently:\tspeed %s\tturn %s " % (speed,turn)

if __name__=="__main__":
    settings = termios.tcgetattr(sys.stdin)

    rospy.init_node('mrobot_teleop')
    pub = rospy.Publisher('/cmd_vel', Twist, queue_size=5)

    x = 0
    th = 0
    status = 0
    count = 0
    acc = 0.1
    target_speed = 0
    target_turn = 0
    control_speed = 0
    control_turn = 0
    try:
        print msg
        print vels(speed,turn)
        while(1):
            key = getKey()
            # 运动控制方向键(1:正方向,-1负方向)
            if key in moveBindings.keys():
                x = moveBindings[key][0]
                th = moveBindings[key][1]
                count = 0
            # 速度修改键
            elif key in speedBindings.keys():
                speed = speed * speedBindings[key][0]  # 线速度增加0.1倍
                turn = turn * speedBindings[key][1]    # 角速度增加0.1倍
                count = 0

                print vels(speed,turn)
                if (status == 14):
                    print msg
                status = (status + 1) % 15
            # 停止键
            elif key == ' ' or key == 'k' :
                x = 0
                th = 0
                control_speed = 0
                control_turn = 0
            else:
                count = count + 1
                if count > 4:
                    x = 0
                    th = 0
                if (key == '\x03'):
                    break

            # 目标速度=速度值*方向值
            target_speed = speed * x
            target_turn = turn * th

            # 速度限位,防止速度增减过快
            if target_speed > control_speed:
                control_speed = min( target_speed, control_speed + 0.02 )
            elif target_speed < control_speed:
                control_speed = max( target_speed, control_speed - 0.02 )
            else:
                control_speed = target_speed

            if target_turn > control_turn:
                control_turn = min( target_turn, control_turn + 0.1 )
            elif target_turn < control_turn:
                control_turn = max( target_turn, control_turn - 0.1 )
            else:
                control_turn = target_turn

            # 创建并发布twist消息
            twist = Twist()
            twist.linear.x = control_speed;
            twist.linear.y = 0;
            twist.linear.z = 0
            twist.angular.x = 0;
            twist.angular.y = 0;
            twist.angular.z = control_turn
            pub.publish(twist)

    except:
        print e

    finally:
        twist = Twist()
        twist.linear.x = 0; twist.linear.y = 0; twist.linear.z = 0
        twist.angular.x = 0; twist.angular.y = 0; twist.angular.z = 0
        pub.publish(twist)

    termios.tcsetattr(sys.stdin, termios.TCSADRAIN, settings)
以下为ros版本为noetic 的文件代码
#!/usr/bin/env python
# -*- coding: utf-8 -*-

import rospy
from geometry_msgs.msg import Twist
import sys, select, termios, tty

msg = """
Control mbot!
---------------------------
Moving around:
   u    i    o
   j    k    l
   m    ,    .
q/z : increase/decrease max speeds by 10%
w/x : increase/decrease only linear speed by 10%
e/c : increase/decrease only angular speed by 10%
space key, k : force stop
anything else : stop smoothly
CTRL-C to quit
"""

moveBindings = {
        'i':(1,0),
        'o':(1,-1),
        'j':(0,1),
        'l':(0,-1),
        'u':(1,1),
        ',':(-1,0),
        '.':(-1,1),
        'm':(-1,-1),
           }

speedBindings={
        'q':(1.1,1.1),
        'z':(.9,.9),
        'w':(1.1,1),
        'x':(.9,1),
        'e':(1,1.1),
        'c':(1,.9),
          }

def getKey():
    tty.setraw(sys.stdin.fileno())
    rlist, _, _ = select.select([sys.stdin], [], [], 0.1)
    if rlist:
        key = sys.stdin.read(1)
    else:
        key = ''

    termios.tcsetattr(sys.stdin, termios.TCSADRAIN, settings)
    return key

speed = .2
turn = 1

def vels(speed,turn):
    return "currently:\tspeed %s\tturn %s " % (speed,turn)

if __name__=="__main__":
    settings = termios.tcgetattr(sys.stdin)

    rospy.init_node('mbot_teleop')
    pub = rospy.Publisher('/cmd_vel', Twist, queue_size=5)

    x = 0
    th = 0
    status = 0
    count = 0
    acc = 0.1
    target_speed = 0
    target_turn = 0
    control_speed = 0
    control_turn = 0
    try:
        print(msg)
        print(vels(speed,turn))
        while(1):
            key = getKey()
            # 运动控制方向键(1:正方向,-1负方向)
            if key in moveBindings.keys():
                x = moveBindings[key][0]
                th = moveBindings[key][1]
                count = 0
            # 速度修改键
            elif key in speedBindings.keys():
                speed = speed * speedBindings[key][0]  # 线速度增加0.1倍
                turn = turn * speedBindings[key][1]    # 角速度增加0.1倍
                count = 0

                print(vels(speed,turn))
                if (status == 14):
                    print(msg)
                status = (status + 1) % 15
            # 停止键
            elif key == ' ' or key == 'k' :
                x = 0
                th = 0
                control_speed = 0
                control_turn = 0
            else:
                count = count + 1
                if count > 4:
                    x = 0
                    th = 0
                if (key == '\x03'):
                    break

            # 目标速度=速度值*方向值
            target_speed = speed * x
            target_turn = turn * th

            # 速度限位,防止速度增减过快
            if target_speed > control_speed:
                control_speed = min( target_speed, control_speed + 0.02 )
            elif target_speed < control_speed:
                control_speed = max( target_speed, control_speed - 0.02 )
            else:
                control_speed = target_speed

            if target_turn > control_turn:
                control_turn = min( target_turn, control_turn + 0.1 )
            elif target_turn < control_turn:
                control_turn = max( target_turn, control_turn - 0.1 )
            else:
                control_turn = target_turn

            # 创建并发布twist消息
            twist = Twist()
            twist.linear.x = control_speed;
            twist.linear.y = 0;
            twist.linear.z = 0
            twist.angular.x = 0;
            twist.angular.y = 0;
            twist.angular.z = control_turn
            pub.publish(twist)

    except:
        print(e)

    finally:
        twist = Twist()
        twist.linear.x = 0; twist.linear.y = 0; twist.linear.z = 0
        twist.angular.x = 0; twist.angular.y = 0; twist.angular.z = 0
        pub.publish(twist)

    termios.tcsetattr(sys.stdin, termios.TCSADRAIN, settings)
注意这里需要更改mbot_teleop.py 的权限
sudo chmod 777 mbot_teleop.py
之后另起一个终端,输入
roslaunch mbot_teleop mbot_teleop.launch
如图所示,启用键盘控制时需要将鼠标悬浮在mbot_teleop 的launch 启动运行窗口

注意键盘控制键位是uio以下九键
本文内容由网友自发贡献,版权归原作者所有,本站不承担相应法律责任。如您发现有涉嫌抄袭侵权的内容,请联系:hwhale#tublm.com(使用前将#替换为@)