ubuntu16.04系统下QT+opencv+realsense435i
- pro文件的内容如下所示。
- mainwindow.h文件的内容是:
- main.cpp文件的内容如下
- mainwindow的内容如下
- 设计的界面是这样的
- 最后的效果图
本文在ubuntu16.04系统下,将realsen435i的深度图像和彩色图像显示在QT界面上,并完成了截图和截取一段视频的功能,并将截取的图片或者视频以当前的时间点来命名保存到工程所在的文件夹。我的工程文件名叫做opencvrealsense。
本文基于opencv和realsense驱动包安装完成的基础上,这部分网上有很多教程,可以自行查询,如有问题也可以给我留言啦,很乐意一起交流进步。
pro文件的内容如下所示。
重点就是QT配置opencv和realsense,网上有很多教程说是在配置时需要把路径改成自己安装opencv和realsense的路径,我也没改直接这样写的竟然运行成功了,大家可以试试直接复制粘贴能不能行。
QT += core gui
greaterThan(QT_MAJOR_VERSION, 4): QT += widgets
CONFIG += c++11
DEFINES += QT_DEPRECATED_WARNINGS
TARGET = untitled
TEMPLATE = app
SOURCES += \
main.cpp \
mainwindow.cpp
HEADERS += \
mainwindow.h
FORMS += \
mainwindow.ui
#system
INCLUDEPATH += /usr/local/include \
/usr/include \
/usr/lib/x86_64-linux-gnu
LIBS += -L/usr/local/lib
LIBS += -L/usr/lib
#Default rules for deployment.
qnx: target.path = /tmp/$${TARGET}/bin
else: unix:!android: target.path = /opt/$${TARGET}/bin
!isEmpty(target.path): INSTALLS += target
INCLUDEPATH += /usr/local/include \
/usr/local/include/opencv \
/usr/local/include/opencv2
LIBS += -L /usr/local/lib/ -lopencv_core -lopencv_highgui -lopencv_imgproc -lopencv_imgcodecs
LIBS += -L /usr/local/lib/libopencv_*.so
LIBS += -lopencv_core \
-lopencv_imgproc \
-lopencv_highgui \
-lopencv_ml \
-lopencv_video \
-lopencv_features2d \
-lopencv_calib3d \
-lopencv_objdetect \
-lopencv_flann
INCLUDEPATH +=/usr/local/include/librealsense2
LIBS += /usr/local/lib/librealsense2.so
mainwindow.h文件的内容是:
(可能有一些头文件也用不到,但是加上也没有影响,我就一直加着呢)
#ifndef MAINWINDOW_H
#define MAINWINDOW_H
#include <QMainWindow>
#include <QtWidgets/QMainWindow>
#include <QTimer>
#include <QFileDialog>
#include <QMessageBox>
#include <QDateTime>
#include "opencv2/opencv.hpp"
#include <librealsense2/rs.hpp>
#include <opencv2/core/core.hpp>
#include <opencv2/highgui/highgui.hpp>
#include <stdlib.h>
#include <stdio.h>
#include <math.h>
#include <cv.h>
using namespace std;
using namespace cv;
using namespace rs2;
namespace Ui {
class MainWindow;
}
class MainWindow : public QMainWindow
{
Q_OBJECT
public:
explicit MainWindow(QWidget *parent =Q_NULLPTR);
~MainWindow();
private slots:
void on_pushButton_clicked();
void on_pushButton_2_clicked();
void update_window();
void update_window2();
void on_pushButton_3_clicked();
void on_pushButton_4_clicked();
void on_pushButton_5_clicked();
private:
Ui::MainWindow *ui;
QTimer *timer,*timerr;
QImage depth_image,color_image;
IplImage *imgIpl;
};
#endif
main.cpp文件的内容如下
这部分我就加了一句话,把界面名字改了。
#include "mainwindow.h"
#include <QApplication>

int main(int argc, char *argv[])
{
    QApplication a(argc, argv);
    MainWindow w;
    w.setWindowTitle("zyl的界面");
    w.show();
    return a.exec();
}
mainwindow的内容如下
这部分就是代码的关键部分,可能我写的比较乱看不懂的话可以给我留言呀!
#include "mainwindow.h"
#include "ui_mainwindow.h"
#include "librealsense2/rs.hpp"
#include <opencv2/opencv.hpp>
#include <opencv2/core/core.hpp>
#include <opencv2/highgui/highgui.hpp>
#include <stdlib.h>
#include <stdio.h>
#include <math.h>
#include <cv.h>
#include <highgui.h>
#include <cxcore.h>
using namespace cv;
using namespace std;
using namespace rs2;
Mat depth_img, color_img;
colorizer color_map;
pipeline pipe;
VideoWriter writer;
int cw,ch;
int c;
MainWindow::MainWindow(QWidget *parent):
QMainWindow(parent),
ui(new Ui::MainWindow)
{
ui->setupUi(this);
timer = new QTimer(this);
timerr = new QTimer(this);
}
MainWindow::~MainWindow()
{
delete ui;
}
void MainWindow::on_pushButton_clicked()
{
connect(timer, SIGNAL(timeout()), this, SLOT(update_window()));
timer->start(20);
pipe.start();
ui->label_3->setText("camera is open");
}
void MainWindow::on_pushButton_2_clicked()
{
pipe.stop();
timer->stop();
ui->label->clear();
ui->label_2->clear();
ui->label_3->setText("camera is closed");
}
void MainWindow::update_window()
{
frameset data = pipe.wait_for_frames();
frame depth = data.get_depth_frame().apply_filter(color_map);
const int w = depth.as<video_frame>().get_width();
const int h = depth.as<video_frame>().get_height();
depth_img = Mat(Size(w, h), CV_8UC3, (void*)depth.get_data(), Mat::AUTO_STEP);
depth_image = QImage((const unsigned char*)(depth_img.data), depth_img.cols, depth_img.rows, QImage::Format_RGB888);
ui->label_2->setPixmap(QPixmap::fromImage(depth_image));
ui->label_2->setFixedSize(480, 260);
ui->label_2->setScaledContents(true);
frame color = data.get_color_frame();
const int cw = color.as<video_frame>().get_width();
const int ch = color.as<video_frame>().get_height();
color_img = Mat(Size(cw, ch), CV_8UC3, (void*)color.get_data(), Mat::AUTO_STEP);
color_image = QImage((const unsigned char*)(color_img.data), color_img.cols, color_img.rows, QImage::Format_RGB888);
ui->label->setPixmap(QPixmap::fromImage(color_image));
ui->label->setFixedSize(480, 260);
ui->label->setScaledContents(true);
}
void MainWindow::on_pushButton_3_clicked()
{
color_image = QImage((const unsigned char*)(color_img.data), color_img.cols, color_img.rows, QImage::Format_RGB888);
ui-hlabel_4->setPixmap(QPixmap::fromImage(color_image));
ui->label_4->setFixedSize(480, 260);
ui->label_4->setScaledContents(true);
waitKey(3000);
const QPixmap *img = ui->label_4->pixmap();
QDateTime time = QDateTime::currentDateTime();
QString dateTime = time.toString("MM-dd-hh-mm");
QString str= QString("Data%1").arg(dateTime);
img->save(str,"jpg",100);
ui->label_4->clear();
}
void MainWindow::on_pushButton_4_clicked()
{
QDateTime time = QDateTime::currentDateTime();
QString dateTime = time.toString("MM-dd-hh-mm");
QString str= QString("Data%1.avi").arg(dateTime);
string videoname;
videoname = str.toStdString();
writer=VideoWriter(videoname, CV_FOURCC('X', 'V', 'I', 'D'), 30, Size(1280,720),1);
connect(timerr, SIGNAL(timeout()), this, SLOT(update_window2()));
timerr->start(10);
ui->label_5->setText("正在录制视频");
}
void MainWindow::on_pushButton_5_clicked()
{
timerr->stop();
ui->label_5->setText("视频录制结束");
waitKey(2000);
ui->label_5->clear();
}
void MainWindow::update_window2()
{
Mat color;
cvtColor(color_img,color,CV_BGR2RGB);
writer.write(color);
waitKey(0);
}
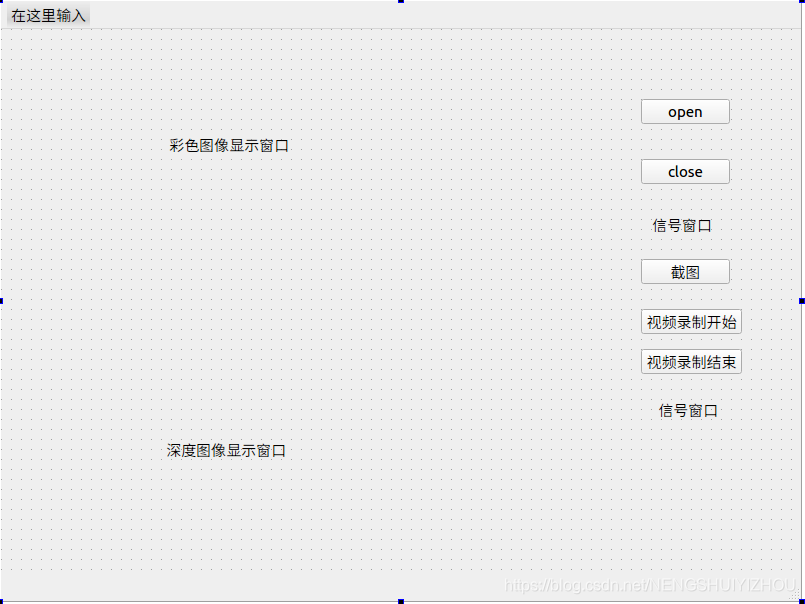
设计的界面是这样的
比较粗糙,对应的组件如下表所示
| 彩色图像显示窗口 | label |
|---|
| 深度图像显示窗口 | label_2 |
| 信号窗口 | label_3 |
| 截图窗口(下图中隐藏了) | label_4 |
| 信号窗口 | label_5 |
| open | pushButton |
| close | pushButton_2 |
| 截图 | pushButton_3 |
| 视频录制开始 | pushButton_4 |
| 视频录制结束 | pushButton_5 |
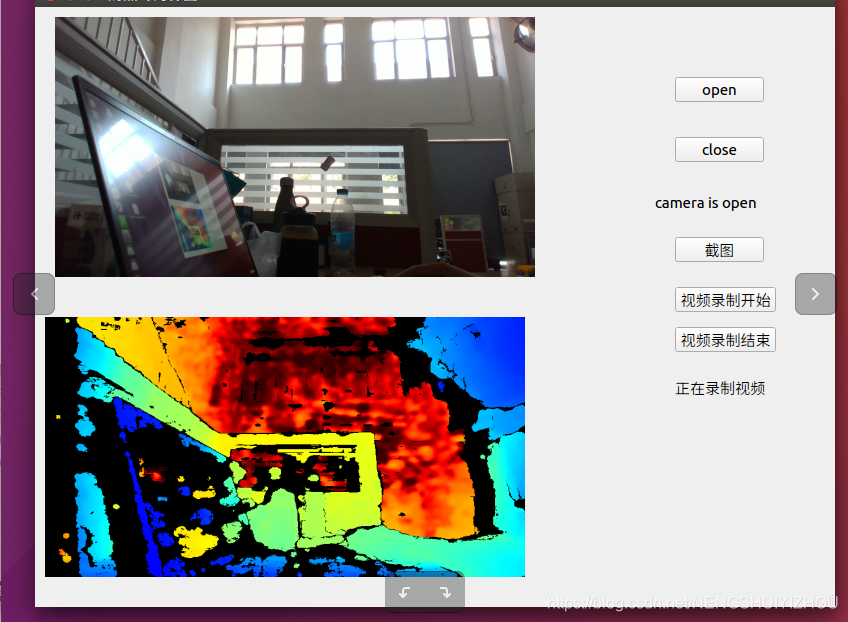
最后的效果图
是这样:
嘿嘿,第一次写博客,如有问题欢迎批评指正,俺还只是个马上研一的小白
本文内容由网友自发贡献,版权归原作者所有,本站不承担相应法律责任。如您发现有涉嫌抄袭侵权的内容,请联系:hwhale#tublm.com(使用前将#替换为@)