目录
前言
开始
.env 数据库配置文件
app/controller 控制器接口api
工具类
分类表 categoryController
收藏表 collecetionController
商品表 goodController
订单表 orderController
轮播图表 swiperController
用户表 userController
route 路由配置
红色
黄色
route/app.php
测试
结尾
前言
经过前面的文档,我们已经完成了设计阶段和环境配置,
如果没有的话,可以先去浏览这篇文章
从0开始教你三天完成毕业设计-项目设计_Black Jun的博客-CSDN博客作为一个初学java的小萌新,用java的springboot框架一时间加急写出来一个项目的话还是有难度的,当然mbatis-plus的代码生成器是可以的,但是比较晦涩难懂,加上配置的问题,所以我这里就不推荐用java,听说php停简单的,因此,为了完成这篇文章我特意花了半天学完了php的phpthink框架,这个项目我们用前后端分离的模式,毕竟冗杂的时代已经快过去了,追上时代潮流,才能成为让老师眼前一亮的毕业设计. https://blog.csdn.net/BlackjunPJH/article/details/127064484这篇文章,我们来教大家thinkphp后端api接口书写
开始
首先,打开C:\wamp64\www下的tp6文件,并导入vscode
我这里用的是phpstrom,vscode同理即可,只是编辑器不同,不影响操作
首先我们来看一下目录文件,以及文件的作用
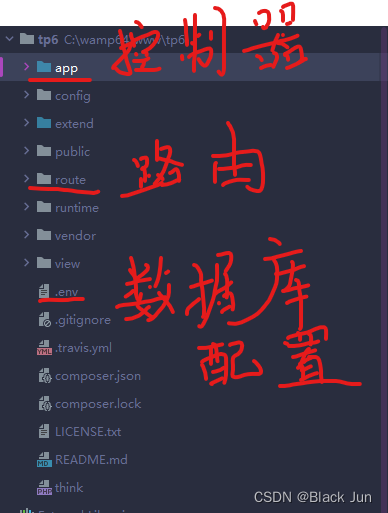
.env 数据库配置文件
先去修改一下.env文件,把它修改成自己的数据库,以及是否开启debug
APP_DEBUG = true[是否开启debug]

[APP]
DEFAULT_TIMEZONE = Asia/Shanghai

[DATABASE]
TYPE = mysql
HOSTNAME = localhost
DATABASE = [自己的数据库名字]
USERNAME = root
PASSWORD =[自己的密码,如果是按照我的来,这里啥也不用填写]
HOSTPORT = 3306
CHARSET = utf8
DEBUG = true

[LANG]
default_lang = zh-cn
修改完成配置文件后
app/controller 控制器接口api
我们到app下面controller,这里就是控制器,也就是书写api的地方
开始之前我们先导入我已经封装好的响应工具类
工具类
在controller下面创建Utils文件夹,再创建responseJson.php文件
<?php

namespace app\controller\Utils;

class responseJson
{
    public $code;
    public $message;
    public $data;
    function __construct($data)
    {
        $this->data=$data;
        if($data===null){
            $this->code="500";
            $this->message="服务器异常,请稍后再试!";
        }else{
            $this->code="200";
            $this->message="操作成功!";
        }
    }

}
这里稍微说一下作用,这是已经封装好的传递给前端的工具类,data为空就是出现问题,否则成功!
用于给前端做一个监听
而后我们在controller下创建house文件夹,代表主目录,开始书写接口
分类表 categoryController
我们先拿分类表举例,先完成基础的增删改查
<?php

namespace app\controller\house;

use app\controller\Utils\responseJson;
use think\facade\Db;
use think\response\Json;

class categoryController
{
    private $sql;
    private $request;

    function __construct()
    {
        $this->sql = Db::name("category");
        $this->request = json_decode(file_get_contents('php://input'), true);
    }

    function add(): Json
    {
        return json(new responseJson($this->sql->insert($this->request)));
    }

    function delete($id): Json
    {
        return json(new responseJson($this->sql->delete($id)));
    }

    function update(): Json
    {
        return json(new responseJson($this->sql->where('id',$this->request["id"])->update($this->request)));
    }

    function select(): Json
    {
        return json(new responseJson($this->sql->select()));
    }

    function selectBy(): Json
    {
        return json(new responseJson($this->sql->where($this->request)->select()));
    }
}
先来说一下这两个参数的作用
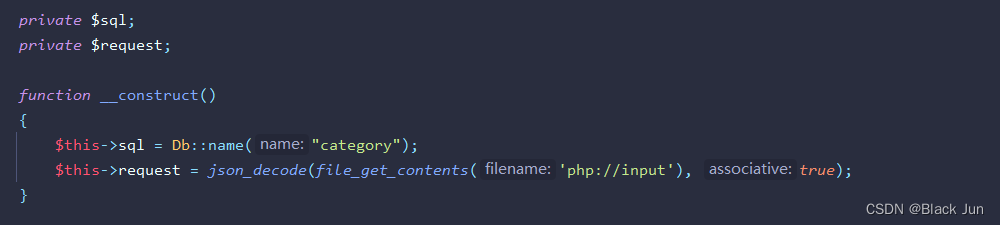
Db:name("category");获取连接分类表的数据库操作对象
json_decode(file_get_contents('php://input'), true);获取前端传递放在data内的数据
下面就是四个方法

$sql->insert(前端参数) 新增
$sql->delete($id) 通过id删除对应数据
$sql->where('id',$this->request['id'])->update([前端参数]) 通过id找到并修改对应数据
$sql->where([前端数据]) 按需查询
好的,这里我们基础的增删改查就已经完成了,后面的话可以会有多表的功能需要实现,
考虑到大家难度问题,我这里直接帖代码吧
收藏表 collecetionController
<?php

namespace app\controller\house;

use app\controller\Utils\responseJson;
use think\facade\Db;
use think\response\Json;

class collectionController
{
    private $sql;
    private $request;

    function __construct()
    {
        $this->sql = Db::name("collections");
        $this->request = json_decode(file_get_contents('php://input'), true);
    }

    function add(): Json
    {
        $collection=$this->sql->where($this->request)->select();
        if(count($collection)>0){
            return json(new responseJson(null));
        }
        return json(new responseJson($this->sql->insert($this->request)));
    }

    function delete($id): Json
    {
        return json(new responseJson($this->sql->delete($id)));
    }

    function update(): Json
    {
        return json(new responseJson($this->sql->where('collection_id',$this->request["collection_id"])->update($this->request)));
    }

    function select(): Json
    {
        return json(new responseJson($this->sql->select()));
    }

    function selectBy(): Json
    {
        return json(new responseJson($this->sql
            ->alias('c')
            ->join("user u","u.user_id=c.user_id")
            ->join("good g","g.good_id=c.good_id")
            ->join("category c2","g.category_id=c2.category_ids")
            ->field("g.*,c2.category_name")
            ->where("u.user_id",$this->request['user_id'])
            ->select()
        ));
    }
}
商品表 goodController
<?php

namespace app\controller\house;


use app\controller\Utils\responseJson;
use think\facade\Db;
use think\response\Json;


class goodController
{
    private $sql;
    private $request;

    public function __construct()
    {
        $this->sql=Db::name("good");
        $this->request=json_decode(file_get_contents('php://input'), true);
    }

    function add(): Json
    {
        return json(new responseJson($this->sql->insert($this->request)));
    }

    function delete($id): Json
    {
        return json(new responseJson($this->sql->delete($id)));
    }

    function update(): Json
    {
        return json(new responseJson($this->sql->where('good_id',$this->request["good_id"])->update($this->request)));
    }

    function select(): Json
    {
        return json(new responseJson($this->sql
            ->alias('g')
            ->join('category c', 'g.category_id=c.category_ids')
            ->field("g.*,c.category_name")
            ->select()));
    }

    function selectBy(): Json
    {
        return json(new responseJson($this->sql
            ->alias('g')
            ->join('category c', 'g.category_id=c.category_ids')
            ->field("g.*,c.category_name")
            ->where($this->request)
            ->select())
        );
    }
}
订单表 orderController
<?php

namespace app\controller\house;

use app\controller\Utils\responseJson;
use think\facade\Db;
use think\response\Json;

class orderController
{
    private $sql;
    private $request;
    function __construct(){
        $this->sql=Db::name("order");
        $this->request=json_decode(file_get_contents('php://input'), true);
    }

    function add(): Json
    {
        return json(new responseJson($this->sql->insert($this->request)));
    }

    function delete($id): Json
    {
        return json(new responseJson($this->sql->delete($id)));
    }

    function update(): Json
    {
        return json(new responseJson($this->sql->where('order_id',$this->request["order_id"])->update($this->request)));
    }

    function select(): Json
    {
        return json(new responseJson($this->sql->select()));
    }

    function selectBy(): Json
    {
        return json(new responseJson($this->sql
            ->alias('o')
            ->join("user u","u.user_id=o.user_id")
            ->join("good g","g.good_id=o.good_id")
            ->join("category c","g.category_id=c.category_ids")
            ->field("g.*,u.user_name,c.category_name,o.create_time createTime")
            ->where("u.user_id",$this->request['user_id'])
            ->select()));
    }

    function selectByBack(): Json
    {
        return json(new responseJson($this->sql
            ->alias('o')
            ->join("user u","u.user_id=o.user_id")
            ->join("good g","g.good_id=o.good_id")
            ->join("category c","g.category_id=c.category_ids")
            ->field("g.*,u.user_name,c.category_name,o.create_time createTime")
            ->where($this->request)
            ->select()));
    }
}
轮播图表 swiperController
<?php

namespace app\controller\house;

use app\controller\Utils\responseJson;
use think\facade\Db;
use \think\response\Json;

class swiperController
{
    private $sql;
    private $request;

    function __construct()
    {
        $this->sql = Db::name("swiper");
        $this->request = json_decode(file_get_contents('php://input'), true);
    }

    function add(): Json
    {
        return json(new responseJson($this->sql->insert($this->request)));
    }

    function delete($id): Json
    {
        return json(new responseJson($this->sql->delete($id)));
    }

    function update(): Json
    {
        return json(new responseJson($this->sql->where('swiper_id', $this->request["swiper_id"])->update($this->request)));
    }

    function select(): Json
    {
        return json(new responseJson($this->sql->select()));
    }

    function selectBy(): Json
    {
        return json(new responseJson($this->sql->where($this->request)->select()));
    }

    function select_back(): Json
    {
        return json(new responseJson(
            $this
                ->sql
                ->alias('s')
                ->join('good g', 's.good_id=g.good_id')
                ->where($this->request)
                ->field("s.*,g.good_title")
                ->select()
        ));
    }
}
用户表 userController
<?php

namespace app\controller\house;

use app\controller\Utils\responseJson;
use think\facade\Db;
use think\response\Json;

class userController
{
    private $sql;
    private $request;
    function __construct(){
        $this->sql=Db::name("user");
        $this->request=json_decode(file_get_contents('php://input'), true);
    }

    function add(): Json
    {
        return json(new responseJson($this->sql->insert($this->request)));
    }

    function delete($id): Json
    {
        return json(new responseJson($this->sql->delete($id)));
    }

    function update(): Json
    {
        return json(new responseJson($this->sql->where('id',$this->request["id"])->update($this->request)));
    }

    function select(): Json
    {
        return json(new responseJson($this->sql->select()));
    }

    function selectBy(): Json
    {
        return json(new responseJson($this->sql->where($this->request)->select()));
    }

    function login(){
        if(count($this->request)===2){
            $res=$this->sql->where($this->request)->select();
            if(count($res)){
                if($res[0]['user_name']===$this->request['user_name']&&$res[0]['password']===$this->request['password']){
                    return json(new responseJson($res[0]));
                }else{
                    return json(new responseJson(null));
                }
            }else{
                return json(new responseJson(null));
            }

        }else{
            return json(new responseJson(null));
        }
    }

    function register(){
        if(count($this->sql->where("user_name",$this->request['user_name'])->select())>0){
            $response=new responseJson(null);
            $response->code="501";
            $response->message="用户名已存在";
            return json($response);
        }else{
            $this->add();
            return json(new responseJson("注册成功!"));
        }
    }

    function pay(){
        Db::name("order")->save(['user_id'=>$this->request["user_id"],'good_id'=>$this->request['good_id']]);
        return json(new responseJson($this->sql->where("user_id",$this->request["user_id"])->update(['wallet'=>$this->request["wallet"]])));
    }
}
中间用到了一些多表的知识,大家可以去翻阅查看一下,也可以直接复制
route 路由配置
路由的作用就是我们不用很长的路径去方法,同时可以规定用什么请求方法
我们这里用到了restfull风格,关于什么是restfull风格大家可以去看看这一篇文章
RESTfull 接口规范理解_菜鸟小奇奇的博客-CSDN博客_restfullRESTfull接口理解RESTfull = Representational State Transfer 即表现层状态转移 加 ful (即形容词后缀) 则表示是形容词性的而要理解RESTful架构,最好的方法就是去理解Representational State Transfer这个词组,直译过来就是「表现层状态转化」,其实它省略了主语。「表现层」其实指的是「资源」的「表现层」,所以通俗来讲...https://blog.csdn.net/qyl_0316/article/details/80549937我这里稍微介绍一下

红色
代码请求方法,请求方法又很多种,浏览器默认是get,同时还有post,delete,put,patch等
黄色
代表等会我们用哪一个路径请求接口
蓝色
代表我们对应的方法位置
注意
大家可以看到我们都是/good/请求,那怎么知道是哪一个呢,这就体现的restfull风格的好处的,
我们可以看到他们虽然请求地址相同,但是请求方法不同,我们便可以以此为依据判断
这样大家理解的话就可以把自己的方法按需放到路由里面了,复制写好的也行
route/app.php
<?php
// +----------------------------------------------------------------------
// | ThinkPHP [ WE CAN DO IT JUST THINK ]
// +----------------------------------------------------------------------
// | Copyright (c) 2006~2018 http://thinkphp.cn All rights reserved.
// +----------------------------------------------------------------------
// | Licensed ( http://www.apache.org/licenses/LICENSE-2.0 )
// +----------------------------------------------------------------------
// | Author: liu21st <liu21st@gmail.com>
// +----------------------------------------------------------------------
use think\facade\Route;

Route::get('think', function () {
    return 'hello,ThinkPHP6!';
});

Route::get('hello/:name', 'index/hello');


Route::post('/good/','house.goodController/add');
Route::delete('/good/:id','house.goodController/delete');
Route::put('/good/','house.goodController/update');
Route::get('/good/','house.goodController/select');
Route::patch('/good/','house.goodController/selectBy');

Route::post('/user/','house.userController/add');
Route::delete('/user/:id','house.userController/delete');
Route::put('/user/','house.userController/update');
Route::get('/user/','house.userController/select');
Route::patch('/user/','house.userController/selectBy');
Route::post('/user/login','house.userController/login');
Route::post('/user/register','house.userController/register');
Route::post('/user/pay','house.userController/pay');

Route::post('/swiper/','house.swiperController/add');
Route::delete('/swiper/:id','house.swiperController/delete');
Route::put('/swiper/','house.swiperController/update');
Route::get('/swiper/','house.swiperController/select');
Route::patch('/swiper/','house.swiperController/selectBy');
Route::patch("/swiper/back",'house.swiperController/select_back');

Route::post('/category/','house.categoryController/add');
Route::delete('/category/:id','house.categoryController/delete');
Route::put('/category/','house.categoryController/update');
Route::get('/category/','house.categoryController/select');
Route::patch('/category/','house.categoryController/selectBy');

Route::post('/order/','house.orderController/add');
Route::delete('/order/:id','house.orderController/delete');
Route::put('/order/','house.orderController/update');
Route::get('/order/','house.orderController/select');
Route::patch('/order/','house.orderController/selectBy');
Route::patch('/order/back','house.orderController/selectByBack');

Route::post('/collection/','house.collectionController/add');
Route::delete('/collection/:id','house.collectionController/delete');
Route::put('/collection/','house.collectionController/update');
Route::get('/collection/','house.collectionController/select');
Route::patch('/collection/','house.collectionController/selectBy');
ok,至此代表方面已经没有什么问题了,基础功能代码还是比较简单的
测试
我们打开C:\wamp64\www\tp6 文件夹
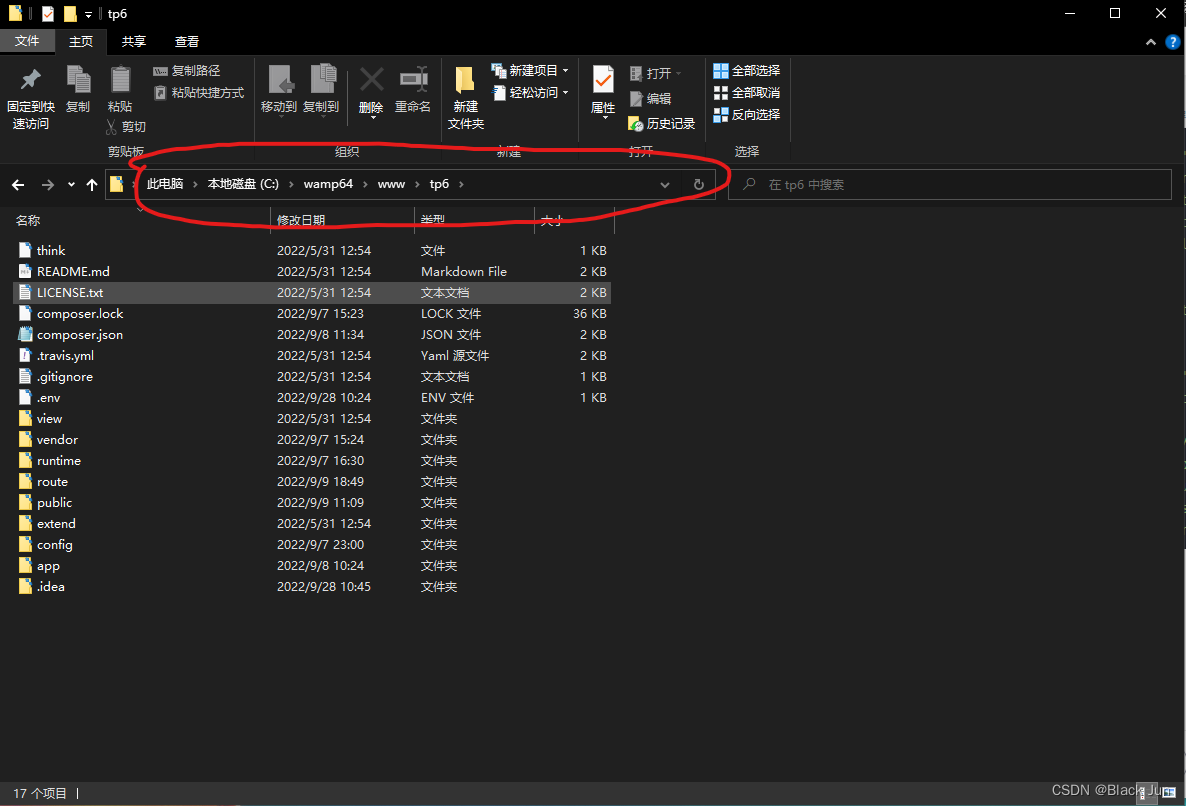
在红色区域输入cmd 跳转到命令提示行
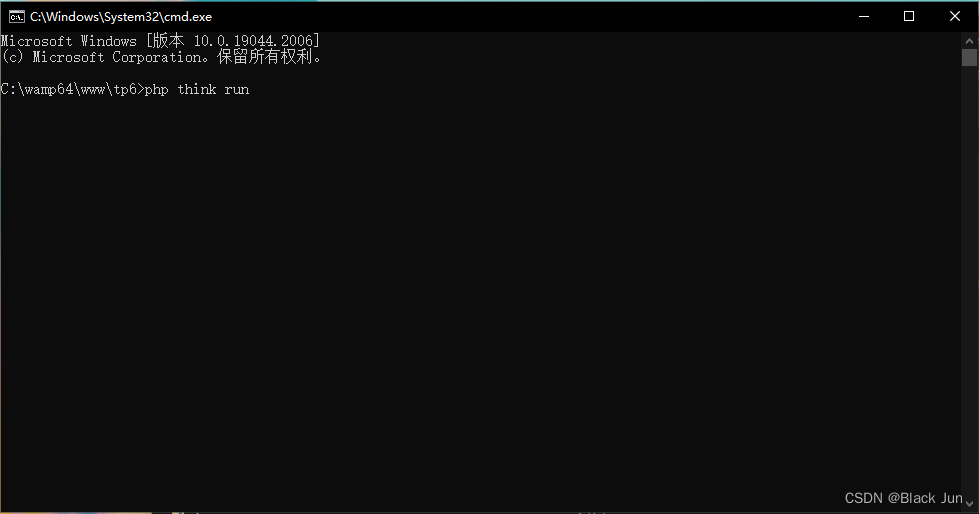
运行
php think run
启动框架,开启路由

出现如下代表启动成功
而后在浏览器输入

出现如下界面(我这里是用json美化的插件)
正常是这种界面
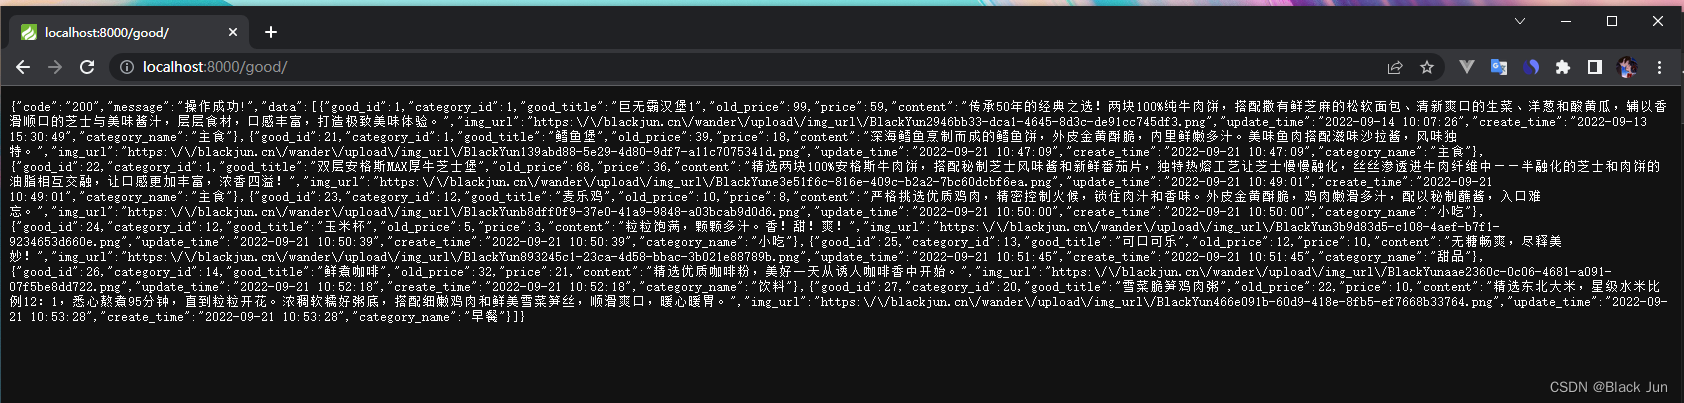
代表后端api接口以及成功!
结尾
我们设计和后端代码已经全部完成,后面重要的就是前端方面了
主题所有文章已经更新欢迎大家,留言评论
从0开始教你三天完成毕业设计-项目设计_Black Jun的博客-CSDN博客作为一个初学java的小萌新,用java的springboot框架一时间加急写出来一个项目的话还是有难度的,当然mbatis-plus的代码生成器是可以的,但是比较晦涩难懂,加上配置的问题,所以我这里就不推荐用java,听说php停简单的,因此,为了完成这篇文章我特意花了半天学完了php的phpthink框架,这个项目我们用前后端分离的模式,毕竟冗杂的时代已经快过去了,追上时代潮流,才能成为让老师眼前一亮的毕业设计.https://blog.csdn.net/BlackjunPJH/article/details/127064484
从0开始教你三天完成毕业设计-后端api_Black Jun的博客-CSDN博客_后端毕业设计经过前面的文档,我们已经完成了设计阶段和环境配置,如果没有的话,可以先去浏览这篇文章这篇文章,我们来教大家thinkphp后端api接口书写https://blog.csdn.net/BlackjunPJH/article/details/127084314?spm=1001.2014.3001.5502
从0开始教你三天完成毕业设计-前端之首页_Black Jun的博客-CSDN博客我这里主要用到了vue+element-ui,大概有不懂的,可以看下面https://blog.csdn.net/BlackjunPJH/article/details/128098608
从0开始教你三天完成毕业设计-前端之后台管理_Black Jun的博客-CSDN博客同理的话,我们还是用vue+element有不懂的话,可以看看前面两篇文章,上面有vue以及element的介绍,这里的话我们还是element的表格插件,同时后台管理界面无非就是一个crud,增删改查所以我这里就用一个界面进行举例说明。https://blog.csdn.net/BlackjunPJH/article/details/128103279?spm=1001.2014.3001.5502
本文内容由网友自发贡献,版权归原作者所有,本站不承担相应法律责任。如您发现有涉嫌抄袭侵权的内容,请联系:hwhale#tublm.com(使用前将#替换为@)