设备:jetsonnano B01 一个usb广角摄像头
语言为python 库为opencv 框架pytorch
大家都知道yolov3的坐标变换过程比较复杂,大概要经过图片缩放,对数空间变换等等,然后在pytorch中是用一个tensor类型来表示张量的,所以一直认为目标检测的坐标是一个奇奇怪怪的值,需要经过变换才能得到原图目标的像素坐标
之前一直纠结怎么坐标转化,但今天实验之后怀疑其实检测结果的坐标转化为int数值以后跟实际原图像素坐标是一样的?
先上结果:
这是原始图片上的坐标点
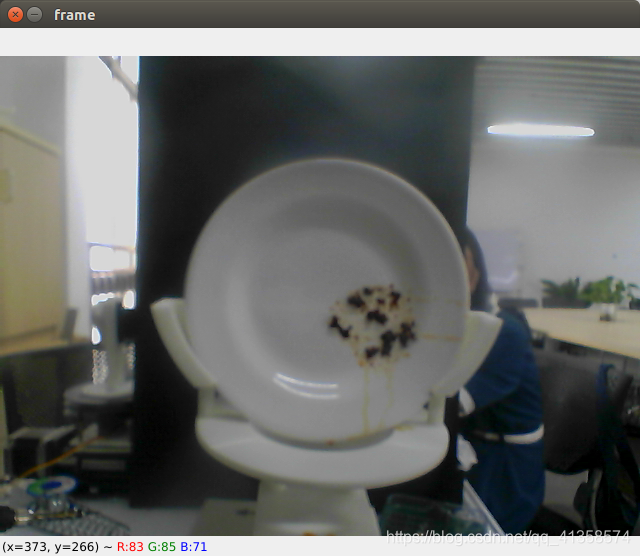
左下角为像素坐标
(鼠标放在中间油渍的位置时显示的坐标
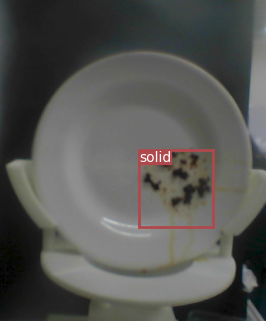
检测结果:
结果输出的坐标(转化为整数之后输出的)
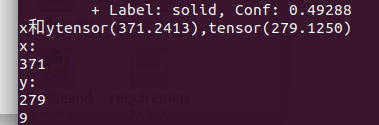
两个坐标几乎一样,感觉其实它们两个是一个数值,而tensor类型后面多了一串小数点
完整代码
用opencv打开摄像头查看图片某点像素坐标:
import cv2
import os
import sys
import time
import datetime
import argparse
cap = cv2.VideoCapture(0)
i = 1
while(cap.isOpened()):
ret, frame = cap.read()
cv2.imshow('frame',frame)
if cv2.waitKey(30) == ord('q'):
cv2.imwrite('data/custom/dd/'+str(i)+".jpg",frame)
frame=cv2.imread('data/custom/dd/'+str(i)+".jpg")
break
检测部分显示结果坐标:
pytorch python
if detections is not None:
detections = rescale_boxes(detections, opt.img_size, img.shape[:2])
unique_labels = detections[:, -1].cpu().unique()
n_cls_preds = len(unique_labels)
bbox_colors = random.sample(colors, n_cls_preds)
for x1, y1, x2, y2, conf, cls_conf, cls_pred in detections:
print("\t+ Label: %s, Conf: %.5f" % (classes[int(cls_pred)], cls_conf.item()))
box_w = x2 - x1
box_h = y2 - y1
centx = int((x1+x2)*0.1/2)
centy = int((y1+y2)*0.1/2)
thex.append(centx)
they.append(centy)
str1+="x:"
str1+=str(centx)
str1+=",y:"
str1+=str(centy)
area = int(box_w*0.1)*int(box_h*0.1)
if area > 600:
time = 30
print("x和y"+str((x2+x1)/2)+","+str((y1+y2)/2))
print("x:")
print(int((x1+x2)/2))
print("y:")
print(int((y1+y2)/2))
print(int(box_w*0.1))
print(int(box_h*0.1))
color = bbox_colors[int(np.where(unique_labels == int(cls_pred))[0])]
bbox = patches.Rectangle((x1, y1), box_w, box_h, linewidth=2, edgecolor=color, facecolor="none")
print(int(box_w)*int(box_h)*0.01)
print(str1)
if(box_w*box_h>50):
se.write("1".encode())
time.sleep(3)
se.write("0".encode())
se.write(str1.encode())
data_read = se.readline()
print(data_read.decode())
ax.add_patch(bbox)
plt.text(
x1,
y1,
s=classes[int(cls_pred)],
color="white",
verticalalignment="top",
bbox={"color": color, "pad": 0},
)
plt.axis("off")
plt.gca().xaxis.set_major_locator(NullLocator())
plt.gca().yaxis.set_major_locator(NullLocator())
filename = os.path.basename(path).split(".")[0]
plt.savefig(filename, bbox_inches="tight", pad_inches=0.0)
plt.close()
    if detections is not None:
    后面的代码是输出坐标的
关于目标检测的完整检测代码:(很长,熟悉的人不必看)
from __future__ import division
import serial as ser
import time
se=ser.Serial("/dev/ttyUSB0",115200,timeout=1)
from models import *
from utils.utils import *
from utils.datasets import *
from utils.augmentations import *
from utils.transforms import *
import cv2
import os
import sys
import time
import datetime
import argparse
from PIL import Image
import torch
import torchvision.transforms as transforms
from torch.utils.data import DataLoader
from torchvision import datasets
from torch.autograd import Variable
import matplotlib.pyplot as plt
import matplotlib.patches as patches
from matplotlib.ticker import NullLocator
i = 1
cap = cv2.VideoCapture(0)
array_of_img = []
start = time.time()
directory_name=r'output'
while(cap.isOpened()):
ret, frame = cap.read()
cv2.imshow('frame',frame)
if cv2.waitKey(30) == ord('q'):
cv2.imwrite('data/custom/dd/'+str(i)+".jpg",frame)
frame=cv2.imread('data/custom/dd/'+str(i)+".jpg")
break
cap.release()
cv2.destroyAllWindows()
washtime = []
thex = []
they = []
area = 0
str1=""
if __name__ == "__main__":
parser = argparse.ArgumentParser()
parser.add_argument("--image_folder", type=str, default="data/samples", help="path to dataset")
parser.add_argument("--model_def", type=str, default="config/yolov3.cfg", help="path to model definition file")
parser.add_argument("--weights_path", type=str, default="weights/yolov3.weights", help="path to weights file")
parser.add_argument("--class_path", type=str, default="data/coco.names", help="path to class label file")
parser.add_argument("--conf_thres", type=float, default=0.8, help="object confidence threshold")
parser.add_argument("--nms_thres", type=float, default=0.4, help="iou thresshold for non-maximum suppression")
parser.add_argument("--batch_size", type=int, default=1, help="size of the batches")
parser.add_argument("--n_cpu", type=int, default=0, help="number of cpu threads to use during batch generation")
parser.add_argument("--img_size", type=int, default=416, help="size of each image dimension")
parser.add_argument("--checkpoint_model", type=str, help="path to checkpoint model")
opt = parser.parse_args()
print(opt)
device = torch.device("cuda" if torch.cuda.is_available() else "cpu")
os.makedirs("output", exist_ok=True)
model = Darknet(opt.model_def, img_size=opt.img_size).to(device)
if opt.weights_path.endswith(".weights"):
model.load_darknet_weights(opt.weights_path)
else:
model.load_state_dict(torch.load(opt.weights_path))
model.eval()
dataloader = DataLoader(
ImageFolder(opt.image_folder, transform= \
transforms.Compose([DEFAULT_TRANSFORMS, Resize(opt.img_size)])),
batch_size=opt.batch_size,
shuffle=False,
num_workers=opt.n_cpu,
)
classes = load_classes(opt.class_path)
Tensor = torch.cuda.FloatTensor if torch.cuda.is_available() else torch.FloatTensor
imgs = []
img_detections = []
print("\nPerforming object detection:")
prev_time = time.time()
for batch_i, (img_paths, input_imgs) in enumerate(dataloader):
input_imgs = Variable(input_imgs.type(Tensor))
with torch.no_grad():
detections = model(input_imgs)
detections = non_max_suppression(detections, opt.conf_thres, opt.nms_thres)
current_time = time.time()
inference_time = datetime.timedelta(seconds=current_time - prev_time)
prev_time = current_time
print("\t+ Batch %d, Inference Time: %s" % (batch_i, inference_time))
imgs.extend(img_paths)
img_detections.extend(detections)
cmap = plt.get_cmap("tab20b")
colors = [cmap(i) for i in np.linspace(0, 1, 20)]
print("\nSaving images:")
for img_i, (path, detections) in enumerate(zip(imgs, img_detections)):
print("(%d) Image: '%s'" % (img_i, path))
img = np.array(Image.open(path))
plt.figure()
fig, ax = plt.subplots(1)
ax.imshow(img)
if detections is not None:
detections = rescale_boxes(detections, opt.img_size, img.shape[:2])
unique_labels = detections[:, -1].cpu().unique()
n_cls_preds = len(unique_labels)
bbox_colors = random.sample(colors, n_cls_preds)
for x1, y1, x2, y2, conf, cls_conf, cls_pred in detections:
print("\t+ Label: %s, Conf: %.5f" % (classes[int(cls_pred)], cls_conf.item()))
box_w = x2 - x1
box_h = y2 - y1
centx = int((x1+x2)*0.1/2)
centy = int((y1+y2)*0.1/2)
thex.append(centx)
they.append(centy)
str1+="x:"
str1+=str(centx)
str1+=",y:"
str1+=str(centy)
area = int(box_w*0.1)*int(box_h*0.1)
if area > 600:
time = 30
print("x和y"+str((x2+x1)/2)+","+str((y1+y2)/2))
print("x:")
print(int((x1+x2)/2))
print("y:")
print(int((y1+y2)/2))
print(int(box_w*0.1))
print(int(box_h*0.1))
color = bbox_colors[int(np.where(unique_labels == int(cls_pred))[0])]
bbox = patches.Rectangle((x1, y1), box_w, box_h, linewidth=2, edgecolor=color, facecolor="none")
print(int(box_w)*int(box_h)*0.01)
print(str1)
if(box_w*box_h>50):
se.write("1".encode())
time.sleep(3)
se.write("0".encode())
se.write(str1.encode())
data_read = se.readline()
print(data_read.decode())
ax.add_patch(bbox)
plt.text(
x1,
y1,
s=classes[int(cls_pred)],
color="white",
verticalalignment="top",
bbox={"color": color, "pad": 0},
)
plt.axis("off")
plt.gca().xaxis.set_major_locator(NullLocator())
plt.gca().yaxis.set_major_locator(NullLocator())
filename = os.path.basename(path).split(".")[0]
plt.savefig(filename, bbox_inches="tight", pad_inches=0.0)
plt.close()
串口:
se.write("50".encode())
print("缓存中的字节数")
print(se.inWaiting())
time.sleep(2)
se.write("100".encode())
print("缓存中的字节数")
print(se.inWaiting())
data = se.readline()
print(data.decode())
data = se.readline()
print(data.decode())
print(se.inWaiting())
se.write("my87u".encode())
print("缓存中的字节数")
print(se.inWaiting())
se.flush()
data = se.readline()
print(data.decode())
data = se.readline()
print(data.decode())
参数:
    parser = argparse.ArgumentParser()
    parser.add_argument("--image_folder", type=str, default="data/custom/dd2", help="path to dataset")
    parser.add_argument("--model_def", type=str, default="config/yolov3-custom.cfg", help="path to model definition file")
    parser.add_argument("--weights_path", type=str, default="checkpoints/ckpt_86.pth", help="path to weights file")
    parser.add_argument("--class_path", type=str, default="data/custom/classes.names", help="path to class label file")
    parser.add_argument("--conf_thres", type=float, default=0.8, help="object confidence threshold")
    parser.add_argument("--nms_thres", type=float, default=0.4, help="iou thresshold for non-maximum suppression")
    parser.add_argument("--batch_size", type=int, default=1, help="size of the batches")
    parser.add_argument("--n_cpu", type=int, default=0, help="number of cpu threads to use during batch generation")
    parser.add_argument("--img_size", type=int, default=416, help="size of each image dimension")
    parser.add_argument("--checkpoint_model",type=str,default="checkpoints/ckpt_86.pth", help="path to checkpoint model")
    opt = parser.parse_args()
    print(opt)
本文内容由网友自发贡献,版权归原作者所有,本站不承担相应法律责任。如您发现有涉嫌抄袭侵权的内容,请联系:hwhale#tublm.com(使用前将#替换为@)