文章目录
- 一、数据格式转换
- 二、dataset class文件配置;
- 1.设置数据集文件
- 2.修改mmseg/datasets/目录下的_init_.py
- 三、在configs/_ base _/datasets下面对数据加载进行定义
- 四、在configs/下面选择你需要的模型参数进行修改
- 五、返回tools/train.py进行训练
- 六、推理
一、数据格式转换
在tools/convert_datasets路径下新建ISBI2012.py,使得原本的tif格式数据能被程序读取。
import argparse
import cv2
import os
import os.path as osp
import tempfile
import zipfile
from skimage import io
import mmcv
def parse_args():
parser = argparse.ArgumentParser(
description='Convert ISBI2012 dataset to mmsegmentation format')
parser.add_argument('--dataset_path', default="openmmlab/dataset/ISBI2012/", help='path of ISBI2012 DATASET')
parser.add_argument('--tmp_dir', help='path of the temporary directory')
parser.add_argument('-o', '--out_dir', help='output path')
args = parser.parse_args()
return args
def main():
ISBI2012_TRAIN = 20
args = parse_args()
dataset_path = args.dataset_path
if args.out_dir is None:
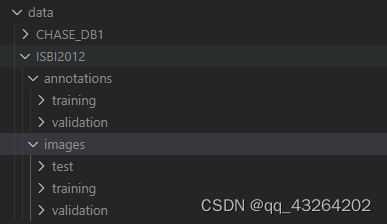
out_dir = osp.join('data', 'ISBI2012')
else:
out_dir = args.out_dir
print('Making directories...')
mmcv.mkdir_or_exist(out_dir)
mmcv.mkdir_or_exist(osp.join(out_dir, 'images'))
mmcv.mkdir_or_exist(osp.join(out_dir, 'images', 'training'))
mmcv.mkdir_or_exist(osp.join(out_dir, 'images', 'validation'))
mmcv.mkdir_or_exist(osp.join(out_dir, 'images', 'test'))
mmcv.mkdir_or_exist(osp.join(out_dir, 'annotations'))
mmcv.mkdir_or_exist(osp.join(out_dir, 'annotations', 'training'))
mmcv.mkdir_or_exist(osp.join(out_dir, 'annotations', 'validation'))
train_volume = io.imread(osp.join(dataset_path, "train-volume.tif"))
train_labels = io.imread(osp.join(dataset_path, "train-labels.tif"))
train_labels[train_labels == 255] = 1
train_labels = 1 - train_labels
test_volume = io.imread(osp.join(dataset_path, "test-volume.tif"))
print('Generating training dataset...')
for raw_index in range(0, ISBI2012_TRAIN):
cv2.imwrite(osp.join(out_dir, 'images', 'training',
"%05d"%raw_index + '.png'), train_volume[raw_index, :, :], [cv2.IMWRITE_PNG_COMPRESSION, 0])
print('Generating training label...')
for label_index in range(0, ISBI2012_TRAIN):
cv2.imwrite(osp.join(out_dir, 'annotations', 'training',
"%05d"%label_index + '.png'), train_labels[label_index, :, :], [cv2.IMWRITE_PNG_COMPRESSION, 0])
print('Generating validation dataset...')
for raw_index in range(ISBI2012_TRAIN, train_volume.shape[0]):
cv2.imwrite(osp.join(out_dir, 'images', 'validation',
"%05d"%raw_index + '.png'), train_volume[raw_index, :, :], [cv2.IMWRITE_PNG_COMPRESSION, 0])
print('Generating validation label...')
for label_index in range(ISBI2012_TRAIN, train_labels.shape[0]):
cv2.imwrite(osp.join(out_dir, 'annotations', 'validation',
"%05d"%label_index + '.png'), train_labels[label_index, :, :], [cv2.IMWRITE_PNG_COMPRESSION, 0])
print('Generating test dataset...')
for raw_index in range(test_volume.shape[0]):
cv2.imwrite(osp.join(out_dir, 'images', 'test',
"%05d"%raw_index + '.png'), test_volume[raw_index, :, :], [cv2.IMWRITE_PNG_COMPRESSION, 0])
print('Done!')
if __name__ == '__main__':
main()
print("ok")
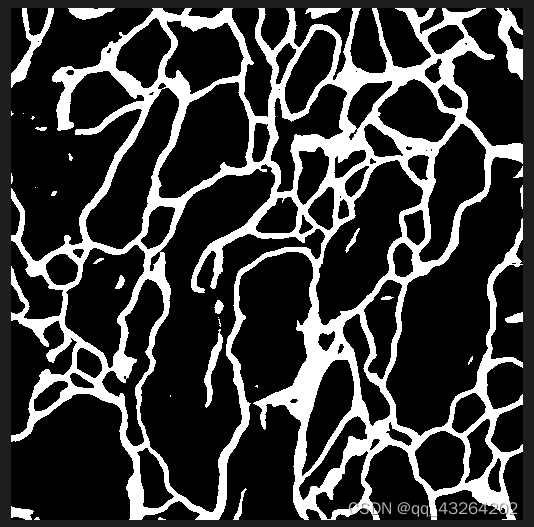
运行完成后,得到的效果如图所示:
由于ISBI2012数据集是灰度图,但mmsegmentation整个环境是基于彩色图编写,mmcv库默认读入进行转化,这里直接保存为灰度即可
https://github.com/open-mmlab/mmdetection/issues/178
二、dataset class文件配置;
1.设置数据集文件
在mmseg/datasets/目录下新建ISBI2012.py文件
from .builder import DATASETS
from .custom import CustomDataset
@DATASETS.register_module()
class ISBI2012Dataset(CustomDataset):
"""Isbi2012 dataset.
In segmentation map annotation for Isbi2012, 0 stands for background,
which is included in 2 categories. ``reduce_zero_label`` is fixed to False.
The ``img_suffix`` is fixed to '.png' and ``seg_map_suffix`` is fixed to
'.png'.
"""
CLASSES = ('background', 'membrane')
PALETTE = [[120, 120, 120], [6, 230, 230]]
def __init__(self, **kwargs):
super(ISBI2012Dataset, self).__init__(
img_suffix='.png',
seg_map_suffix='.png',
reduce_zero_label=False,
**kwargs)
assert self.file_client.exists(self.img_dir)
其中
ISBI2012Dataset:表示自定义的数据集
CLASSES:表示你数据集的背景+类别
PALETTE:训练完后进行测试后的结果保存,mmseg默认为把分割出来的mask结果直接画在原图上进行显示,PALETTE好像指定了画上原图的mask蒙版的颜色。
img_suffix:原图图像后缀
seg_map_suffix:mask图像后缀
注意:mmseg要求mask的像素在[0,num_classes-1]范围内,比如我是2分类,背景像素值为0,那么目标像素值应该为1。如果你也是二分类,mask为单通道(8 bit)二值化的0(背景)/255(目标)图像的话,先去把图像改为0(背景)/1(目标)图像,否则能跑起来,但是指标异常,几乎全是0。(这是个大坑!!!一定要注意)
2.修改mmseg/datasets/目录下的_init_.py
末尾加入Isbi2012Dataset数据
from .ade import ADE20KDataset
from .builder import DATASETS, PIPELINES, build_dataloader, build_dataset
from .chase_db1 import ChaseDB1Dataset
from .cityscapes import CityscapesDataset
from .coco_stuff import COCOStuffDataset
from .custom import CustomDataset
from .dark_zurich import DarkZurichDataset
from .dataset_wrappers import (ConcatDataset, MultiImageMixDataset,
RepeatDataset)
from .drive import DRIVEDataset
from .hrf import HRFDataset
from .isaid import iSAIDDataset
from .isprs import ISPRSDataset
from .loveda import LoveDADataset
from .night_driving import NightDrivingDataset
from .pascal_context import PascalContextDataset, PascalContextDataset59
from .potsdam import PotsdamDataset
from .stare import STAREDataset
from .voc import PascalVOCDataset
from .ISBI2012 import ISBI2012Dataset
__all__ = [
'CustomDataset', 'build_dataloader', 'ConcatDataset', 'RepeatDataset',
'DATASETS', 'build_dataset', 'PIPELINES', 'CityscapesDataset',
'PascalVOCDataset', 'ADE20KDataset', 'PascalContextDataset',
'PascalContextDataset59', 'ChaseDB1Dataset', 'DRIVEDataset', 'HRFDataset',
'STAREDataset', 'DarkZurichDataset', 'NightDrivingDataset',
'COCOStuffDataset', 'LoveDADataset', 'MultiImageMixDataset',
'iSAIDDataset', 'ISPRSDataset', 'PotsdamDataset', 'ISBI2012Dataset'
]
三、在configs/_ base _/datasets下面对数据加载进行定义
在configs/__ base __/datasets/新建ISBI2012.py。
dataset_type = 'ISBI2012Dataset'
data_root = 'data/ISBI2012'
img_norm_cfg = dict(
mean=[127, 127, 127], std=[57, 57, 57], to_rgb=True)
img_scale = (512, 512)
crop_size = (256, 256)
train_pipeline = [
dict(type='LoadImageFromFile'),
dict(type='LoadAnnotations'),
dict(type='Resize', img_scale=img_scale, ratio_range=(0.5, 2.0)),
dict(type='RandomCrop', crop_size=crop_size, cat_max_ratio=0.75),
dict(type='RandomFlip', prob=0.5),
dict(type='PhotoMetricDistortion'),
dict(type='Normalize', **img_norm_cfg),
dict(type='Pad', size=crop_size, pad_val=0, seg_pad_val=255),
dict(type='DefaultFormatBundle'),
dict(type='Collect', keys=['img', 'gt_semantic_seg'])
]
test_pipeline = [
dict(type='LoadImageFromFile'),
dict(
type='MultiScaleFlipAug',
img_scale=img_scale,
flip=False,
transforms=[
dict(type='Resize', keep_ratio=True),
dict(type='RandomFlip'),
dict(type='Normalize', **img_norm_cfg),
dict(type='ImageToTensor', keys=['img']),
dict(type='Collect', keys=['img'])
])
]
data = dict(
samples_per_gpu=4,
workers_per_gpu=4,
train=dict(
type='RepeatDataset',
times=40000,
dataset=dict(
type=dataset_type,
data_root=data_root,
img_dir='images/training',
ann_dir='annotations/training',
pipeline=train_pipeline)),
val=dict(
type=dataset_type,
data_root=data_root,
img_dir='images/validation',
ann_dir='annotations/validation',
pipeline=test_pipeline),
test=dict(
type=dataset_type,
data_root=data_root,
img_dir='images/test',
pipeline=test_pipeline))
四、在configs/下面选择你需要的模型参数进行修改
以U-Net为例,在configs/unet下新建fcn_unet_s5-d16_256x256_40k_isbi2012.py
_base_ = [
'../_base_/models/fcn_unet_s5-d16_isbi2012.py',
'../_base_/datasets/ISBI2012.py',
'../_base_/default_runtime.py',
'../_base_/schedules/schedule_40k.py'
]
model = dict(test_cfg=dict(crop_size=(256, 256), stride=(170, 170)))
evaluation = dict(metric='mDice')
新建对应的模型_base_/models/fcn_unet_s5-d16_isbi2012.py,是否有需要特别改动之处:
norm_cfg = dict(type='BN', requires_grad=True)
model = dict(
type='EncoderDecoder',
pretrained=None,
backbone=dict(
type='UNet',
in_channels=3,
base_channels=64,
num_stages=5,
strides=(1, 1, 1, 1, 1),
enc_num_convs=(2, 2, 2, 2, 2),
dec_num_convs=(2, 2, 2, 2),
downsamples=(True, True, True, True),
enc_dilations=(1, 1, 1, 1, 1),
dec_dilations=(1, 1, 1, 1),
with_cp=False,
conv_cfg=None,
norm_cfg=norm_cfg,
act_cfg=dict(type='ReLU'),
upsample_cfg=dict(type='InterpConv'),
norm_eval=False),
decode_head=dict(
type='FCNHead',
in_channels=64,
in_index=4,
channels=64,
num_convs=1,
concat_input=False,
dropout_ratio=0.1,
num_classes=2,
norm_cfg=norm_cfg,
align_corners=False,
loss_decode=dict(
type='CrossEntropyLoss', use_sigmoid=False, loss_weight=1.0)),
auxiliary_head=dict(
type='FCNHead',
in_channels=128,
in_index=3,
channels=64,
num_convs=1,
concat_input=False,
dropout_ratio=0.1,
num_classes=2,
norm_cfg=norm_cfg,
align_corners=False,
loss_decode=dict(
type='CrossEntropyLoss', use_sigmoid=False, loss_weight=0.4)),
train_cfg=dict(),
test_cfg=dict(mode='slide', crop_size=256, stride=170))
五、返回tools/train.py进行训练
训练命令:
python tools/train.py /path/to/fcn_unet_s5-d16_256x256_40k_isbi2012.py --work-dir ${YOUR_WORK_DIR}
/path/to/fcn_unet_s5-d16_256x256_40k_isbi2012.py:表示配置文件的位置,也就是上一步的fcn_unet_s5-d16_256x256_40k_isbi2012.py所在位置
work-dir:是用来存储模型和日志的地方,你可以自己指定,不指定的话会自己创建
也可以在tools/train.py里面进行指定,随后直接运行train.py就行
在train.py中你需要修改的只有以下几个内容:
1、–config指定网络文件加载配置文件的位置
2、–work-dir是你结果存储路径
3、–gpu-id是你指定哪个GPU进行训练,–gpus与–gpu-id作者在API文档中已经介绍这两弃用了,至于为啥不删,估计是在其他地方还在加载。
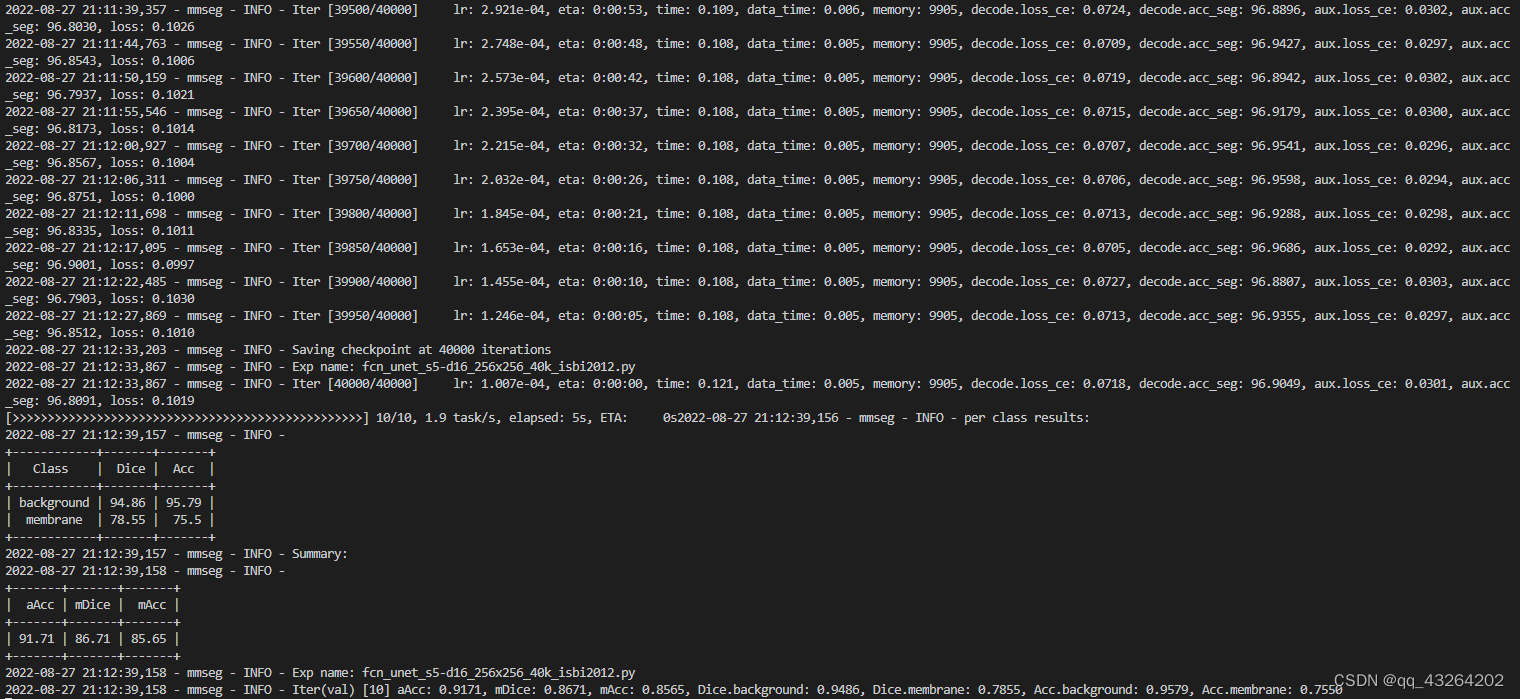
开始训练,并得到最终结果。
六、推理
在tools/test.py中进行如下设置
import argparse
import os
import os.path as osp
import shutil
import time
import warnings
import mmcv
import torch
from mmcv.cnn.utils import revert_sync_batchnorm
from mmcv.runner import (get_dist_info, init_dist, load_checkpoint,
wrap_fp16_model)
from mmcv.utils import DictAction
from mmseg import digit_version
from mmseg.apis import multi_gpu_test, single_gpu_test
from mmseg.datasets import build_dataloader, build_dataset
from mmseg.models import build_segmentor
from mmseg.utils import build_ddp, build_dp, get_device, setup_multi_processes
def parse_args():
parser = argparse.ArgumentParser(
description='mmseg test (and eval) a model')
parser.add_argument('--config',
default='configs/unet/fcn_unet_s5-d16_256x256_40k_isbi2012.py',
help='train config file path')
parser.add_argument('--checkpoint',
default='output/ISBI2012/unet/latest.pth',
help='checkpoint file')
parser.add_argument(
'--work-dir',
help=('if specified, the evaluation metric results will be dumped'
'into the directory as json'))
parser.add_argument(
'--aug-test', action='store_true', help='Use Flip and Multi scale aug')
parser.add_argument('--out', help='output result file in pickle format')
parser.add_argument(
'--format-only',
action='store_true',
help='Format the output results without perform evaluation. It is'
'useful when you want to format the result to a specific format and '
'submit it to the test server')
parser.add_argument(
'--eval',
type=str,
nargs='+',
default='mDice',
help='evaluation metrics, which depends on the dataset, e.g., "mIoU"'
' for generic datasets, and "cityscapes" for Cityscapes')
parser.add_argument('--show',
default=True,
action='store_true', help='show results')
parser.add_argument(
'--show-dir',
default='output/ISBI2012/unet/show_dir',
help='directory where painted images will be saved')
parser.add_argument(
'--gpu-collect',
action='store_true',
help='whether to use gpu to collect results.')
parser.add_argument(
'--gpu-id',
type=int,
default=0,
help='id of gpu to use '
'(only applicable to non-distributed testing)')
parser.add_argument(
'--tmpdir',
help='tmp directory used for collecting results from multiple '
'workers, available when gpu_collect is not specified')
parser.add_argument(
'--options',
nargs='+',
action=DictAction,
help="--options is deprecated in favor of --cfg_options' and it will "
'not be supported in version v0.22.0. Override some settings in the '
'used config, the key-value pair in xxx=yyy format will be merged '
'into config file. If the value to be overwritten is a list, it '
'should be like key="[a,b]" or key=a,b It also allows nested '
'list/tuple values, e.g. key="[(a,b),(c,d)]" Note that the quotation '
'marks are necessary and that no white space is allowed.')
parser.add_argument(
'--cfg-options',
nargs='+',
action=DictAction,
help='override some settings in the used config, the key-value pair '
'in xxx=yyy format will be merged into config file. If the value to '
'be overwritten is a list, it should be like key="[a,b]" or key=a,b '
'It also allows nested list/tuple values, e.g. key="[(a,b),(c,d)]" '
'Note that the quotation marks are necessary and that no white space '
'is allowed.')
parser.add_argument(
'--eval-options',
nargs='+',
action=DictAction,
help='custom options for evaluation')
parser.add_argument(
'--launcher',
choices=['none', 'pytorch', 'slurm', 'mpi'],
default='none',
help='job launcher')
parser.add_argument(
'--opacity',
type=float,
default=0.5,
help='Opacity of painted segmentation map. In (0, 1] range.')
parser.add_argument('--local_rank', type=int, default=0)
args = parser.parse_args()
if 'LOCAL_RANK' not in os.environ:
os.environ['LOCAL_RANK'] = str(args.local_rank)
if args.options and args.cfg_options:
raise ValueError(
'--options and --cfg-options cannot be both '
'specified, --options is deprecated in favor of --cfg-options. '
'--options will not be supported in version v0.22.0.')
if args.options:
warnings.warn('--options is deprecated in favor of --cfg-options. '
'--options will not be supported in version v0.22.0.')
args.cfg_options = args.options
return args
def main():
args = parse_args()
assert args.out or args.eval or args.format_only or args.show \
or args.show_dir, \
('Please specify at least one operation (save/eval/format/show the '
'results / save the results) with the argument "--out", "--eval"'
', "--format-only", "--show" or "--show-dir"')
if args.eval and args.format_only:
raise ValueError('--eval and --format_only cannot be both specified')
if args.out is not None and not args.out.endswith(('.pkl', '.pickle')):
raise ValueError('The output file must be a pkl file.')
cfg = mmcv.Config.fromfile(args.config)
if args.cfg_options is not None:
cfg.merge_from_dict(args.cfg_options)
setup_multi_processes(cfg)
if cfg.get('cudnn_benchmark', False):
torch.backends.cudnn.benchmark = True
if args.aug_test:
cfg.data.test.pipeline[1].img_ratios = [
0.5, 0.75, 1.0, 1.25, 1.5, 1.75
]
cfg.data.test.pipeline[1].flip = True
cfg.model.pretrained = None
cfg.data.test.test_mode = True
if args.gpu_id is not None:
cfg.gpu_ids = [args.gpu_id]
if args.launcher == 'none':
cfg.gpu_ids = [args.gpu_id]
distributed = False
if len(cfg.gpu_ids) > 1:
warnings.warn(f'The gpu-ids is reset from {cfg.gpu_ids} to '
f'{cfg.gpu_ids[0:1]} to avoid potential error in '
'non-distribute testing time.')
cfg.gpu_ids = cfg.gpu_ids[0:1]
else:
distributed = True
init_dist(args.launcher, **cfg.dist_params)
rank, _ = get_dist_info()
if args.work_dir is not None and rank == 0:
mmcv.mkdir_or_exist(osp.abspath(args.work_dir))
timestamp = time.strftime('%Y%m%d_%H%M%S', time.localtime())
if args.aug_test:
json_file = osp.join(args.work_dir,
f'eval_multi_scale_{timestamp}.json')
else:
json_file = osp.join(args.work_dir,
f'eval_single_scale_{timestamp}.json')
elif rank == 0:
work_dir = osp.join('./work_dirs',
osp.splitext(osp.basename(args.config))[0])
mmcv.mkdir_or_exist(osp.abspath(work_dir))
timestamp = time.strftime('%Y%m%d_%H%M%S', time.localtime())
if args.aug_test:
json_file = osp.join(work_dir,
f'eval_multi_scale_{timestamp}.json')
else:
json_file = osp.join(work_dir,
f'eval_single_scale_{timestamp}.json')
dataset = build_dataset(cfg.data.test)
loader_cfg = dict(
num_gpus=len(cfg.gpu_ids),
dist=distributed,
shuffle=False)
loader_cfg.update({
k: v
for k, v in cfg.data.items() if k not in [
'train', 'val', 'test', 'train_dataloader', 'val_dataloader',
'test_dataloader'
]
})
test_loader_cfg = {
**loader_cfg,
'samples_per_gpu': 1,
'shuffle': False,
**cfg.data.get('test_dataloader', {})
}
data_loader = build_dataloader(dataset, **test_loader_cfg)
cfg.model.train_cfg = None
model = build_segmentor(cfg.model, test_cfg=cfg.get('test_cfg'))
fp16_cfg = cfg.get('fp16', None)
if fp16_cfg is not None:
wrap_fp16_model(model)
checkpoint = load_checkpoint(model, args.checkpoint, map_location='cpu')
if 'CLASSES' in checkpoint.get('meta', {}):
model.CLASSES = checkpoint['meta']['CLASSES']
else:
print('"CLASSES" not found in meta, use dataset.CLASSES instead')
model.CLASSES = dataset.CLASSES
if 'PALETTE' in checkpoint.get('meta', {}):
model.PALETTE = checkpoint['meta']['PALETTE']
else:
print('"PALETTE" not found in meta, use dataset.PALETTE instead')
model.PALETTE = dataset.PALETTE
torch.cuda.empty_cache()
eval_kwargs = {} if args.eval_options is None else args.eval_options
efficient_test = eval_kwargs.get('efficient_test', False)
if efficient_test:
warnings.warn(
'``efficient_test=True`` does not have effect in tools/test.py, '
'the evaluation and format results are CPU memory efficient by '
'default')
eval_on_format_results = (
args.eval is not None and 'cityscapes' in args.eval)
if eval_on_format_results:
assert len(args.eval) == 1, 'eval on format results is not ' \
'applicable for metrics other than ' \
'cityscapes'
if args.format_only or eval_on_format_results:
if 'imgfile_prefix' in eval_kwargs:
tmpdir = eval_kwargs['imgfile_prefix']
else:
tmpdir = '.format_cityscapes'
eval_kwargs.setdefault('imgfile_prefix', tmpdir)
mmcv.mkdir_or_exist(tmpdir)
else:
tmpdir = None
cfg.device = get_device()
if not distributed:
warnings.warn(
'SyncBN is only supported with DDP. To be compatible with DP, '
'we convert SyncBN to BN. Please use dist_train.sh which can '
'avoid this error.')
if not torch.cuda.is_available():
assert digit_version(mmcv.__version__) >= digit_version('1.4.4'), \
'Please use MMCV >= 1.4.4 for CPU training!'
model = revert_sync_batchnorm(model)
model = build_dp(model, cfg.device, device_ids=cfg.gpu_ids)
results = single_gpu_test(
model,
data_loader,
args.show,
args.show_dir,
False,
args.opacity,
pre_eval=args.eval is not None and not eval_on_format_results,
format_only=args.format_only or eval_on_format_results,
format_args=eval_kwargs)
else:
model = build_ddp(
model,
cfg.device,
device_ids=[int(os.environ['LOCAL_RANK'])],
broadcast_buffers=False)
results = multi_gpu_test(
model,
data_loader,
args.tmpdir,
args.gpu_collect,
False,
pre_eval=args.eval is not None and not eval_on_format_results,
format_only=args.format_only or eval_on_format_results,
format_args=eval_kwargs)
rank, _ = get_dist_info()
if rank == 0:
if args.out:
warnings.warn(
'The behavior of ``args.out`` has been changed since MMSeg '
'v0.16, the pickled outputs could be seg map as type of '
'np.array, pre-eval results or file paths for '
'``dataset.format_results()``.')
print(f'\nwriting results to {args.out}')
mmcv.dump(results, args.out)
if args.eval:
eval_kwargs.update(metric=args.eval)
metric = dataset.evaluate(results, **eval_kwargs)
metric_dict = dict(config=args.config, metric=metric)
mmcv.dump(metric_dict, json_file, indent=4)
if tmpdir is not None and eval_on_format_results:
shutil.rmtree(tmpdir)
if __name__ == '__main__':
main()
print('ok')
如果没有标签的测试集中,在–eval参数中设置为None即可。
parser.add_argument(
'--eval',
type=str,
nargs='+',
default=None,
help='evaluation metrics, which depends on the dataset, e.g., "mIoU"'
' for generic datasets, and "cityscapes" for Cityscapes')
如果想要输出最终的图像为Mask掩膜,不将原图数据作为背景,可以设置opacity参数为1
    parser.add_argument(
        '--opacity',
        type=float,
        default=1,
        help='Opacity of painted segmentation map. In (0, 1] range.')
最后结果:
warnings.warn(
[>>>>>>>>>>>>>>>>>>>>>>>>>>>>>>>>>>>>>>>>>>>>>>>>>>] 30/30, 3.9 task/s, elapsed: 8s, ETA:     0

本文内容由网友自发贡献,版权归原作者所有,本站不承担相应法律责任。如您发现有涉嫌抄袭侵权的内容,请联系:hwhale#tublm.com(使用前将#替换为@)