本博文是本人学习gazebo的学习记录。
Gazebo是一款3D仿真器,支持机器人开发所需的机器人、传感器和环境模型,并且通过搭载的物理引擎可以得到逼真的仿真结果。Gazebo是近年来最受欢迎的三维仿真器之一,并被选为美国DARPA机器人挑战赛7的官方仿真器。因此它再接再厉,即便是开源仿真器,却具有高水准的仿真性能,因此在机器人工程领域中非常流行。不仅如此,负责开发和普及ROS,且担任社区的Open obotics在开发ROS和Gazebo,因此ROS和Gazebo非常兼容。
Gazebo不仅提供虚拟机器人的外形,还可以检测机体的碰撞,也可以测量位置,还能虚拟地使用IMU传感器和摄像机传感器。
目录
Gazebo 测试
run gazebo
world files
Environment Variables
Model files
基于turtlebot3的gazebo测试
Gazebo 基本介绍
User Interface
The Toolbars
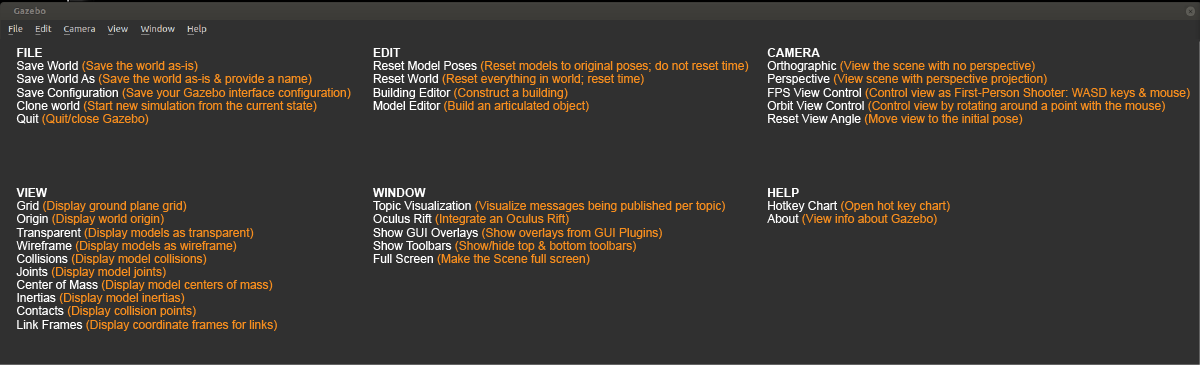
菜单
通过gazebo创建一个机器人
创建一个world仿真环境
添加目标
下载gazebo模型
保存创建的world
gazebo仿真环境的特性
Physics Properties
Connect to ROS
采用roslaunch来启动gazebo
基于ROS的gazebo深度相机
基于ROS的gazebo遥控仿真
BUG解决
参考资料
Gazebo 测试
http://gazebosim.org/tutorials?cat=get_started
之前在安装ROS的时候已经安装好了gazebo。(没安装的可以参考http://gazebosim.org/tutorials?cat=guided_b&tut=guided_b1)
run gazebo
通过下面代码就可以直接打开gazebo
gazebo
此时打开的将会是一个空的gazebo空间,如下图所示

导入机器人pioneer2dx。运行下面command
gazebo worlds/pioneer2dx.world
Note: If you don't have the pioneer2dx model already, Gazebo will download it from the online model database which may take some time.
结果如下图所示

world files
The world description file contains all the elements in a simulation, including robots, lights, sensors, and static objects. This file is formatted using SDF (Simulation Description Format), and typically has a .world extension.
world文件其实就是所建立的gazebo仿真环境的模型。
这个网站有一系列word文件的文档(https://bitbucket.org/osrf/gazebo/src/default/worlds/)
The Gazebo server (gzserver) reads this file to generate and populate a world.
Environment Variables
Gazebo uses a number of environment variables to locate files, and set up communications between the server and clients. Default values that work for most cases are compiled in. This means you don't need to set any variables
Model files
A model file uses the same SDF format as world files, but should only contain a single <model> ... </model>. The purpose of these files is to facilitate model reuse, and simplify world files. Once a model file is created, it can be included in a world file using the following SDF syntax:
<include>
  <uri>model://model_file_name</uri>
</include>
所谓的模型文件应该就是加载到仿真环境的物体了
这个网址有一系列模型的文件(https://bitbucket.org/osrf/gazebo_models/src/default/)
基于turtlebot3的gazebo测试
首先运行roscore
然后在gazebo内运行turtlebot
roslaunch turtlebot_gazebo turtlebot_world.launch
由于我已经定义了自己的turtlebot模型,所以可以运行为
roslaunch turtlebot3_gazebo turtlebot3_world.launch
结果如下图所示

类似于RVIZ,gazebo也可以用鼠标来控制不同的视角。如下图所示

然后运行rviz来可视化gazebo仿真环境
具体可以参考博客https://blog.csdn.net/m0_37340621/article/details/104111415?utm_source=blogxgwz4
打开键盘遥控节点
roslaunch turtlebot3_teleop turtlebot3_teleop_key.launch
Gazebo 基本介绍
gazebo是一种适用于复杂室内多机器人和室外环境的仿真环境。它能够在三维环境中对多个机器人、传感器及物体进行仿真,产生实际传感器反馈和物体之间的物理响应。
User Interface
Gazebo的界面如下图所示

首先中间部分为仿真器的场景

通过拖动将其与场景分隔开的栏,可以显示、隐藏或调整左右两侧面板的大小。

在gazebo的左边主要有以下三个标签:
-
WORLD: The World tab displays the models that are currently in the scene, and allows you to view and modify model parameters, like their pose. You can also change the camera view angle by expanding the "GUI" option and tweaking the camera pose.
-
INSERT: The Insert tab is where you add new objects (models) to the simulation. To see the model list, you may need to click the arrow to expand the folder. Click (and release) on the model you want to insert, and click again in the Scene to add it.
-
LAYERS: The Layers tab organizes and displays the different visualization groups that are available in the simulation, if any. A layer may contain one or more models. Toggling a layer on or off will display or hide the models in that layer.
The Toolbars
The Gazebo interface has two Toolbars. One is located just above the Scene, and the other is just below.


菜单
通过gazebo创建一个机器人
http://gazebosim.org/tutorials?cat=build_robot
Gazebo is able to dynamically load models into simulation either programmatically or through the GUI. Models exist on your computer, after they have been downloaded or created by you.
由于本人并不是做机械设计等。接下来在仿真用到的机器人都将是直接下载的模型或者加载已有的模型。但感兴趣的reader可以参考上面的连接来看怎么定义自己的机器人。
创建一个world仿真环境
http://gazebosim.org/tutorials?cat=build_world
Terminology(术语)
- World: The term used to describe a collection of robots and objects (such as buildings, tables, and lights), and global parameters including the sky, ambient light, and physics properties.
- Static: Entities marked as static (those having the
<static>true</static> element in SDF), are objects which only have collision geometry. All objects which are not meant to move should be marked as static, which is a performance enhancement. - Dynamic: Entities marked as dynamic (either missing the
<static> element or setting false in SDF), are objects which have both inertia and a collision geometry.
首先运行gazebo
添加目标
gazebo有两个地方可以添加物体
The first is a set of simple shapes, located above the render window.

The second is via the model database, which is accessible by selecting the Insert tab in the upper left corner.

The pose of each model may be altered through the translate and rotate tools:

下载gazebo模型
cd ~/.gazebo/
ls

cd ~/.gazebo/models/

wget http://file.ncnynl.com/ros/gazebo_models.txt

wget -i gazebo_models.txt
(下载比较耗费时间~)
下载完需要解压
ls model.tar.g* | xargs -n1 tar xzvf
解压完后会看到多了很多模型

然后运行下面命令可以删除压缩包(省点空间哈哈)
rm -fr model.tar.g*
因为文件名都是以“rm -fr model.tar.g*”形式命名的,*是数字
添加一系列机器人,结果如下图所示

保存创建的world
Once you are happy with a world it can be save through the File menu.
Select the File menu now, and choose Save World As.
A pop-up will appear asking you to enter a new filename. Enter my_world.sdf and click okay.
运行下面命令即可打开之前所创建的文件了
gazebo 文件的绝对路径

gazebo仿真环境的特性
In the World tab, select the scene item. A list of scene properties will be displayed in the list box below. Click the triangle to expand the properties.
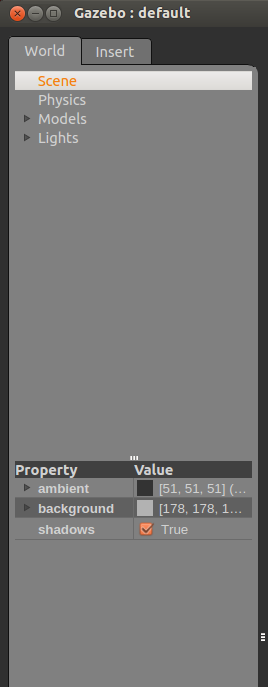
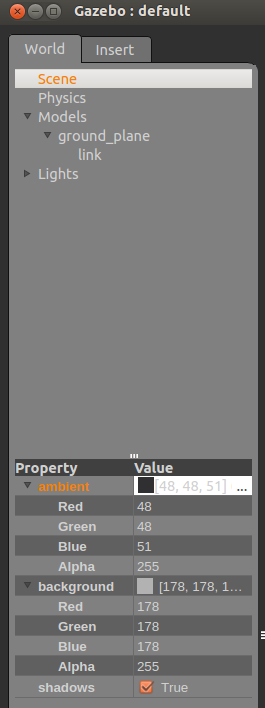
These properties allow you to change the ambient light. Note: The background color will not change if the Sky is enabled.
其实就是改变场景的颜色

Physics Properties
这部分实际上就是一些物理特性,比如中立等等的设置(平时仿真中直接默认就好了)
In the World tab, select the physics item. A list of physics properties will be displayed in the list box below.
- The
enable physics check-box can be used to disable physics while allowing plugins and sensors to continue running. - The
real time update rate parameter specifies in Hz the number of physics updates that will be attempted per second. If this number is set to zero, it will run as fast as it can. Note that the product of real time update rate and max step sizerepresents the target real time factor, or ratio of simulation time to real-time. - The
max step size specifies the time duration in seconds of each physics update step.
In the gravity block:
- The
x, y and z parameters set the global gravity vector components in m/s^2.
In the solver block:
- The
iterations parameter specifies the number of iterations to use for iterative LCP solvers (used by ODE and bullet). - The
SOR parameter stands for successive over-relaxation, which can be used to try to speed the convergence of the iterative method.
The constraints block contains several parameters related to solving constraints:
- The
CFM and ERP parameters stands for Constraint Force Mixing and Error Reduction Parameter and are used by ODE and bullet. The CFM and ERP parameters can be related to linear stiffness and damping coefficients. The max velocity and surface layer parameters are used to resolve contacts with a split impulse method. Any contacts with that penetrate deeper than a depth specified by surface layer and have a normal velocity less than max velocity will not bounce.
这个连接是描述这些参数的(http://osrf-distributions.s3.amazonaws.com/sdformat/api/dev.html#physics12)

Connect to ROS
(http://gazebosim.org/tutorials?cat=connect_ros)
由于本人学习gazebo的最主要目的就是用于ROS的仿真上,为此这一部分讲一下gazebo跟ROS的联系
关于ROS的介绍,之前的博客已经有讲过了,可以参考《复习笔记之——ROS(robot operating system)》
The set of ROS packages for interfacing with Gazebo are contained within a new meta package (catkin's version of stacks) named gazebo_ros_pkgs.在这个连接里有ROS与gazebo的包(https://wiki.ros.org/gazebo_ros_pkgs)
They provide the necessary interfaces to simulate a robot in Gazebo using ROS messages, services and dynamic reconfigure Some features :
- Supports a stand alone system dependency of Gazebo, that has no ROS bindings on its own
- Builds with catkin
- Treats URDF and SDF as equally as possible
- Reduces code duplication with Gazebo
- Improves out of the box support for controllers using
ros_control - Integrates real time controller efficiency improvements from the DARPA Robotics Challenge
- Cleans up old code from previous versions of ROS and Gazebo

安装对应版本的gazebo_ros_pkgs
sudo apt-get install ros-melodic-gazebo-ros-pkgs ros-melodic-gazebo-ros-control
安装成功

下面来测试一下
Be sure to always source the appropriate ROS setup file, which for melodic is done like so:
source /opt/ros/melodic/setup.bash
Source the catkin setup.
source ~/catkin_ws/devel/setup.bash
然后运行
roscore
rosrun gazebo_ros gazebo
rostopic list

rosservice list

采用roslaunch来启动gazebo
The roslaunch tool is the standard method for starting ROS nodes and bringing up robots in ROS. To start an empty Gazebo world similar to the rosrun command in the previous tutorial, simply run
roslaunch gazebo_ros empty_world.launch
关于用roslaunch来启动gazebo有一系列的参数。可以参考(http://gazebosim.org/tutorials?tut=ros_roslaunch&cat=connect_ros)但一般采用默认的,就是直接打开
当然,通过不同的launch文件可以导入不同的world,如下图所示

基于ROS的gazebo深度相机
http://gazebosim.org/tutorials?tut=ros_depth_camera&cat=connect_ros
Because Gazebo and ROS are separate projects that do not depend on each other, sensors from the gazebo_models repository(存储库) (such as depth cameras) do not include ROS plugins by default.
由于ros和gazebo都是分别的project。所以直接从gazebo的模型库中导入的模型是不会带有ROS插件的。这意味着我们需要基于已有的gazebo存储库来创建自己的camera,使得该camera可以发布点云和图像到ROS中
通过这个网址来下载模型(http://bitbucket.org/osrf/gazebo_tutorials/raw/default/ros_depth_camera/files/kinect.zip)这是一个Kinect sensor

由于这个模型本身已经存在gazebo的库里面了,所以将这个包重命名为kinect_ros
To change the model's name, you should update the folder name, the <name> stored in the .config file, and the model name in the model.sdf file.(关于这些文件的介绍可以参考http://gazebosim.org/tutorials?tut=model_contrib&cat=build_robot)


然后添加ROS插件
Now you need to add the ROS plugin to publish depth camera information and output to ROS topics. A list of ROS plugins, with example code, can be found in the plugins tutorial(http://gazebosim.org/tutorials?tut=ros_gzplugins&cat=connect_ros).
在这里我们会使用"Openni Kinect" plugin. You can (and should) use this plugin for other types of depth cameras besides the Kinect (it's an older plugin, and so it retains its old name).
Open the model.sdf file in your new model's directory. Add the following SDF markup inside the <sensor> tag, immediately after the closing </camera> tag:如下图所示

        <plugin name="camera_plugin" filename="libgazebo_ros_openni_kinect.so">
          <baseline>0.2</baseline>
          <alwaysOn>true</alwaysOn>
          <!-- Keep this zero, update_rate in the parent <sensor> tag
            will control the frame rate. -->
          <updateRate>0.0</updateRate>
          <cameraName>camera_ir</cameraName>
          <imageTopicName>/camera/color/image_raw</imageTopicName>
          <cameraInfoTopicName>/camera/color/camera_info</cameraInfoTopicName>
          <depthImageTopicName>/camera/depth/image_raw</depthImageTopicName>
          <depthImageCameraInfoTopicName>/camera/depth/camera_info</depthImageCameraInfoTopicName>
          <pointCloudTopicName>/camera/depth/points</pointCloudTopicName>
          <frameName>camera_link</frameName>
          <pointCloudCutoff>0.5</pointCloudCutoff>
          <pointCloudCutoffMax>3.0</pointCloudCutoffMax>
          <distortionK1>0</distortionK1>
          <distortionK2>0</distortionK2>
          <distortionK3>0</distortionK3>
          <distortionT1>0</distortionT1>
          <distortionT2>0</distortionT2>
          <CxPrime>0</CxPrime>
          <Cx>0</Cx>
          <Cy>0</Cy>
          <focalLength>0</focalLength>
          <hackBaseline>0</hackBaseline>
        </plugin>
As you can see, this plugin allows you a lot of fine-grained control over how the information is passed to ROS. A few points to note:
- The
updateRate parameter should be set to 0, which will cause the plugin to publish depth information as the same rate as the parent SDF sensor. If updateRate is not 0, it will do additional throttling on top of the parent sensor's update rate. - The topic names and
frameName can be set to whatever you'd like, but the ones shown above match the default topics that are published by commonly used ROS packages, such as openni2_launch. Keeping the topic names the same will help make switching between real and simulated cameras easier. - The
distortionX parameters should match those in the <distortion> tag of the parent camera. If there is no <distortion> tag, then use 0 for all the distortionX values. pointCloudCutoff and pointCloudCutoffMax is the minimum and maximum distance for points, respectively. No points beyond this distance will be shown. This is an additional restriction to any clipping that has been set in the parent sensor.
Once you've renamed the model, added the above code to your .sdf file, and saved your changes, you should be ready to roll!
接下来测试。
打开gazebo
roslaunch gazebo_ros empty_world.launch
添加model("Kinect ROS" model)
然后运行rviz
rosrun rviz rviz
You can also run RViz (rosrun rviz rviz). First, set the RViz Fixed Frame in the left panel's Global Options section to match the value you set for <frameName> in the plugin XML code. Then, add a PointCloud2 and/or an Image display to RViz. For an Image, set the Image Topic to the value you used in the <imageTopicName> tag. For the PointCloud2, set the Topic to the name you used in the <depthImageTopicName> tag. See the screenshot below for an example that matches the values in the example sensor XML above:

结果如下图所示

基于ROS的gazebo遥控仿真
(http://emanual.robotis.com/docs/en/platform/turtlebot3/simulation/#gazebo-3d)
在ROS教程里,本身就有基于gazebo的slam仿真。通过这一事例,看看ros和gazebo的关系
为了在Gazebo运行TurtleBot,先安装相关的功能包。要安装的功能包有gazebo_ros_pkgs metapack和turtlebot3_gazebo。前者的功能是连接Gazebo和ROS,已经安装。后者是与TurtleBot3的三维仿真有关的功能包(均已安装)
通过下面命令打开turtlebot3
roslaunch turtlebot3_gazebo turtlebot3_empty_world.launch
添加几个turtlebot3机器人如下图所示

通过下面命令运行一个仿真环境
roslaunch turtlebot3_gazebo turtlebot3_world.launch

然后运行下面命令来用键盘遥控
roslaunch turtlebot3_teleop turtlebot3_teleop_key.launch
通过下面命令用rviz打开
roslaunch turtlebot3_gazebo turtlebot3_gazebo_rviz.launch
运行下面命令可以更换机器人的模型
export TURTLEBOT3_MODEL=waffle
roslaunch turtlebot3_gazebo turtlebot3_world.launch

启动机器人(让它自动运动或者键盘遥控)
roslaunch turtlebot3_gazebo turtlebot3_simulation.launch
打开rviz
export TURTLEBOT3_MODEL=waffle
roslaunch turtlebot3_gazebo turtlebot3_gazebo_rviz.launch
如下图所示

但是直接在gazebo环境再添加一个turtlebot3机器人却是不能控制的

新增加的机器人在rviz中是可以看到的

BUG解决
突然出现的一个bug是,当运行过下面命令来打开创建的gazebo文件后,再输入gazebo无法打开,那篇用rosluanch打开gazebo文件出现的还是创建的环境
gazebo 文件的绝对路径
感觉应该是缓存没有去掉而导致的。运行下面两条命令可以清一下重新打开就可以了。
killall gzserver
killall gzclient
参考资料
http://learn.turtlebot.com/2015/02/03/1/
http://gazebosim.org/tutorials/
https://www.cnblogs.com/linuxAndMcu/p/10876005.html
https://blog.csdn.net/qq_36170626/article/details/90417359
本文内容由网友自发贡献,版权归原作者所有,本站不承担相应法律责任。如您发现有涉嫌抄袭侵权的内容,请联系:hwhale#tublm.com(使用前将#替换为@)