目录:
- 前言
- IMU标定
-
- Camera-IMU标定
- 1、安装依赖
- 2、编译Kaibr
- 3、制作标定板
-
- 4、数据采集
- 5、相机标定
-
- 6、相机-IMU外参标定
-
前言
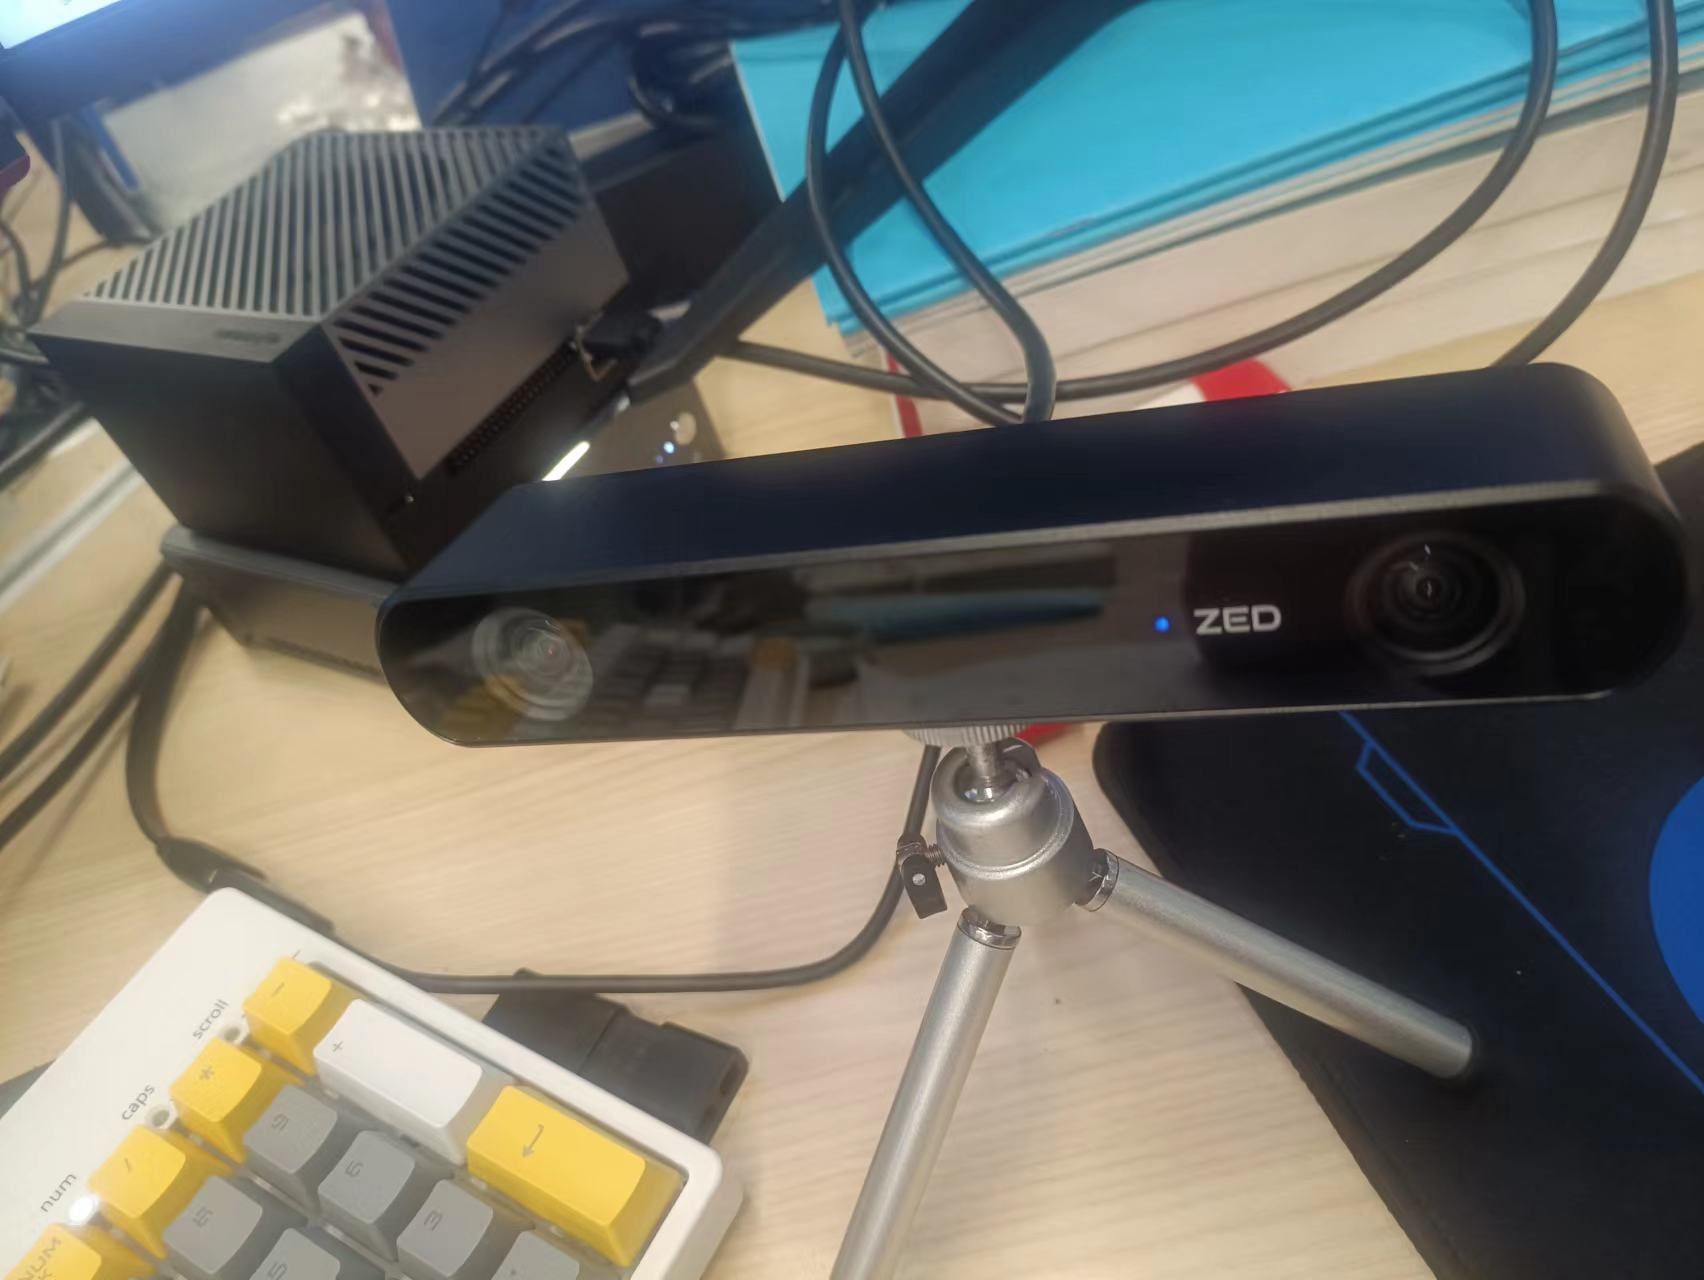
最近团队买了一个ZED 2i双目相机,之前也做过一些其他一些相机的标定比如 realsence d435i,但之前都没有对标定整个流程整理过,现在刚好趁标定这个新相机对标定的一些流程做一次整理,方便以后查看
IMU标定
标定IMU的白噪声和bias游走时,有两个常用的开源工具,一个是imu_utils,一个是kalibr_allan,都是计算IMU随机误差的Allan方差的。本文主要使用的是imu_utils进行IMU的标定。
Allan方差是将误差序列在某个指定的时间尺度上的波动情况进行了精确提取,其具体计算步骤如下:
- 将整段误差序列按设定的时间尺度的长度(例如1分钟)进行分块;
通过分块确定所要考察的时间块长度;
- 每块求平均值;
利用块内求平均的办法把短于块长度的那些快速变化成份(细节)都抹掉;
- 相邻块的平均值求差;
利用相邻块求差的办法把长于两块长度的那些缓慢变化成份(宏观)都抹掉
- 将所有差值进行统计,得到其均方值,并乘以1/2。
最后对差值序列统计其均方值(这是处理任何随机样本的标准操作),这样统计出来的就是介于1倍块长度和2倍块长度这样一个很窄的时间尺度范围内的误差波动情况。
参考:Allan方差分析方法的直观理解
1、编译标定工具
使用 imu_utils 进行标定,它依赖ceres-solver优化库,要先安装ceres库
另外,imu_utils是依赖于code_utils的,所以先编译code_utils后再下载编译imu_utils
cd  ~/calibration_ws/src
git clone https://github.com/gaowenliang/code_utils
cd ..
catkin_make
编译报错一:
fatal error: backward.hpp:No such file or directory
- 解决方法:打开工程将sumpixel_test.cpp中的#include “backward.hpp"修改为#include “code_utils/backward.hpp”
编译报错二:
code_utils/backward.hpp:216:30: fatal error: elfutils/libdw.h: No such file or directory
- 解决办法:安装libdw-dev库,
sudo apt install libdw-dev
编译成功code_utils之后,下载编译imu_utils
cd  ~/calibration_ws/src
git clone https://github.com/gaowenliang/imu_utils
cd ..
catkin_make
2、准备数据集
静止IMU,录制一段两个小时左右的 /imu_topic 的数据,用于之后回放标定
rosbag record -O zed-imu-calibrate.bag /zed2i/zed_node/imu/data_raw

3、标定
编写一个launch文件,启动标定工具。这里以我标定ZED 2i内部的IMU为例,如下:
<launch>
<node pkg="imu_utils" type="imu_an" name="imu_an" output="screen">
<param name="imu_topic" type="string" value= "/zed2i/zed_node/imu/data_raw"/>
<param name="imu_name" type="string" value= "zed_imu"/>
<param name="data_save_path" type="string" value= "/home/linzs/ZED_calib/imu_calib"/>
<param name="max_time_min" type="int" value= "170"/>
<param name="max_cluster" type="int" value= "100"/>
</node>
</launch>
之后就是播放录制的数据集,以及运行上面的launch文件,
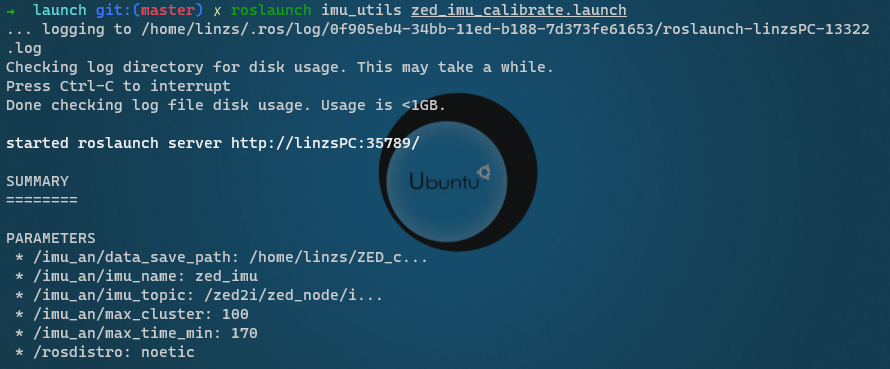
播放数据集的时候可以加速播放,我这里是加速了200倍

最后会生成标定文件如下:
Camera-IMU标定
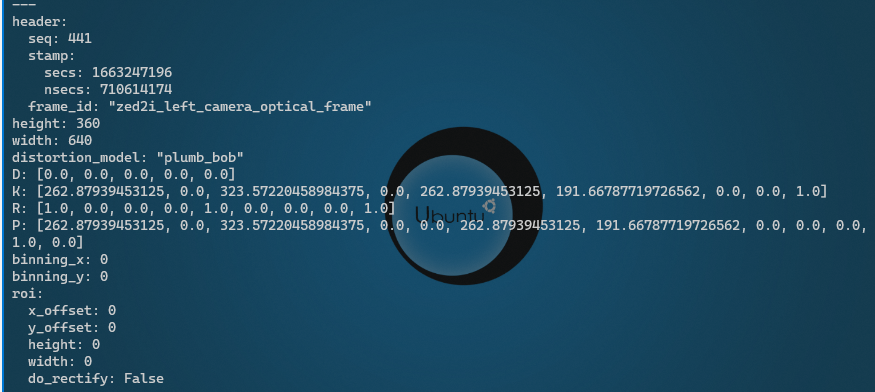
相机的内参可以通过读取/camera/color/camera_info话题获得,如果没有这个话题也可以通过Kaibr标定出来
其实,这个ZED 2i相机的话题特别多,里面就包含了相机内参和外参信息发布的话题,但是为了记录标定流程这里还是按标定流程来进行记录
使用 Kalibr 标定双目相机内外参数以及和IMU之间外参数。Kaibr在SLAM领域比较出名,它提供多相机系统、相机-IMU系统互标定的功能
Kailbr 使用手册 https://slightech.github.io/MYNT-EYE-S-SDK-Guide/src/slam/how_to_use_kalibr.html
1、安装依赖
$ sudo apt install python-setuptools python-rosinstall ipython libeigen3-dev libboost-all-dev doxygen libopencv-dev
$ sudo apt install ros-noetic-vision-opencv ros-noetic-image-transport-plugins ros-noetic-cmake-modules
$ sudo apt install python-software-properties software-properties-common libpoco-dev python-matplotlib python-scipy python-git python-pip ipython
$ sudo apt install libtbb-dev libblas-dev liblapack-dev python-catkin-tools libv4l-dev
$ sudo apt install build-essential python-dev libxml2 libxml2-dev zlib1g-dev bison flex libigraph0-dev texlive-binaries
$ sudo pip install -i https://pypi.tuna.tsinghua.edu.cn/simple python-igraph
$ sudo pip install python-igraph --upgrade
2、编译Kaibr
$ cd ~/kalibr_ws/src
$ git clone https://github.com/ethz-asl/Kalibr.git
$ cd .. && catkin build -DCMAKE_BUILD_TYPE=Release -j2
使用方式
$ rosrun kalibr <command_you_want_to_run_here>
例如:查看标定板生成的指令的参数
$ rosrun kalibr kalibr_create_target_pdf -h
usage:
Example Aprilgrid:
kalibr_create_target_pdf --type apriltag --nx 6 --ny 6 --tsize 0.08 --tspace 0.3
Example Checkerboard:
kalibr_create_target_pdf --type checkerboard --nx 6 --ny 6 -csx 0.05 --csy 0.1
Generate PDFs of calibration patterns.
optional arguments:
-h, --help show this help message and exit
Output options:
output Output filename
–eps Also output an EPS file
Generic grid options:
–type GRIDTYPE The grid pattern type. (‘apriltag’ or ‘checkerboard’)
–nx N_COLS The number of tags in x direction (default: 6)
–ny N_ROWS The number of tags in y direction (default: 7)
Apriltag arguments:
–tsize TSIZE The size of one tag [m] (default: 0.08)
–tspace TAGSPACING The space between the tags in fraction of the edge size [0…1] (default: 0.3)
–tfam TAGFAMILIY Familiy of April tags [‘t16h5’, ‘t25h7’, ‘t25h9’, ‘t36h11’] (default: t36h11)
–skip-ids SKIPIDS Space-separated list of tag ids to leave blank (default: none)
Checkerboard arguments:
–csx CHESSSZX The size of one chessboard square in x direction [m] (default: 0.05)
–csy CHESSSZY The size of one chessboard square in y direction [m] (default: 0.05)
3、制作标定板
下载标定板
三种类型的标定板(Aprilgrid, Checkerboard, Circlegrid)。由于Aprilgrid能提供序号信息, 能够防止姿态计算时出现跳跃的情况, 所以建议采用Aprilgrid进行标定。
标定板下载:https://github.com/ethz-asl/kalibr/wiki/downloads
对于针孔型相机 pinhole,失真模型分为为plumb_bob和rational_polynomial,具体取决于使用的径向畸变参数K的数量,当K为6时是rational_polynomial模型,其他则为plumb_bob。
生成标定板
$ rosrun kalibr kalibr_create_target_pdf --type apriltag --nx 6 --ny 6 --tsize 0.08 --tspace 0.3
这时文件夹中会生成一个标定板 target.pdf

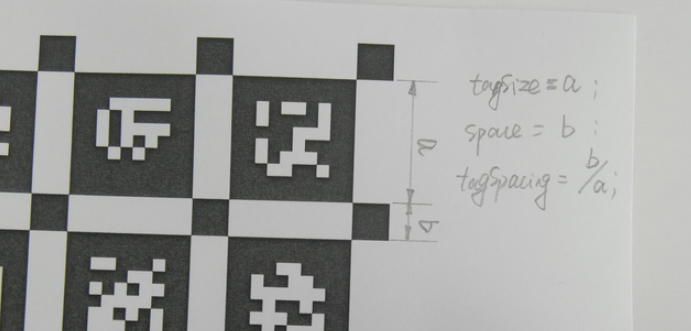
注意:这个是A0纸尺寸的,后面我们编写target.yaml文件的时候要以实际的标定板的尺寸进行参数填写
target.yaml文件
在标定之间我们需要一个描述这个标定板的文件,这个文件是描述标定板的真实尺度的,比如:如果用A4纸打印的就写成如下即可
target_type: 'aprilgrid'
tagCols: 6
tagRows: 6
tagSize: 0.021
tagSpacing: 0.285714285714
codeOffset: 0
4、数据采集
把标定纸放在桌面上,让相机从各个角度对标定纸进行拍摄即可,或者相机不动,把标定纸在相机前面晃,让相机能在各个角度对标定纸拍摄
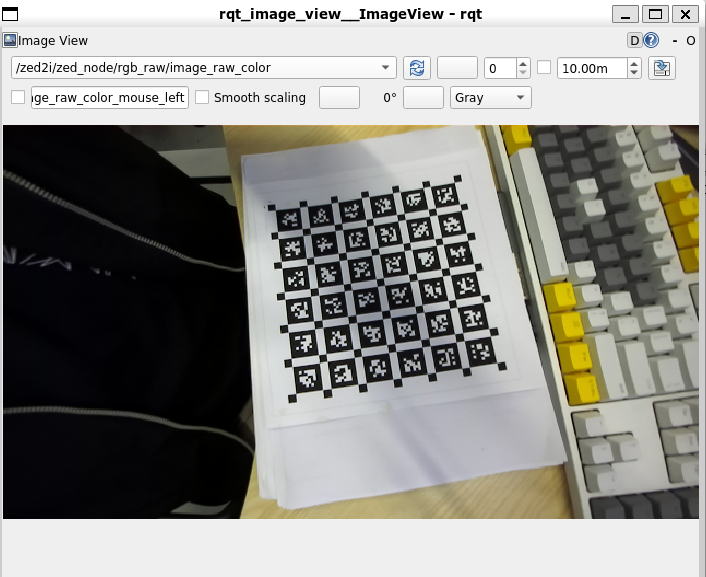
通过rosbag record来进行话题的录制即可
注意:通常设备采集的频率为 20-60 hz, 这会使得标定的图像过多, 而导致计算量太大。 最好通过topic_tools将ros topic的频率降低到4hz左右进行采集
$ roslaunch zed_wrapper zed2i.launch
$ rosrun topic_tools throttle messages /zed2i/zed_node/right_raw/image_raw_color 4.0 /right/image_raw
$ rosrun topic_tools throttle messages /zed2i/zed_node/left_raw/image_raw_color 4.0 /left/image_raw
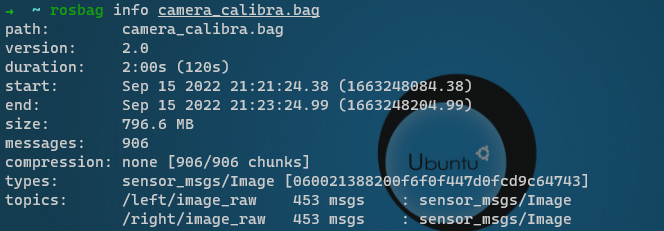
$ rosbag record -O camera_calibra.bag /right/image_raw /left/image_raw
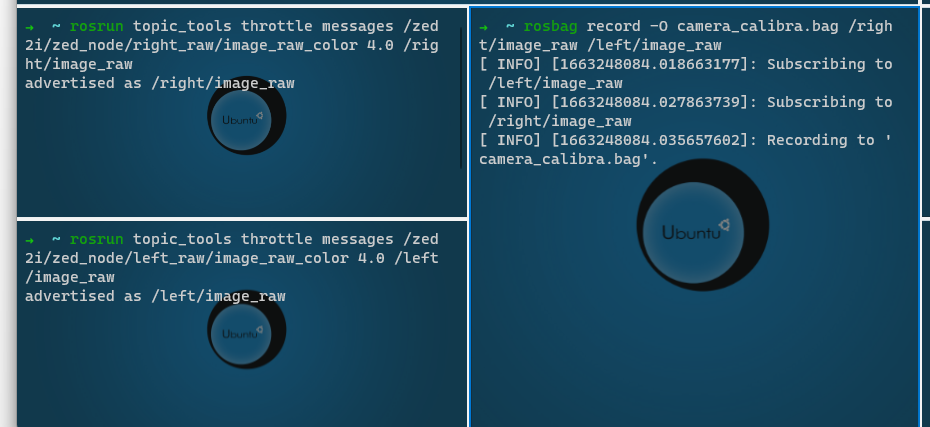
我这里录制了一小段的bag
5、相机标定
kalibr_calibrate_cameras的命令格式,他可以实现多相机标定
$ rosrun kalibr kalibr_calibrate_cameras --bag [filename.bag] --topics [TOPIC_0 ... TOPIC_N] --models [MODEL_0 ... MODEL_N] --target [target.yaml]
相机的models
Camera models
Kalibr supports the following projection models:
pinhole camera model (pinhole)
(intrinsics vector: [fu fv pu pv])
omnidirectional camera model (omni)
(intrinsics vector: [xi fu fv pu pv])
double sphere camera model (ds)
(intrinsics vector: [xi alpha fu fv pu pv])
extended unified camera model (eucm)
(intrinsics vector: [alpha beta fu fv pu pv])
The intrinsics vector contains all parameters for the model:
fu, fv: focal-length
pu, pv: principal point
xi: mirror parameter (only omni)
xi, alpha: double sphere model parameters (only ds)
alpha, beta: extended unified model parameters (only eucm)
Distortion models
Kalibr supports the following distortion models:
radial-tangential (radtan)
(distortion_coeffs: [k1 k2 r1 r2])
equidistant (equi)
(distortion_coeffs: [k1 k2 k3 k4])
fov (fov)
(distortion_coeffs: [w])
none (none)
(distortion_coeffs: [])
pinhole-equi 模型,对畸变大的相机效果不错
标定中遇到的问题
问题1:
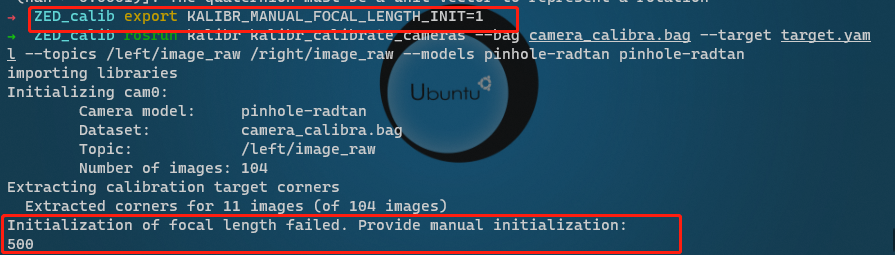
Initialization of focal length failed. You can enable manual input by setting ‘KALIBR_MANUAL_FOCAL_LENGTH_INIT’.

解决办法:终端中设置变量 KALIBR_MANUAL_FOCAL_LENGTH_INIT = 1 然后程序运行时手动给相机设置初始焦距
$ export KALIBR_MANUAL_FOCAL_LENGTH_INIT=1
问题2
Cameras are not connected through mutual observations, please check the dataset. Maybe adjust the approx. sync. tolerance.
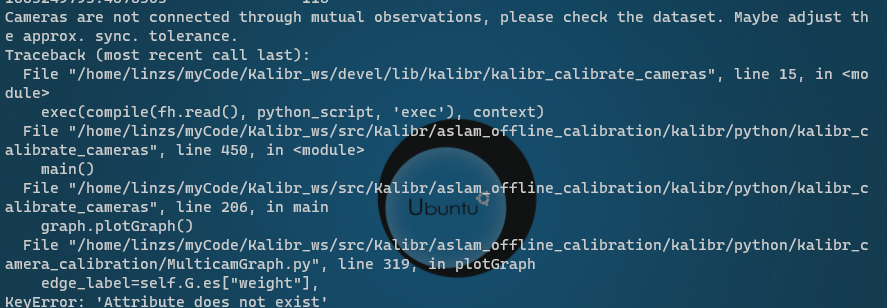
解决办法:Kalibr官网的issue中找到了一个解决办法,注释掉Kalibr/aslam_offline_calibration/kalibr/python/kalibr_calibrate_cameras中的一段代码

标定结果查看
标定完成后会生成3个文件

pdf中有一些误差分析结果
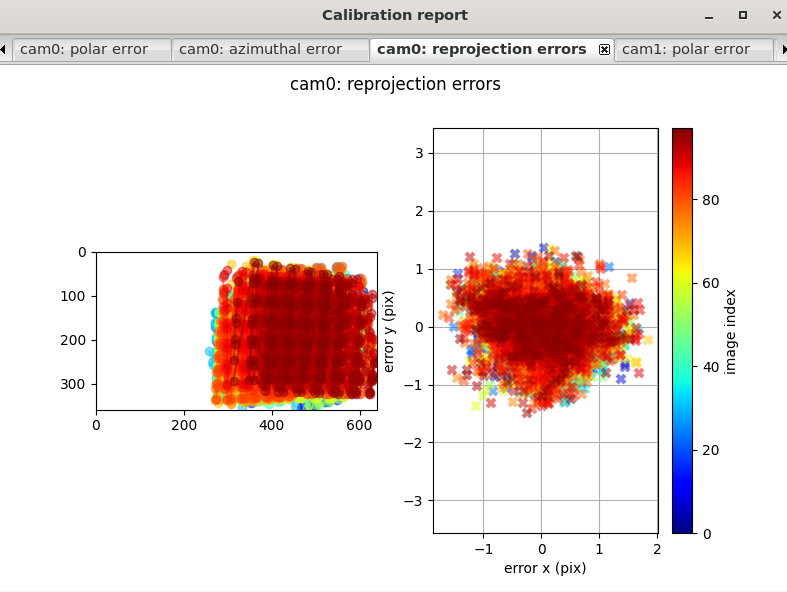
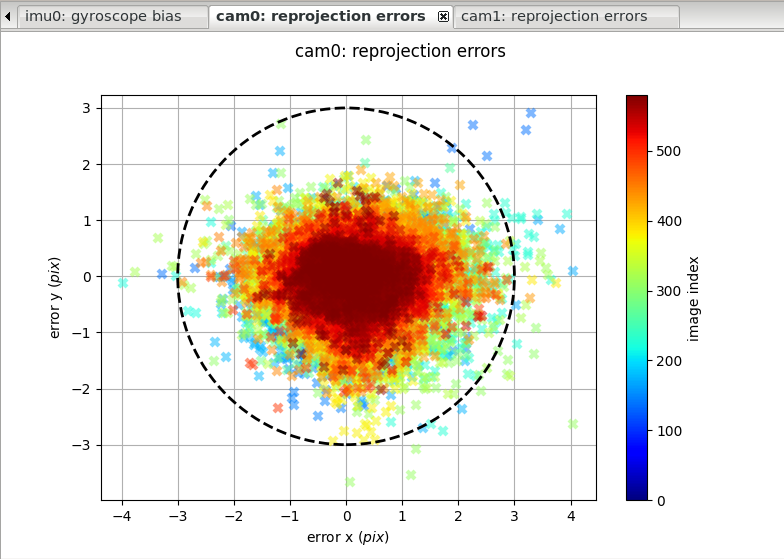
从给出的结果来看,重投影误差不大,基本控制在1-2个像素之内。
标定结果和相机本身的/camera/color/camera_info话题中读出来的基本一致,可见标定效果还行。
6、相机-IMU外参标定
联合标定需要的材料:
1、数据包 xxx.bag: 里面包含了相机和IMU的话题
2、IMU描述文件[imu.yaml]: 描述IMU的噪声模型
3、相机的描述文件[camchain.yaml]: 相机的内参和外参
4、标定板描述文件[target.yaml]:描述标定板的真实尺寸
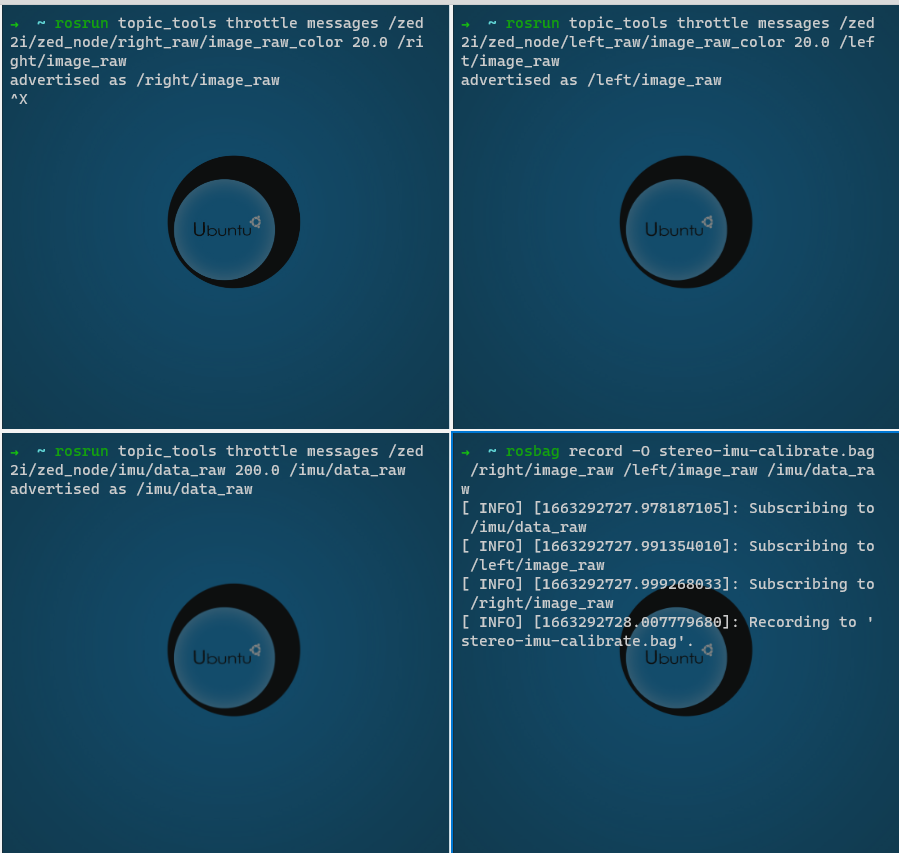
注意:收集数据的过程中充分激励IMU的各个轴,也要注意别运动太剧烈,保证图像不模糊,采集数据的最佳频率为图像20Hz, IMU 200 Hz
收集数据
# 修改三个话题的发布频率
$ rosrun topic_tools throttle messages /zed2i/zed_node/right_raw/image_raw_color 20.0 /right/image_raw
$ rosrun topic_tools throttle messages /zed2i/zed_node/left_raw/image_raw_color 20.0 /left/image_raw
$ rosrun topic_tools throttle messages /zed2i/zed_node/imu/data_raw 200.0 /imu/data_raw
# 录制数据
$ rosbag record -O stereo-imu-calibrate.bag /right/image_raw /left/image_raw /imu/data_raw
标定
kalibr_calibrate_imu_camera 命令格式
$ rosrun kalibr kalibr_calibrate_imu_camera --target [target.yaml] --cam [camchain.yaml] --imu [imu.yaml] --bag [dynamic.bag] --show-extraction
kalibr_calibrate_imu_camera的可输入参数
Calibrate the spatial and temporal parameters of an IMU to a camera chain.
usage:
Example usage to calibrate a camera system against an IMU using an aprilgrid.
Temporal calibration is enabled by default.
kalibr_calibrate_imu_camera --bag MYROSBAG.bag --cam camchain.yaml --imu imu.yaml \
--target aprilgrid.yaml
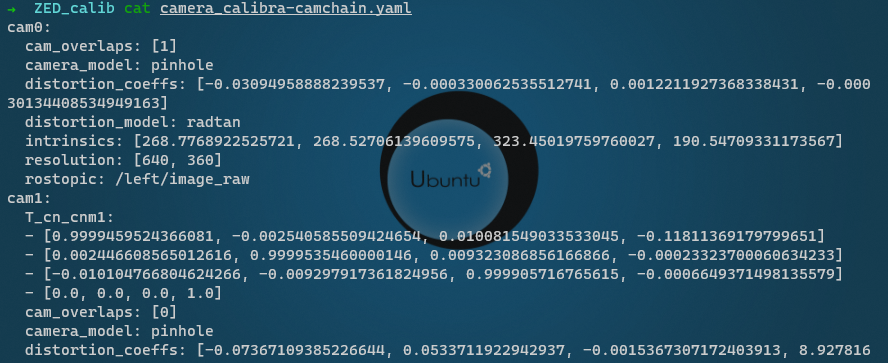
camchain.yaml: is the camera-system calibration output of the multiple-camera
calibratin tool (kalibr_calibrate_cameras)
example aprilgrid.yaml: | example imu.yaml: (ADIS16448)
target_type: 'aprilgrid' | accelerometer_noise_density: 0.006
tagCols: 6 | accelerometer_random_walk: 0.0002
tagRows: 6 | gyroscope_noise_density: 0.0004
tagSize: 0.088 | gyroscope_random_walk: 4.0e-06
tagSpacing: 0.3 | update_rate: 200.0
optional arguments:
-h, --help show this help message and exit
Dataset source:
–bag BAGFILE Ros bag file containing image and imu data (rostopics specified in the yamls)
–bag-from-to bag_from_to bag_from_to
Use the bag data starting from up to this time [s]
–bag-freq bag_freq Frequency to extract features at [hz]
–perform-synchronization
Perform a clock synchronization according to ‘Clock synchronization algorithms for network
measurements’ by Zhang et al. (2002).
Camera system configuration:
–cams CHAIN_YAML Camera system configuration as yaml file
–recompute-camera-chain-extrinsics
Recompute the camera chain extrinsics. This option is exclusively recommended for debugging
purposes in order to identify problems with the camera chain extrinsics.
–reprojection-sigma REPROJECTION_SIGMA
Standard deviation of the distribution of reprojected corner points [px]. (default: 1.0)
IMU configuration:
–imu IMU_YAMLS [IMU_YAMLS …]
Yaml files holding the IMU noise parameters. The first IMU will be the reference IMU.
–imu-delay-by-correlation
Estimate the delay between multiple IMUs by correlation. By default, no temporal calibration
between IMUs will be performed.
–imu-models IMU_MODELS [IMU_MODELS …]
The IMU models to estimate. Currently supported are ‘calibrated’, ‘scale-misalignment’ and
‘scale-misalignment-size-effect’.
Calibration target:
–target TARGET_YAML Calibration target configuration as yaml file
Optimization options:
–no-time-calibration
Disable the temporal calibration
–max-iter MAX_ITER Max. iterations (default: 30)
–recover-covariance Recover the covariance of the design variables.
–timeoffset-padding TIMEOFFSET_PADDING
Maximum range in which the timeoffset may change during estimation [s] (default: 0.03)
Output options:
–show-extraction Show the calibration target extraction. (disables plots)
–extraction-stepping
Show each image during calibration target extraction (disables plots)
–verbose Verbose output (disables plots)
–dont-show-report Do not show the report on screen after calibration.
–export-poses Also export the optimized poses.
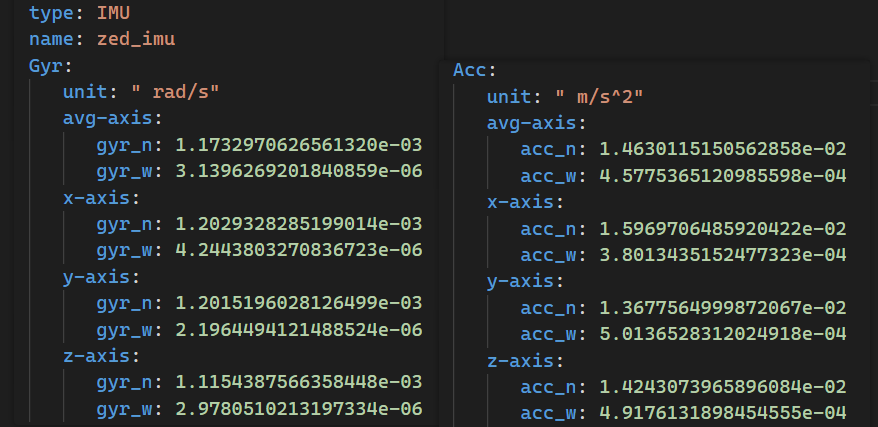
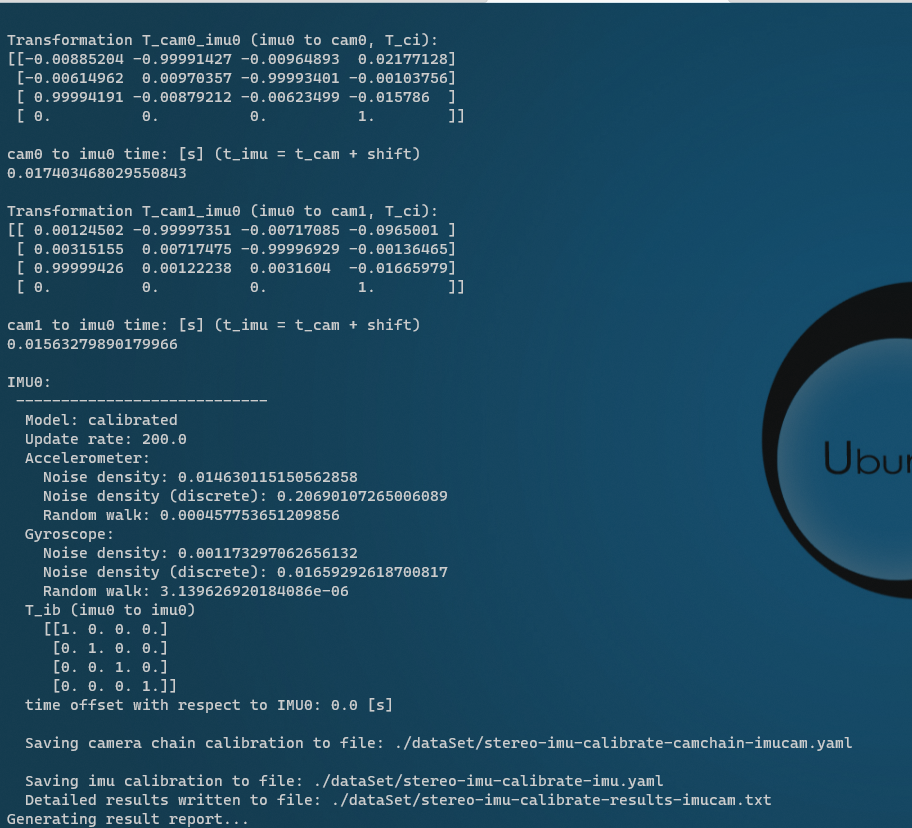
关于IMU的描述文件如下,新建一个imu_param.yaml文件,写入如下内容
rostopic: /zed2i/zed_node/imu/data_raw
update_rate: 200.0
accelerometer_noise_density: 1.4630115150562858e-02
accelerometer_random_walk: 4.5775365120985598e-04
gyroscope_noise_density: 1.1732970626561320e-03
gyroscope_random_walk: 3.1396269201840859e-06
然后运行标定命令如下:
$ ZED_calib rosrun kalibr kalibr_calibrate_imu_camera --bag ./dataSet/stereo-imu-calibrate.bag --target target.yaml --cam camera_calibra-camchain.yaml --imu imu_param.yaml
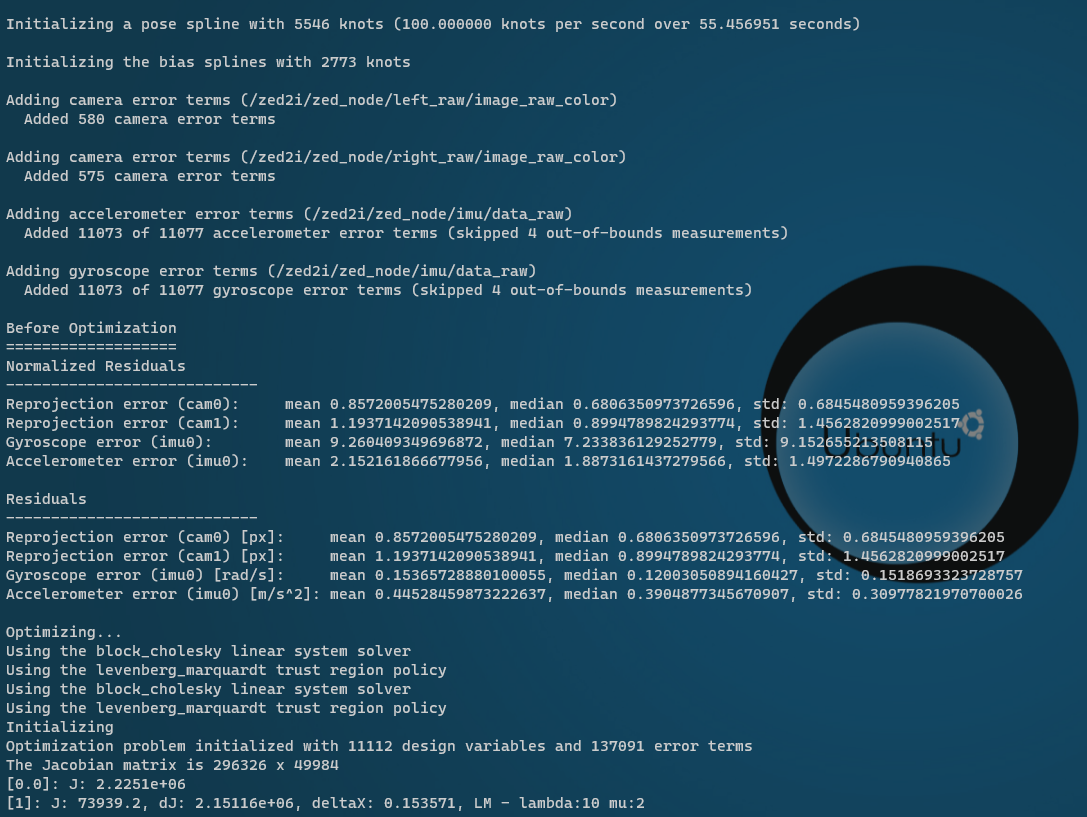
如果采集的数据包事件比较长,那么标定的事件相对也比较长,因为里面涉及到大规模超定方程的求解。我这里采集的数据包大概有1.7G左右,正在优化中,如下图
标定结果
最后标定成功会弹出一个窗口,里面有一些误差分析报告的图
还有生成的一些文件


相机的外参和内参已经标定完成,后面用这个ZED 2i以及外参和内参跑一下vSLAM相关的框架!
本文内容由网友自发贡献,版权归原作者所有,本站不承担相应法律责任。如您发现有涉嫌抄袭侵权的内容,请联系:hwhale#tublm.com(使用前将#替换为@)