在这里看到的:https://blog.csdn.net/Lin_QC/article/details/89188698

转载自:https://blog.csdn.net/Lin_QC/article/details/90180786
Dronekit 搭配使用Ardupilot 和 PX4
Lin_QC 2019-05-20 17:33:37 6245 收藏 15
分类专栏: px4
最后发布:2019-05-20 17:33:37首次发布:2019-05-20 17:33:37
版权声明:本文为博主原创文章,遵循<a href="http://creativecommons.org/licenses/by-sa/4.0/" target="_blank" rel="noopener"> CC 4.0 BY-SA </a>版权协议,转载请附上原文出处链接和本声明。
本文链接:https://blog.csdn.net/lin_qc/article/details/90180786
版权
Dronekit是一个与无人机飞控搭配使用,方便开发者使用代码控制无人机。个人认为它会比搭建ros来控制无人机更容易上手一些。
对于Dronekit,PX4被支持的较少,不可以进行模式切换,而对Ardupilot支持的比较多,可调用的函数也比较多。
PX4 官网的官方文档dronekit部分 https://dev.px4.io/en/robotics/dronekit.html
对于Ardupilot与无人机搭配使用,有一篇还不错的博客,本篇有些内容摘于此篇https://blog.csdn.net/liberatetheus/article/details/78004917
一、dronekit的安装
安装所需依赖
sudo apt-get install python-dev python3-dev libxml2-dev libxslt1-dev zlib1g-dev
git clone https://github.com/dronekit/dronekit-python.git
cd ./dronekit-python
sudo python setup.py build
sudo python setup.py install
二、连接于获取数据
目前没有实际设备,所以还是在仿真下做
我们可以建立一个连接:
对于PX4 系统仿真提供的接口是:
127.0.0.1:14540
对于Ardupilot 系统仿真提供的接口是
127.0.0.1:14551
一小段代码可以测试一下连接,以及获取飞控板的数据(以PX4为例)
# Import DroneKit-Python
from dronekit import connect, Command, LocationGlobal
from pymavlink import mavutil
import time, sys, argparse, math

# Connect to the Vehicle
print "Connecting"
connection_string = '127.0.0.1:14540'
vehicle = connect(connection_string, wait_ready=True)

# Display basic vehicle state
print " Type: %s" % vehicle._vehicle_type
print " Armed: %s" % vehicle.armed
print " System status: %s" % vehicle.system_status.state
print " GPS: %s" % vehicle.gps_0
print " Alt: %s" % vehicle.location.global_relative_frame.alt
首先,启动模拟器,可以是gozebo ,也可以是jmavsim
之后,我们执行python代码使用命令 例如 python test.py
python 你要执行的文件名.python
执行后我们可以收到飞控的数据
三、执行飞行任务
3.1 px4
对于PX4 它不支持模式转换,但是官网还是给出了使PX4执行飞行任务的方法,代码如下:
################################################################################################
# @File DroneKitPX4.py
# Example usage of DroneKit with PX4
#
# @author Sander Smeets <sander@droneslab.com>
#
# Code partly based on DroneKit (c) Copyright 2015-2016, 3D Robotics.
################################################################################################

# Import DroneKit-Python
from dronekit import connect, Command, LocationGlobal
from pymavlink import mavutil
import time, sys, argparse, math


################################################################################################
# Settings
################################################################################################

connection_string       = '127.0.0.1:14540'
MAV_MODE_AUTO   = 4
# https://github.com/PX4/Firmware/blob/master/Tools/mavlink_px4.py


# Parse connection argument
parser = argparse.ArgumentParser()
parser.add_argument("-c", "--connect", help="connection string")
args = parser.parse_args()

if args.connect:
    connection_string = args.connect


################################################################################################
# Init
################################################################################################

# Connect to the Vehicle
print "Connecting"
vehicle = connect(connection_string, wait_ready=True)

def PX4setMode(mavMode):
    vehicle._master.mav.command_long_send(vehicle._master.target_system, vehicle._master.target_component,
                                               mavutil.mavlink.MAV_CMD_DO_SET_MODE, 0,
                                               mavMode,
                                               0, 0, 0, 0, 0, 0)


def get_location_offset_meters(original_location, dNorth, dEast, alt):
    """
    Returns a LocationGlobal object containing the latitude/longitude `dNorth` and `dEast` metres from the
    specified `original_location`. The returned Location adds the entered `alt` value to the altitude of the `original_location`.
    The function is useful when you want to move the vehicle around specifying locations relative to
    the current vehicle position.
    The algorithm is relatively accurate over small distances (10m within 1km) except close to the poles.
    For more information see:
    http://gis.stackexchange.com/questions/2951/algorithm-for-offsetting-a-latitude-longitude-by-some-amount-of-meters
    """
    earth_radius=6378137.0 #Radius of "spherical" earth
    #Coordinate offsets in radians
    dLat = dNorth/earth_radius
    dLon = dEast/(earth_radius*math.cos(math.pi*original_location.lat/180))

    #New position in decimal degrees
    newlat = original_location.lat + (dLat * 180/math.pi)
    newlon = original_location.lon + (dLon * 180/math.pi)
    return LocationGlobal(newlat, newlon,original_location.alt+alt)


################################################################################################
# Listeners
################################################################################################

home_position_set = False

#Create a message listener for home position fix
@vehicle.on_message('HOME_POSITION')
def listener(self, name, home_position):
    global home_position_set
    home_position_set = True


################################################################################################
# Start mission example
################################################################################################

# wait for a home position lock
while not home_position_set:
    print "Waiting for home position..."
    time.sleep(1)

# Display basic vehicle state
print " Type: %s" % vehicle._vehicle_type
print " Armed: %s" % vehicle.armed
print " System status: %s" % vehicle.system_status.state
print " GPS: %s" % vehicle.gps_0
print " Alt: %s" % vehicle.location.global_relative_frame.alt

# Change to AUTO mode
PX4setMode(MAV_MODE_AUTO)
time.sleep(1)

# Load commands
cmds = vehicle.commands
cmds.clear()

home = vehicle.location.global_relative_frame

# takeoff to 10 meters
wp = get_location_offset_meters(home, 0, 0, 10);
cmd = Command(0,0,0, mavutil.mavlink.MAV_FRAME_GLOBAL_RELATIVE_ALT, mavutil.mavlink.MAV_CMD_NAV_TAKEOFF, 0, 1, 0, 0, 0, 0, wp.lat, wp.lon, wp.alt)
cmds.add(cmd)

# move 10 meters north
wp = get_location_offset_meters(wp, 10, 0, 0);
cmd = Command(0,0,0, mavutil.mavlink.MAV_FRAME_GLOBAL_RELATIVE_ALT, mavutil.mavlink.MAV_CMD_NAV_WAYPOINT, 0, 1, 0, 0, 0, 0, wp.lat, wp.lon, wp.alt)
cmds.add(cmd)

# move 10 meters east
wp = get_location_offset_meters(wp, 0, 10, 0);
cmd = Command(0,0,0, mavutil.mavlink.MAV_FRAME_GLOBAL_RELATIVE_ALT, mavutil.mavlink.MAV_CMD_NAV_WAYPOINT, 0, 1, 0, 0, 0, 0, wp.lat, wp.lon, wp.alt)
cmds.add(cmd)

# move 10 meters south
wp = get_location_offset_meters(wp, -10, 0, 0);
cmd = Command(0,0,0, mavutil.mavlink.MAV_FRAME_GLOBAL_RELATIVE_ALT, mavutil.mavlink.MAV_CMD_NAV_WAYPOINT, 0, 1, 0, 0, 0, 0, wp.lat, wp.lon, wp.alt)
cmds.add(cmd)

# move 10 meters west
wp = get_location_offset_meters(wp, 0, -10, 0);
cmd = Command(0,0,0, mavutil.mavlink.MAV_FRAME_GLOBAL_RELATIVE_ALT, mavutil.mavlink.MAV_CMD_NAV_WAYPOINT, 0, 1, 0, 0, 0, 0, wp.lat, wp.lon, wp.alt)
cmds.add(cmd)

# land
wp = get_location_offset_meters(home, 0, 0, 10);
cmd = Command(0,0,0, mavutil.mavlink.MAV_FRAME_GLOBAL_RELATIVE_ALT, mavutil.mavlink.MAV_CMD_NAV_LAND, 0, 1, 0, 0, 0, 0, wp.lat, wp.lon, wp.alt)
cmds.add(cmd)

# Upload mission
cmds.upload()
time.sleep(2)

# Arm vehicle
vehicle.armed = True

# monitor mission execution
nextwaypoint = vehicle.commands.next
while nextwaypoint < len(vehicle.commands):
    if vehicle.commands.next > nextwaypoint:
        display_seq = vehicle.commands.next+1
        print "Moving to waypoint %s" % display_seq
        nextwaypoint = vehicle.commands.next
    time.sleep(1)

# wait for the vehicle to land
while vehicle.commands.next > 0:
    time.sleep(1)


# Disarm vehicle
vehicle.armed = False
time.sleep(1)

# Close vehicle object before exiting script
vehicle.close()
time.sleep(1)
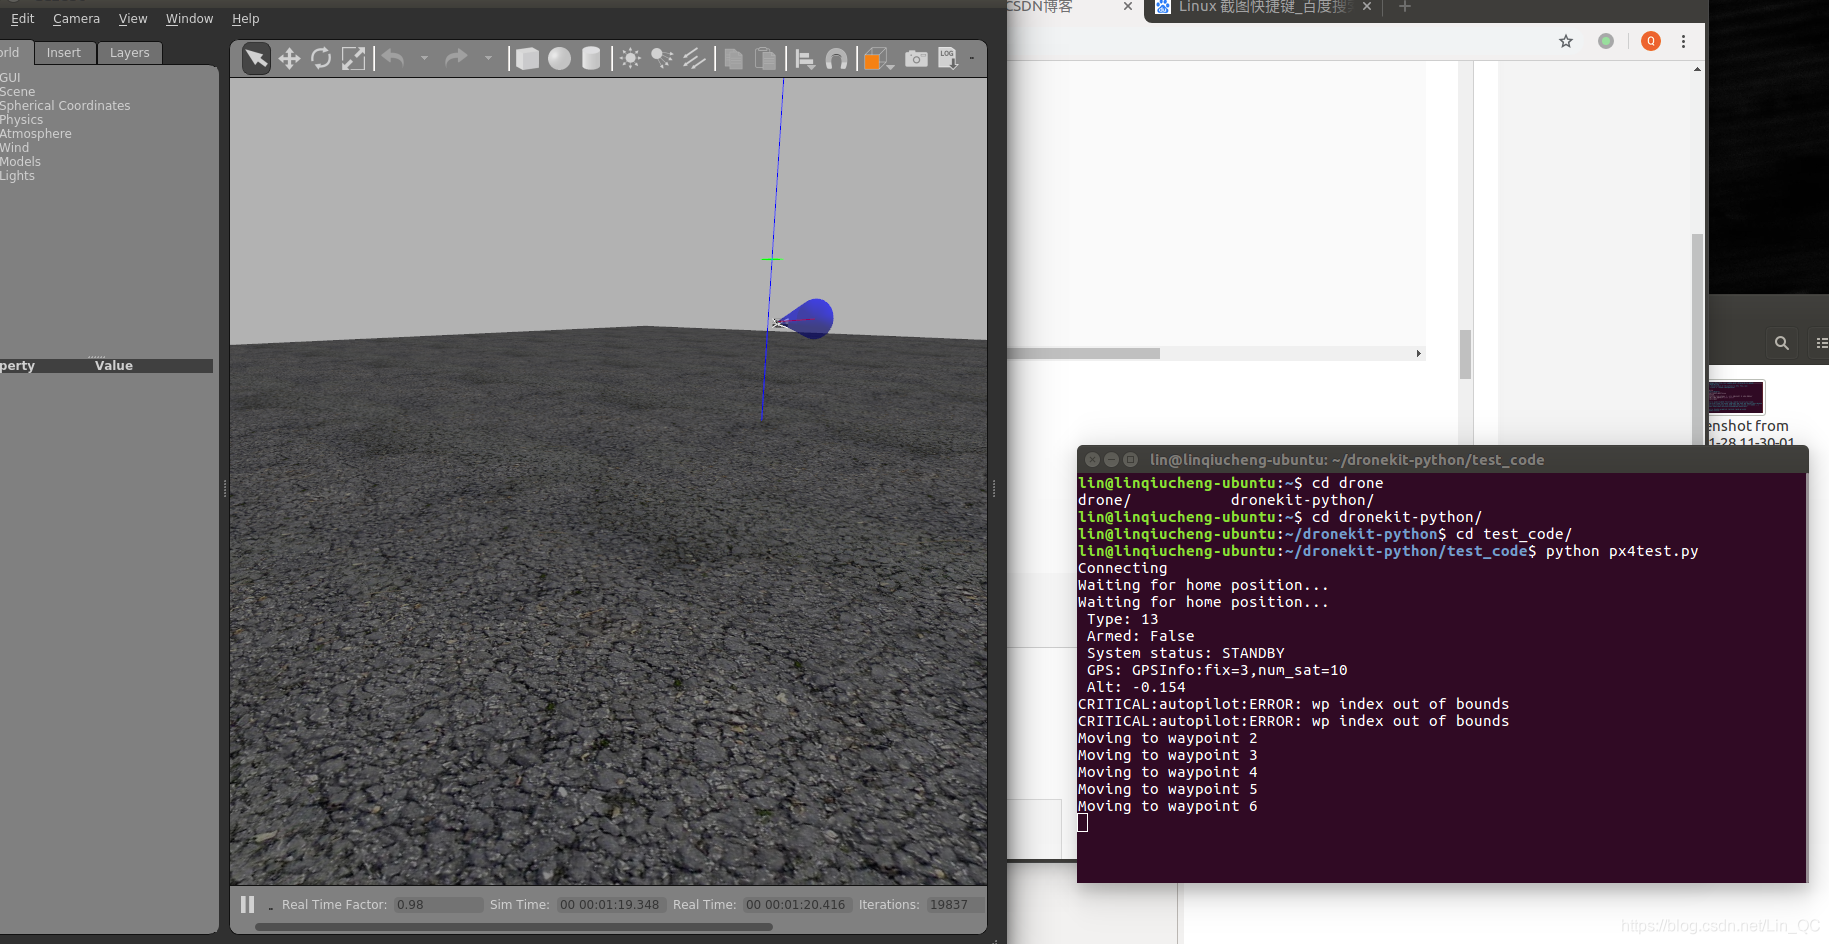
进入px4目录
执行启动模拟器(这里我使用gazebo)
make posix gazebo_typhoon_h480
新建一个终端,进入python代码目录,执行py文件
python px4test.py
效果如下图
3.2 Ardupilot
对于Ardupilot 我们有很多现有的API可以调用
示例代码如下:
#!/usr/bin/env python
# -*- coding: utf-8 -*-

"""
© Copyright 2015-2016, 3D Robotics.
simple_goto.py: GUIDED mode "simple goto" example (Copter Only)
Demonstrates how to arm and takeoff in Copter and how to navigate to points using Vehicle.simple_goto.
"""

from __future__ import print_function
import time
from dronekit import connect, VehicleMode, LocationGlobalRelative


# 通过本地的14551端口,使用UDP连接到SITL模拟器
connection_string = '127.0.0.1:14551'
print('Connecting to vehicle on: %s' % connection_string)
# connect函数将会返回一个Vehicle类型的对象,即此处的vehicle
# 即可认为是无人机的主体,通过vehicle对象,我们可以直接控制无人机
vehicle = connect(connection_string, wait_ready=True)

# 定义arm_and_takeoff函数,使无人机解锁并起飞到目标高度
# 参数aTargetAltitude即为目标高度,单位为米
def arm_and_takeoff(aTargetAltitude):
    # 进行起飞前检查
    print("Basic pre-arm checks")
    # vehicle.is_armable会检查飞控是否启动完成、有无GPS fix、卡曼滤波器
    # 是否初始化完毕。若以上检查通过,则会返回True
    while not vehicle.is_armable:
        print(" Waiting for vehicle to initialise...")
        time.sleep(1)

    # 解锁无人机(电机将开始旋转)
    print("Arming motors")
    # 将无人机的飞行模式切换成"GUIDED"(一般建议在GUIDED模式下控制无人机)
    vehicle.mode = VehicleMode("GUIDED")
    # 通过设置vehicle.armed状态变量为True,解锁无人机
    vehicle.armed = True

    # 在无人机起飞之前,确认电机已经解锁
    while not vehicle.armed:
        print(" Waiting for arming...")
        time.sleep(1)

    # 发送起飞指令
    print("Taking off!")
    # simple_takeoff将发送指令,使无人机起飞并上升到目标高度
    vehicle.simple_takeoff(aTargetAltitude)

    # 在无人机上升到目标高度之前,阻塞程序
    while True:
        print(" Altitude: ", vehicle.location.global_relative_frame.alt)
        # 当高度上升到目标高度的0.95倍时,即认为达到了目标高度,退出循环
        # vehicle.location.global_relative_frame.alt为相对于home点的高度
        if vehicle.location.global_relative_frame.alt >= aTargetAltitude * 0.95:
            print("Reached target altitude")
            break
        # 等待1s
        time.sleep(1)

# 调用上面声明的arm_and_takeoff函数,目标高度10m
arm_and_takeoff(10)

# 设置在运动时,默认的空速为3m/s
print("Set default/target airspeed to 3")
# vehicle.airspeed变量可读可写,且读、写时的含义不同。
# 读取时,为无人机的当前空速;写入时,设定无人机在执行航点任务时的默认速度
vehicle.airspeed = 3

# 发送指令,让无人机前往第一个航点
print("Going towards first point for 30 seconds ...")
# LocationGlobalRelative是一个类,它由经纬度(WGS84)和相对于home点的高度组成
# 这条语句将创建一个位于南纬35.361354,东经149.165218,相对home点高20m的位置
point1 = LocationGlobalRelative(-35.361354, 149.165218, 20)
# simple_goto函数将位置发送给无人机,生成一个目标航点
vehicle.simple_goto(point1)

# simple_goto函数只发送指令,不判断有没有到达目标航点
# 它可以被其他后续指令打断,此处延时30s,即让无人机朝向point1飞行30s
time.sleep(30)

# 发送指令,让无人机前往第二个航点
print("Going towards second point for 30 seconds (groundspeed set to 10 m/s) ...")
# 与之前类似,这条语句创建了另一个相对home高20m的点
point2 = LocationGlobalRelative(-35.363244, 149.168801, 20)
# simple_goto将目标航点发送给无人机,groundspeed=10设置飞行时的地速为10m/s
vehicle.simple_goto(point2, groundspeed=10)

# 与之前一样,延时30s
time.sleep(30)

# 发送"返航"指令
print("Returning to Launch")
# 返航,只需将无人机的飞行模式切换成"RTL(Return to Launch)"
# 无人机会自动返回home点的正上方,之后自动降落
vehicle.mode = VehicleMode("RTL")

# 退出之前,清除vehicle对象
print("Close vehicle object")
vehicle.close()
摘自 https://blog.csdn.net/liberatetheus/article/details/78004917
执行代码时建议把中文注释删除。
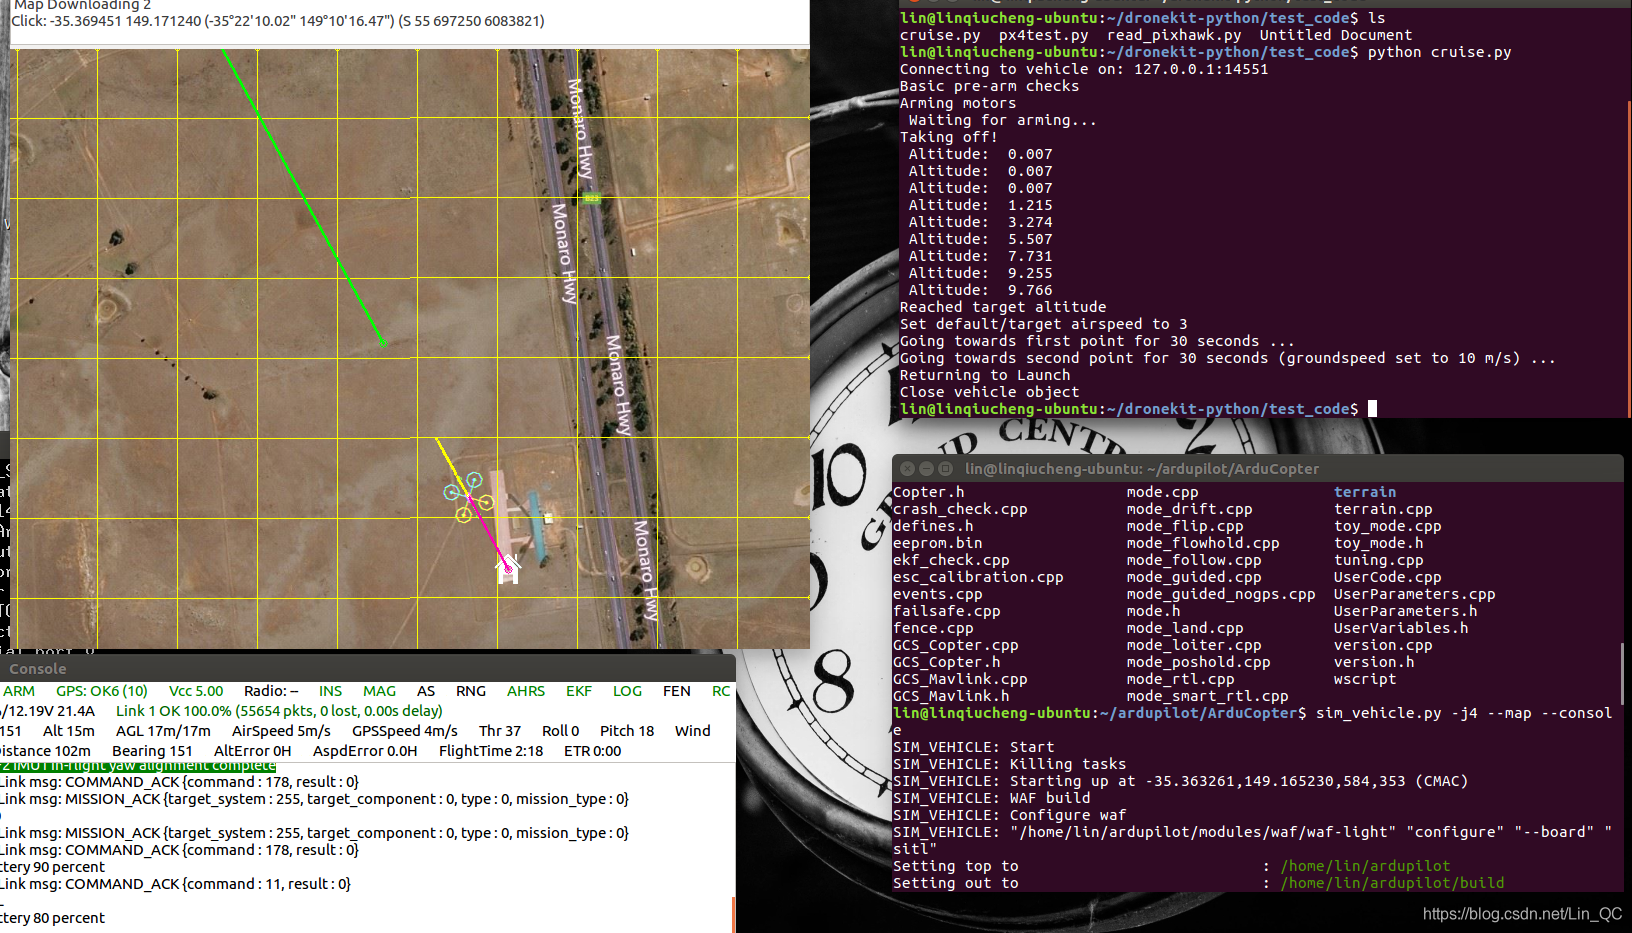
打开一个终端,进入Ardupilot工作目录, 执行命令启动模拟器
sim_vehicle.py -j4 --map --console
打开另一个终端,找到编写的代码的目录
执行py文件
python simple_go.py
效果如下
本文内容由网友自发贡献,版权归原作者所有,本站不承担相应法律责任。如您发现有涉嫌抄袭侵权的内容,请联系:hwhale#tublm.com(使用前将#替换为@)