目录
1.数据集下载
2.相关知识点
3.训练模型实战开始
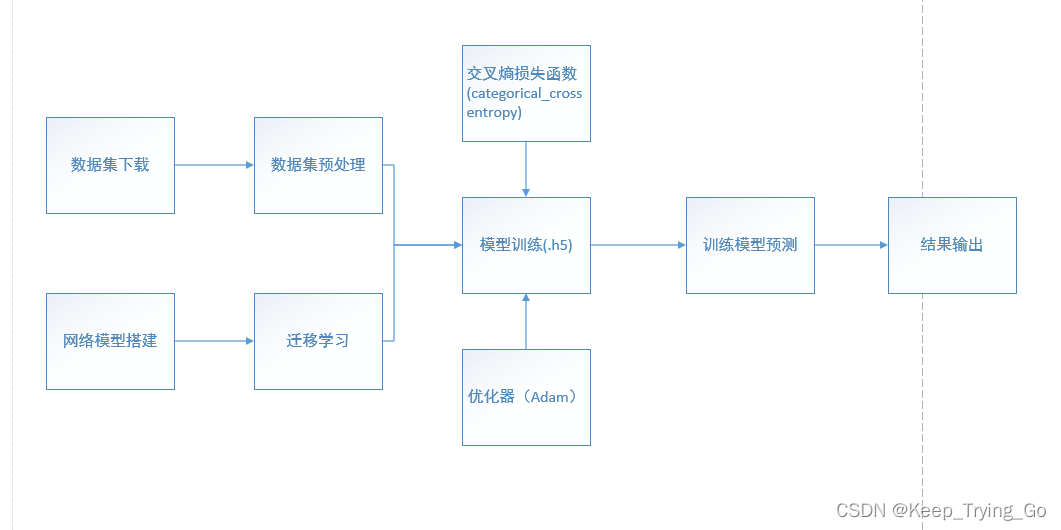
(1)整个过程思路
(2)导入相关的库
(3)参数预设置
(4)数据增强
(5)使用迁移学习搭建模型
(6)定义相关的回调函数
(7)模型训练
(8)绘制图形
4.口罩检测开始
(1)结合训练的模型进行预测
(2)使用MobileNet_SSD进行人脸定位进行口罩检测
(3)使用MobileNet_SSD对摄像头中多个行人口罩检测
1.数据集下载
下载方式一:
https://www.kaggle.com/datasets/prithwirajmitra/covid-face-mask-detection-dataset/download?datasetVersionNumber=1
下载方式二:
链接:https://pan.baidu.com/s/1oMj7_0nvqm3vCoIWas-ygA
提取码:a7xu

2.相关知识点
迁移学习之EfficientNetBX(图像识别)
Tensorflow中预处理图像的方法
使用MobileNet_SSD进行目标检测
3.训练模型实战开始
(1)整个过程思路
(2)导入相关的库
import os
import cv2
import time
import numpy as np
import tensorflow as tf
from tensorflow import keras
from keras.models import Model
import matplotlib.pyplot as plt
from tensorflow.keras import layers
from tensorflow.keras.optimizers import Adam
from tensorflow.keras.models import load_model
from tensorflow.keras.preprocessing.image import ImageDataGenerator
from tensorflow.keras.callbacks import ModelCheckpoint,EarlyStopping,ReduceLROnPlateau
from tensorflow.keras.layers import Dense,Dropout,Flatten,BatchNormalization,Conv2D,MaxPool2D
(3)参数预设置
#训练的类别:有口罩和无口罩
num_classes=2
#输入网路图片的大小
img_h,img_w=224,224
#训练一次性加载数据集大小
batch_size=4
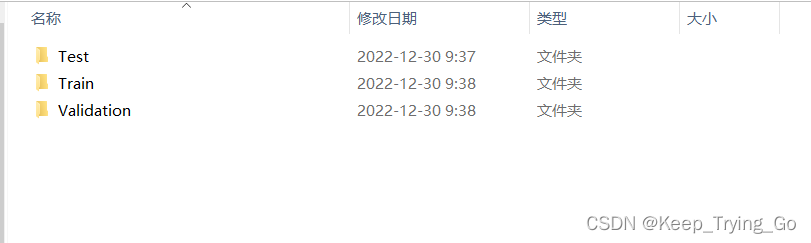
#训练集和验证集图片位置
train_data_dir='myDataset/New Masks Dataset/Train'
validation_data_dir='myDataset/New Masks Dataset/Validation'
(4)数据增强
#对图片数据进行增强
train_datagen=ImageDataGenerator(rescale=1.0/255)
val_datagen=ImageDataGenerator(rescale=1.0/255)

#对图片进行缩放大小,设置加载图片数量,定义类别模式和随机打散
train_generate=train_datagen.flow_from_directory(
    train_data_dir,
    target_size=(img_h,img_w),
    batch_size=batch_size,
    class_mode='categorical',
    shuffle=True
)

val_generate=val_datagen.flow_from_directory(
    validation_data_dir,
    target_size=(img_h,img_w),
    batch_size=batch_size,
    class_mode='categorical',
    shuffle=True
)
(5)使用迁移学习搭建模型
#使用迁移学习的方式定义模型
model_inception_v3=keras.applications.inception_v3.InceptionV3(weights='imagenet',include_top=False)
x=model_inception_v3.output
x=keras.layers.GlobalAveragePooling2D()(x)
x=keras.layers.Dense(1024,activation='relu')(x)
predications=keras.layers.Dense(2,activation='softmax')(x)
model_V3=Model(inputs=model_inception_v3.input,outputs=predications)

#冻结住所有的层
for layer in model_inception_v3.layers:
    layer.trainable=False

#查看模型
model_V3.summary()
(6)定义相关的回调函数
#保存最优的模型
checkpoint=ModelCheckpoint(
    'model/checkMask.h5',
    monitor='val_loss',
    mode='min',
    save_best_only=True,
    save_weights_only=False
)
#当经过5代之后,验证集的损失值没有下降就提前终止训练
earlyStop=EarlyStopping(
    monitor='val_loss',
    min_delta=0,
    patience=10,
    verbose=1,
    restore_best_weights=True
)
#当经过3代的训练之后验证集的损失值没有下降就学习衰减率
reduce_lr=ReduceLROnPlateau(
    monitor='val_loss',
    factor=0.8,
    patience=10,
    verbose=1,
    min_delta=0.0001
)

callbacks=[checkpoint,earlyStop,reduce_lr]
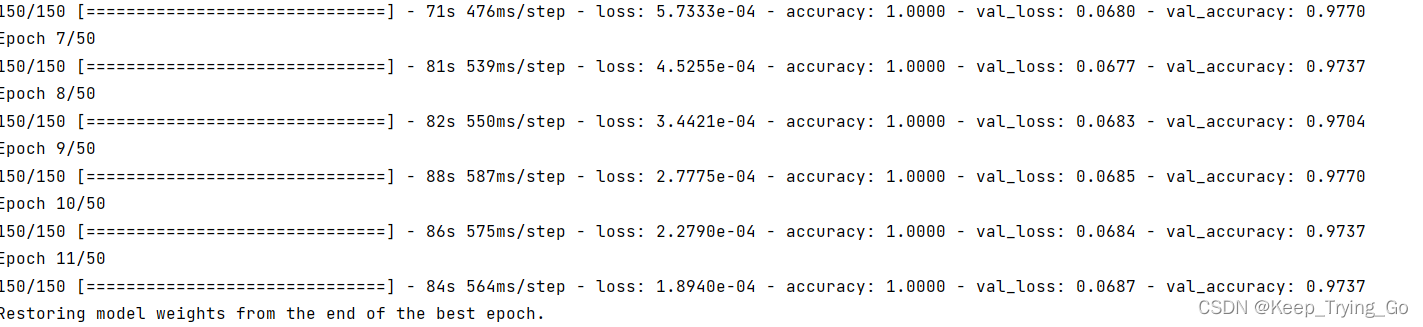
(7)模型训练
#模型编译
model_V3.compile(loss='categorical_crossentropy',optimizer=Adam(learning_rate=0.0001),
                 metrics=['accuracy'])
#获取训练集和验证集大小
n_train=train_generate.n
n_val=val_generate.n

#迭代次数
epoches=50

#开始训练
history=model_V3.fit(
    train_generate,
    steps_per_epoch=n_train//batch_size,
    callbacks=callbacks,
    epochs=epoches,
    validation_data=val_generate,
    validation_steps=n_val//batch_size
)
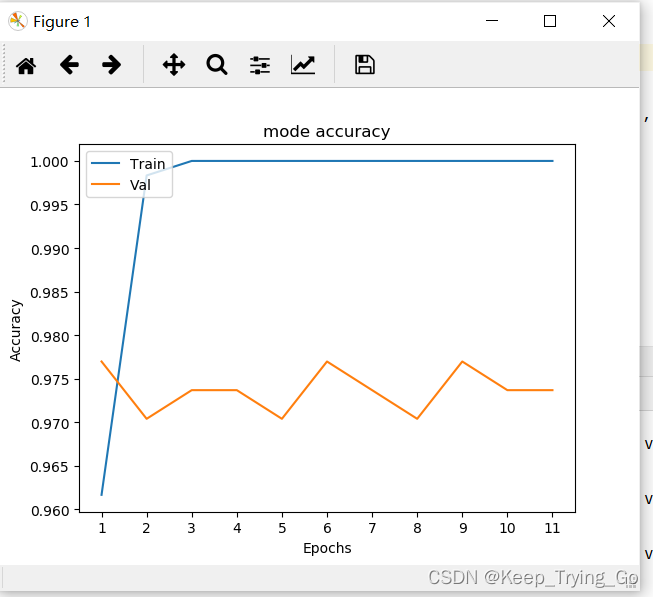
(8)绘制图形
#绘制图像
x=range(1,len(history.history['accuracy'])+1)
plt.plot(x,history.history['accuracy'])
plt.plot(x,history.history['val_accuracy'])
plt.title('mode accuracy')
plt.ylabel('Accuracy')
plt.xlabel('Epochs')
plt.xticks(x)
plt.legend(['Train','Val'],loc='upper left')
plt.savefig(fname='inception_v3',figsize=[10,10])
plt.show()
4.口罩检测开始
首先理解使用MobileNet_SSD进行目标检测过程:
使用MobileNet_SSD进行目标检测
(1)结合训练的模型进行预测
detect.py
import os
import cv2
import numpy as np
from PIL import Image
import tensorflow as tf
from tensorflow.keras.models import load_model
from MobileSSD300x300 import detectTime,SignalDetect,processImage
from tensorflow.keras.preprocessing.image import img_to_array,load_img

#训练模型的位置
modelPath='model/checkMask.h5'
#输入网络的图片大小
target_size=(224,224)
#预测图片位置
imgPath='myDataset/New Masks Dataset/Test/Mask/2072.jpg'
#图片的预测类别
classes={0:'mask',1:'non_mask'}

#对图像进行预处理
def preprocess_image(img_path,target_size):
    """
    :param img_path: 图片路径
    :param target_size: 图片大小
    :return:
    """
    image=Image.open(img_path)
    if image.mode!='RGB':
        image=image.convert('RGB')
    image=image.resize(target_size)
    image=img_to_array(image)
    image=image/255.0
    image=np.expand_dims(image,axis=0)
    return image

#单张图片检测
def detectImage(imgPath):
    modelInV3 = load_model(modelPath)
    img = preprocess_image(img_path=imgPath, target_size=target_size)
    predications = modelInV3.predict(img)[0].tolist()
    print(predications)
    print(np.argmax(predications))
    PreResult = int(np.argmax(predications))
    print('预测类别: {}'.format(classes[PreResult]))

    imgSize = cv2.imread(imgPath)
    imgSize = cv2.resize(src=imgSize, dsize=(520, 520))
    imgSize = cv2.flip(src=imgSize, flipCode=2)
    imgSize = processImage(imgSize=imgSize,mask=classes[PreResult])
    print(np.shape(imgSize))
    cv2.imshow('imgSize', imgSize)
    cv2.waitKey(0)
    cv2.destroyAllWindows()


#实时检测
def Timedetect():
    modelInV3 = load_model(modelPath)
    detectTime(modelInV3=modelInV3,classes=classes)


if __name__ == '__main__':
    # Timedetect()
    detectImage(imgPath=imgPath)
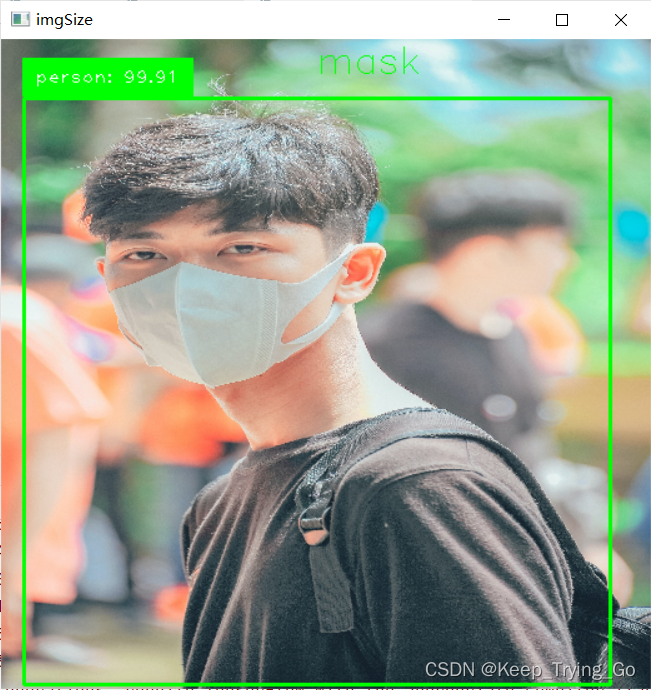
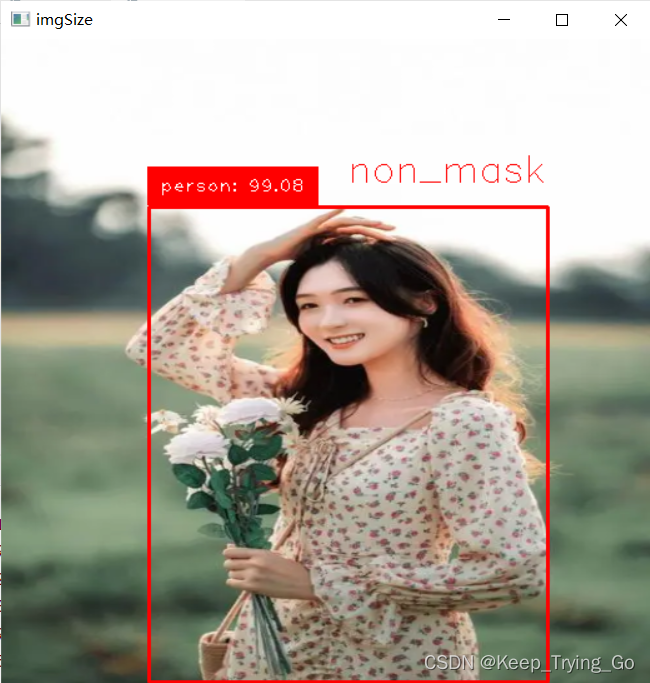
(2)使用MobileNet_SSD进行人脸定位进行口罩检测
MobileSSD300x300.py
"""
@Author : Keep_Trying_Go
@Major  : Computer Science and Technology
@Hobby  : Computer Vision
@Time   : 2023-01-01 17:40
"""
import os
import cv2
import cvzone
import numpy as np
from PIL import Image
from tensorflow.keras.models import load_model
from tensorflow.keras.preprocessing.image import img_to_array

#设置图片的宽高
img_w,img_h=300,300
#得到图片的高宽比
WHRatio=img_w/float(img_h)
#设置图片的缩放因子
ScaleFactor=0.007843
#设置平均值
meanVal=127.5
#设置置信度阈值
threadVal=0.2

#预测类别
#mobileNetSSD可以检测类别数21=20+1(背景)
classNames = ['background',
              'aeroplane', 'bicycle', 'bird', 'boat',
              'bottle', 'bus', 'car', 'cat', 'chair',
              'cow', 'diningtable', 'dog', 'horse',
              'motorbike', 'person', 'pottedplant',
              'sheep', 'sofa', 'train', 'tvmonitor']
#加载文件
net=cv2.dnn.readNetFromCaffe(prototxt='SSD300X300/MobileNetSSD_300x300.prototxt',
                             caffeModel='SSD300X300/mobilenet_iter_73000.caffemodel')


#对图片进行处理和设置网络的输入同时进行前向传播
def processImage(imgSize,mask):
    # 对图片进行预处理
    blob = cv2.dnn.blobFromImage(image=imgSize, scalefactor=ScaleFactor,
                                 size=(img_w, img_h), mean=meanVal)
    # 设置网络的输入并进行前向传播
    net.setInput(blob)
    detections = net.forward()
    # 对图像进行按比例裁剪
    height,width,channel=np.shape(imgSize)
    if width/float(height)>WHRatio:#说明高度比较小
        #裁剪多余的宽度
        cropSize=(int(height*WHRatio),height)
    else:#说明宽度比较小
        # 裁剪多余的高度
        cropSize = (width,int(width / WHRatio))
    x1 = int((width - cropSize[0]) / 2)
    x2 = int(x1 + cropSize[0])
    y1=int((height-cropSize[1])/2)
    y2=int(y1+cropSize[1])
    imgSize=imgSize[y1:y2,x1:x2]
    height,width,channel=np.shape(imgSize)

    #遍历检测的目标
    # print('detection.shape: {}'.format(detections.shape))
    # print('detection: {}'.format(detections))
    for i in range(detections.shape[2]):
        #保留两位小数
        confidence=round(detections[0,0,i,2]*100,2)
        #这里只检测人这个目标
        if confidence>threadVal:
            class_id=int(detections[0,0,i,1])
            if class_id==15:
                xLeftBottom=int(detections[0,0,i,3]*width)
                yLeftBottom=int(detections[0,0,i,4]*height)
                xRightTop=int(detections[0,0,i,5]*width)
                yRightTop=int(detections[0,0,i,6]*height)

                # 绘制是否佩戴口罩标志的位置
                mask_x = int(xLeftBottom + (xRightTop - xLeftBottom) / 2)
                mask_y = int(yLeftBottom - 20)
                if mask=='mask':
                    cv2.rectangle(img=imgSize,pt1=(xLeftBottom,yLeftBottom),
                                  pt2=(xRightTop,yRightTop),color=(0,255,0),thickness=2)
                    label=classNames[class_id]+": "+str(confidence)
                    labelSize, baseLine = cv2.getTextSize(label, cv2.FONT_HERSHEY_SIMPLEX, 0.5, 1)

                    cvzone.putTextRect(img=imgSize,text=label,pos=(xLeftBottom+9,yLeftBottom-12),
                                    scale=1,thickness=1,colorR=(0,255,0))
                    cv2.putText(imgSize, str(mask), (mask_x, mask_y),
                                cv2.FONT_HERSHEY_SIMPLEX, 1.0, (0, 255, 0))

                elif mask=='non_mask':
                    cv2.rectangle(img=imgSize, pt1=(xLeftBottom, yLeftBottom),
                                  pt2=(xRightTop, yRightTop), color=(0, 0, 255), thickness=2)
                    label = classNames[class_id] + ": " + str(confidence)
                    labelSize, baseLine = cv2.getTextSize(label, cv2.FONT_HERSHEY_SIMPLEX, 0.5, 1)

                    cvzone.putTextRect(img=imgSize, text=label, pos=(xLeftBottom + 9, yLeftBottom - 12),
                                       scale=1, thickness=1, colorR=(0, 0, 255))
                # cv2.rectangle(imgSize, (xLeftBottom, yLeftBottom - labelSize[1]),
                #               (xLeftBottom + labelSize[0], yLeftBottom + baseLine),
                #               (255, 255, 255), cv2.FILLED)
                    cv2.putText(imgSize, str(mask), (mask_x, mask_y),
                                cv2.FONT_HERSHEY_SIMPLEX, 1.0, (0, 0, 255))
    return imgSize

#对单张图片进行检测
def SignalDetect(img_path='images//8.png'):
    imgSize=cv2.imread(img_path)
    imgSize=processImage(imgSize=imgSize,mask='mask')
    cv2.imshow('imgSize', imgSize)
    cv2.waitKey(0)
    cv2.destroyAllWindows()


#输入网络的图片大小
target_size=(224,224)
#对图像进行预处理
def preprocess_image(image,target_size):
    """
    :param img_path: 图片路径
    :param target_size: 图片大小
    :return:
    """
    image=Image.fromarray(image,mode='RGB')
    if image.mode!='RGB':
        image=image.convert('RGB')
    image=image.resize(target_size)
    image=img_to_array(image)
    image=image/255.0
    image=np.expand_dims(image,axis=0)
    return image
#实时检测
def detectTime(modelInV3,classes):
    cap=cv2.VideoCapture(0)
    while cap.isOpened():
        ret,frame=cap.read()
        #预测图像类别
        img=preprocess_image(frame,target_size=target_size)
        predications = modelInV3.predict(img)[0].tolist()
        print(predications)
        print(np.argmax(predications))
        PreResult = int(np.argmax(predications))
        print('预测类别: {}'.format(classes[PreResult]))

        frame=cv2.resize(src=frame,dsize=(520,520))
        frame=cv2.flip(src=frame,flipCode=2)
        frame=processImage(frame,mask=classes[PreResult])
        cv2.imshow('frame',frame)
        key=cv2.waitKey(1)
        if key==27:
            break
    cap.release()
    cv2.destroyAllWindows()

if __name__ == '__main__':
    SignalDetect()
提示:这里检测是在detect.py文件中,而关于MobileSSD300x300.py文件则是实现相关的人脸检测,所以在detect.py中需要导入MobileSSD300x300.py文件,如下:
from MobileSSD300x300 import detectTime
(3)使用MobileNet_SSD对摄像头中多个行人口罩检测
"""
@Author : Keep_Trying_Go
@Major  : Computer Science and Technology
@Hobby  : Computer Vision
@Time   : 2023-01-01 17:40
"""
import os
import cv2
import cvzone
import numpy as np
from PIL import Image
from tensorflow.keras.models import load_model
from tensorflow.keras.preprocessing.image import img_to_array

#设置图片的宽高
img_w,img_h=300,300
#得到图片的高宽比
WHRatio=img_w/float(img_h)
#设置图片的缩放因子
ScaleFactor=0.007843
#设置平均值
meanVal=127.5
#设置置信度阈值
threadVal=0.8

#预测类别
#mobileNetSSD可以检测类别数21=20+1(背景)
classNames = ['background',
              'aeroplane', 'bicycle', 'bird', 'boat',
              'bottle', 'bus', 'car', 'cat', 'chair',
              'cow', 'diningtable', 'dog', 'horse',
              'motorbike', 'person', 'pottedplant',
              'sheep', 'sofa', 'train', 'tvmonitor']
#加载文件
net=cv2.dnn.readNetFromCaffe(prototxt='SSD300X300/MobileNetSSD_300x300.prototxt',
                             caffeModel='SSD300X300/mobilenet_iter_73000.caffemodel')


#对图片进行处理和设置网络的输入同时进行前向传播
def processImage(imgSize,modelInV3,classes):
    # 对图片进行预处理
    blob = cv2.dnn.blobFromImage(image=imgSize, scalefactor=ScaleFactor,
                                 size=(img_w, img_h), mean=meanVal)
    # 设置网络的输入并进行前向传播
    net.setInput(blob)
    detections = net.forward()
    # 对图像进行按比例裁剪
    height,width,channel=np.shape(imgSize)
    if width/float(height)>WHRatio:#说明高度比较小
        #裁剪多余的宽度
        cropSize=(int(height*WHRatio),height)
    else:#说明宽度比较小
        # 裁剪多余的高度
        cropSize = (width,int(width / WHRatio))
    x1 = int((width - cropSize[0]) / 2)
    x2 = int(x1 + cropSize[0])
    y1=int((height-cropSize[1])/2)
    y2=int(y1+cropSize[1])
    imgSize=imgSize[y1:y2,x1:x2]
    height,width,channel=np.shape(imgSize)

    #遍历检测的目标
    # print('detection.shape: {}'.format(detections.shape))
    # print('detection: {}'.format(detections))
    for i in range(detections.shape[2]):
        #保留两位小数
        confidence=round(detections[0,0,i,2]*100,2)
        #这里只检测人这个目标
        if confidence>threadVal*100:
            class_id=int(detections[0,0,i,1])
            if class_id==15:
                xLeftBottom=int(detections[0,0,i,3]*width)
                yLeftBottom=int(detections[0,0,i,4]*height)
                xRightTop=int(detections[0,0,i,5]*width)
                yRightTop=int(detections[0,0,i,6]*height)

                #对得到的人脸区域进行检测是否佩戴口罩
                x1=np.maximum(xLeftBottom,0)
                x2=np.minimum(xRightTop,width)
                y1=np.maximum(yLeftBottom,0)
                y2=np.maximum(yRightTop,height)
                img=imgSize[x1:x2,y1:y2]
                img = preprocess_image(img, target_size=target_size)
                predications = modelInV3.predict(img)[0].tolist()
                # print(predications)
                # print(np.argmax(predications))
                PreResult = int(np.argmax(predications))

                # 绘制是否佩戴口罩标志的位置
                mask_x = int(xLeftBottom + (xRightTop - xLeftBottom) / 2)
                mask_y = int(yLeftBottom - 20)
                mask=classes[PreResult]
                if mask=='mask':
                    cv2.rectangle(img=imgSize,pt1=(xLeftBottom,yLeftBottom),
                                  pt2=(xRightTop,yRightTop),color=(0,255,0),thickness=2)
                    label=classNames[class_id]+": "+str(confidence)
                    labelSize, baseLine = cv2.getTextSize(label, cv2.FONT_HERSHEY_SIMPLEX, 0.5, 1)

                    cvzone.putTextRect(img=imgSize,text=label,pos=(xLeftBottom+9,yLeftBottom-12),
                                    scale=1,thickness=1,colorR=(0,255,0))
                    cv2.putText(imgSize, str(mask), (mask_x, mask_y),
                                cv2.FONT_HERSHEY_SIMPLEX, 1.0, (0, 255, 0))

                elif mask=='non_mask':
                    cv2.rectangle(img=imgSize, pt1=(xLeftBottom, yLeftBottom),
                                  pt2=(xRightTop, yRightTop), color=(0, 0, 255), thickness=2)
                    label = classNames[class_id] + ": " + str(confidence)
                    labelSize, baseLine = cv2.getTextSize(label, cv2.FONT_HERSHEY_SIMPLEX, 0.5, 1)

                    cvzone.putTextRect(img=imgSize, text=label, pos=(xLeftBottom + 9, yLeftBottom - 12),
                                       scale=1, thickness=1, colorR=(0, 0, 255))
                # cv2.rectangle(imgSize, (xLeftBottom, yLeftBottom - labelSize[1]),
                #               (xLeftBottom + labelSize[0], yLeftBottom + baseLine),
                #               (255, 255, 255), cv2.FILLED)
                    cv2.putText(imgSize, str(mask), (mask_x, mask_y),
                                cv2.FONT_HERSHEY_SIMPLEX, 1.0, (0, 0, 255))
    return imgSize

#对单张图片进行检测
def SignalDetect(img_path='images//1802.jpg'):
    imgSize=cv2.imread(img_path)
    imgSize=processImage(imgSize=imgSize)
    cv2.imshow('imgSize', imgSize)
    cv2.waitKey(0)
    cv2.destroyAllWindows()


#输入网络的图片大小
target_size=(224,224)
#对图像进行预处理
def preprocess_image(image,target_size):
    """
    :param img_path: 图片路径
    :param target_size: 图片大小
    :return:
    """
    image=Image.fromarray(image,mode='RGB')
    if image.mode!='RGB':
        image=image.convert('RGB')
    image=image.resize(target_size)
    image=img_to_array(image)
    image=image/255.0
    image=np.expand_dims(image,axis=0)
    return image
#实时检测
def detectTime(modelInV3,classes):
    cap=cv2.VideoCapture(0)
    while cap.isOpened():
        ret,frame=cap.read()
        #预测图像类别
        # img=preprocess_image(frame,target_size=target_size)
        # predications = modelInV3.predict(img)[0].tolist()
        # # print(predications)
        # # print(np.argmax(predications))
        # PreResult = int(np.argmax(predications))
        # print('预测类别: {}'.format(classes[PreResult]))

        frame=cv2.resize(src=frame,dsize=(520,520))
        frame=cv2.flip(src=frame,flipCode=2)
        frame=processImage(frame,modelInV3,classes)
        cv2.imshow('frame',frame)
        key=cv2.waitKey(1)
        if key==27:
            break
    cap.release()
    cv2.destroyAllWindows()

if __name__ == '__main__':
    pass
本文内容由网友自发贡献,版权归原作者所有,本站不承担相应法律责任。如您发现有涉嫌抄袭侵权的内容,请联系:hwhale#tublm.com(使用前将#替换为@)