PX4飞控试炼之路
- 一、地面站控制台上显示输出“Hello Sky!”
- 二、利用飞控计算加法
- 三、飞控按指定频率计数,并将计数结果反馈到控制台
- 1. 利用while循环实现计数
- 2. 利用`hrt_call_every`周期回调函数实现
- 3. 飞控创建新线程
- (1)task控制接口
- (2)phreads方式创建线程
- 四、uORB通信发布和订阅数据
-
一、地面站控制台上显示输出“Hello Sky!”
- 找到目录:Firmware/src/examples/, 并新建一个子目录,可以命为:my_example_app;
- 在新建的目录下,新建一个 c文件,可以命名为:my_example_app.c;
- 打开新建的 c文件,并填入以下代码:
#include <px4_posix.h>
__EXPORT int my_example_app_main(int argc, char *argv[]);
int my_example_app_main(int argc, char *argv[])
{
PX4_INFO("Hello Sky!");
return 0;
}
my_example_app是飞控运行过程中的一个指令,可在地面站端口输入,调用该条指令时,打印信息Hello Sky。需要注意的是主函数命名方式为 C文件的名称 + _main, 这样在控制台输入命令时,就可以从该入口进入函数;
- 仍在该目录下,新建一个 txt文件,名为:CMakeLists.txt,该文件用于编译,必不可少,里面写入以下代码:
px4_add_module(
	MODULE examples__my_example_app
	MAIN my_example_app
	STACK_MAIN 2000
	SRCS
		my_example_app.c
	DEPENDS
	)
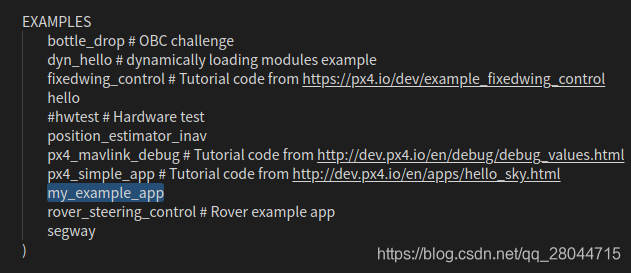
- 如果想从仿真中查看的话,需要进入文件夹:Firmware/boards/px4/sitl/, 并打开文件:default.cmake,如果想从飞控中查看,需要进入文件夹:Firmware/boards/px4/fmu-v2/并打开文件:default.cmake, 在EXAMPLES类中添加
my_example_app。
 该cmake文件中的命令,如果在使用过程中不需要可以注释掉,这样编译过程会更快;
然后进入Firmware目录下的终端,输入指令:make px4_fmu-v2_default编译固件,输入指令:make px4_sitl_default gazebo打开gazebo仿真:
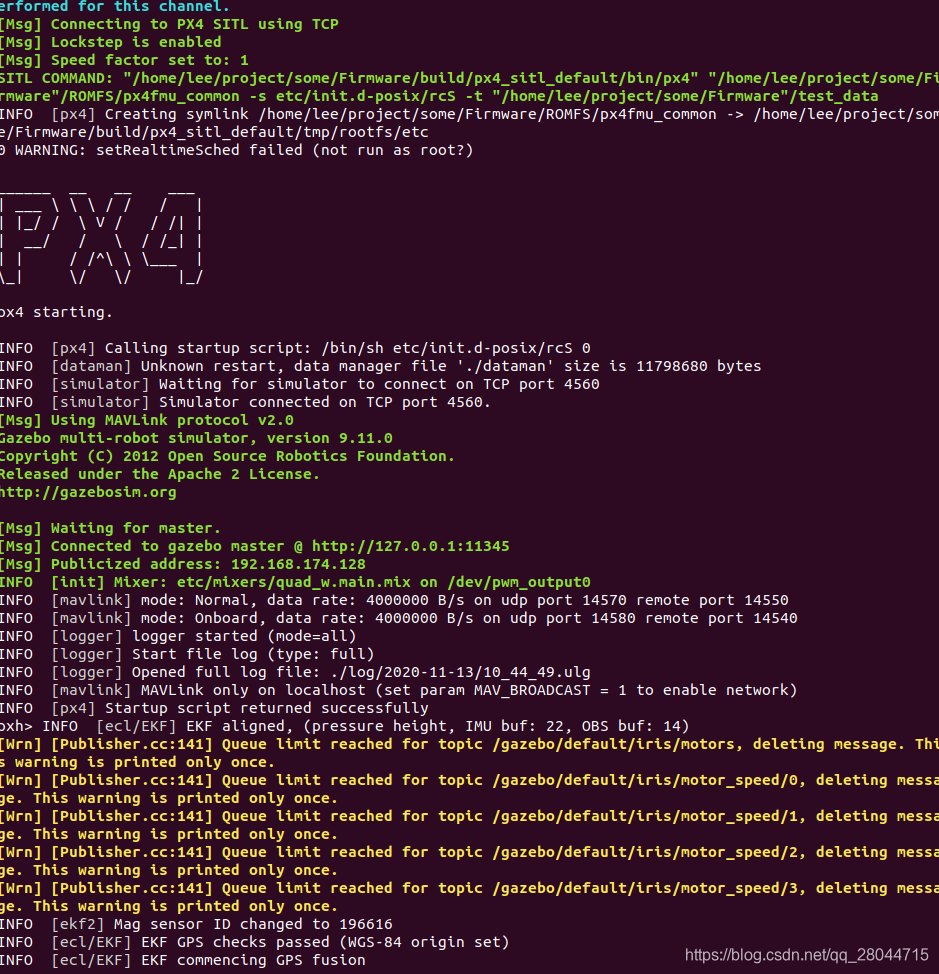
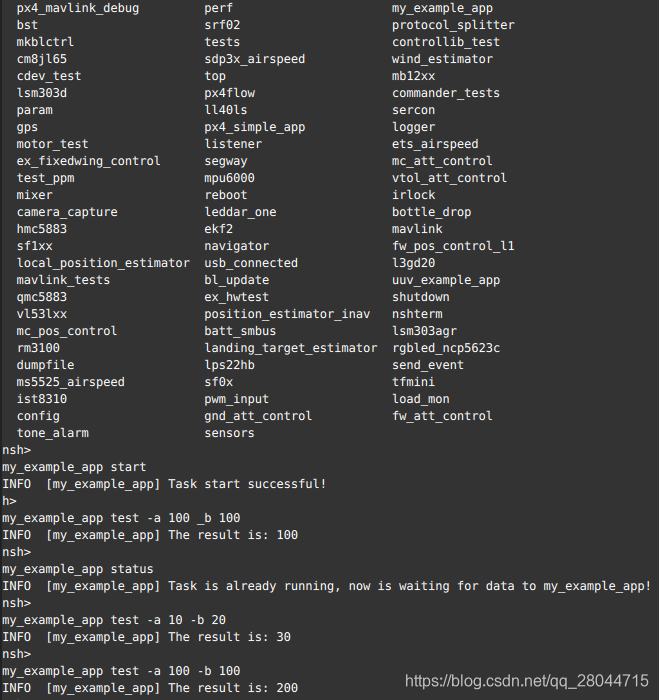
接着在该终端中输入my_example_app,终端输出“Hello Sky!”

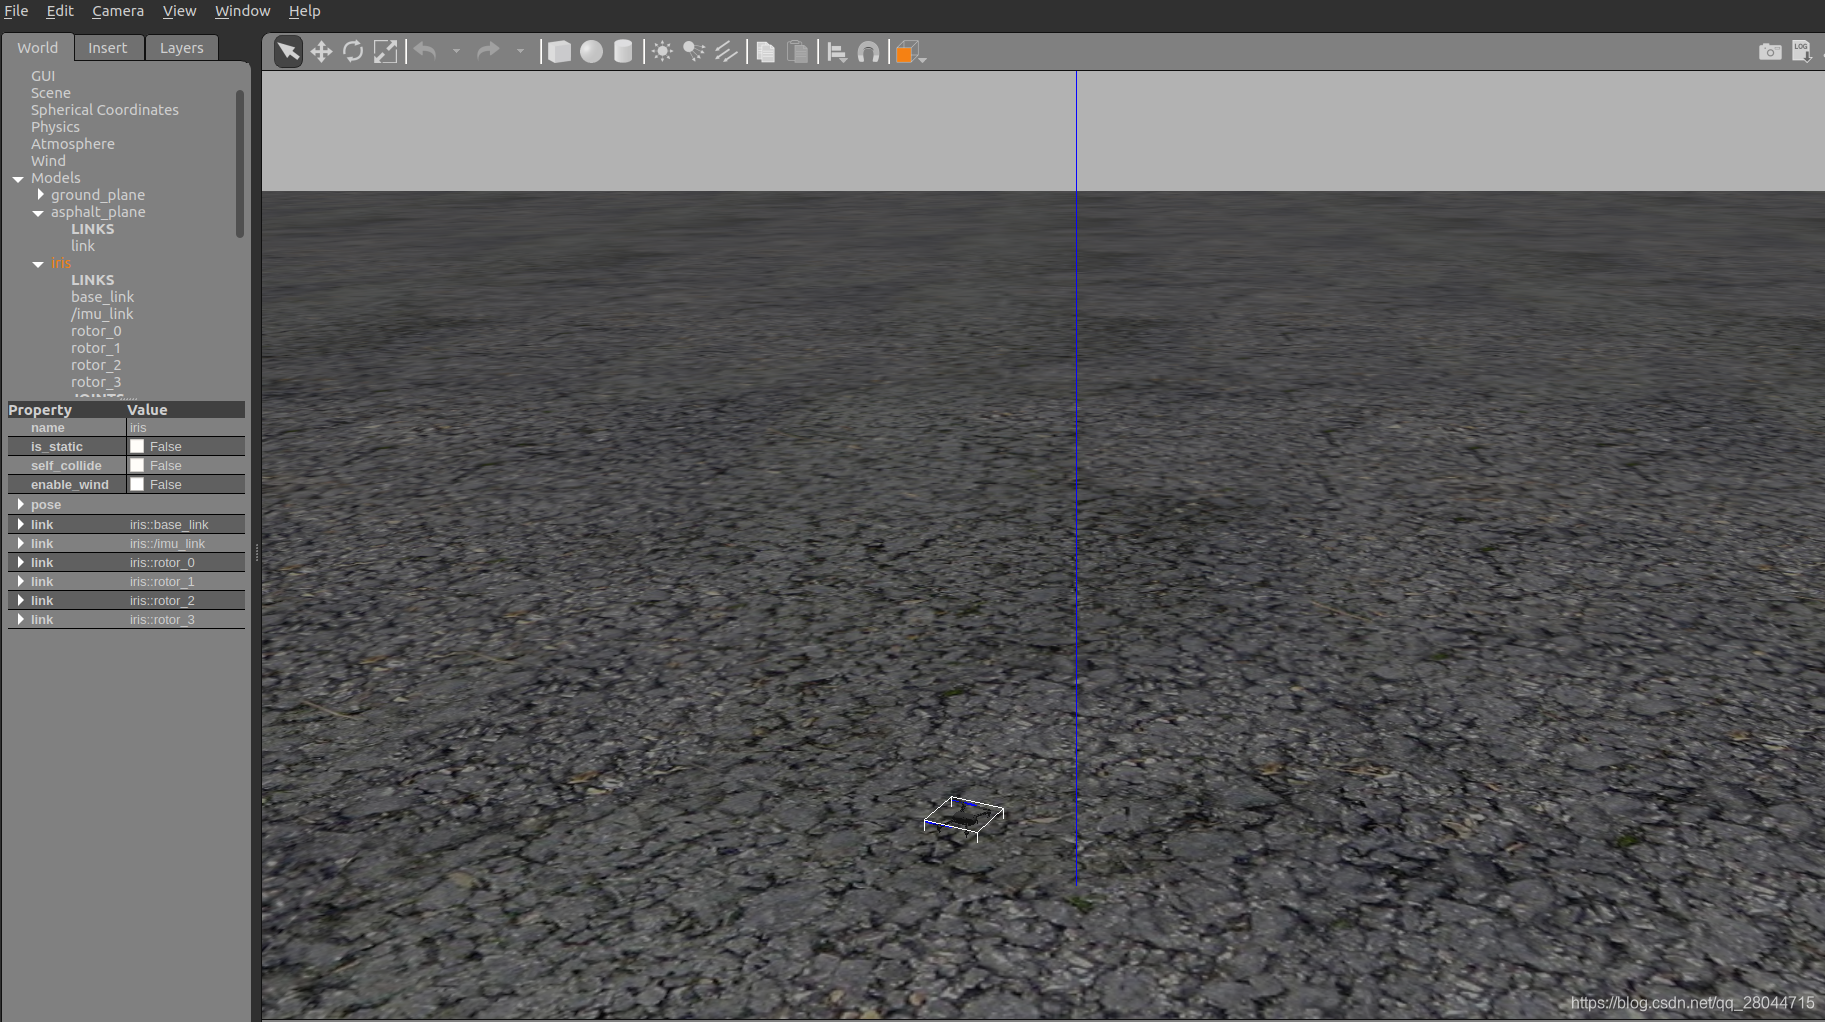
gazebo仿真界面如下图,中心位置出现一辆无人机。
二、利用飞控计算加法
- PX4中的任何一个功能模块或者说一个进程基本模式如下图所示:
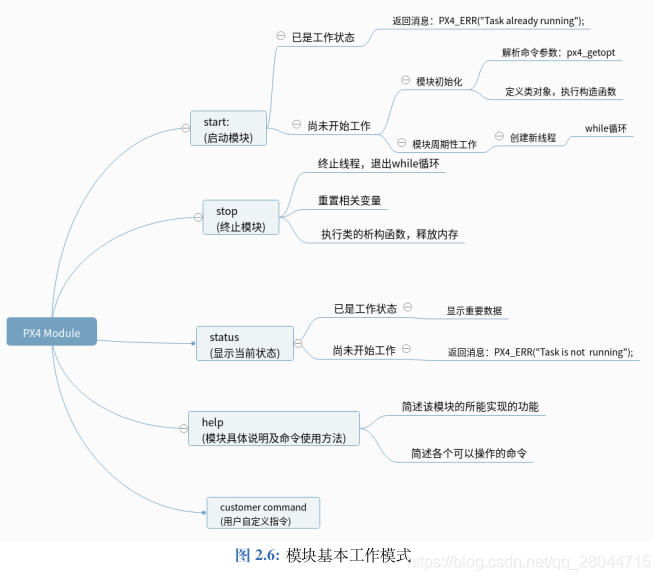 要想用飞控实现两个数字的加法,需在控制台输入两个数字a和b,然后经飞控计算后,再返回控制台。按照上图的进程模式指令应包括:进程启动、进程停止、进程状态、进程帮助以及用户操作指令。
用户的操作指令格式为:my_example_app test -a num1 -b num2,其中my_example_app 是指令的名称, -a num1 -b num2均是指令参数。例如,一个正常指令为:
my_example_app test -a 100 -b 2
- 考虑到源码主要使用C++进行变成,这里我们将.c文件改为.cpp文件,首先创建一个类,里面包含需要实现各个指令的公有公式和用于运算与状态标记的变量。
对参数的提取主要利用了头文件#include <px4_getopt.h>中的int PX4_getopt(int argc, char *argv[], const char *options, int *myoptind, const char **myoptarg)函数。完整代码如下:
#include <px4_posix.h>
#include <px4_defines.h>
#include <px4_getopt.h>
#include <stdlib.h>
#include <string.h>
extern "C" __EXPORT int my_example_app_main(int argc, char *argv[]);
class AddtionCall
{
public:
AddtionCall();
~AddtionCall();
int start();
int stop();
void status();
void help();
void my_example_app(int argc, char *argv[]);
private:
float _num1 ;
float _num2;
float _result ;
bool _status;
};
AddtionCall::AddtionCall():
_num1(0.0f),
_num2(0.0f),
_result(0.0f),
_status(false)
{
;
}
AddtionCall::~AddtionCall()
{
_num1= 0.0f;
_num2= 0.0f;
_result = 0.0f;
_status=false;
}
int AddtionCall::start()
{
if (_status)
{
PX4_INFO("Task is already running, now is waiting for data to my_example_app");
}
else
{
_status=true;
PX4_INFO("Task start successful!");
}
return 1;
}
int AddtionCall::stop()
{
_status=false;
PX4_INFO("Task has been stopped!");
return 1;
}
void AddtionCall::status()
{
if (!_status)
{
PX4_INFO("Task is is not running, please start it first ");
}
else
{
PX4_INFO("Task is already running, now is waiting for data to my_example_app!");
}
}
void AddtionCall::help()
{
PX4_INFO("This is my_example_app module, using for addition opreation. You can use the following command:");
PX4_INFO(" my_example_app start //---- start the module");
PX4_INFO(" my_example_app stop //---- stop the module");
PX4_INFO(" my_example_app status //---- show the current state of the module");
PX4_INFO("my_example_app help //---- show what you can do in this module");
PX4_INFO("my_example_app test -a num1 -b num2 //----caculate your data, There is a limit that \"a<=10000 and a>=-10000\", and ’b’ has the same limitation.");
}
void AddtionCall::my_example_app(int argc, char *argv[])
{
bool error_flag=false;
int myoptind = 1;
int ch;
const char *myoptarg = nullptr;
while ((ch = px4_getopt(argc, argv, "a:b:", &myoptind, &myoptarg)) != EOF)
{
switch (ch) {
case 'a':
_num1= atof(myoptarg);
break;
case 'b':
_num2 = atof(myoptarg);
break;
default:
error_flag = true;
break;
}
}
if (error_flag)
{
PX4_WARN("unrecognized flag");
}
else
{
if (_num1<=10000&&_num1>=-10000&&_num2<=10000&&_num2>=-10000)
{
_result=_num1+_num2;
PX4_INFO("The result is: %f",(double)_result);
}
else
{
PX4_WARN("Your data is beyond the limitation!");
}
}
}
int my_example_app_main(int argc, char *argv[])
{
static AddtionCall add_num;
if (argc < 2)
{
PX4_WARN( "AddtionCall: my_example_app {start|stop|status|help|test -a num1 -b num2}");
}
if (!strcmp(argv[1], "start")&&argc==2)
{
{
add_num.start();
}
_exit(0);
}
else if (!strcmp(argv[1], "stop")&&argc==2) {
{
add_num.stop();
}
_exit(0);
}
else if (!strcmp(argv[1], "status")&&argc==2) {
{
add_num.status();
}
_exit(0);
}
else if (!strcmp(argv[1], "help")&&argc==2)
{
{
add_num.help();
}
_exit(0);
}
else if (!strcmp(argv[1], "test")&&argc>2)
{
{
add_num.my_example_app(argc, argv);
}
_exit(0);
}
else
{
PX4_INFO("This is my_example_app module, using for addition opreation. You can use the following command:");
PX4_INFO(" my_example_app start //---- start the module");
PX4_INFO(" my_example_app stop //---- stop the module");
PX4_INFO(" my_example_app status //---- show the current state of the module");
PX4_INFO("my_example_app help //---- show what you can do in this module");
PX4_INFO("my_example_app test -a num1 -b num2 //----caculate your data, there is a limit that \"a<=10000 and a>=-10000\", and ’b’ has the same limitation. ");
}
return OK;
}
编译固件,打开终端输入:make px4_sitl_default gazebo,打开gazebo仿真,在终端继续输入my_example_app test -a 5 -b 5,计算得到两个数的加法。
也可以通过数据线连接飞控板,打开QGC地面站,在MAVLink Console命令端口输入my_example_app test -a 5 -b 5,也可得到返回的计算结果。
三、飞控按指定频率计数,并将计数结果反馈到控制台
1. 利用while循环实现计数
在类中加入void run()函数专门处理计数任务,代码如下:
void AddtionCall::run()
{
hrt_abstime time_start = hrt_absolute_time();
float time_count=0;
while (_status)
{
usleep(WAITING_1S);
time_count=(float)hrt_elapsed_time(&time_start)/WAITING_1S;
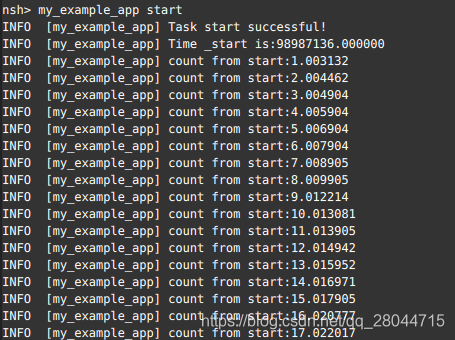
PX4_INFO("count from start:%3.6f",(double)time_count);
}
}
在start()函数中调用run()函数。
在原代码中修改得到的完整程序为:
#include <px4_posix.h>
#include <px4_defines.h>
#include <px4_getopt.h>
#include <stdlib.h>
#include <string.h>
#include <drivers/drv_hrt.h>
extern "C" __EXPORT int my_example_app_main(int argc, char *argv[]);
#define WAITING_1S 1000000
class AddtionCall
{
public:
AddtionCall();
~AddtionCall();
int start();
int stop();
void status();
void help();
void my_example_app(int argc, char *argv[]);
void run();
private:
float _num1 ;
float _num2;
float _result ;
bool _status;
hrt_abstime _time_start;
};
AddtionCall::AddtionCall():
_num1(0.0f),
_num2(0.0f),
_result(0.0f),
_status(false)
{
;
}
AddtionCall::~AddtionCall()
{
_num1= 0.0f;
_num2= 0.0f;
_result = 0.0f;
_status=false;
}
void AddtionCall::run()
{
_time_start = hrt_absolute_time();
PX4_INFO("Time _start is:%3.6f",(double)_time_start);
float time_count=0;
while (_status)
{
usleep(WAITING_1S);
time_count=(float)hrt_elapsed_time(&_time_start)/WAITING_1S;
PX4_INFO("count from start:%3.6f",(double)time_count);
}
}
int AddtionCall::start()
{
if (_status)
{
PX4_INFO("Task is already running, now is waiting for data to my_example_app");
}
else
{
_status=true;
PX4_INFO("Task start successful!");
}
run();
return 1;
}
int AddtionCall::stop()
{
_status=false;
PX4_INFO("Task has been stopped!");
return 1;
}
void AddtionCall::status()
{
if (!_status)
{
PX4_INFO("Task is is not running, please start it first ");
}
else
{
PX4_INFO("Task is already running, now is waiting for data to my_example_app!");
}
}
void AddtionCall::help()
{
PX4_INFO("This is my_example_app module, using for addition opreation. You can use the following command:");
PX4_INFO(" my_example_app start //---- start the module");
PX4_INFO(" my_example_app stop //---- stop the module");
PX4_INFO(" my_example_app status //---- show the current state of the module");
PX4_INFO("my_example_app help //---- show what you can do in this module");
PX4_INFO("my_example_app test -a num1 -b num2 //----caculate your data, There is a limit that \"a<=10000 and a>=-10000\", and ’b’ has the same limitation.");
}
void AddtionCall::my_example_app(int argc, char *argv[])
{
bool error_flag=false;
int myoptind = 1;
int ch;
const char *myoptarg = nullptr;
while ((ch = px4_getopt(argc, argv, "a:b:", &myoptind, &myoptarg)) != EOF)
{
switch (ch) {
case 'a':
_num1= atof(myoptarg);
break;
case 'b':
_num2 = atof(myoptarg);
break;
default:
error_flag = true;
break;
}
}
if (error_flag)
{
PX4_WARN("unrecognized flag");
}
else
{
if (_num1<=10000&&_num1>=-10000&&_num2<=10000&&_num2>=-10000)
{
_result=_num1+_num2;
PX4_INFO("The result is: %f",(double)_result);
}
else
{
PX4_WARN("Your data is beyond the limitation!");
}
}
}
int my_example_app_main(int argc, char *argv[])
{
static AddtionCall add_num;
if (argc < 2)
{
PX4_WARN( "AddtionCall: my_example_app {start|stop|status|help|test -a num1 -b num2}");
}
if (!strcmp(argv[1], "start")&&argc==2)
{
{
add_num.start();
}
_exit(0);
}
else if (!strcmp(argv[1], "stop")&&argc==2) {
{
add_num.stop();
}
_exit(0);
}
else if (!strcmp(argv[1], "status")&&argc==2) {
{
add_num.status();
}
_exit(0);
}
else if (!strcmp(argv[1], "help")&&argc==2)
{
{
add_num.help();
}
_exit(0);
}
else if (!strcmp(argv[1], "test")&&argc>2)
{
{
add_num.my_example_app(argc, argv);
}
_exit(0);
}
else
{
PX4_INFO("This is my_example_app module, using for addition opreation. You can use the following command:");
PX4_INFO(" my_example_app start //---- start the module");
PX4_INFO(" my_example_app stop //---- stop the module");
PX4_INFO(" my_example_app status //---- show the current state of the module");
PX4_INFO("my_example_app help //---- show what you can do in this module");
PX4_INFO("my_example_app test -a num1 -b num2 //----caculate your data, there is a limit that \"a<=10000 and a>=-10000\", and ’b’ has the same limitation. ");
}
return OK;
}
上传固件到飞控后,在地面站控制台输入my_example_app start,飞控开始计数:
2. 利用hrt_call_every周期回调函数实现
该函数为:void hrt_call_every(struct hrt_call *entry, hrt_abstime delay, hrt_abstime interval, hrt_callout callout, void *arg)
位于头文件 #include <drivers/drv_hrt.h>中。其作用是以周期 interval (us) 循环调用函数 callout. 调用时间最多不超过 delay(单位 us,delay 要略大于interval), 且函数callout调用期间禁止中断。传感器 mpu6000的驱动中就使用了该函数,如下:
hrt_call_every(&_call,
				1000,
				_call_interval - MPU6000_TIMER_REDUCTION,
				(hrt_callout)&MPU6000::measure_trampoline, this);
仍旧在my_example_app原代码中进行修改,得到该部分完整代码。
3. 飞控创建新线程
多线程所需要使用的函数在Nuttx中,相关函数的具体说明可参考Nuttx系统Porting Guide;
Nuttx可以运行两种线程:
tasks: 各线程相互独立,每创建一个tasks都会产生一组新的描述符包括输入、输出和错误,子进程可以自由使用自己的描述符而不影响父进程。
pthreads: 与父进程共享相同的描述符,子进程的操作将影响到父进程和父进程包含的所有子进程,互相共享资源。
(1)task控制接口
task_create函数:
task_create(char *name, int priority, int stack_size, main_t entry, char *
const argv[]);
--------------函数说明------------------
name:/任务名称
priority:/任务优先级,有:SCHED_PRIORITY_MAX/SCHED_PRIORITY_MAX/
SCHED_PRIORITY_MIN/SCHED_PRIORITY_IDLE等,具体参考头文件platforms/nuttx/NuttX/nuttx/include/sys/types.h
stack_size:/栈大小,一般取2048
entry:/线程主函数入口
argv[]:/主函数入口参数
通过创建task_create函数来解决上面无法在控制台打印信息的问题,主要过程如下:
hrt_call_every函数定时精度较高,我们使用该函数计时,每隔1s,给相应的计时标志位;
利用task_creat创建的主线程执行while循环任务,检测到计时标志位时(可以理解为中断),调用打印函数将计数信息打印到控制台。
在类中定义新的打印信息函数和用于标志计数的变量,该变量定义为了静态变量,不能在构造函数内部初始化,只能在外面初始化赋值。
int AddtionCall::run_info_print(int argc,char *argv[])
{
while(_status)
{
if(!_tick_arrived)
{
_tick_arrived = true ;
PX4_INFO("count from start: %3.6f",(double)_time_count);
usleep(WAITING_1S-50);
}
}
return OK;
}
...
static bool _tick_arrived;
...
bool AddtionCall::_tick_arrived=false;
- start()函数修改:
int AddtionCall::start()
{
if (_status)
{
PX4_INFO("Task is already running, now is waiting for data to my_example_app");
return 0;
}
else
{
_status=true;
PX4_INFO("Task start successful!");
}
pid_t task_pid=task_create("addtion_call",
SCHED_PRIORITY_DEFAULT,
2048,
run_info_print,
NULL);
if(task_pid<0)
{
int errcode =errno;
PX4_INFO("ERROR:Failed to start addtion_call: \n");
return -errcode;
}
hrt_cancel(&_call);
_call_interval=WAITING_1S;
_time_start=hrt_absolute_time();
hrt_call_every(&_call,WAITING_1S+200,WAITING_1S,(hrt_callout)&AddtionCall::run_trampoline, this);
return 1;
}
完整程序如下:
#include <px4_posix.h>
#include <px4_defines.h>
#include <px4_getopt.h>
#include <px4_log.h>
#include <stdlib.h>
#include <string.h>
#include <drivers/drv_hrt.h>
#include <sched.h>
#include <errno.h>
extern "C" __EXPORT int my_example_app_main(int argc, char *argv[]);
#define WAITING_1S 1000000
#define RUN_TIMER_REDUCTION 200000
class AddtionCall
{
public:
AddtionCall();
~AddtionCall();
int start();
int stop();
void status();
void help();
void my_example_app(int argc, char *argv[]);
void run();
void calculate(int argc,char *argv[]);
static void run_trampoline(void *arg);
static int run_info_print(int argc,char *argv[]);
private:
float _num1 ;
float _num2;
float _result ;
static bool _status;
struct hrt_call _call;
unsigned _call_interval;
hrt_abstime _time_start;
static float _time_count;
static bool _tick_arrived;
};
bool AddtionCall::_status=false;
float AddtionCall::_time_count=0;
bool AddtionCall::_tick_arrived= false;
AddtionCall::AddtionCall():
_num1(0.0f),
_num2(0.0f),
_result(0.0f),
_call{},
_call_interval(1000),
_time_start(0)
{
memset(&_call,0,sizeof(_call));
}
AddtionCall::~AddtionCall()
{
_num1= 0.0f;
_num2= 0.0f;
_result = 0.0f;
_status=false;
}
void AddtionCall::run()
{
_time_count=(float)hrt_elapsed_time(&_time_start)/WAITING_1S;
_tick_arrived=false;
}
void AddtionCall::run_trampoline(void *arg)
{
AddtionCall *dev=(AddtionCall*)arg;
dev->run();
}
int AddtionCall::run_info_print(int argc,char *argv[])
{
while(_status)
{
if(!_tick_arrived)
{
_tick_arrived = true ;
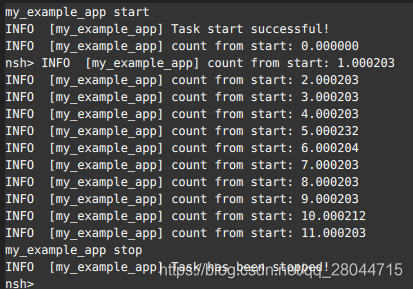
PX4_INFO("count from start: %3.6f",(double)_time_count);
usleep(WAITING_1S-50);
}
}
return OK;
}
int AddtionCall::start()
{
if (_status)
{
PX4_INFO("Task is already running, now is waiting for data to my_example_app");
return 0;
}
else
{
_status=true;
PX4_INFO("Task start successful!");
}
pid_t task_pid=task_create("addtion_call",
SCHED_PRIORITY_DEFAULT,
2048,
run_info_print,
NULL);
if(task_pid<0)
{
int errcode =errno;
PX4_INFO("ERROR:Failed to start addtion_call: \n");
return -errcode;
}
hrt_cancel(&_call);
_call_interval=WAITING_1S;
_time_start=hrt_absolute_time();
hrt_call_every(&_call,WAITING_1S+200,WAITING_1S,(hrt_callout)&AddtionCall::run_trampoline, this);
return 1;
}
int AddtionCall::stop()
{
_status=false;
hrt_cancel(&_call);
PX4_INFO("Task has been stopped!");
return 1;
}
void AddtionCall::status()
{
if (!_status)
{
PX4_INFO("Task is is not running, please start it first ");
}
else
{
PX4_INFO("count from start: %3.6f",(double)_time_count);
PX4_INFO("Task is already running, now is waiting for data to calculate!");
}
}
void AddtionCall::help()
{
PX4_INFO("This is calculate module, using for addition opreation. You can use the following command:");
PX4_INFO(" calculate start //---- start the module");
PX4_INFO(" calculate stop //---- stop the module");
PX4_INFO(" calculate status //---- show the current state of the module");
PX4_INFO("calculate help //---- show what you can do in this module");
PX4_INFO("calculate test -a num1 -b num2 //----caculate your data, There is a limit that \"a<=10000 and a>=-10000\", and ’b’ has the same limitation.");
}
void AddtionCall::calculate(int argc, char *argv[])
{
bool error_flag=false;
int myoptind = 1;
int ch;
const char *myoptarg = nullptr;
while ((ch = px4_getopt(argc, argv, "a:b:", &myoptind, &myoptarg)) != EOF)
{
switch (ch) {
case 'a':
_num1= atof(myoptarg);
break;
case 'b':
_num2 = atof(myoptarg);
break;
default:
error_flag = true;
break;
}
}
if (error_flag)
{
PX4_WARN("unrecognized flag");
}
else
{
if (_num1<=10000&&_num1>=-10000&&_num2<=10000&&_num2>=-10000)
{
_result=_num1+_num2;
PX4_INFO("The result is: %f",(double)_result);
}
else
{
PX4_WARN("Your data is beyond the limitation!");
}
}
}
int my_example_app_main(int argc, char *argv[])
{
static AddtionCall add_num;
if (argc < 2)
{
PX4_WARN( "AddtionCall: calculate {start|stop|status|help|test -a num1 -b num2}");
}
if (!strcmp(argv[1], "start")&&argc==2)
{
{
add_num.start();
}
_exit(0);
}
else if (!strcmp(argv[1], "stop")&&argc==2) {
{
add_num.stop();
}
_exit(0);
}
else if (!strcmp(argv[1], "status")&&argc==2) {
{
add_num.status();
}
_exit(0);
}
else if (!strcmp(argv[1], "help")&&argc==2)
{
{
add_num.help();
}
_exit(0);
}
else if (!strcmp(argv[1], "test")&&argc>2)
{
{
add_num.calculate(argc, argv);
}
_exit(0);
}
else
{
PX4_INFO("This is calculate module, using for addition opreation. You can use the following command:");
PX4_INFO(" calculate start //---- start the module");
PX4_INFO(" calculate stop //---- stop the module");
PX4_INFO(" calculate status //---- show the current state of the module");
PX4_INFO("calculate help //---- show what you can do in this module");
PX4_INFO("calculate test -a num1 -b num2 //----caculate your data, there is a limit that \"a<=10000 and a>=-10000\", and ’b’ has the same limitation. ");
}
return OK;
}
运行结果如下,计数可通过my_example_app stop命令结束:
(2)phreads方式创建线程
该方式以pthread.h文件和线程函数库实现,主要函数有:
线程操纵函数:pthread_create()创建一个线程,pthread_exit()终止当前线程等;
线程属性函数:pthread_attr_init()初始化线程属性变量等;
在tasks线程基础上修改代码,完整程序如下:
#include <px4_posix.h>
#include <px4_defines.h>
#include <px4_getopt.h>
#include <px4_log.h>
#include <stdlib.h>
#include <string.h>
#include <drivers/drv_hrt.h>
#include <sched.h>
#include <errno.h>
#include <pthread.h>
extern "C" __EXPORT int my_example_app_main(int argc, char *argv[]);
#define WAITING_1S 1000000
#define RUN_TIMER_REDUCTION 200000
class AddtionCall
{
public:
AddtionCall();
~AddtionCall();
int start();
int stop();
void status();
void help();
void my_example_app(int argc, char *argv[]);
void run();
void calculate(int argc,char *argv[]);
static void run_trampoline(void *arg);
static int run_info_print(int argc,char *argv[]);
static void *run_phreads(void *context);
static void phreads_define();
private:
float _num1 ;
float _num2;
float _result ;
static bool _status;
struct hrt_call _call;
unsigned _call_interval;
hrt_abstime _time_start;
static float _time_count;
static bool _tick_arrived;
static pthread_t _thread;
static pthread_mutex_t _value_mutex;
};
bool AddtionCall::_status=false;
float AddtionCall::_time_count=0;
bool AddtionCall::_tick_arrived= false;
pthread_t AddtionCall::_thread = {};
pthread_mutex_t AddtionCall::_value_mutex={};
AddtionCall::AddtionCall():
_num1(0.0f),
_num2(0.0f),
_result(0.0f),
_call{},
_call_interval(1000),
_time_start(0)
{
memset(&_call,0,sizeof(_call));
}
AddtionCall::~AddtionCall()
{
_num1= 0.0f;
_num2= 0.0f;
_result = 0.0f;
_status=false;
}
void AddtionCall::run()
{
_time_count=(float)hrt_elapsed_time(&_time_start)/WAITING_1S;
_tick_arrived=false;
}
void AddtionCall::run_trampoline(void *arg)
{
AddtionCall *dev=(AddtionCall*)arg;
dev->run();
}
int AddtionCall::run_info_print(int argc,char *argv[])
{
while(_status)
{
if(!_tick_arrived)
{
_tick_arrived = true ;
PX4_INFO("count from start1: %3.6f",(double)_time_count);
usleep(WAITING_1S-50);
}
}
return OK;
}
void *AddtionCall::run_phreads(void *context)
{
while(_status)
{
if(!_tick_arrived)
{
pthread_mutex_lock(&_value_mutex);
pthread_mutex_unlock(&_value_mutex);
PX4_INFO("count from start2: %3.6f",(double)_time_count);
usleep(WAITING_1S-50);
}
}
return OK;
}
void AddtionCall::phreads_define()
{
pthread_attr_t runloop_attr;
pthread_attr_init(&runloop_attr);
struct sched_param param;
(void)pthread_attr_getschedparam(&runloop_attr,¶m);
param.sched_priority=SCHED_PRIORITY_MAX -100;
(void)pthread_attr_setschedparam(&runloop_attr,¶m);
pthread_attr_setstacksize(&runloop_attr,PX4_STACK_ADJUSTED(2840));
pthread_create(&_thread, &runloop_attr, AddtionCall::run_phreads, NULL);
}
int AddtionCall::start()
{
if (_status)
{
PX4_INFO("Task is already running, now is waiting for data to my_example_app");
return 0;
}
else
{
_status=true;
PX4_INFO("Task start successful!");
}
pid_t task_pid=task_create("addtion_call",
SCHED_PRIORITY_DEFAULT,
2048,
run_info_print,
NULL);
if(task_pid<0)
{
int errcode =errno;
PX4_INFO("ERROR:Failed to start addtion_call: \n");
return -errcode;
}
hrt_cancel(&_call);
_call_interval=WAITING_1S;
_time_start=hrt_absolute_time();
hrt_call_every(&_call,WAITING_1S+200,WAITING_1S,(hrt_callout)&AddtionCall::run_trampoline, this);
pthread_mutex_init(&AddtionCall::_value_mutex, nullptr);
phreads_define();
return 1;
}
int AddtionCall::stop()
{
_status=false;
hrt_cancel(&_call);
pthread_join(_thread, nullptr);
PX4_INFO("Task has been stopped!");
return 1;
}
void AddtionCall::status()
{
if (!_status)
{
PX4_INFO("Task is is not running, please start it first ");
}
else
{
PX4_INFO("count from start3: %3.6f",(double)_time_count);
PX4_INFO("Task is already running, now is waiting for data to my_example_app!");
}
}
void AddtionCall::help()
{
PX4_INFO("This is my_example_app module, using for addition opreation. You can use the following command:");
PX4_INFO(" my_example_app start //---- start the module");
PX4_INFO(" my_example_app stop //---- stop the module");
PX4_INFO(" my_example_app status //---- show the current state of the module");
PX4_INFO("my_example_app help //---- show what you can do in this module");
PX4_INFO("my_example_appte test -a num1 -b num2 //----caculate your data, There is a limit that \"a<=10000 and a>=-10000\", and ’b’ has the same limitation.");
}
void AddtionCall::calculate(int argc, char *argv[])
{
bool error_flag=false;
int myoptind = 1;
int ch;
const char *myoptarg = nullptr;
while ((ch = px4_getopt(argc, argv, "a:b:", &myoptind, &myoptarg)) != EOF)
{
switch (ch) {
case 'a':
_num1= atof(myoptarg);
break;
case 'b':
_num2 = atof(myoptarg);
break;
default:
error_flag = true;
break;
}
}
if (error_flag)
{
PX4_WARN("unrecognized flag");
}
else
{
if (_num1<=10000&&_num1>=-10000&&_num2<=10000&&_num2>=-10000)
{
_result=_num1+_num2;
PX4_INFO("The result is: %f",(double)_result);
}
else
{
PX4_WARN("Your data is beyond the limitation!");
}
}
}
int my_example_app_main(int argc, char *argv[])
{
static AddtionCall add_num;
if (argc < 2)
{
PX4_WARN( "AddtionCall: my_example_app {start|stop|status|help|test -a num1 -b num2}");
}
if (!strcmp(argv[1], "start")&&argc==2)
{
{
add_num.start();
}
_exit(0);
}
else if (!strcmp(argv[1], "stop")&&argc==2) {
{
add_num.stop();
}
_exit(0);
}
else if (!strcmp(argv[1], "status")&&argc==2) {
{
add_num.status();
}
_exit(0);
}
else if (!strcmp(argv[1], "help")&&argc==2)
{
{
add_num.help();
}
_exit(0);
}
else if (!strcmp(argv[1], "test")&&argc>2)
{
{
add_num.calculate(argc, argv);
}
_exit(0);
}
else
{
PX4_INFO("This is my_example_app module, using for addition opreation. You can use the following command:");
PX4_INFO(" my_example_app start //---- start the module");
PX4_INFO(" my_example_app stop //---- stop the module");
PX4_INFO(" my_example_app status //---- show the current state of the module");
PX4_INFO("my_example_app help //---- show what you can do in this module");
PX4_INFO("my_example_app test -a num1 -b num2 //----caculate your data, there is a limit that \"a<=10000 and a>=-10000\", and ’b’ has the same limitation. ");
}
return OK;
}
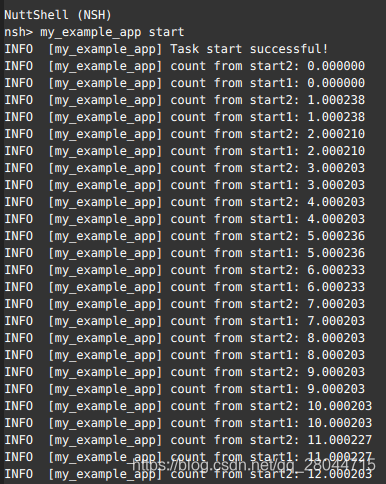
完成程序包含tasks和pthreads两个线程的计数,所以控制台中两个计数进程同时打印计数信息。
四、uORB通信发布和订阅数据
飞控各个功能模块之间是独立运行的,但对整个系统来说,进程间需要有数据传输,这需要uORB通信机制来实现。
uORB机制包含两个部分,功能模块订阅和发布;
- 模块订阅数据:订阅主题、设置订阅数据最小间隔、检查数据更新、拷贝数据;
- 模块发布数据:公告主题、发布主题数据、取消订阅主题。
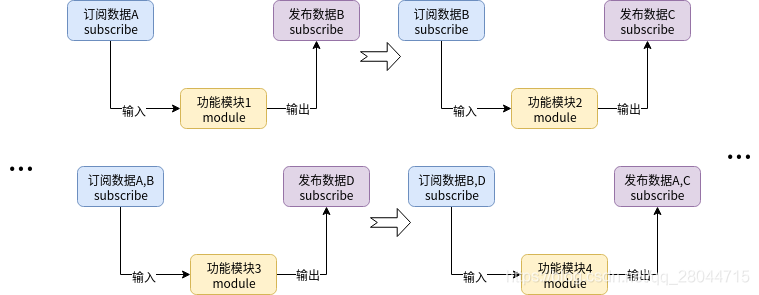 uORB消息A、B、C、D在源码中是预先定义的结构体变量,是由
.msg文件编译自动生成的,所有可以订阅或者发布的数据均可以在Firmware/msg/文件夹下找到。这些消息我们可以理解为预先定义好的全局变量,任何功能模块都能去读写,但需要通过特定的订阅和发布过程。
注意uORB通信不能用于进程内通信,一个功能模块不能既订阅某主题的同时又发布该主题。
1.模块订阅数据
- 订阅数据需要先订阅该数据主题,使用的函数格式为:
int orb_subscribe(const struct orb_metadata *meta)
参数:meta:uORB元对象,可以认为是主题id;
返回值:正确返回一个句柄,句柄是你自己定义的,初始化为-1,
eg:
int my_topic_sub=-1;
int my_topic_sub = orb_subscribe(ORB_ID(my_topic));
句柄在某种程度上可以理解为订阅主题的地址.
注意:函数都是直接对句柄操作,句柄的初始化放在进程的初始化部分。
-
设置订阅数据更新周期
我们可以自己设定读取的频率,这个类似于多长时间去读一次,也有很多模块不设置就会一直检测。
eg:orb_set_interval(sensor_sub_fd, 1000);
参数:handle:orb_subscribe函数返回的句柄;
interval:间隔时间,单位ms;
该函数返回OK表示成功;返回ERROR表示错误。
-
检查数据更新
订阅数据后需要知道数据是否更新,检查数据更新的方法有两种:第一是阻塞等待,就是程序卡在此处等着更新;第二种是使用while循环周期性的检查:
阻塞等待函数格式:
int poll(struct pollfd fds[], nfds_t nfds, int timeout)
参数:fds[]:结构类型的数组,进程可以同时等待很多个主题数据,当有数据更新时,判断一下是谁;fd也经常被称为文件描述符
nfds:用于标记数组fds中的结构体元素的总数量;
timeout:阻塞时间,单位是ms,即如果timeout=1000,那么就是1000ms=1s。
eg:
px4_pollfd_struct_t fds[] =
{
{ .fd = sensor_sub_fd,
.events = POLLIN },
};
int poll_ret = px4_poll(fds, 1, 1000);
timeout是最长等待时间,返回为0表示超过最长等待时间没有等到数据更新;>0就是在时间内收到了数据,<0表示出错。如果正常拿到数据,函数返回的是拿到数据剩下的阻塞时间。
检查更新函数格式为:
int orb_check(int handle, bool *updated)
参数:handle:句柄
*updated:是否更新的标志位,如果主题数据已经更新了,那么updated会被设置为true。
eg:下面是一个从订阅到检查更新到拷贝数据到最后关闭订阅的完整过程
int subsys_sub = orb_subscribe(ORB_ID(subsystem_info));
struct subsystem_info_s info;
memset(&info, 0, sizeof(info));
...
orb_check(subsys_sub, &updated);
if (updated) {
orb_copy(ORB_ID(subsystem_info), subsys_sub, &info);
}
...
orb_unsubscribe(subsys_sub);
调用orb_copy函数接收、处理数据后,updated会自动设置为false,所以这种方式在被第一次检测到后,后面再检测时就不再算是新数据了。
- 拷贝数据
函数格式为:
int orb_copy(const struct orb_metadata *meta, int handle, void *buffer)
参数:meta:消息ID
handle:句柄
buffer: 存放拷贝出的数据,是自己事先定义的数据结构类型
返回值:拷贝成功,返回OK(0)
eg:
sensor_combined_s raw ;
orb_copy(ORB_ID(sensor_combined), sensor_sub_fd, &raw);
- 取消订阅数据
int orb_unsubscribe(int handle)
参数:handle:主题句柄;
返回值:OK表示成功;错误返回ERROR;否则则有根据的去设置errno;
eg:
ret = orb_unsubscribe(handle);
2.模块发布数据
发布数据主要分为公告主题和发布主题两部分:
- 公告主题:
1.orb_advert_t orb_advertise(const struct orb_metadata *meta, const void *data)
功能:先公告主题,相当于注册,只要一次就行了。meta为公告的消息ID,data为公告的原始数据。
说明:在发布主题之前是必须的;否则订阅者虽然能订阅,但是得不到数据;
eg:
orb_advert_t _to_system_power;
_to_system_power(nullptr)
_to_system_power = orb_advertise(ORB_ID(system_power), &system_power);
2.orb_advert_t orb_advertise_multi(const struct orb_metadata *meta, const void
*data, int *instance,int priority)
说明:主要用于同一主题的多个数据来源的发布,比如飞控连接了多个超声波传感器,那么可
以发布到同一主题下;同时,需要订阅的时候,也是用:
int orb_subscribe_multi(const struct orb_metadata *meta, unsigned instance)进行订阅。
eg:_distance_sensor_topic = orb_advertise_multi(ORB_ID(distance_sensor), &ds_report,&_orb_class_instance, ORB_PRIO_LOW);
- 发布主题数据
int orb_publish(const struct orb_metadata *meta, orb_advert_t handle, const void *data)
功能:公告之后就可以发布主题数据。meta为公告的消息ID,handle为公告返回的句柄,这个句柄初始化为null,data为发布的数据。
- 新建主题
首先如果我们需要订阅和公告的主题已经存在,通过上面的方式就能完成数据的订阅或发布。否则需要新建这个主题,新建主题的步骤如下:
在目录Firmware/msg/下,新建文件my_test_data.msg,在其中写入:
#Date:2020年11月16日
#File name:my_test_data.msg
#Author:李俊龙
#说明:新建一个消息主题
uint64 timestamp	# time since system start (microseconds)
uint8  my_test_data     #测试数据
.msg必须定义时间戳变量,否则无法编译。
接着在Firmware/msg/下的CMakeList.txt文件中,添加my_test_data.msg。
 打开终端编译固件,系统会在
Firmware/build/px4_fmu-v3_default/uORB/topics/文件夹中自动生成对应的头文件my_test_data.h。

本文内容由网友自发贡献,版权归原作者所有,本站不承担相应法律责任。如您发现有涉嫌抄袭侵权的内容,请联系:hwhale#tublm.com(使用前将#替换为@)