看过了http.client的文档,趁热打铁,今天继续研究一下http.client的源码。
(一)
你会怎么实现
开始之前先让我们回忆一下一个HTTP调用的完整流程:

看到这张图,不妨先来思考一下如果要你来实现http.client,你会怎样做?
(二)
http.client是怎么设计的
现在,复习一下上篇文章关于http.client里面官方给出的一个示例:
>>> import http.client
>>> conn = http.client.HTTPSConnection("www.python.org")
>>> conn.request("GET", "/")
>>> r1 = conn.getresponse()
>>> print(r1.status, r1.reason)
200 OK
>>> data1 = r1.read()  # This will return entire content.
单单从这个示例,我们可以看出,http.client提供了HTTPSConnection类,首先需要实例化该类,然后调用request()方法发送请求,最后调用getresponse()方法来获得响应。
奇怪的事情发生了,在没有打开http.client的源代码之前,我们已经开始感叹HTTP协议是如此的简单。
然而HTTP协议真的易于实现吗?
(三)
http.client状态机
如果有小伙伴之前打开过client.py文件,首先映入眼帘就是一个关于状态说明文档,这里我把纯文本的文档制作成了一个状态机,如下图:
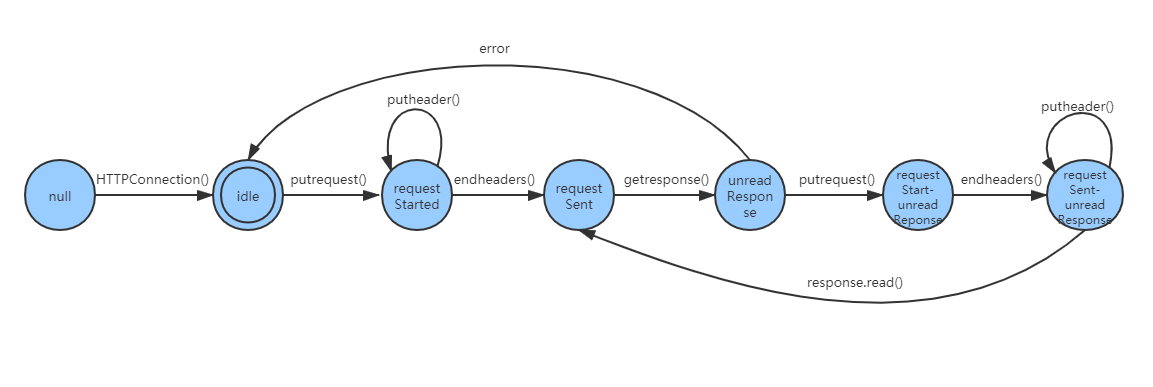
有了这个状态机,对于http.client的源码阅读会事半功倍。
(四)
源码预热
# HTTPMessage, parse_headers(), and the HTTP status code constants are
# intentionally omitted for simplicity
__all__ = ["HTTPResponse", "HTTPConnection",
           "HTTPException", "NotConnected", "UnknownProtocol",
           "UnknownTransferEncoding", "UnimplementedFileMode",
           "IncompleteRead", "InvalidURL", "ImproperConnectionState",
           "CannotSendRequest", "CannotSendHeader", "ResponseNotReady",
           "BadStatusLine", "LineTooLong", "RemoteDisconnected", "error",
           "responses"]
首先,这里指明了http.client对外提供的API,可以看到除了HTTPResponse和HTTPConnection之外,剩下大多是自定义的错误消息。
HTTP_PORT = 80
HTTPS_PORT = 443
紧接着定义了HTTP和HTTPS的默认端口。
_UNKNOWN = 'UNKNOWN'


# connection states
_CS_IDLE = 'Idle'
_CS_REQ_STARTED = 'Request-started'
_CS_REQ_SENT = 'Request-sent'
随后,又定义了一些内部状态。
咦,似乎比状态机里面的可能的状态要少呢?
(四)
HTTPResponse
先来看HTTPResponse的实例化方法:
class HTTPResponse(io.BufferedIOBase):
    def __init__(self, sock, debuglevel=0, method=None, url=None):
        self.fp = sock.makefile("rb")
        self.debuglevel = debuglevel
        self._method = method


        self.headers = self.msg = None


        # from the Status-Line of the response
        self.version = _UNKNOWN # HTTP-Version
        self.status = _UNKNOWN  # Status-Code
        self.reason = _UNKNOWN  # Reason-Phrase


        self.chunked = _UNKNOWN         # is "chunked" being used?
        self.chunk_left = _UNKNOWN      # bytes left to read in current chunk
        self.length = _UNKNOWN          # number of bytes left in response
        self.will_close = _UNKNOWN      # conn will close at end of response
在这里,初始化了一些状态,通过makefile将入参sock当作了一个可读的文件对象,但是HTTPResponse本身又是继承至io.BufferedIOBase,所以HTTPResponse本身也提供了read方法。
class HTTPResponse(io.BufferedIOBase):
    def read(self, amt=None):
        if self.fp is None:
            return b""


        if self._method == "HEAD":
            self._close_conn()
            return b""


        if amt is not None:
            # Amount is given, implement using readinto
            b = bytearray(amt)
            n = self.readinto(b)
            return memoryview(b)[:n].tobytes()
        else:
            # Amount is not given (unbounded read) so we must check self.length
            # and self.chunked


            if self.chunked:
                return self._readall_chunked()


            if self.length is None:
                s = self.fp.read()
            else:
                try:
                    s = self._safe_read(self.length)
                except IncompleteRead:
                    self._close_conn()
                    raise
                self.length = 0
            self._close_conn()        # we read everything
            return s
咦?好像read方法直接返回self.fp.read()即可,为什么还会这么复杂呢?
可以看到read方法除了开头的异常判断之外,增加了对于HEAD请求的特殊处理,另外剩下的大多数代码都是因为分块传输的存在而额外增加的。
这里插入一下分块传输的方案图:

没想到,看起来简单的HTTP分块传输,却要额外增加这么些代码。
回到read方法,好像调用read返回的只有响应体,响应行和响应头去哪了?
原来除了read方法之外,HTTPResponse还提供了一个begin方法用来接收响应行和响应头。
class HTTPResponse(io.BufferedIOBase):
    def begin(self):
        if self.headers is not None:
            # we've already started reading the response
            return


        # read until we get a non-100 response
        while True:
            version, status, reason = self._read_status()
            if status != CONTINUE:
                break
            # skip the header from the 100 response
            while True:
                skip = self.fp.readline(_MAXLINE + 1)
                if len(skip) > _MAXLINE:
                    raise LineTooLong("header line")
                skip = skip.strip()
                if not skip:
                    break
                if self.debuglevel > 0:
                    print("header:", skip)


        self.code = self.status = status
        self.reason = reason.strip()
        if version in ("HTTP/1.0", "HTTP/0.9"):
            # Some servers might still return "0.9", treat it as 1.0 anyway
            self.version = 10
        elif version.startswith("HTTP/1."):
            self.version = 11   # use HTTP/1.1 code for HTTP/1.x where x>=1
        else:
            raise UnknownProtocol(version)


        self.headers = self.msg = parse_headers(self.fp)


        if self.debuglevel > 0:
            for hdr, val in self.headers.items():
                print("header:", hdr + ":", val)


        # are we using the chunked-style of transfer encoding?
        tr_enc = self.headers.get("transfer-encoding")
        if tr_enc and tr_enc.lower() == "chunked":
            self.chunked = True
            self.chunk_left = None
        else:
            self.chunked = False


        # will the connection close at the end of the response?
        self.will_close = self._check_close()


        # do we have a Content-Length?
        # NOTE: RFC 2616, S4.4, #3 says we ignore this if tr_enc is "chunked"
        self.length = None
        length = self.headers.get("content-length")


         # are we using the chunked-style of transfer encoding?
        tr_enc = self.headers.get("transfer-encoding")
        if length and not self.chunked:
            try:
                self.length = int(length)
            except ValueError:
                self.length = None
            else:
                if self.length < 0:  # ignore nonsensical negative lengths
                    self.length = None
        else:
            self.length = None


        # does the body have a fixed length? (of zero)
        if (status == NO_CONTENT or status == NOT_MODIFIED or
            100 <= status < 200 or      # 1xx codes
            self._method == "HEAD"):
            self.length = 0


        # if the connection remains open, and we aren't using chunked, and
        # a content-length was not provided, then assume that the connection
        # WILL close.
        if (not self.will_close and
            not self.chunked and
            self.length is None):
            self.will_close = True
看起来begin方法比read还要复杂的多,这主要还是因为HTTP的发展早已超出了其设计初衷。早在HTTP0.9版本,甚至都没有HTTP头部的设计,在随后的演进中,出现了HTTP头部,但是却要求它即负责表达HTTP实体的内容特征,如Content-Length等;又要求它负责控制HTTP连接的行为,如Connection。
从第25-31行,可以看出http.client目前最高仅支持HTTP1.1,已经出现的HTTP2.0乃至HTTP3.0均不支持。
随后,第33行,响应头部分被保存在了self.headers属性中,第33行之后的一大串逻辑验证了我们关于HTTP头部其混乱性的观点。
(五)
HTTPConnection
class HTTPConnection:
    _http_vsn = 11
    _http_vsn_str = 'HTTP/1.1'


    response_class = HTTPResponse
    default_port = 80
    auto_open = 1
    debuglevel = 0
可以看到http.client默认使用HTTP1.1版本,默认使用HTTPResponse接收响应,默认使用80端口。
注:HTTPSConnection 继承至HTTPConnection,区别在于连接时多了SSL
鉴于HTTPConnection的内部方法较多,咱们依照前面的状态机里面提到的顺序,依次来看一下HTTPConnection对外提供的API。
首先是实例化方法:
class HTTPConnection:
    def __init__(self, host, port=None, timeout=socket._GLOBAL_DEFAULT_TIMEOUT,
                 source_address=None, blocksize=8192)
        ...
其实例化方法要求host必填,其他入参均是带有缺省值。
紧接着是putrequest:
class HTTPConnection:
    def putrequest(self, method, url, skip_host=False,
                   skip_accept_encoding=False):
       """Send a request to the server"""


        # if a prior response has been completed, then forget about it.
        if self.__response and self.__response.isclosed():
            self.__response = None


        # in certain cases, we cannot issue another request on this connection.
        # this occurs when:
        #   1) we are in the process of sending a request.   (_CS_REQ_STARTED)
        #   2) a response to a previous request has signalled that it is going
        #      to close the connection upon completion.
        #   3) the headers for the previous response have not been read, thus
        #      we cannot determine whether point (2) is true.   (_CS_REQ_SENT)
        #
        # if there is no prior response, then we can request at will.
        #
        # if point (2) is true, then we will have passed the socket to the
        # response (effectively meaning, "there is no prior response"), and
        # will open a new one when a new request is made.
        #
        # Note: if a prior response exists, then we *can* start a new request.
        #       We are not allowed to begin fetching the response to this new
        #       request, however, until that prior response is complete.
        #
        if self.__state == _CS_IDLE:
            self.__state = _CS_REQ_STARTED
        else:
            raise CannotSendRequest(self.__state)


        # Save the method for use later in the response phase
        self._method = method


        url = url or '/'
        self._validate_path(url)


        request = '%s %s %s' % (method, url, self._http_vsn_str)


        self._output(self._encode_request(request))


        if self._http_vsn == 11:
            # Issue some standard headers for better HTTP/1.1 compliance


            if not skip_host:
                # this header is issued *only* for HTTP/1.1
                # connections. more specifically, this means it is
                # only issued when the client uses the new
                # HTTPConnection() class. backwards-compat clients
                # will be using HTTP/1.0 and those clients may be
                # issuing this header themselves. we should NOT issue
                # it twice; some web servers (such as Apache) barf
                # when they see two Host: headers


                # If we need a non-standard port,include it in the
                # header.  If the request is going through a proxy,
                # but the host of the actual URL, not the host of the
                # proxy.


                netloc = ''
                if url.startswith('http'):
                    nil, netloc, nil, nil, nil = urlsplit(url)


                if netloc:
                    try:
                        netloc_enc = netloc.encode("ascii")
                    except UnicodeEncodeError:
                        netloc_enc = netloc.encode("idna")
                    self.putheader('Host', netloc_enc)
                else:
                    if self._tunnel_host:
                        host = self._tunnel_host
                        port = self._tunnel_port
                    else:
                        host = self.host
                        port = self.port


                    try:
                        host_enc = host.encode("ascii")
                    except UnicodeEncodeError:
                        host_enc = host.encode("idna")


                    # As per RFC 273, IPv6 address should be wrapped with []
                    # when used as Host header


                    if host.find(':') >= 0:
                        host_enc = b'[' + host_enc + b']'


                    if port == self.default_port:
                        self.putheader('Host', host_enc)
                    else:
                        host_enc = host_enc.decode("ascii")
                        self.putheader('Host', "%s:%s" % (host_enc, port))


            # note: we are assuming that clients will not attempt to set these
            #       headers since *this* library must deal with the
            #       consequences. this also means that when the supporting
            #       libraries are updated to recognize other forms, then this
            #       code should be changed (removed or updated).


            # we only want a Content-Encoding of "identity" since we don't
            # support encodings such as x-gzip or x-deflate.
            if not skip_accept_encoding:
                self.putheader('Accept-Encoding', 'identity')


            # we can accept "chunked" Transfer-Encodings, but no others
            # NOTE: no TE header implies *only* "chunked"
            #self.putheader('TE', 'chunked')


            # if TE is supplied in the header, then it must appear in a
            # Connection header.
            #self.putheader('Connection', 'TE')


        else:
            # For HTTP/1.0, the server will assume "not chunked"
            pass
看到第29行至32行,有经验的小伙伴已经能够意识到,HTTPConnection其实是只能单线程运行的,如果非要在多线程里运行,就需要上层调用者控制不能多个线程同时调用同一个HTTPConnection实例。
第37行至42行,格式化了请求行。但是随后大量的注释和代码想我们形象的展示了为了兼容各版本的HTTP协议,具体的代码实现有多复杂。
随后是putheader:
class HTTPConnection:
    def putheader(self, header, *values):
        """Send a request header line to the server.


        For example: h.putheader('Accept', 'text/html')
        """
        if self.__state != _CS_REQ_STARTED:
            raise CannotSendHeader()


        if hasattr(header, 'encode'):
            header = header.encode('ascii')


        if not _is_legal_header_name(header):
            raise ValueError('Invalid header name %r' % (header,))


        values = list(values)
        for i, one_value in enumerate(values):
            if hasattr(one_value, 'encode'):
                values[i] = one_value.encode('latin-1')
            elif isinstance(one_value, int):
                values[i] = str(one_value).encode('ascii')


            if _is_illegal_header_value(values[i]):
                raise ValueError('Invalid header value %r' % (values[i],))


        value = b'\r\n\t'.join(values)
        header = header + b': ' + value
        self._output(header)
通过代码来看,这一步其实相对比较简单,分别对header和value做了校验,值得注意的是HTTP协议即允许一个header有多个值,也允许一条请求有多个同名的header。
再来看endheaders:
class HTTPConnection:
    def endheaders(self, message_body=None, *, encode_chunked=False):
        """Indicate that the last header line has been sent to the server.


        This method sends the request to the server.  The optional message_body
        argument can be used to pass a message body associated with the
        request.
        """
        if self.__state == _CS_REQ_STARTED:
            self.__state = _CS_REQ_SENT
        else:
            raise CannotSendHeader()
        self._send_output(message_body, encode_chunked=encode_chunked)
endheaders方法更简单,先是更新了内部状态,随后调用self._send_output真正的将请求发出。
请求既然发出,下一步就是通过getresponse获取响应:
class HTTPConnection:
    def getresponse(self):
        """Get the response from the server.


        If the HTTPConnection is in the correct state, returns an
        instance of HTTPResponse or of whatever object is returned by
        the response_class variable.


        If a request has not been sent or if a previous response has
        not be handled, ResponseNotReady is raised.  If the HTTP
        response indicates that the connection should be closed, then
        it will be closed before the response is returned.  When the
        connection is closed, the underlying socket is closed.
        """


        # if a prior response has been completed, then forget about it.
        if self.__response and self.__response.isclosed():
            self.__response = None


        # if a prior response exists, then it must be completed (otherwise, we
        # cannot read this response's header to determine the connection-close
        # behavior)
        #
        # note: if a prior response existed, but was connection-close, then the
        # socket and response were made independent of this HTTPConnection
        # object since a new request requires that we open a whole new
        # connection
        #
        # this means the prior response had one of two states:
        #   1) will_close: this connection was reset and the prior socket and
        #                  response operate independently
        #   2) persistent: the response was retained and we await its
        #                  isclosed() status to become true.
        #
        if self.__state != _CS_REQ_SENT or self.__response:
            raise ResponseNotReady(self.__state)


        if self.debuglevel > 0:
            response = self.response_class(self.sock, self.debuglevel,
                                           method=self._method)
        else:
            response = self.response_class(self.sock, method=self._method)


        try:
            try:
                response.begin()
            except ConnectionError:
                self.close()
                raise
            assert response.will_close != _UNKNOWN
            self.__state = _CS_IDLE


            if response.will_close:
                # this effectively passes the connection to the response
                self.close()
            else:
                # remember this, so we can tell when it is complete
                self.__response = response


            return response
        except:
            response.close()
            raise
可以看到在真正的返回response对象之前,getresponse内部调用了response实例的begin()方法,将响应头先一步读取完毕,留下未读取的响应体由上层调用方决定。
最后需要单独介绍一下request方法:
class HTTPConnection:
    def request(self, method, url, body=None, headers={}, *,
                encode_chunked=False):
        """Send a complete request to the server."""
        self._send_request(method, url, body, headers, encode_chunked)
request方法相当于putrequest + ( putheader() *) + endheaders(),通过调用该方法免去了繁琐的调用之苦。
(六)
总结
一路看下来,整个http.client文件共计约1500行,好多注释都是为了说明历史背景,好多代码都是为了兼容各版本,还有一些是因为HTTP头部功能的多样性而引入的必要控制逻辑。
所以,看起来简洁的HTTP协议其实内部隐藏大量的复杂实现。