

nginx前言
nginx [engine x] 是 HTTP 和反向代理服务器、邮件代理服务器和通用 TCP/UDP 代理服务器,最初由Igor Sysoev编写。很长一段时间以来,它一直在许多负载重的俄罗斯网站上运行,包括 Yandex、 Mail.Ru、 VK和 Rambler。根据 Netcraft 的数据, 2022 年 1 月,nginx 服务或代理了 22.16% 最繁忙的站点。以下是一些成功案例: Dropbox、 Netflix、 Wordpress.com、 FastMail.FM。
nginx 参考
| nginx | zlib |
| download | download |
Linux 各系统下载使用参考
| Red Hat | Rocky Linux | Oracle Linux | AlmaLinux | ubuntu | suselinux | esxi | RHEL标准安装 | 系统安装参考 | YUM参考 | MobaXterm 远程连接工具 | Red Hat Enterprise 9.0 文档 | Kickstart 生成器 |
| download | download | download | download | download | download | download | 参考 | 参考 | 配置参考 | download | 参考 | Kickstart |
| 版本兼容性 |
安装 nginx
-
创建安装自动化脚本
- 实现在线安装nginx,配置nginx配置文件,防火墙配置,企业微信机器人通知。
- 以下基于Redhat系统
- nginx 安装目录/usr/local/nginx
- curl 'https://qyapi.weixin.qq.com/cgi-bin/webhook/send?key=XXXXX' #更改自己的企业微信机器人地址
- curl -o /etc/yum.repos.d/redhat.repo http://mirrors.aliyun.com/repo/Centos-8.repo #阿里在线repo
- yum install figlet -y #用于将文字转换为放大艺术字(使用figlet Mysql显示)
vi /Nginx_install.sh
#!/bin/sh
# -*- coding: utf-8 -*-
# Author: Ciasm
# Date: 2022/04/10
<<!
_ _ _
| \ | | __ _(_)_ __ __ __
| \| |/ _` | | '_ \\ \/ /
| |\ | (_| | | | | |> <
|_| \_|\__, |_|_| |_/_/\_\
|___/
!
#source /etc/rc.d/init.d/functions
NGINX_URL=http://nginx.org/download/
NGINX_FILE=nginx-1.22.1.tar.gz
NGINX_FILE_DIR=nginx-1.22.1
NGINX_PREFIX=/usr/local/nginx
data_downloads=/data/downloads
zlib_devel_url=https://yum.oracle.com/repo/OracleLinux/OL8/baseos/latest/x86_64/getPackage/zlib-devel-1.2.11-20.el8.x86_64.rpm
zlib_url=https://yum.oracle.com/repo/OracleLinux/OL8/baseos/latest/x86_64/getPackageSource/zlib-1.2.11-20.el8.src.rpm
nginx_dependence (){
mkdir -p $data_downloads
wget -N -P $data_downloads $zlib_devel_url
wget -N -P $data_downloads $zlib_url
rpm -ihv $data_downloads/*.rpm --nodeps --force
yum install -y pcre pcre-devel openssl openssl-devel gcc gcc-c++ net-tools vim cmake make
#Centos 8 install rely on
#yum install -y pcre pcre-devel openssl openssl-devel gcc gcc-c++ net-tools vim cmake make zlib-devel zlib-devel-
}
install_nginx (){
if [ ! -d ${NGINX_PREFIX} ];then
nginx_dependence
/usr/sbin/useradd -s /sbin/nologin -M www
/usr/sbin/groupadd -f www
wget -N -P $data_downloads $NGINX_URL/$NGINX_FILE
tar -zxf $data_downloads/$NGINX_FILE -C $data_downloads
if [ $? -eq 0 ];then
cd $data_downloads/$NGINX_FILE_DIR
./configure --prefix=/usr/local/nginx --user=www --group=www --with-http_stub_status_module --with-http_ssl_module --with-http_v2_module --with-http_gzip_static_module --with-http_realip_module --with-stream --with-stream_ssl_module --with-http_flv_module --with-http_mp4_module --with-http_dav_module --with-http_sub_module --with-http_gunzip_module --with-pcre --with-debug
cd $data_downloads/$NGINX_FILE_DIR && make && make install
rm -rf /usr/local/nginx/conf/nginx.conf
config_nginx
ln -s /usr/local/nginx/sbin/* /usr/local/sbin/
nginx_server
action "\033[32mThe nginx Install Sussess...\033[0m"
else
action "\033[33mThe nginx Install Failed...\033[0m"
exit 1
fi
else
echo -e "\033[31mThe nginx already Install...\033[0m"
fi
}
config_nginx (){
cat >>/usr/local/nginx/conf/nginx.conf<<EOF
#user nobody;
worker_processes auto; #Custom CPU
worker_rlimit_nofile 100000;
error_log logs/error.log info;
events {
worker_connections 1024;
accept_mutex on;
multi_accept on;
use epoll;
}
stream {
upstream mysql {
hash $remote_addr consistent;
server 127.0.0.1:3306 weight=5 max_fails=3 fail_timeout=30s;
}
server {
listen 3307;
proxy_connect_timeout 1s;
proxy_timeout 3s;
proxy_pass mysql;
}
}
http{
#gzip
gzip on; #Open compression
gzip_min_length 1k;
gzip_buffers 4 32k; #Compressed cache area size
gzip_http_version 1.1; #Compressed version
gzip_comp_level 9; #compression ratio
gzip_types text/css text/xml application/javascript; #Compression type
gzip_vary on; #vary header
server_tokens off; #Closed version
include mime.types;
default_type application/octet-stream;
tcp_nopush on; #Prevent network and disk i/o blocking
tcp_nodelay on; #Prevent network and disk i/o blocking
sendfile on; #Efficient file transfer
keepalive_timeout 65; #keepalive timeout
server_names_hash_bucket_size 128; #Multiple domain names
server_names_hash_max_size 512;
client_header_timeout 15s;
client_body_timeout 15s;
send_timeout 60s;
client_header_buffer_size 2k; #Buffer size
large_client_header_buffers 4 4k;
client_max_body_size 8m;
#open_file_cache max=204800 inactive=20s;
#open_file_cache_min_uses 1;
#open_file_cache_valid 30s;
#php
#fastcgi_connect_timeout 240; #FastCGI timeout
#fastcgi_send_timeout 240; #FastCGI Transfer request timeout time
#fastcgi_read_timeout 240; #FastCGI Response timeout time
#fastcgi_buffer_size 64k; #Buffer size
#fastcgi_buffers 4 64k;
#fastcgi_busy_buffers_size 128k;
#fastcgi_temp_file_write_size 128k;
server {
listen 80;
server_name localhost;
location / {
proxy_pass http://127.0.0.1:8082;
}
error_page 500 502 503 504 /50x.html;
location = /50x.html {
root html;
}
}
}
EOF
}
nginx_server (){
cat >>/usr/lib/systemd/system/nginx.service<<EOF
[Unit]
Description=The NGINX HTTP and reverse proxy server
After=syslog.target network.target remote-fs.target nss-lookup.target
Wants=network-online.target
[Service]
Type=forking
PIDFile=/usr/local/nginx/logs/nginx.pid
ExecStartPre=/usr/local/nginx/sbin/nginx -t
ExecStart=/usr/local/nginx/sbin/nginx
ExecReload=/usr/local/nginx/sbin/nginx -s reload
ExecStop=/usr/bin/kill -s QUIT $MAINPID
PrivateTmp=true
[Install]
WantedBy=multi-user.target
EOF
systemctl daemon-reload
systemctl enable --now nginx.service
firewall-cmd --zone=public --permanent --add-port=80/tcp
firewall-cmd --reload
rm -rf $data_downloads/*
}
Deployment_completion_notification (){
host_ID=`dmidecode -s system-serial-number | sed -r 's/\s+//g'`
host_IP=`ifconfig -a | grep inet | grep -v '127.0.0.1' | awk '{ print $2}' | awk 'NR==1'`
memory_Size=`dmidecode -t memory | grep Size | grep -v No | awk '{sum+=$2} END {printf "%.0fG\n",sum/1^C4}'`
CPU_Model=`cat /proc/cpuinfo | grep 'model name' | awk '{print $6}' | uniq`
Disk_size=`fdisk -l | grep "sda:" | awk '{print $3$4}'`
redhat_version=`cat /etc/redhat-release | grep "release" | awk '{print $6}'`
redhat_core=`cat /proc/version | grep "version" | awk '{print $3}'`
nginx_version=`nginx -v 2>&1 | awk -F/ '{print $2}'`
nginx_server=`systemctl status nginx.service | grep "Active" | awk '{print $2}'`
curl 'https://qyapi.weixin.qq.com/cgi-bin/webhook/send?key=XXXX' \
-H 'Content-Type: application/json' \
-d '
{
"msgtype": "markdown",
"markdown": {
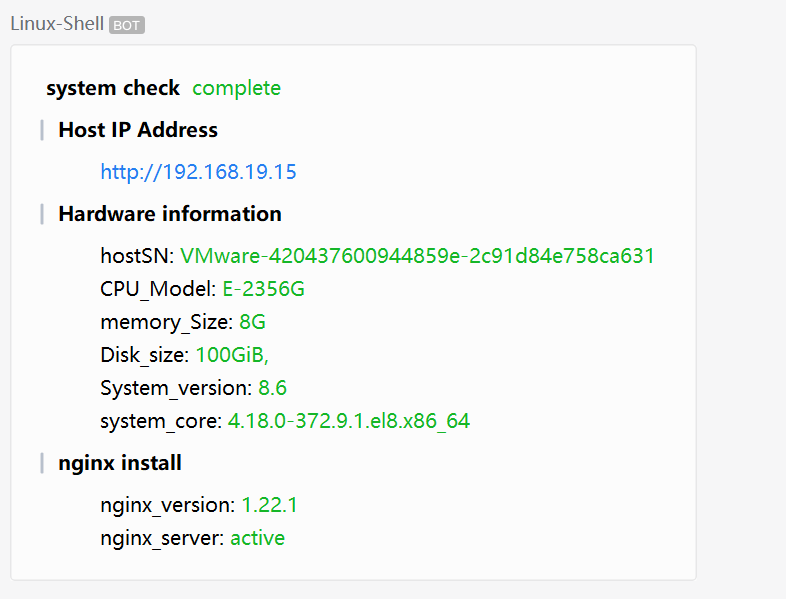
"content": " **system check** <font color=\"info\"> complete </font> \n
> **Host IP Address** \n
[http://'$host_IP'](http://'$host_IP') \n
> **Hardware information** \n
hostSN:<font color=\"info\"> '$host_ID' </font> \n
CPU_Model:<font color=\"info\"> '$CPU_Model' </font> \n
memory_Size:<font color=\"info\"> '$memory_Size' </font> \n
Disk_size:<font color=\"info\"> '$Disk_size' </font> \n
System_version:<font color=\"info\"> '$redhat_version' </font> \n
system_core:<font color=\"info\"> '$redhat_core' </font> \n
> **nginx install** \n
nginx_version:<font color=\"info\"> '$nginx_version' </font> \n
nginx_server:<font color=\"info\"> '$nginx_server' </font> \n",
}
}'
}
main (){
install_nginx
Deployment_completion_notification
}
main
执行安装
sh /Nginx_install.sh
企业微信机器人通知
本文内容由网友自发贡献,版权归原作者所有,本站不承担相应法律责任。如您发现有涉嫌抄袭侵权的内容,请联系:hwhale#tublm.com(使用前将#替换为@)