1开发环境及工具
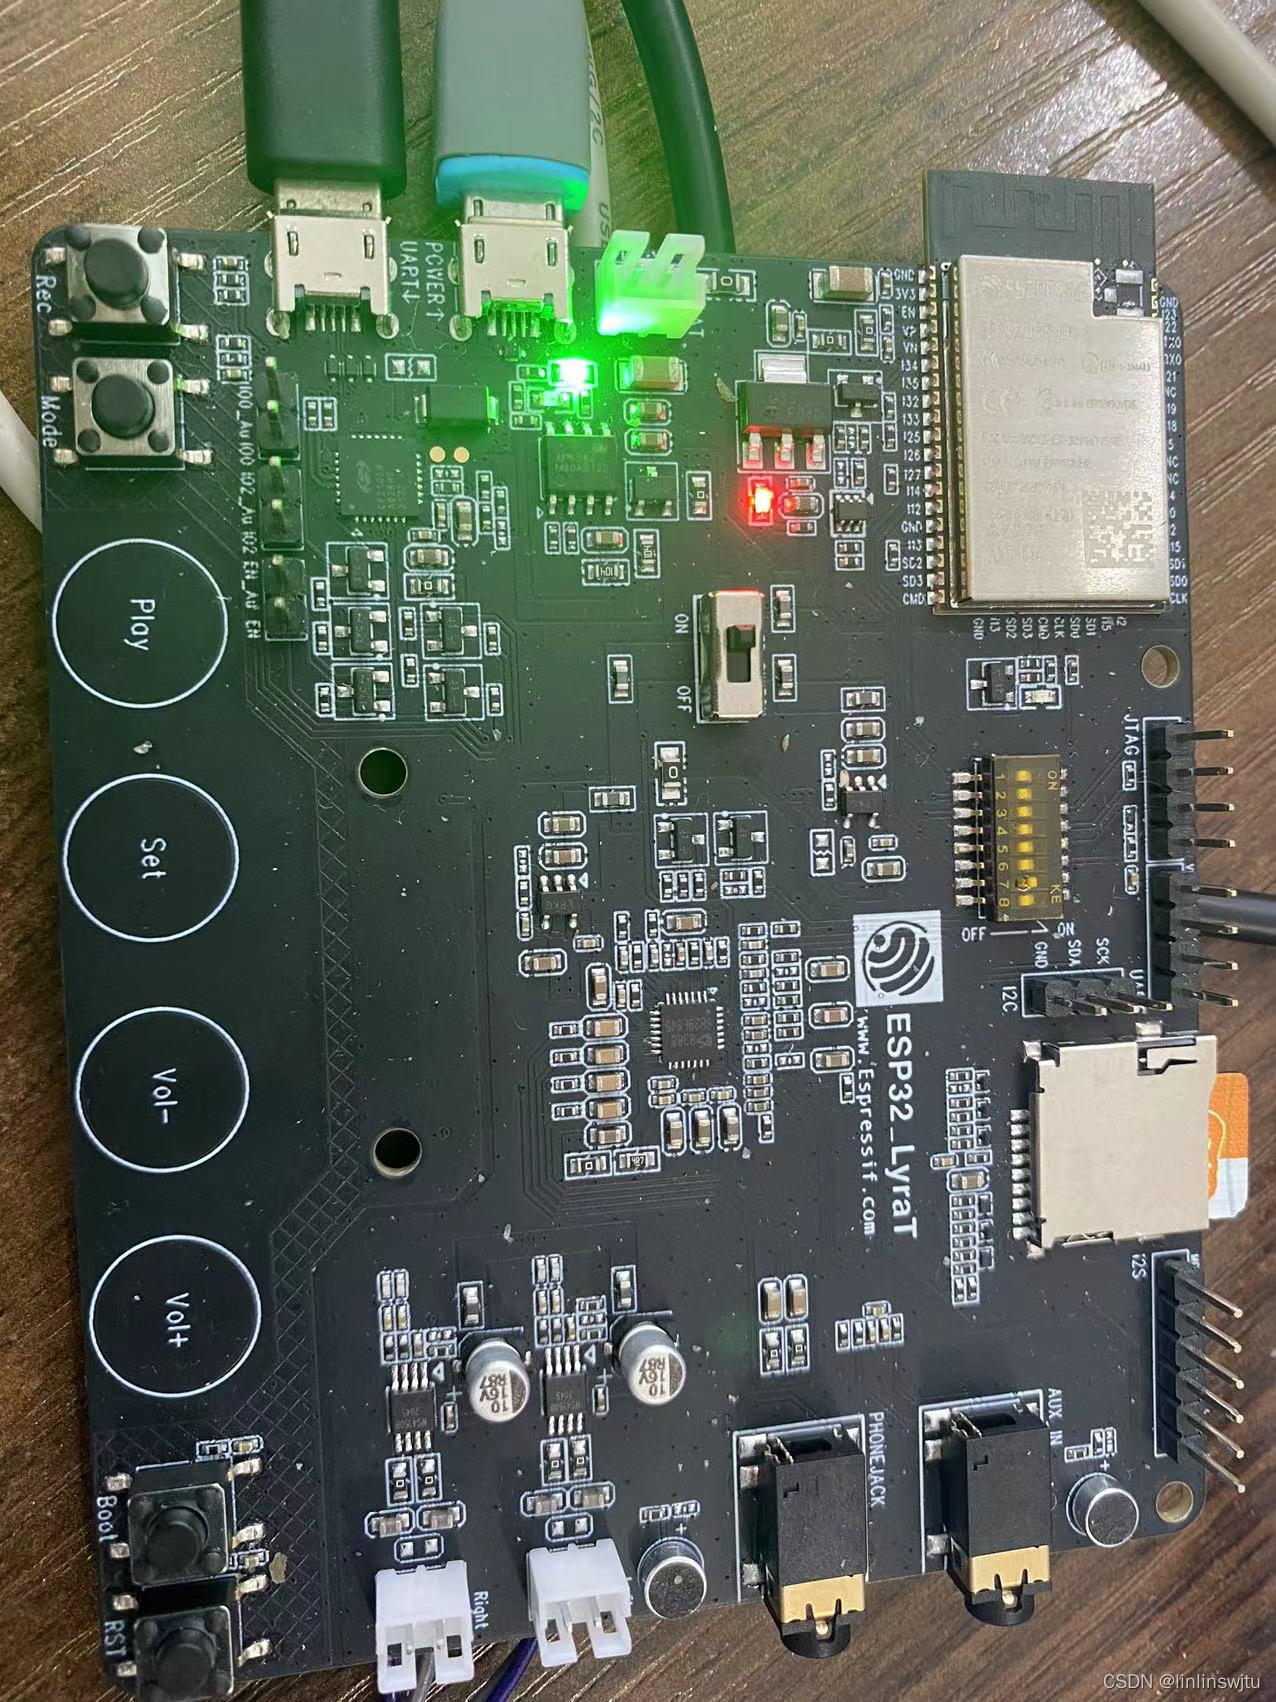
开发板使用的是ESP32_LyraTv4.3,入下图所示,开环境在是在Ubuntu20.04上搭建的ESP-IDF,在ESP-IDF中添加了支持语音开发的sdk,ESP-ADF。
2开发过程
参考的例程为adf中esp-adf/examples/speech_recognition/asr这个目录下面的程序,这个目录中包含了离线的语音识别,其中包含了原始语音数据的采集。
3注意事项
参考ESP32开发(6)esp-adf:百度语音识别_lovehanchenchen的博客-CSDN博客_esp32 百度语音识别
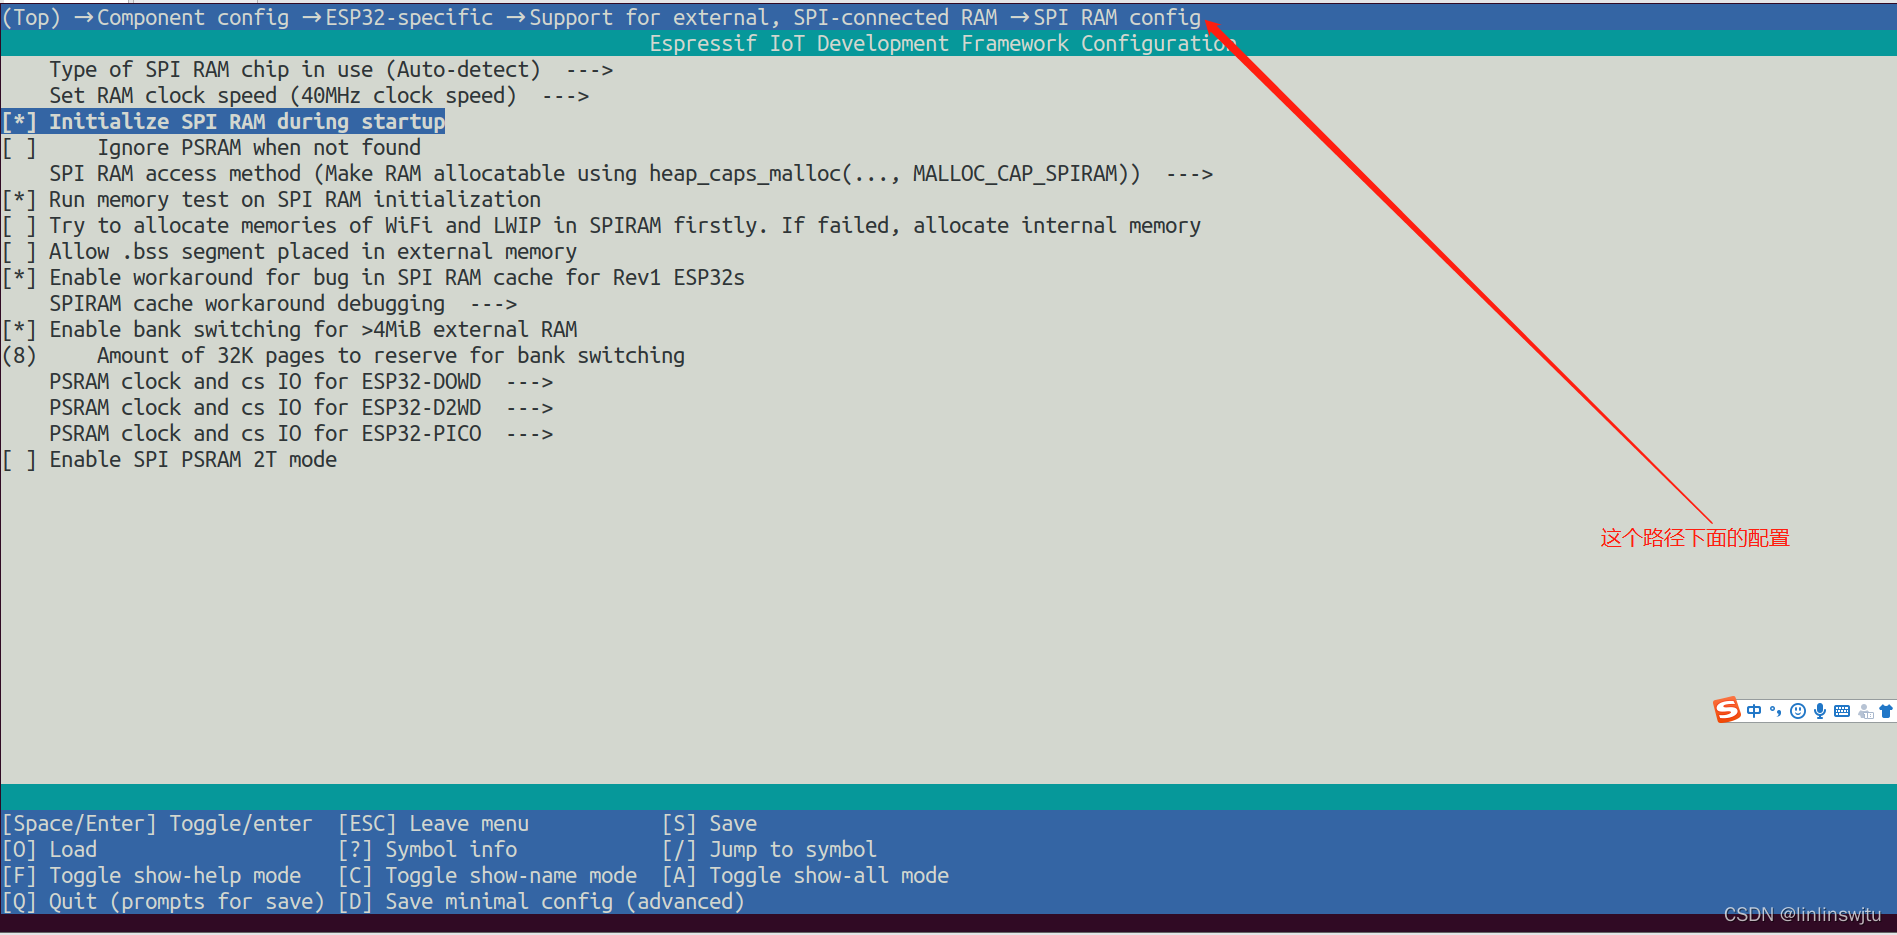
上面这位大佬对语音数据的采集,其中在申请内存的时候需要在配置中开启SPIRAM,如下图所示。
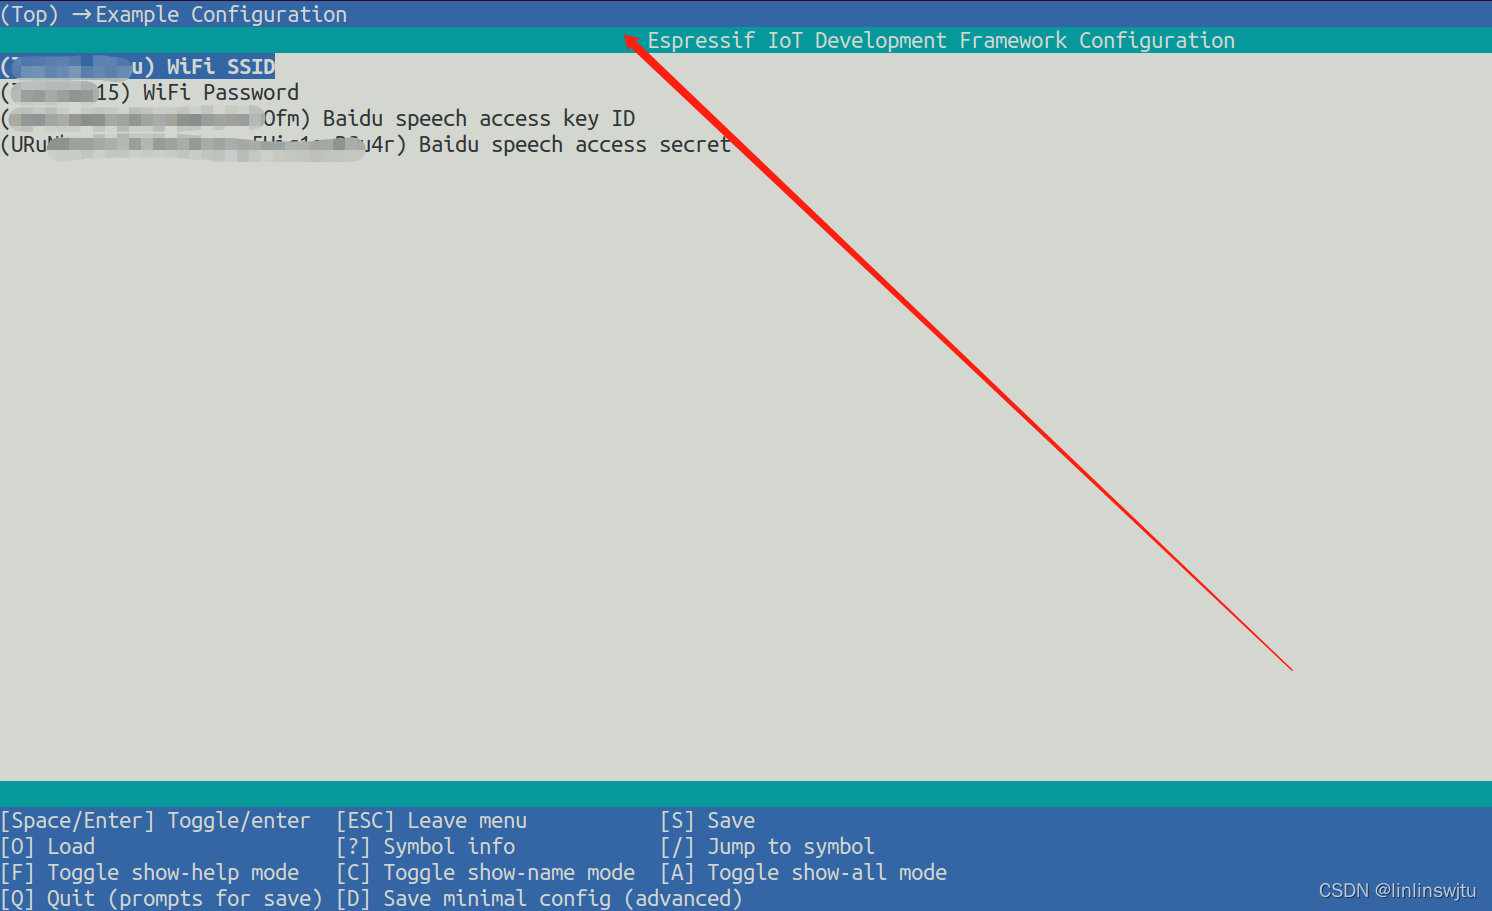
在配置菜单中添加自己在百度云平台申请的的API_key和access secret,这个配置是我在Kconfig.projbuild文件中添加的,添加后idf.py menuconfig后就会出现这个配置,然后编译后就会把配置项编译到build文件下面的"sdkconfig.h"文件,使用时只需要include就行。
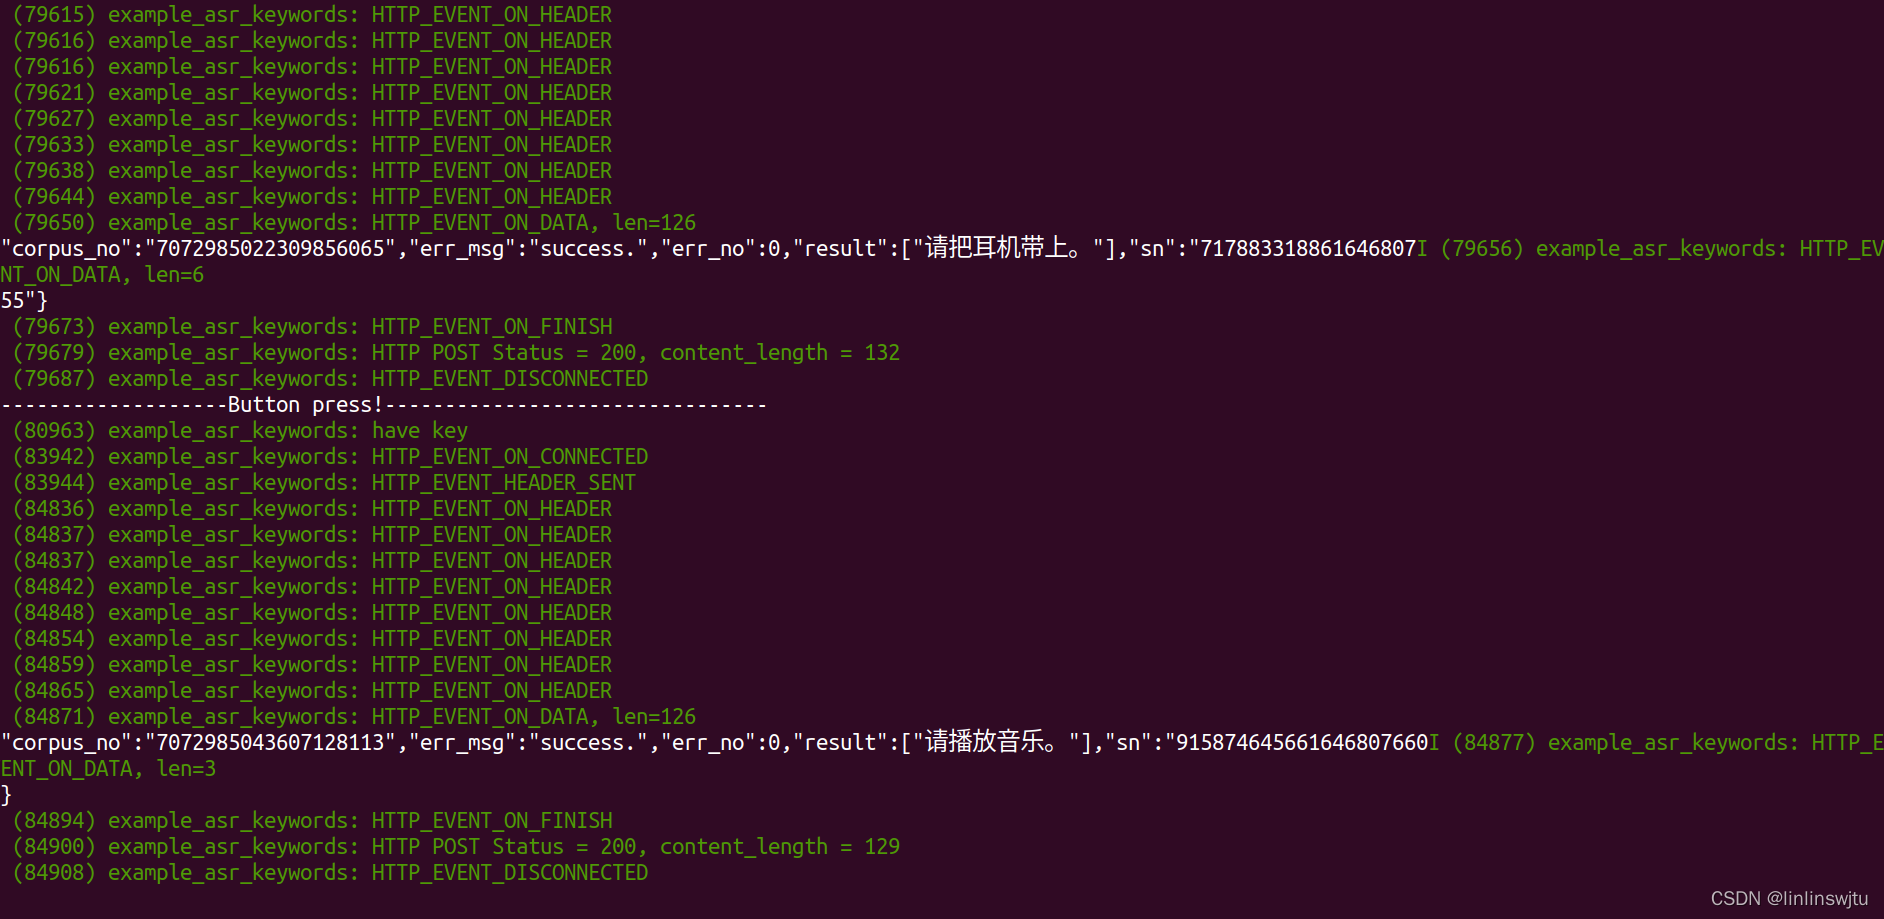
下面是全部的源码,烧写到板子上后,自动连接上wifi,然后点击Rec按键,说话就能支持显示出返回的汉字。
4源码
/* Examples of speech recognition with multiple keywords.

    This example code is in the Public Domain (or CC0 licensed, at your option.)

    Unless required by applicable law or agreed to in writing, this
    software is distributed on an "AS IS" BASIS, WITHOUT WARRANTIES OR
    CONDITIONS OF ANY KIND, either express or implied.
*/

#include "freertos/FreeRTOS.h"
#include "freertos/task.h"
#include "esp_log.h"
#include "board.h"
#include "rom/spi_flash.h"
#include "audio_pipeline.h"
#include "fatfs_stream.h"
#include "i2s_stream.h"
#include "raw_stream.h"
#include "esp_audio.h"
#include "esp_wifi.h"
#include "nvs_flash.h"
#include "esp_wn_iface.h"
#include "esp_wn_models.h"
#include "esp_mn_iface.h"
#include "esp_mn_models.h"
#include "sdkconfig.h"
#include "mp3_decoder.h"
#include "filter_resample.h"
#include "rec_eng_helper.h"
#include "http_stream.h"
#include "esp_peripherals.h"
#include "periph_wifi.h"
#include "board.h"
#include "esp_http_client.h"
#include "baidu_access_token.h"
#include "audio_event_iface.h"
#include "periph_button.h"

#if __has_include("esp_idf_version.h")
#include "esp_idf_version.h"
#else
#define ESP_IDF_VERSION_VAL(major, minor, patch) 1
#endif

//添加wifi功能时,需要添加这个部分,如果不添加会出现一直重启的现象,我实验时是这样的。
#if (ESP_IDF_VERSION >= ESP_IDF_VERSION_VAL(4, 1, 0))
#include "esp_netif.h"
#else
#include "tcpip_adapter.h"
#endif

static const char *TAG = "example_asr_keywords";

static char *baidu_access_token = NULL;
static char request_data[1024];
//http client处理函数  这个函数会在接到数据后打印出数据内容
esp_err_t _http_event_handle(esp_http_client_event_t *evt)
{
    switch (evt->event_id)
    {
    case HTTP_EVENT_ERROR:
        ESP_LOGI(TAG, "HTTP_EVENT_ERROR");
        break;
    case HTTP_EVENT_ON_CONNECTED:
        ESP_LOGI(TAG, "HTTP_EVENT_ON_CONNECTED");
        break;
    case HTTP_EVENT_HEADER_SENT:
        ESP_LOGI(TAG, "HTTP_EVENT_HEADER_SENT");
        break;
    case HTTP_EVENT_ON_HEADER:
        ESP_LOGI(TAG, "HTTP_EVENT_ON_HEADER");
        printf("%.*s", evt->data_len, (char *)evt->data);
        break;
    case HTTP_EVENT_ON_DATA:
        ESP_LOGI(TAG, "HTTP_EVENT_ON_DATA, len=%d", evt->data_len);
        if (!esp_http_client_is_chunked_response(evt->client))
        {
            printf("%.*s", evt->data_len, (char *)evt->data);
        }
        break;
    case HTTP_EVENT_ON_FINISH:
        ESP_LOGI(TAG, "HTTP_EVENT_ON_FINISH");
        break;
    case HTTP_EVENT_DISCONNECTED:
        ESP_LOGI(TAG, "HTTP_EVENT_DISCONNECTED");
        break;
    }
    return ESP_OK;
}
//这个就是我们的语音识别任务
void asr_baidu_task(void *pv)
{

    esp_err_t err = nvs_flash_init();
    if (err == ESP_ERR_NVS_NO_FREE_PAGES)
    {
        // NVS partition was truncated and needs to be erased
        // Retry nvs_flash_init
        ESP_ERROR_CHECK(nvs_flash_erase());
        err = nvs_flash_init();
    }
#if (ESP_IDF_VERSION >= ESP_IDF_VERSION_VAL(4, 1, 0))
    ESP_ERROR_CHECK(esp_netif_init());
#else
    tcpip_adapter_init();
#endif

#if defined CONFIG_ESP_LYRAT_V4_3_BOARD
    gpio_config_t gpio_conf = {
        .pin_bit_mask = 1UL << get_green_led_gpio(),
        .mode = GPIO_MODE_OUTPUT,
        .pull_up_en = 0,
        .pull_down_en = 0,
        .intr_type = 0};
    gpio_config(&gpio_conf);
#endif
    ESP_LOGI(TAG, "[ 1 ] Initialize Buttons & Connect to Wi-Fi network, ssid=%s", CONFIG_WIFI_SSID);

    //外设配置与初始化wifi  这是添加的wifi功能
    esp_periph_config_t periph_cfg = DEFAULT_ESP_PERIPH_SET_CONFIG();
    esp_periph_set_handle_t set = esp_periph_set_init(&periph_cfg);
    periph_wifi_cfg_t wifi_cfg = {
        .ssid = CONFIG_WIFI_SSID,
        .password = CONFIG_WIFI_PASSWORD,
    };
    // 初始化wifi
    esp_periph_handle_t wifi_handle = periph_wifi_init(&wifi_cfg);

    // Initialize Button peripheral  这个是添加的按键功能,通过板子上的Rec按键开始录音
    periph_button_cfg_t btn_cfg = {
        .gpio_mask = (1ULL << get_input_mode_id()) | (1ULL << get_input_rec_id()),
    };
    esp_periph_handle_t button_handle = periph_button_init(&btn_cfg);

    esp_periph_start(set, button_handle);
    esp_periph_start(set, wifi_handle);
    periph_wifi_wait_for_connected(wifi_handle, portMAX_DELAY);

    audio_pipeline_handle_t pipeline;
    audio_element_handle_t i2s_stream_reader, filter, raw_read, http_stream_reader;
    bool enable_wn = true;
    uint32_t mn_count = 0;

    ESP_LOGI(TAG, "[ 2.0 ] Create audio pipeline for recording");
    audio_pipeline_cfg_t pipeline_cfg = DEFAULT_AUDIO_PIPELINE_CONFIG();
    pipeline = audio_pipeline_init(&pipeline_cfg);
    mem_assert(pipeline);

    ESP_LOGI(TAG, "[ 2.1 ] Create i2s stream to read audio data from codec chip");
    i2s_stream_cfg_t i2s_cfg = I2S_STREAM_CFG_DEFAULT();
    i2s_cfg.i2s_config.sample_rate = 48000;
    i2s_cfg.type = AUDIO_STREAM_READER;

    i2s_stream_reader = i2s_stream_init(&i2s_cfg);
    ESP_LOGI(TAG, "[ 2.2 ] Create filter to resample audio data");
    rsp_filter_cfg_t rsp_cfg = DEFAULT_RESAMPLE_FILTER_CONFIG();
    rsp_cfg.src_rate = 48000;
    rsp_cfg.src_ch = 2;
    rsp_cfg.dest_rate = 16000;
    rsp_cfg.dest_ch = 1;
    filter = rsp_filter_init(&rsp_cfg);

    ESP_LOGI(TAG, "[ 2.3 ] Create raw to receive data");
    raw_stream_cfg_t raw_cfg = {
        .out_rb_size = 8 * 1024,
        .type = AUDIO_STREAM_READER,
    };
    raw_read = raw_stream_init(&raw_cfg);

    ESP_LOGI(TAG, "[ 3 ] Register all elements to audio pipeline");
    audio_pipeline_register(pipeline, i2s_stream_reader, "i2s");
    audio_pipeline_register(pipeline, raw_read, "raw");

    ESP_LOGI(TAG, "[ 4 ] Set up  event listener");
    audio_event_iface_cfg_t evt_cfg = AUDIO_EVENT_IFACE_DEFAULT_CFG();
    audio_event_iface_handle_t evt = audio_event_iface_init(&evt_cfg);
    ESP_LOGI(TAG, "[4.2] Listening event from peripherals");
    audio_event_iface_set_listener(esp_periph_set_get_event_iface(set), evt);

    audio_pipeline_register(pipeline, filter, "filter");
    ESP_LOGI(TAG, "[ 4 ] Link elements together [codec_chip]-->i2s_stream-->filter-->raw-->[SR]");
    const char *link_tag[3] = {"i2s", "filter", "raw"};
    audio_pipeline_link(pipeline, &link_tag[0], 3);

    ESP_LOGI(TAG, "[ 5 ] Start audio_pipeline");
    audio_pipeline_run(pipeline);

    while (1)
    {
        audio_event_iface_msg_t msg;
        if (audio_event_iface_listen(evt, &msg, portMAX_DELAY) != ESP_OK)
        {
            ESP_LOGW(TAG, "[ * ] Event process failed: src_type:%d, source:%p cmd:%d, data:%p, data_len:%d",
                     msg.source_type, msg.source, msg.cmd, msg.data, msg.data_len);
            continue;
        }
        if (msg.cmd == PERIPH_BUTTON_PRESSED)
        {
            printf("--------------------Button press!--------------------------------\n");
//这个地方需要在meke menuconfig中开始对SPIRAM的支持
            char *buff = (char *)heap_caps_malloc(96 * 1024, MALLOC_CAP_SPIRAM);
            if (NULL == buff)
            {
                ESP_LOGE(TAG, "Memory allocation failed!");
                // return;
            }
            memset(buff, 0, 96 * 1024);
            ESP_LOGI(TAG, "have key");
            for (size_t i = 0; i < 12; i++)
            {
                raw_stream_read(raw_read, (char *)buff + i * 8 * 1024, 8 * 1024);
            }
            esp_http_client_config_t config =
                {
                    .url = "http://vop.baidu.com/server_api?dev_pid=1537&cuid=123456PHP&token=这儿是你自己的token",
                    .event_handler = _http_event_handle,
                };
            esp_http_client_handle_t client = esp_http_client_init(&config);

            esp_http_client_set_method(client, HTTP_METHOD_POST);
            esp_http_client_set_post_field(client, (const char *)buff, 96 * 1024);
            esp_http_client_set_header(client, "Content-Type", "audio/pcm;rate=16000");
            esp_err_t err = esp_http_client_perform(client);
            if (err == ESP_OK)
            {
                ESP_LOGI(TAG, "HTTP POST Status = %d, content_length = %d",
                         esp_http_client_get_status_code(client),
                         esp_http_client_get_content_length(client));
            }
            else
            {
                ESP_LOGE(TAG, "HTTP POST request failed: %s", esp_err_to_name(err));
            }
            esp_http_client_cleanup(client);
            free(buff);
            buff = NULL;
        }
    }
    ESP_LOGI(TAG, "[ 6 ] Stop audio_pipeline");
    audio_pipeline_stop(pipeline);
    audio_pipeline_wait_for_stop(pipeline);
    audio_pipeline_terminate(pipeline);

    /* Terminate the pipeline before removing the listener */
    audio_pipeline_remove_listener(pipeline);

    audio_pipeline_unregister(pipeline, raw_read);
    audio_pipeline_unregister(pipeline, i2s_stream_reader);
    audio_pipeline_unregister(pipeline, filter);

    /* Release all resources */
    audio_pipeline_deinit(pipeline);
    audio_element_deinit(raw_read);
    audio_element_deinit(i2s_stream_reader);
    audio_element_deinit(filter);

    ESP_LOGI(TAG, "[ 7 ] Destroy model");
    vTaskDelete(NULL);
}
void app_main()
{
    esp_log_level_set("*", ESP_LOG_INFO);
    esp_log_level_set(TAG, ESP_LOG_INFO);
    xTaskCreate(asr_baidu_task, "asr_baidu_task", 2 * 4096, NULL, 5, NULL);
}
5效果
测试了一下在背景嘈杂的情况下也能有较好的识别成功率。初次使用语言识别功能,在此记录下步骤。
本文内容由网友自发贡献,版权归原作者所有,本站不承担相应法律责任。如您发现有涉嫌抄袭侵权的内容,请联系:hwhale#tublm.com(使用前将#替换为@)