首先安装rplidar2,在工作空间src目录下git clone,catkin make编译后即可使用了。
git clone https://github.com/robopeak/rplidar_ros.git
在使用之前还需要检查雷达串口权限,激光雷达launch文件默认的串口为ttyUSB0,可以通过下面的指令来查询。
ls -l /dev |grep ttyUSB
如果权限不够直接运行程序会出现以下错误:
[ERROR] [1678950584.084970351]: Error, cannot bind to the specified serial port /dev/ttyUSB0.
[rplidarNode-2] process has died [pid 192788, exit code 255, cmd /home/xmx/radar_ws/devel/lib/rplidar_ros/rplidarNode __name:=rplidarNode __log:=/home/xmx/.ros/log/86d3752c-c3c9-11ed-b73b-5f5a83d5ec9a/rplidarNode-2.log].
log file: /home/xmx/.ros/log/86d3752c-c3c9-11ed-b73b-5f5a83d5ec9a/rplidarNode-2*.log
按照下面方法赋予权限就可以运行了:
 sudo chmod 666 /dev /ttyUSB0
 roslaunch rplidar_ros view_rplidar.launch

新下载的包在编译之后, 有时没有被加载到 ros 的包的地址集合中,这时即使执行 source 指令,在启动 roslaunch 时也可能会报错, 提示找不到包或者可执行节点。可以通过 rospack profile 命令可以将新下载的包加载到 ros 的包的地址集合, 再执行roslaunch 时就不会再报错了。
接着来利用Cartographer来进行建图,进入launch文件:
<launch>
  <param name="/use_sim_time" value="true" />

  <node name="cartographer_node" pkg="cartographer_ros"
      type="cartographer_node" args="
          -configuration_directory $(find cartographer_ros)/configuration_files
          -configuration_basename test.lua"
      output="screen">
    <remap from="scan" to="scan" />
  </node>

  <node name="rviz" pkg="rviz" type="rviz" required="true"
      args="-d $(find cartographer_ros)/configuration_files/demo_2d.rviz" />"
</launch>
这里需要注意的是文件名字那里的lua文件-configuration_basename需改为自己设置的名字,通过查询可以知道雷达的话题名为scan。因为只是拿了一个单线雷达进行建图,如果launch文件中 <remap from="points2" to="rslidar_points" /> <remap from="imu" to="imu" />没有删除,又或者打错了就会出现订阅话题名称对不上这种警告:

[ WARN] [1625724725.726943013]: W0708 14:12:05.000000 20138
node.cc:1267] Expected topic "points2" (trajectory 0) (resolved
topic "/rplidar_points") but no publisher is currently active.
[ WARN] [1625724725.727046746]: W0708 14:12:05.000000 20138
node.cc:1267] Expected topic "imu" (trajectory 0) (resolved topic
"/imu") but no publisher is currently active
lua文件中需要将tracking_frame以及published_frame改为自己的frame_id,通过以下指令进行查询,一般的都为"laser":
rostopic echo /topic | grep frame_id
include "map_builder.lua"
include "trajectory_builder.lua"

options = {
  map_builder = MAP_BUILDER,
  trajectory_builder = TRAJECTORY_BUILDER,
  map_frame = "map",
  tracking_frame = "laser",
  published_frame = "laser",
  odom_frame = "odom",
  provide_odom_frame = true,
  publish_frame_projected_to_2d = false,
  use_pose_extrapolator = true,
  use_odometry = false,
  use_nav_sat = false,
  use_landmarks = false,

  num_laser_scans = 1,
  num_multi_echo_laser_scans = 0,
  num_subdivisions_per_laser_scan = 1,
  num_point_clouds = 0,

  lookup_transform_timeout_sec = 0.2,
  submap_publish_period_sec = 0.3,
  pose_publish_period_sec = 5e-3,
  trajectory_publish_period_sec = 30e-3,
  rangefinder_sampling_ratio = 1.,
  odometry_sampling_ratio = 1.,
  fixed_frame_pose_sampling_ratio = 1.,
  imu_sampling_ratio = 1.,
  landmarks_sampling_ratio = 1.,
}

MAP_BUILDER.use_trajectory_builder_2d = true

TRAJECTORY_BUILDER_2D.submaps.num_range_data = 35
TRAJECTORY_BUILDER_2D.min_range = 0.3
TRAJECTORY_BUILDER_2D.max_range = 8.
TRAJECTORY_BUILDER_2D.missing_data_ray_length = 1.
TRAJECTORY_BUILDER_2D.use_imu_data = false
TRAJECTORY_BUILDER_2D.use_online_correlative_scan_matching = true
TRAJECTORY_BUILDER_2D.real_time_correlative_scan_matcher.linear_search_window = 0.1
TRAJECTORY_BUILDER_2D.real_time_correlative_scan_matcher.translation_delta_cost_weight = 10.
TRAJECTORY_BUILDER_2D.real_time_correlative_scan_matcher.rotation_delta_cost_weight = 1e-1


POSE_GRAPH.optimization_problem.huber_scale = 1e2
POSE_GRAPH.optimize_every_n_nodes = 35
POSE_GRAPH.constraint_builder.min_score = 0.65

return options
每次修改完lua文件要记得catkin_make_isolated --install --use-ninja重新编译一下。到这里就设置完成了,打开两个终端分别运行单线激光雷达以及cartographer就可以看到图像了:
roslaunch rplidar_ros rplidar.launch
roslaunch cartographer_ros test.launch
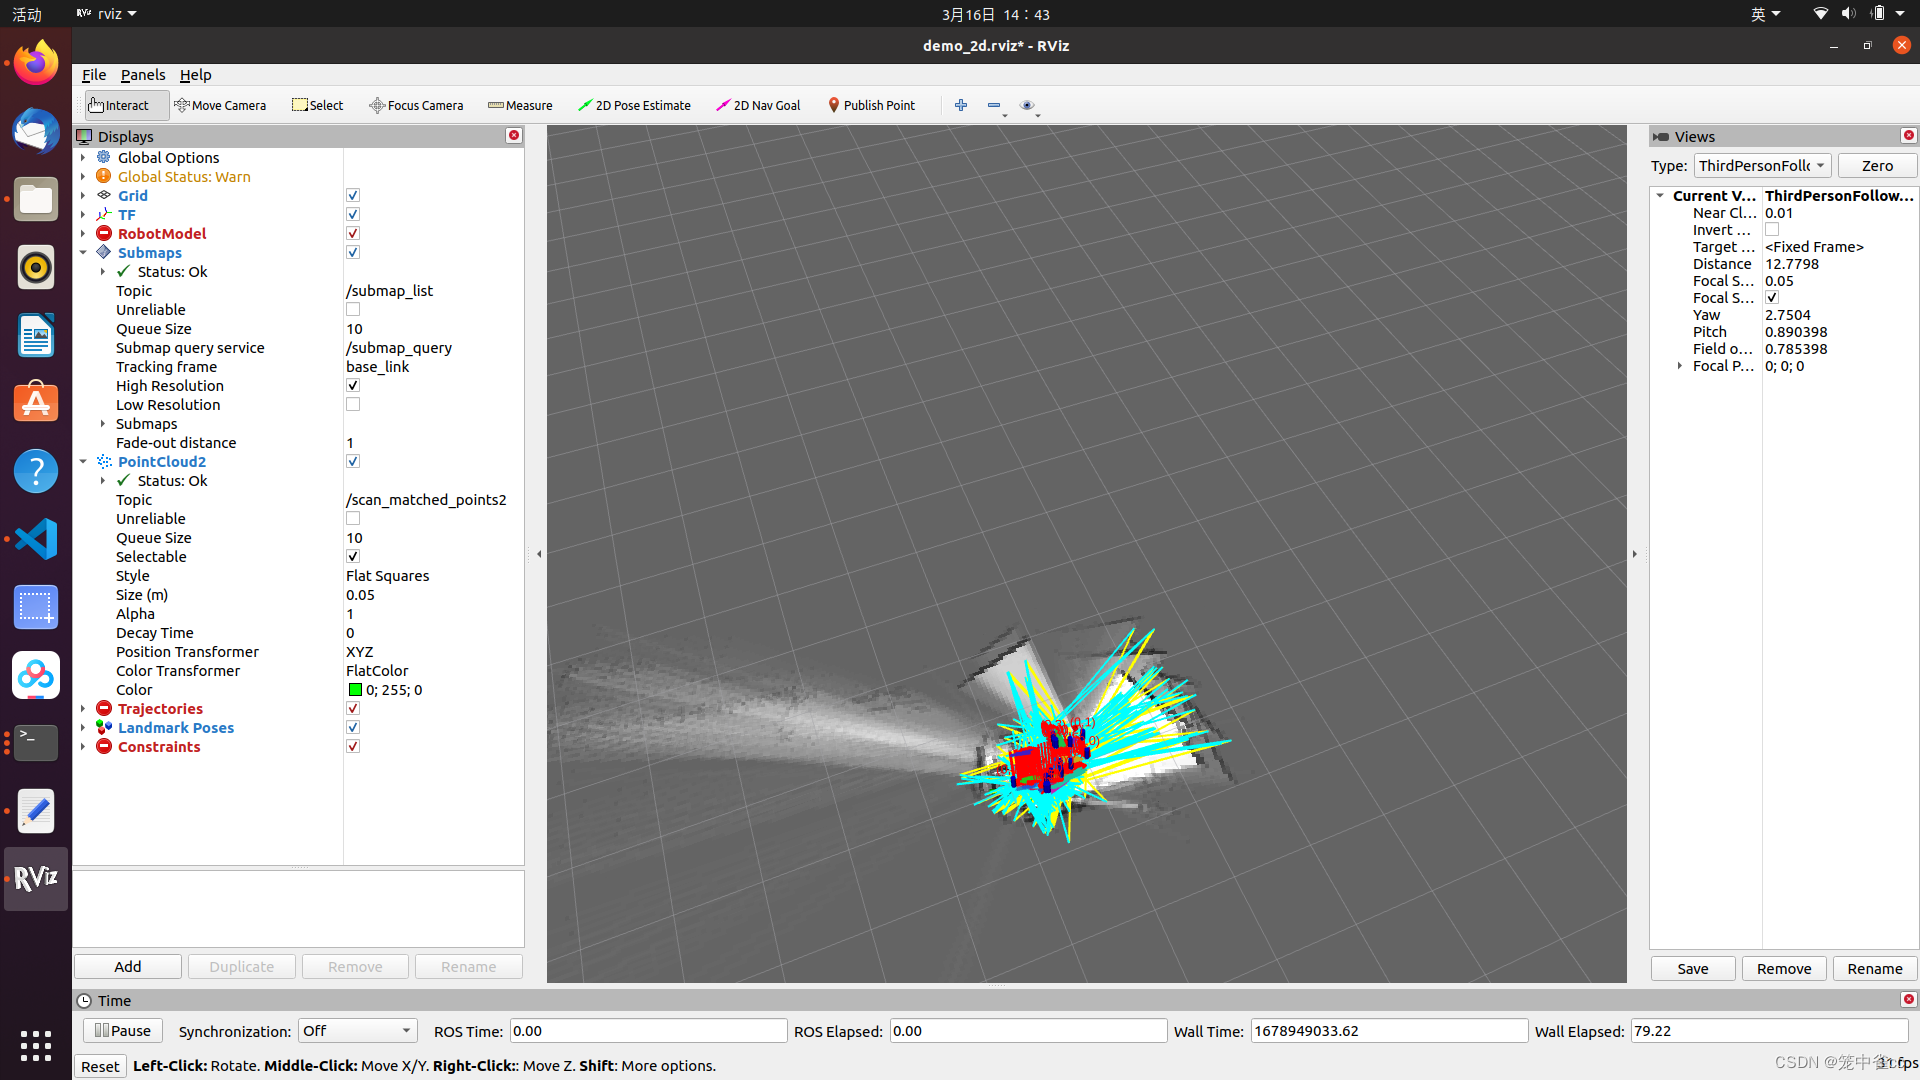
如果最后没有图像的话可以看看Lua文件中是否设置了TRAJECTORY_BUILDER_2D.min_z选项,使用的单线激光雷达一般不需要设置或者数值为0。最后附上一张实验室的效果图:

只用一个单线激光雷达运动畸变还是很明显的,可能是因为雷达的频率不高,又或者是我手持雷达的时候不能严格保证在同一平面内,如果后续想要校正估计还得加入IMU等里程计进行辅助。
本文内容由网友自发贡献,版权归原作者所有,本站不承担相应法律责任。如您发现有涉嫌抄袭侵权的内容,请联系:hwhale#tublm.com(使用前将#替换为@)