一. 添加传感器插件
(1)在rrbot.xacro中添加< link/>和< joint/>,内容如下:
<joint name="camera_joint" type="fixed">
    <axis xyz="0 1 0" />
    <origin xyz="${camera_link} 0 ${height3 - axel_offset*2}" rpy="0 0 0"/>
    <parent link="link3"/>
    <child link="camera_link"/>
  </joint>

  <!-- Camera -->
  <link name="camera_link">
    <collision>
      <origin xyz="0 0 0" rpy="0 0 0"/>
      <geometry>
	<box size="${camera_link} ${camera_link} ${camera_link}"/>
      </geometry>
    </collision>

    <visual>
      <origin xyz="0 0 0" rpy="0 0 0"/>
      <geometry>
	<box size="${camera_link} ${camera_link} ${camera_link}"/>
      </geometry>
      <material name="red"/>
    </visual>

    <inertial>
      <mass value="1e-5" />
      <origin xyz="0 0 0" rpy="0 0 0"/>
      <inertia ixx="1e-6" ixy="0" ixz="0" iyy="1e-6" iyz="0" izz="1e-6" />
    </inertial>
  </link>
上面是用于rviz加载
(2)在rrbot.gazebo中添加如下内容:
  <!-- camera -->
  <gazebo reference="camera_link">
    <sensor type="camera" name="camera1">
      <update_rate>30.0</update_rate>
      <camera name="head">
        <horizontal_fov>1.3962634</horizontal_fov>
        <image>
          <width>800</width>
          <height>800</height>
          <format>R8G8B8</format>
        </image>
        <clip>
          <near>0.02</near>
          <far>300</far>
        </clip>
        <noise>
          <type>gaussian</type>
          <!-- Noise is sampled independently per pixel on each frame.
               That pixel's noise value is added to each of its color
               channels, which at that point lie in the range [0,1]. -->
          <mean>0.0</mean>
          <stddev>0.007</stddev>
        </noise>
      </camera>
      <plugin name="camera_controller" filename="libgazebo_ros_camera.so">
        <alwaysOn>true</alwaysOn>
        <updateRate>0.0</updateRate>
        <cameraName>rrbot/camera1</cameraName>
        <imageTopicName>image_raw</imageTopicName>
        <cameraInfoTopicName>camera_info</cameraInfoTopicName>
        <frameName>camera_link_optical</frameName>
        <!-- setting hackBaseline to anything but 0.0 will cause a misalignment
            between the gazebo sensor image and the frame it is supposed to
            be attached to -->
        <hackBaseline>0.0</hackBaseline>
        <distortionK1>0.0</distortionK1>
        <distortionK2>0.0</distortionK2>
        <distortionK3>0.0</distortionK3>
        <distortionT1>0.0</distortionT1>
        <distortionT2>0.0</distortionT2>
        <CxPrime>0</CxPrime>
        <Cx>0.0</Cx>
        <Cy>0.0</Cy>
        <focalLength>0.0</focalLength>
      </plugin>
    </sensor>
  </gazebo>
<gazebo reference="camera_link">
首先这个link的名字必须与我们添加到xacro文件中的canera的link匹配。
<sensor type="camera" name="camera1">
其次传感器的名字必须是唯一的,除了在gazebo插件中,这个名字不能用在其它地方。
<update_rate>30.0</update_rate>
这是在仿真期间传感器尝试刷新的最大频率,但是当物理仿真速度快于传感器生成的速度时,它会低于这个目标值。
        <horizontal_fov>1.3962634</horizontal_fov>
        <image>
          <width>800</width>
          <height>800</height>
          <format>R8G8B8</format>
        </image>
        <clip>
          <near>0.02</near>
          <far>300</far>
        </clip>
上面的取值是与自身相机物理硬件的规格相匹配。而< near>和< far>表示的是相机可以看到物体的最近和最远距离。
<plugin name="camera_controller" filename="libgazebo_ros_camera.so">
这个是实际文件gazebo_ros/gazebo_ros_camera.cpp所要链接的。
        <cameraName>rrbot/camera1</cameraName>
        <imageTopicName>image_raw</imageTopicName>
        <cameraInfoTopicName>camera_info</cameraInfoTopicName>
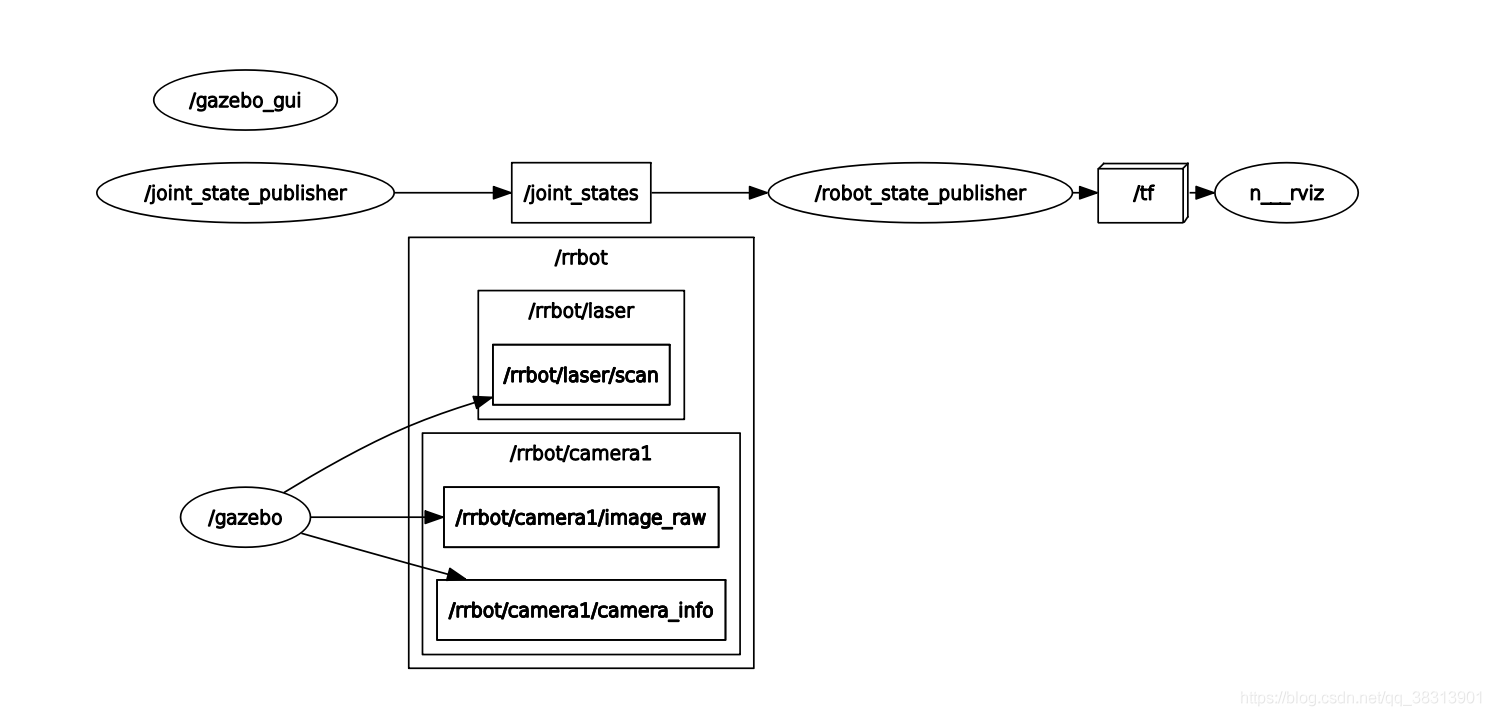
这里定义的是相机发布的话题。对于rrbot,我们所要订阅的话题为:
/rrbot/camera1/image_raw
/rrbot/camera1/camera_info
二. 运行launch文件
roslaunch rrbot_gazebo rrbot_world.launch
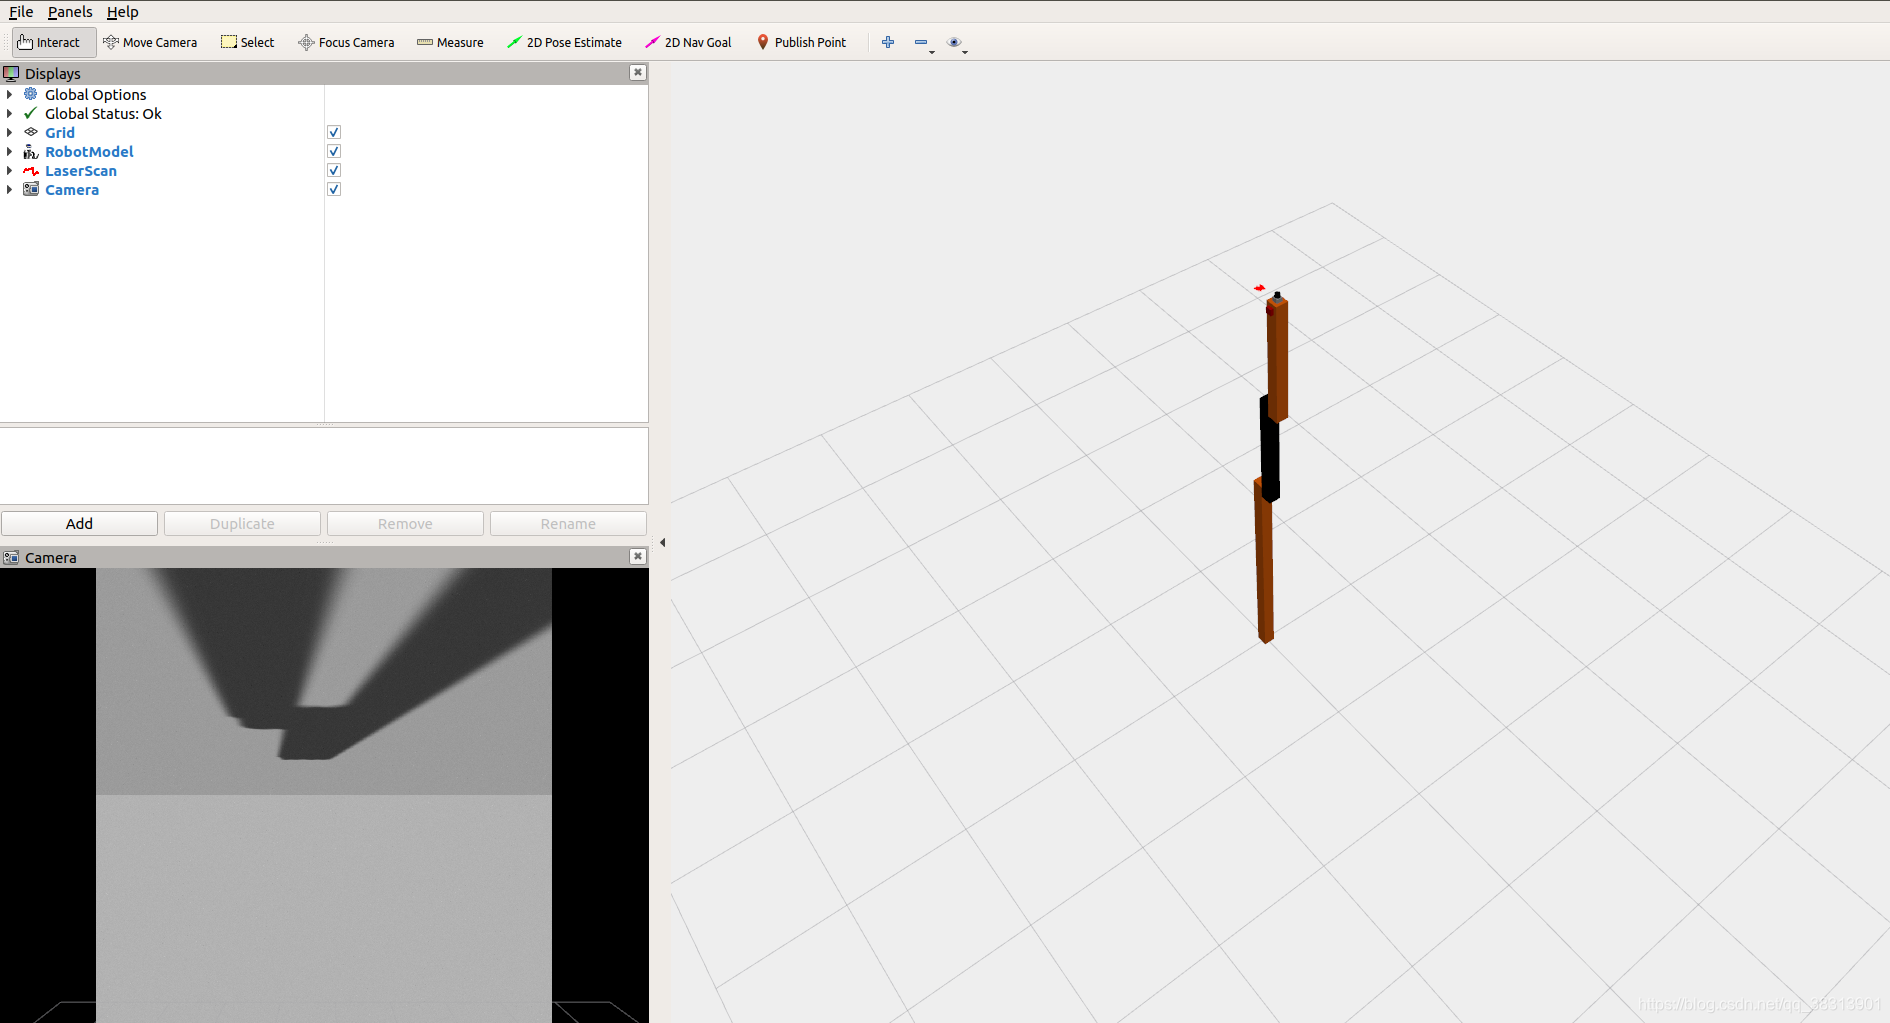
roslaunch rrbot_description rrbot_rviz.launch
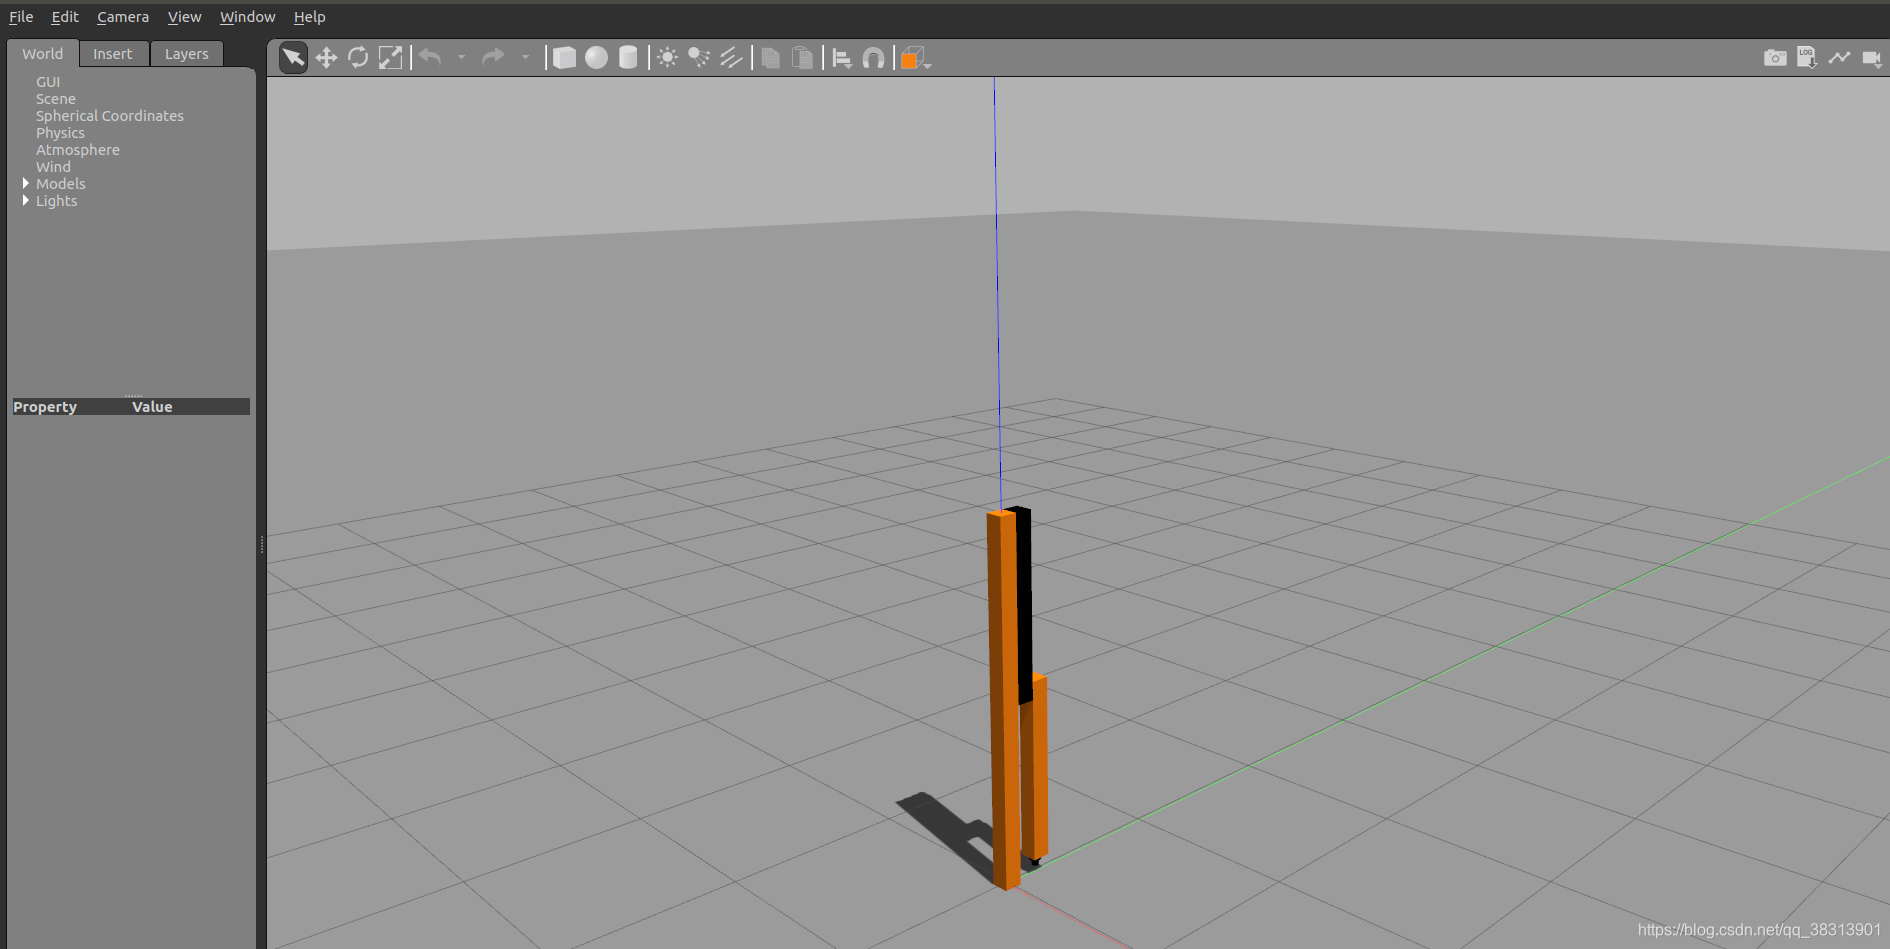
结果如下图:
运行rqt_graph,显示节点图:
可以看出gazebo和rviz中的机器人状态不一致。
此时加载的rrbot_world.launch的内容如下:
<launch>

  <!-- these are the arguments you can pass this launch file, for example paused:=true -->
  <arg name="paused" default="false"/>
  <arg name="use_sim_time" default="true"/>
  <arg name="gui" default="true"/>
  <arg name="headless" default="false"/>
  <arg name="debug" default="false"/>

  <!-- We resume the logic in empty_world.launch, changing only the name of the world to be launched -->
  <include file="$(find gazebo_ros)/launch/empty_world.launch">
    <arg name="world_name" value="$(find rrbot_gazebo)/worlds/rrbot.world"/>
    <arg name="debug" value="$(arg debug)" />
    <arg name="gui" value="$(arg gui)" />
    <arg name="paused" value="$(arg paused)"/>
    <arg name="use_sim_time" value="$(arg use_sim_time)"/>
    <arg name="headless" value="$(arg headless)"/>
  </include>

  <!-- Load the URDF into the ROS Parameter Server -->
  <param name="robot_description"
    command="$(find xacro)/xacro --inorder '$(find rrbot_description)/urdf/rrbot.xacro'" />

  <!-- Run a python script to the send a service call to gazebo_ros to spawn a URDF robot -->
  <node name="urdf_spawner" pkg="gazebo_ros" type="spawn_model" respawn="false" output="screen"
    args="-urdf -model rrbot -param robot_description"/>

</launch>
rrbot_rviz.launch的内容如下:
<launch>
  <param name="robot_description"
    command="$(find xacro)/xacro --inorder '$(find rrbot_description)/urdf/rrbot.xacro'" />

  <!-- send fake joint values -->
  <node name="joint_state_publisher" pkg="joint_state_publisher" type="joint_state_publisher">
    <param name="use_gui" value="true"/>
  </node>

  <!-- Combine joint values -->
  <node name="robot_state_publisher" pkg="robot_state_publisher" type="robot_state_publisher"/>

  <!-- Show in Rviz   -->
  <node name="rviz" pkg="rviz" type="rviz" args="-d $(find rrbot_description)/launch/rrbot.rviz"/>

</launch>
对于添加激光雷达插件是一样的原理。
参考:
http://gazebosim.org/tutorials?tut=ros_gzplugins
本文内容由网友自发贡献,版权归原作者所有,本站不承担相应法律责任。如您发现有涉嫌抄袭侵权的内容,请联系:hwhale#tublm.com(使用前将#替换为@)