实现目标:机器人检测到有人走过来,迎上去并开始追踪。
追踪算法使用kcf算法,关于kcf追踪的ros库在github地址 https://github.com/TianyeAlex/tracker_kcf_ros,kcf算法是目前追踪算法中比较好的,程序跑起来后效果也是不错的。我能力有限,在这里不作介绍。有兴趣的可以去研究一下。这里主要讲一下在次基础上添加行人检测,做到自动追踪。
训练库地址:http://download.csdn.net/detail/yiranhaiziqi/9711174,下载后放到src目录下。
追踪的代码结构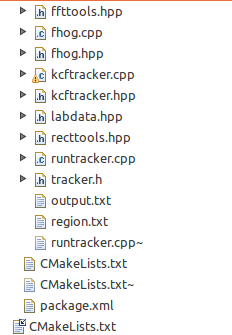
作者将kcf算法封装起来,在runtracker.cpp里面调用。
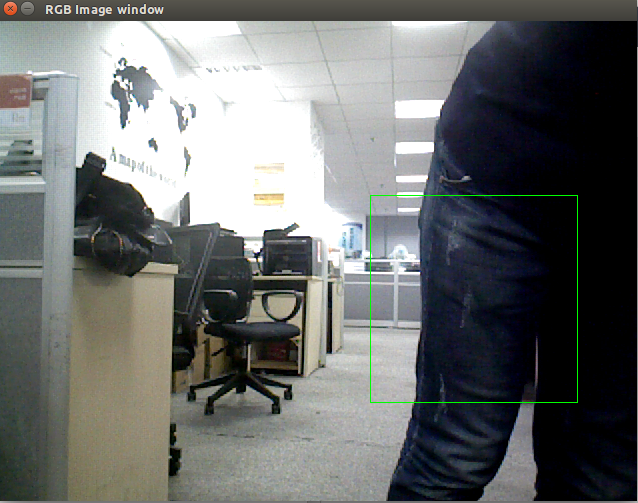
程序跑起来的效果

出现一个窗口,用鼠标左键选中一个区域作为感兴趣区域,之后机器人会跟踪这个区域。例如,选中画面中的椅子,移动椅子之后,机器人会跟随移动。选中画面中的人或者人的某个部位都可以实现人物跟踪。我要想实现自动追踪,就是把鼠标选择跟踪物变成自动选择跟踪物,这里的跟踪物就是行人。
首先要先实现行人检测,在opencv中,有行人检测的demo,路径在opencv-2.4.13/samples/cpp/peopledetect.cpp。接下来做的就是把代码结合起来。
简单介绍一下runtracker.cpp。
ImageConverter类是核心
初始化我们要接受/发送主题的Publisher 和Subscriber,设置相应的回掉函数。
image_sub_ = it_.subscribe("/camera/rgb/image_rect_color", 1,&ImageConverter::imageCb, this)
depth_sub_ = it_.subscribe("/camera/depth/image", 1,&ImageConverter::depthCb, this)
pub = nh_.advertise<geometry_msgs::Twist>("/mobile_base/mobile_base_controller/cmd_vel", 1000)
image_sub_是接受rgb图的subscribe,执行imageCb回掉函数,imageCb主要是将摄像头的数据显示在窗口中,选择感兴趣区域。
depth_sub_是接受深度图的subscribe,执行depthCb回掉函数,depthCb作用就是计算距离和方向。
了解到这里之后,要将手动选择感兴趣区域改为自动选择感兴趣区域,必然是在imageCb函数中修改。
imageCb中 cv::setMouseCallback(RGB_WINDOW, onMouse, 0);监听鼠标操作,如果鼠标不动,程序不会往下执行。onMouse为鼠标监听回调。要实现自动选择肯定就不能用这个了,将其注掉。
再来看下onMouse函数做了什么事
void onMouse(int event, int x, int y, int, void*)
{
if (select_flag)
{
selectRect.x = MIN(origin.x, x);
selectRect.y = MIN(origin.y, y);
selectRect.width = abs(x - origin.x);
selectRect.height = abs(y - origin.y);
selectRect &= cv::Rect(0, 0, rgbimage.cols, rgbimage.rows);
}
if (event == CV_EVENT_LBUTTONDOWN)
{
bBeginKCF = false;
select_flag = true;
origin = cv::Point(x, y);
selectRect = cv::Rect(x, y, 0, 0);
}
else if (event == CV_EVENT_LBUTTONUP)
{
select_flag = false;
bRenewROI = true;
}
}
当按下鼠标左键时,这个点就是起始点,按住鼠标左键移动鼠标,会选择感兴趣区域,松开鼠标左键,bRenewROI = true;修改标志,表示新的roi区域selectRect已经产生。在imageCb中程序继续执行,初始化KCFTracker,开始追踪。
到这里基本的流程已经比较清晰了,接下来开始将行人检测代替手动选择roi区域。
preparePeopleDetect()函数是初始化检测,
peopleDetect()函数是开始检测。
void preparePeopleDetect()
{
has_dectect_people = false;
MySVM svm;
string path = ros::package::getPath("track_pkg")+"/src/12000neg_2400pos.xml";
printf("path === %s",path.c_str());
svm.load(path.c_str());
DescriptorDim = svm.get_var_count();
int supportVectorNum = svm.get_support_vector_count();
cout<<"支持向量个数:"<<supportVectorNum<<endl;
Mat alphaMat = Mat::zeros(1, supportVectorNum, CV_32FC1);
Mat supportVectorMat = Mat::zeros(supportVectorNum, DescriptorDim, CV_32FC1);
Mat resultMat = Mat::zeros(1, DescriptorDim, CV_32FC1);
for(int i=0; i<supportVectorNum; i++)
{
const float * pSVData = svm.get_support_vector(i);
for(int j=0; j<DescriptorDim; j++)
{
supportVectorMat.at<float>(i,j) = pSVData[j];
}
}
double * pAlphaData = svm.get_alpha_vector();
for(int i=0; i<supportVectorNum; i++)
{
alphaMat.at<float>(0,i) = pAlphaData[i];
}
resultMat = -1 * alphaMat * supportVectorMat;
for(int i=0; i<DescriptorDim; i++)
{
myDetector.push_back(resultMat.at<float>(0,i));
}
myDetector.push_back(svm.get_rho());
cout<<"检测子维数:"<<myDetector.size()<<endl;
hog.setSVMDetector(myDetector);
ofstream fout("HOGDetectorForOpenCV.txt");
for(int i=0; i<myDetector.size(); i++)
{
fout<<myDetector[i]<<endl;
}
printf("Start the tracking process\n");
}
void peopleDetect()
{
if(has_dectect_people)
return;
vector<Rect> found, found_filtered;
double t = (double)getTickCount();
hog.detectMultiScale(rgbimage, found, 0, Size(8,8), Size(32,32), 1.05, 2);
t = (double)getTickCount() - t;
size_t i, j;
printf("found.size==%d",found.size());
for( i = 0; i < found.size(); i++ )
{
Rect r = found[i];
for( j = 0; j < found.size(); j++ )
if( j != i && (r & found[j]) == r)
break;
if( j == found.size() )
found_filtered.push_back(r);
}
Rect r ;
for( i = 0; i < found_filtered.size(); i++ )
{
r = found_filtered[i];
r.x += cvRound(r.width*0.1);
r.width = cvRound(r.width*0.8);
r.y += cvRound(r.height*0.07);
r.height = cvRound(r.height*0.8);
}
if(r.width>100&&r.height>350){
has_dectect_people=true;
selectRect.x = r.x+(r.width-roi_width)/2;
selectRect.y = r.y+(r.height-roi_height)/2;
selectRect.width = roi_width;
selectRect.height = roi_height;
printf("selectRect.x==%d,y==%d,width==%d,height==%d\n",selectRect.x,selectRect.y,selectRect.width,selectRect.height);
}
}
检测到人后,人所在的区域是一个矩形,我这里在矩形区域内取其中间100*100的矩形为感兴趣区域。检测到人后将has_dectect_people置为true,使其不会再次检测。设置bRenewROI = true;select_flag = true;
select_flag:当追踪目标未消失时,为true,消失时为false,与bRenewROI一起作为是否重新检测行人追踪的标记。
完整代码如下
#include <iostream>
#include <fstream>
#include <sstream>
#include <algorithm>
#include <dirent.h>
#include <math.h>
#include <ros/ros.h>
#include <ros/package.h>
#include <image_transport/image_transport.h>
#include <cv_bridge/cv_bridge.h>
#include <sensor_msgs/image_encodings.h>
#include "geometry_msgs/Twist.h"
#include <opencv2/core/core.hpp>
#include <opencv2/highgui/highgui.hpp>
#include "opencv2/imgproc/imgproc.hpp"
#include "opencv2/objdetect/objdetect.hpp"
#include <stdio.h>
#include <string.h>
#include <ctype.h>
#include "kcftracker.hpp"
using namespace cv;
using namespace std;
static const std::string RGB_WINDOW = "RGB Image window";
#define Max_linear_speed 1
#define Min_linear_speed 0.4
#define Min_distance 1.0
#define Max_distance 5.0
#define Max_rotation_speed 0.75
float linear_speed = 0;
float rotation_speed = 0;
float k_linear_speed = (Max_linear_speed - Min_linear_speed) / (Max_distance - Min_distance);
float h_linear_speed = Min_linear_speed - k_linear_speed * Min_distance;
float k_rotation_speed = 0.004;
float h_rotation_speed_left = 1.2;
float h_rotation_speed_right = 1.36;
float distance_scale = 1.0;
int ERROR_OFFSET_X_left1 = 100;
int ERROR_OFFSET_X_left2 = 300;
int ERROR_OFFSET_X_right1 = 340;
int ERROR_OFFSET_X_right2 = 600;
int roi_height = 100;
int roi_width = 100;
cv::Mat rgbimage;
cv::Mat depthimage;
cv::Rect selectRect;
cv::Point origin;
cv::Rect result;
bool select_flag = false;
bool bRenewROI = false;
bool bBeginKCF = false;
bool enable_get_depth = false;
bool HOG = true;
bool FIXEDWINDOW = false;
bool MULTISCALE = true;
bool SILENT = true;
bool LAB = false;
int DescriptorDim;
bool has_dectect_people ;
KCFTracker tracker(HOG, FIXEDWINDOW, MULTISCALE, LAB);
vector<float> myDetector;
float dist_val[5] ;
class MySVM : public CvSVM
{
public:
double * get_alpha_vector()
{
return this->decision_func->alpha;
}
float get_rho()
{
return this->decision_func->rho;
}
};
class ImageConverter
{
ros::NodeHandle nh_;
image_transport::ImageTransport it_;
image_transport::Subscriber image_sub_;
image_transport::Subscriber depth_sub_;
HOGDescriptor hog;
public:
ros::Publisher pub;
ImageConverter()
: it_(nh_)
{
image_sub_ = it_.subscribe("/camera/rgb/image_rect_color", 1,&ImageConverter::imageCb, this);
        depth_sub_ = it_.subscribe("/camera/depth/image", 1,&ImageConverter::depthCb, this);
        pub = nh_.advertise<geometry_msgs::Twist>("/mobile_base/mobile_base_controller/cmd_vel", 1000);
preparePeopleDetect();
cv::namedWindow(RGB_WINDOW);
}
~ImageConverter()
{
cv::destroyWindow(RGB_WINDOW);
}
void imageCb(const sensor_msgs::ImageConstPtr& msg)
{
cv_bridge::CvImagePtr cv_ptr;
try
{
cv_ptr = cv_bridge::toCvCopy(msg, sensor_msgs::image_encodings::BGR8);
}
catch (cv_bridge::Exception& e)
{
ROS_ERROR("cv_bridge exception: %s", e.what());
return;
}
cv_ptr->image.copyTo(rgbimage);
peopleDetect();
if(has_dectect_people&&!select_flag)
{
printf("has_dectect_people = true \n");
selectRect &= cv::Rect(0,0,rgbimage.cols,rgbimage.rows);
bRenewROI = true;
select_flag = true;
}
if(bRenewROI)
{
tracker.init(selectRect, rgbimage);
bBeginKCF = true;
bRenewROI = false;
enable_get_depth = false;
}
if(bBeginKCF)
{
result = tracker.update(rgbimage);
cv::rectangle(rgbimage, result, cv::Scalar( 0, 255,0 ), 1, 8 );
enable_get_depth = true;
}
else
cv::rectangle(rgbimage, selectRect, cv::Scalar(0, 255, 0), 2, 8, 0);
cv::imshow(RGB_WINDOW, rgbimage);
cv::waitKey(1);
}
void preparePeopleDetect()
{
has_dectect_people = false;
MySVM svm;
string path = ros::package::getPath("track_pkg")+"/src/12000neg_2400pos.xml";
printf("path === %s",path.c_str());
svm.load(path.c_str());
DescriptorDim = svm.get_var_count();
int supportVectorNum = svm.get_support_vector_count();
cout<<"支持向量个数:"<<supportVectorNum<<endl;
Mat alphaMat = Mat::zeros(1, supportVectorNum, CV_32FC1);
Mat supportVectorMat = Mat::zeros(supportVectorNum, DescriptorDim, CV_32FC1);
Mat resultMat = Mat::zeros(1, DescriptorDim, CV_32FC1);
for(int i=0; i<supportVectorNum; i++)
{
const float * pSVData = svm.get_support_vector(i);
for(int j=0; j<DescriptorDim; j++)
{
supportVectorMat.at<float>(i,j) = pSVData[j];
}
}
double * pAlphaData = svm.get_alpha_vector();
for(int i=0; i<supportVectorNum; i++)
{
alphaMat.at<float>(0,i) = pAlphaData[i];
}
resultMat = -1 * alphaMat * supportVectorMat;
for(int i=0; i<DescriptorDim; i++)
{
myDetector.push_back(resultMat.at<float>(0,i));
}
myDetector.push_back(svm.get_rho());
cout<<"检测子维数:"<<myDetector.size()<<endl;
hog.setSVMDetector(myDetector);
ofstream fout("HOGDetectorForOpenCV.txt");
for(int i=0; i<myDetector.size(); i++)
{
fout<<myDetector[i]<<endl;
}
printf("Start the tracking process\n");
}
void peopleDetect()
{
if(has_dectect_people)
return;
vector<Rect> found, found_filtered;
double t = (double)getTickCount();
hog.detectMultiScale(rgbimage, found, 0, Size(8,8), Size(32,32), 1.05, 2);
t = (double)getTickCount() - t;
size_t i, j;
printf("found.size==%d",found.size());
for( i = 0; i < found.size(); i++ )
{
Rect r = found[i];
for( j = 0; j < found.size(); j++ )
if( j != i && (r & found[j]) == r)
break;
if( j == found.size() )
found_filtered.push_back(r);
}
Rect r ;
for( i = 0; i < found_filtered.size(); i++ )
{
r = found_filtered[i];
r.x += cvRound(r.width*0.1);
r.width = cvRound(r.width*0.8);
r.y += cvRound(r.height*0.07);
r.height = cvRound(r.height*0.8);
}
if(r.width>100&&r.height>350){
has_dectect_people=true;
selectRect.x = r.x+(r.width-roi_width)/2;
selectRect.y = r.y+(r.height-roi_height)/2;
selectRect.width = roi_width;
selectRect.height = roi_height;
printf("selectRect.x==%d,y==%d,width==%d,height==%d\n",selectRect.x,selectRect.y,selectRect.width,selectRect.height);
}
}
void depthCb(const sensor_msgs::ImageConstPtr& msg)
{
cv_bridge::CvImagePtr cv_ptr;
try
{
cv_ptr = cv_bridge::toCvCopy(msg,sensor_msgs::image_encodings::TYPE_32FC1);
cv_ptr->image.copyTo(depthimage);
}
catch (cv_bridge::Exception& e)
{
ROS_ERROR("Could not convert from '%s' to 'TYPE_32FC1'.", msg->encoding.c_str());
}
if(enable_get_depth)
{
dist_val[0] = depthimage.at<float>(result.y+result.height/3 , result.x+result.width/3) ;
dist_val[1] = depthimage.at<float>(result.y+result.height/3 , result.x+2*result.width/3) ;
dist_val[2] = depthimage.at<float>(result.y+2*result.height/3 , result.x+result.width/3) ;
dist_val[3] = depthimage.at<float>(result.y+2*result.height/3 , result.x+2*result.width/3) ;
dist_val[4] = depthimage.at<float>(result.y+result.height/2 , result.x+result.width/2) ;
float distance = 0;
int num_depth_points = 5;
for(int i = 0; i < 5; i++)
{
if(dist_val[i] > 0.4 && dist_val[i] < 10.0)
distance += dist_val[i];
else
num_depth_points--;
}
distance /= num_depth_points;
if(distance > Min_distance)
linear_speed = distance * k_linear_speed + h_linear_speed;
else if (distance <= Min_distance-0.5){
linear_speed =-1* ((Min_distance-0.5) * k_linear_speed + h_linear_speed);
}else{
linear_speed = 0;
}
if( fabs(linear_speed) > Max_linear_speed)
linear_speed = Max_linear_speed;
int center_x = result.x + result.width/2;
if(center_x < ERROR_OFFSET_X_left1){
printf("center_x <<<<<<<< ERROR_OFFSET_X_left1\n");
rotation_speed = Max_rotation_speed/5;
has_dectect_people = false;
enable_get_depth = false;
select_flag = false;
bBeginKCF = false;
}
else if(center_x > ERROR_OFFSET_X_left1 && center_x < ERROR_OFFSET_X_left2)
rotation_speed = -k_rotation_speed * center_x + h_rotation_speed_left;
else if(center_x > ERROR_OFFSET_X_right1 && center_x < ERROR_OFFSET_X_right2)
rotation_speed = -k_rotation_speed * center_x + h_rotation_speed_right;
else if(center_x > ERROR_OFFSET_X_right2){
printf("center_x >>>>>>>> ERROR_OFFSET_X_right2\n");
rotation_speed = -Max_rotation_speed/5;
has_dectect_people = false;
enable_get_depth = false;
select_flag = false;
bBeginKCF = false;
}
else
rotation_speed = 0;
}
cv::waitKey(1);
}
};
int main(int argc, char** argv)
{
ros::init(argc, argv, "kcf_tracker");
ImageConverter ic;
while(ros::ok())
{
ros::spinOnce();
geometry_msgs::Twist twist;
twist.linear.x = linear_speed;
twist.linear.y = 0;
twist.linear.z = 0;
twist.angular.x = 0;
twist.angular.y = 0;
twist.angular.z = rotation_speed;
ic.pub.publish(twist);
if (cvWaitKey(33) == 'q')
break;
}
return 0;
}
程序运行结果。
本文内容由网友自发贡献,版权归原作者所有,本站不承担相应法律责任。如您发现有涉嫌抄袭侵权的内容,请联系:hwhale#tublm.com(使用前将#替换为@)