目录
相关知识点
1.加载分类网络模型
(1)加载网络模型
(2)查看网络模型和模型参数
(3)读取ImageNet.txt分类文件
(4)使用预训练模型预测一张图片
(5)加载CIFAR10数据集
(6)对网络输出修改
2.完整迁移学习实例1
首先导入相关的包:
(1)CIFAR10数据集类别
(2)加载预训练模型
(3)数据变换
(4)获取数据集
(5)模型修改
(6)模型冻结
(7)加载数据集
(8)定义损失函数
(9)定义优化器
(10) 模型的保存和加载
(11)训练开始
(12)加载模型预测
(13)打开tensorboard查看训练的过程
(14)训练好的模型下载
3.完整迁移学习实例2
导入相关的包
(1)加载数据集
(2)加载预训练模型
(3)模型修改
(4)模型冻结
(5)定义损失函数
(6)定义优化器
(7)模型保存和加载
(8)训练开始
(9)预测图片和实时检测
(10)打开tensorboard查看训练的过程
(11)训练好的模型下载
提示:
第一:由于我们在搭建自己的网络来训练模型时,总是在准确率上达不到要求,最后导致训练出来的模型对图像的预测效果不怎么好;
第二:由于我们本身电脑的配置,对于一些小伙伴来说,可能电脑配置并没有像常见的GPU之类的加速器,所以导致在数据集上选择不能太大,不然电脑承受不了太长时间的训练,也就是我们电脑本身的资源不够,也会导致训练的模型效果不好。
基于上面一些比较常见的问题,我们可以采用已经训练好的预训练模型来实现,在别人训练好的模型基础上进行训练,数据集上不需要很多,也能在资源有限的情况下达到比较好的效果。以下主要是采用pytorch中的预训练模型来对图形进行分类和目标检测。
相关知识点
- 预训练模型是一个之前基于大型数据集(通常是大型图像分类任务)训练的已保存网络。可以按原样使用预训练模型,也可以使用迁移学习针对给定任务自定义此模型。
- 用于图像分类的迁移学习背后的理念是,如果一个模型是基于足够大且通用的数据集训练的,那么该模型将有效地充当视觉世界的通用模型。随后,您可以利用这些学习到的特征映射,而不必通过基于大型数据集训练大型模型而从头开始。
- 通过以下两种方式来自定义预训练模型:
- 方式一:
- 特征提取:使用先前网络学习的表示从新样本中提取有意义的特征。您只需在预训练模型上添加一个将从头开始训练的新分类器,这样便可重复利用先前针对数据集学习的特征映射。
- 无需(重新)训练整个模型。基础卷积网络已经包含通常用于图片分类的特征。但是,预训练模型的最终分类部分特定于原始分类任务,随后特定于训练模型所使用的类集。
- 方式二:
- 微调:解冻已冻结模型库的一些顶层,并共同训练新添加的分类器层和基础模型的最后几层。这样,我们便能“微调”基础模型中的高阶特征表示,以使其与特定任务更相关。
- 通用的机器学习工作流。
- 检查并理解数据
- 构建输入流水线,在本例中使用 Keras ImageDataGenerator
- 构成模型
- 加载预训练的基础模型(和预训练权重)
- 将分类层堆叠在顶部
- 训练模型
- 评估模型
1.加载分类网络模型
这里以ResNet50为例子,之所以选择这个模型,主要是在精度和参数量上进行权衡的。
(1)加载网络模型
官网地址:https://pytorch.org/vision/stable/models/generated/torchvision.models.resnet50.html#torchvision.models.resnet50
import os
import cv2
import torch
from PIL import Image
from torchvision.models import resnet50
from torchvision import datasets,transforms
from torchstat import stat,stat_tree,statistics
from torch.utils.data import DataLoader,Dataset

#加载resNet50预训练模型
# https://pytorch.org/vision/stable/models/generated/torchvision.models.resnet50.html#torchvision.models.resnet50
# pretrained (bool): If True, returns a model pre-trained on ImageNet(如果设置为True的话,表示返回一个在ImageNet上训练的模型)
# progress (bool): If True, displays a progress bar of the download to stderr(如果为True,表示在下载的过程显示进度条)
modelResNet50=resnet50(pretrained=True,progress=True)
(2)查看网络模型和模型参数
深度学习模型的参数、计算量和推理速度统计
#查看网络模型的结构
print(modelResNet50)
#查看模型的参数量
print('modelParameters: {}'.format(stat(modelResNet50,(3,224,224))))


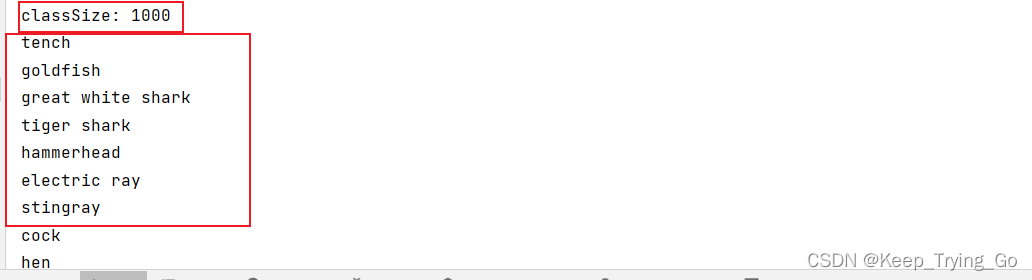
(3)读取ImageNet.txt分类文件
ImageNet.txt分类文件下载:
链接:https://pan.baidu.com/s/1YAIACNbo9IcLeP1Fb8o8kQ
提取码:equ2

#读取类别文件
def readClasses():
    classes=[]
    with open('tempData/imageNet_1.txt','r') as fp:
        readlines=fp.read().strip().split('\n')
        #遍历每一行
        for line in readlines:
            #读取编号后面的类别名,这里的line表示在一行类别中找到第一个空格,取第一个空格之后的所有字符串,
            # 使用split以","作为分割目标,并且获取第一个字符串,也就是类别名
            classes.append(line[line.find(' ')+1:].split(',')[0])

    print('classSize: {}'.format(len(classes)))
    for className in classes:
        print(className)
    return classes
(4)使用预训练模型预测一张图片
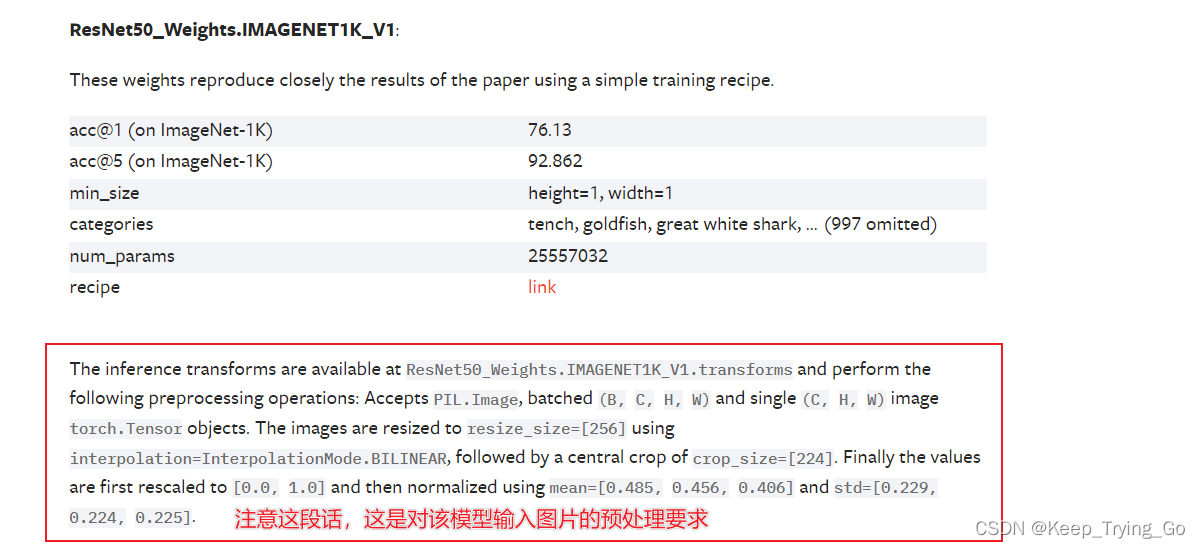
提示:意思是说,对于输入网络模型的图片预处理要求是:
- 第一步:接收的是Image读取的读取的类型图片(Image.open(img_path)),如果是批量输入的话,输入格式为[N,C,H,W];但是如果输入的是单张的图片的话,输入格式为:[C,H,W];
- 第二步:将读取图片的类型转换为tensor类型;
- 第三步:将图片缩放至[256,256]大小并且使用的线性插值为:InterpolationMode.BILINEAR;
- transforms.Resize(size=(232,232),interpolation=transforms.InterpolationMode.BILINEAR);
- 第四步:将图片中心裁剪到[224,224];
- transforms.CenterCrop(size=(224,224));
- 第五步:将像素值缩放至[0-1]之间;
- 第六步:对图片进行标准化处理,平均值=[0.485,0.456,0.406],标准差=[0.229,0.224,0.225]。
-
transforms.Normalize(mean=[0.485, 0.456, 0.406],std=[0.229, 0.224, 0.225])
"""
@Author : Keep_Trying_Go
@Major : Computer Science and Technology
@Hobby : Computer Vision
@Time : 2023-01-04 10:05
"""
import os
import cv2
import torch
import numpy as np
from PIL import Image
from torchvision.models import resnet50
from torchvision import datasets,transforms
from torchstat import stat,stat_tree,statistics
from torch.utils.data import DataLoader,Dataset
#读取类别文件
def readClasses():
classes=[]
with open('tempData/imageNet_1.txt','r') as fp:
readlines=fp.read().strip().split('\n')
#遍历每一行
for line in readlines:
#读取编号后面的类别名,这里的line表示在一行类别中找到第一个空格,取第一个空格之后的所有字符串,
# 使用split以","作为分割目标,并且获取第一个字符串,也就是类别名
classes.append(line[line.find(' ')+1:].split(',')[0])
print('classSize: {}'.format(len(classes)))
for className in classes:
print(className)
return classes
def Model(classes):
#加载resNet50预训练模型
# https://pytorch.org/vision/stable/models/generated/torchvision.models.resnet50.html#torchvision.models.resnet50
# pretrained (bool): If True, returns a model pre-trained on ImageNet(如果设置为True的话,表示返回一个在ImageNet上训练的模型)
# progress (bool): If True, displays a progress bar of the download to stderr(如果为True,表示在下载的过程显示进度条)
modelResNet50=resnet50(pretrained=True,progress=True)
#查看网络模型的结构
# print(modelResNet50)
# #查看模型的参数量
# print('modelParameters: {}'.format(stat(modelResNet50,(3,224,224))))
#加载CIFAR10数据https://mydreamambitious.blog.csdn.net/article/details/128482455
#数据变换
transform=transforms.Compose([
transforms.Resize(size=(232,232),interpolation=transforms.InterpolationMode.BILINEAR),
transforms.CenterCrop(size=(224,224)),
transforms.ToTensor(),
transforms.Normalize(mean=[0.485, 0.456, 0.406],std=[0.229, 0.224, 0.225])
])
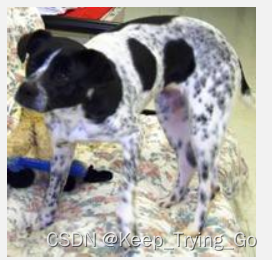
#预测一张图片的位置
img_path='data/dog.4356.jpg'
img=Image.open(img_path)
imgPerprocess=transform(img=img)
# print(type(imgPerprocess))
# print(imgPerprocess.shape)
imgPerprocess=torch.unsqueeze(imgPerprocess,dim=0)
#将modelResNet50模型设置为eval模式
modelResNet50.eval()
ResOutput=modelResNet50(imgPerprocess)
#从行上找到最大值
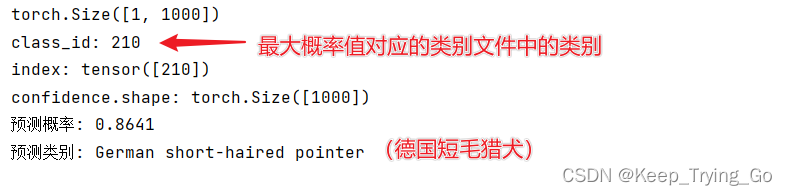
print(ResOutput.shape)
_,index=torch.max(input=ResOutput,dim=1)
#获取类别概率值
confidence=torch.nn.functional.softmax(ResOutput,dim=1)[0]
#取概率值的小数后四位
class_id=confidence.argmax()
print('class_id: {}'.format(class_id))
print('index: {}'.format(index))
print('confidence.shape: {}'.format(confidence.shape))
#获取概率最大值
print('预测概率: {:.4f}'.format(confidence[index].item()))
print('预测类别: {}'.format(classes[class_id]))
if __name__ == '__main__':
# readClasses()
classes=readClasses()
Model(classes=classes)
(5)加载CIFAR10数据集
推荐博客:https://mydreamambitious.blog.csdn.net/article/details/128482455
#加载CIFAR10数据https://mydreamambitious.blog.csdn.net/article/details/128482455
#数据变换
transform=transforms.Compose([
    transforms.ToTensor()
])
dataset=datasets.CIFAR10(root='tempData/CIFAR10',train=True,transform=transform,download=False)
这里读者也可以不用使用CIFAR10数据集,也可以使用其他的数据集。
(6)对网络输出修改
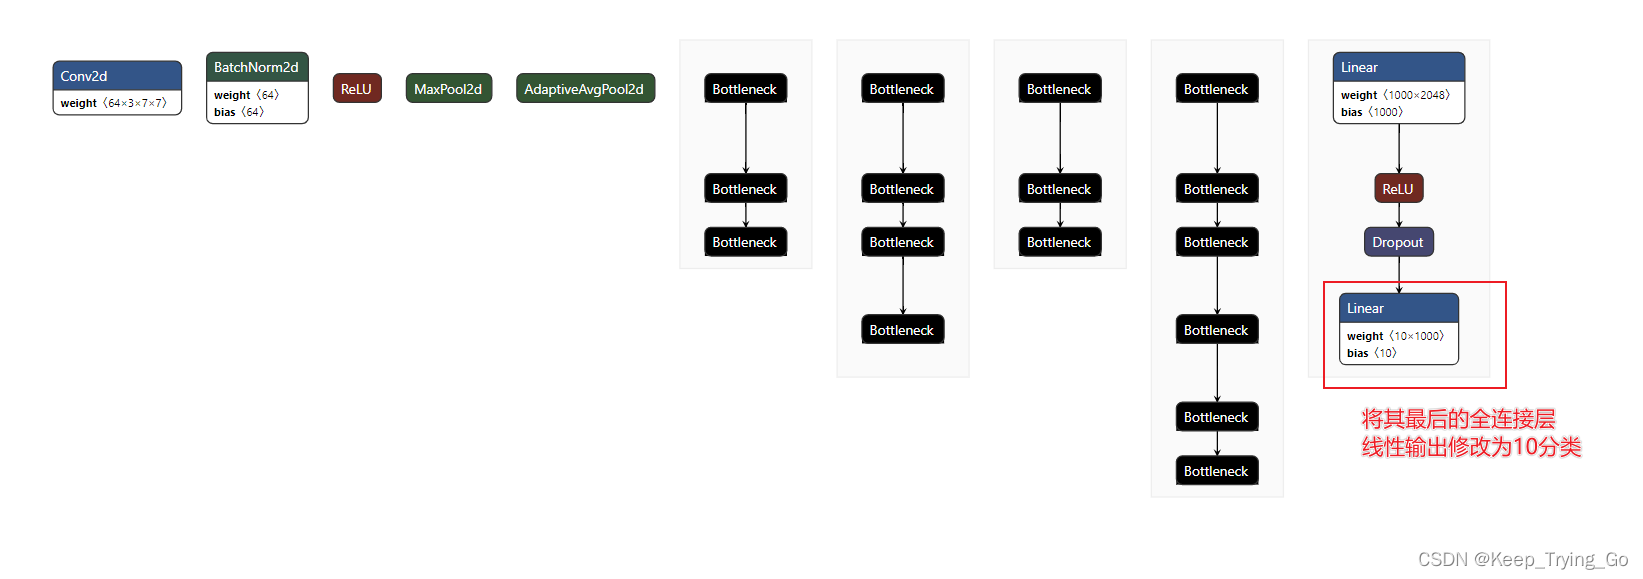
方式一:
#由于CIFAR10数据集是10分类的,所以需要对网络输出进行修改(resnet50网络的输出为1000分类)
modelResNet50.add_module(name='outputLayer',module=torch.nn.Linear(in_features=1000,out_features=10,bias=False))
print(modelResNet50)

方式二:
#或者修改最后的全连接的输出特征个数为10
fc_features=modelResNet50.fc.in_features
modelResNet50.fc=torch.nn.Linear(fc_features,10)


2.完整迁移学习实例1
提示:我们这里训练以CIFAR10数据集为例子。对于以下的迁移学习过程其实只是加载了一个预训练模型新,如果读者在搭建自己的模型进行训练也是同样的步骤,只是换了一下模型。
首先导入相关的包:
"""
@Author : Keep_Trying_Go
@Major  : Computer Science and Technology
@Hobby  : Computer Vision
@Time   : 2023-01-04 10:05
"""

import os
import cv2
import torch
import numpy as np
from PIL import Image
import matplotlib.pyplot as plt
from torchvision.models import resnet50
from torchvision import datasets,transforms
from torchstat import stat,stat_tree,statistics
from torch.utils.data import DataLoader,Dataset
from torch.utils.tensorboard import SummaryWriter
(1)CIFAR10数据集类别
 #CIFAR10数据集的类别名
    classes=['airplane', 'automobile', 'bird', 'cat', 'deer', 'dog', 'frog', 'horse', 'ship', 'truck']
    classToIdx={'airplane': 0, 'automobile': 1, 'bird': 2, 'cat': 3, 'deer': 4, 'dog': 5, 'frog': 6, 'horse': 7,
                 'ship': 8, 'truck': 9}
(2)加载预训练模型
modelResNet50 = resnet50(pretrained=True, progress=True)
# 查看网络模型的结构
# print(modelResNet50)
# #查看模型的参数量
# print('modelParameters: {}'.format(stat(modelResNet50,(3,224,224))))
(3)数据变换
# 数据变换
    transform = transforms.Compose([
        transforms.Resize(size=(232, 232), interpolation=transforms.InterpolationMode.BILINEAR),
        transforms.CenterCrop(size=(224, 224)),
        transforms.ToTensor(),
        transforms.Normalize(mean=[0.485, 0.456, 0.406], std=[0.229, 0.224, 0.225])
    ])
(4)获取数据集
 #获取数据集
    trainDataset = datasets.CIFAR10(root='tempData/CIFAR10', train=True, transform=transform, download=False)
    testDataset=datasets.CIFAR10(root='tempData/CIFAR10',train=False,transform=transform,download=False)
 #获取数据集的相关属性
    print('trainDatasetSize: {}'.format(len(trainDataset)))
    print('testDatasetSize: {}'.format(len(testDataset)))
    print('classToIdx: {}'.format(trainDataset.class_to_idx))
    print('classes: {}'.format(trainDataset.classes))
    print('targetLabel: {}'.format(trainDataset.targets))
    print('transform: {}'.format(trainDataset.transform))
    print('transforms: {}'.format(trainDataset.transforms))
    img,target=trainDataset[0]
    print('trainDataset[0].shape: {}'.format(img.shape))
    print('type(trainDataset[0]): {}'.format(type(img)))
#将tensor=>numpy
    img=np.array(img)
    #对于opencv读取的图像格式为[H,W,C],所以需要将img:[C,H,W]=>[H,W,C]
    img=np.transpose(img,(1,2,0))
    cv2.imshow('img',img)
    cv2.waitKey(0)
    cv2.destroyAllWindows()
(5)模型修改
 # 由于CIFAR10数据集是10分类的,所以需要对网络输出进行修改(resnet50网络的输出为1000分类)
    #方式一:
    fc_in_features=modelResNet50.fc.in_features
    fc_out_features=modelResNet50.fc.out_features
    #PyTorch中nn.ReLU(inplace=True)中inplace的作用:https://blog.csdn.net/AugustMe/article/details/92589979
    modelResNet50.add_module(name='fc',module=torch.nn.Sequential(
        torch.nn.Linear(in_features=fc_in_features, out_features=fc_out_features, bias=True),
        torch.nn.ReLU(inplace=False),
        torch.nn.Dropout(p=0.5,inplace=False),
        torch.nn.Linear(in_features=fc_out_features, out_features=10,bias=True)
    ))
    #方式二:或者修改最后的全连接的输出特征个数为10
    # fc_features=modelResNet50.fc.in_features
    # modelResNet50.fc=torch.nn.Linear(fc_features,10)
    # print(modelResNet50)
(6)模型冻结
# 提取模型的layer4,avgpool,fc,Classifer层的参数,其他层冻结
    #https://blog.csdn.net/Wind_2028/article/details/120541017
     for name,child in modelResNet50.named_children():
        if name in ['layer4','avgpool','fc']:
            for param in child.parameters():
                param.requires_grad=True
        else:
            for param in child.parameters():
                param.requires_grad=False
    # print(modelResNet50)

 #查看冻结的层
    for name,param in modelResNet50.named_parameters():
        if param.requires_grad==False:
            print(name)
提示:关于使用预训练模型的时候进行微调训练,那么该怎么进行微调训练呢?
(7)加载数据集
 # #加载数据集  https://mydreamambitious.blog.csdn.net/article/details/128482455
    batch_size=4
    trainDataLoader=DataLoader(dataset=trainDataset,batch_size=batch_size,shuffle=True,num_workers=0,drop_last=False)
    testDataLoader=DataLoader(dataset=testDataset,batch_size=batch_size,shuffle=True,num_workers=0,drop_last=False)
(8)定义损失函数
 # #损失函数的定义
    lossCIFAR10=torch.nn.CrossEntropyLoss()
(9)定义优化器
# #定义优化器 https://blog.csdn.net/Wind_2028/article/details/120541017
    learing_rate=0.001
    optimizer=torch.optim.SGD([
        {'params':modelResNet50.layer4.parameters(),'lr':learing_rate},
        {'params':modelResNet50.avgpool.parameters(),'lr':learing_rate},
        {'params':modelResNet50.fc.parameters(),'lr':learing_rate}
    ],lr=learing_rate)
(10) 模型的保存和加载
- 模型的保存方式:
- 方式一:模型的结构+模型的参数
- torch.save(modelResNet50,'modelName.pth');
- 方式二:模型的参数
- torch.save(modelResNet50.state_dict(),'modelName.pth');
- 对应的模型加载方式:
- 对应模型保存方式一:
- model=torch.load('modeName.pth');
- 对应模型保存方式二:
- modelResNet50=torchvision.models.resnet50(pretrained=False);
- modelResNet50.load_state_dict(torch.load('modeName.pth'));
(11)训练开始
提示:训练模型中使用:model.train()和model.eval()的具体作用:分别设置为训练模型和验证模型。但是这仅对某些模块有任何影响,比如: Dropout, BatchNorm。
https://pytorch.org/docs/stable/generated/torch.nn.Module.html#torch.nn.Module
# #迭代的次数
epoches=10
#使用tensorboard显示训练过程
writer=SummaryWriter('logs')
#将损失值和准确率保存起来,用于最后画出图形
PlotTestLoss=[]
PlotTestCorrect=[]
PlotTrainLoss=[]
PlotTrainCorrect=[]
for i in range(epoches):
# 训练的次数
trainStep = 0
#训练集上的准确率
trainCorrect=0
#训练集上的损失
trainLoss=0
traintotal=0
print('-----------------------第{}轮的训练--------------------------'.format(i+1))
#每一次迭代的训练
modelResNet50.train()
for traindata in trainDataLoader:
imgs,targets=traindata
# print(type(imgs)) =><class 'torch.Tensor'>
#输入模型,进行训练
output=modelResNet50(imgs)
# print(output)
# print(output.shape)
# 计算损失值
loss=lossCIFAR10(output,targets)
#优化器清零
optimizer.zero_grad()
#反向传播
loss.backward()
#梯度更新
optimizer.step()
#步数加一
trainStep=trainStep+1
with torch.no_grad():
#获取预测概率最大值索引(按行计算最大)
output=torch.argmax(input=output,dim=1)
# print(output)=>tensor([2, 9, 6, 0])
# print(output[0].item())=>2
#计算准确率
trainCorrect+=(output==targets).sum().item()
traintotal+=imgs.shape[0]
#计算总的损失
trainLoss+=loss.item()
if trainStep%100==0:
print('-----------step: {}--------loss: {:.6f}---------correct: {:.6f}'.format(trainStep,trainLoss*1.0/traintotal,trainCorrect*1.0/traintotal))
writer.add_scalar(tag='trainLoss',scalar_value=trainLoss*1.0/traintotal,global_step=i+1)
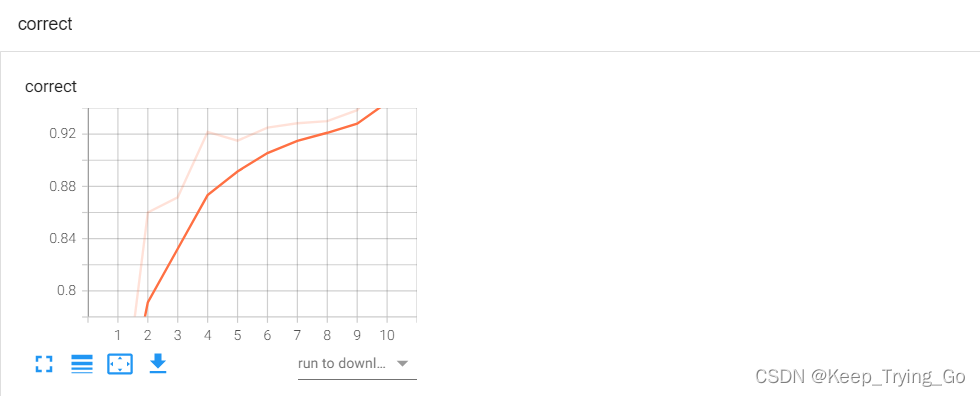
writer.add_scalar(tag='correct',scalar_value=trainCorrect*1.0/traintotal,global_step=i+1)
#在tensorboard中绘制预测最优一步训练的output[0]结果图
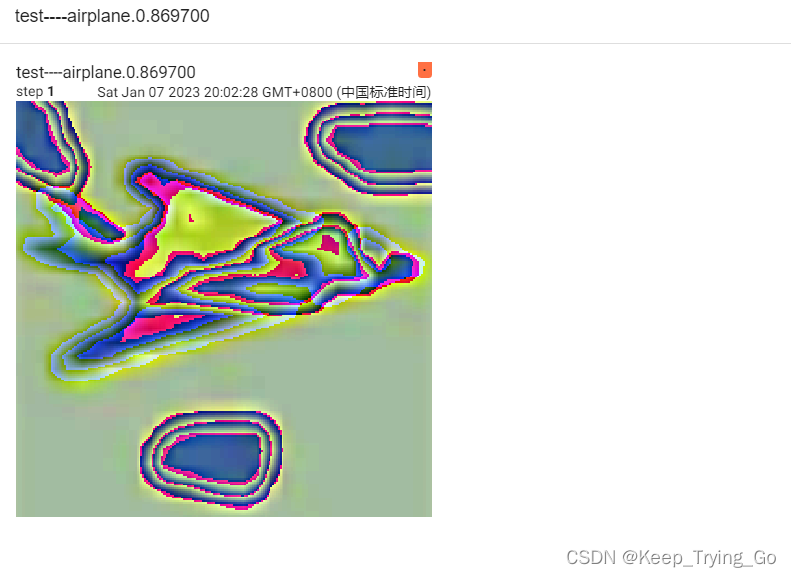
writer.add_image(tag='train----{}.{:.4f}'.format(classes[output[0].item()],trainCorrect/traintotal),img_tensor=imgs[0],global_step=i+1)
PlotTrainLoss.append(trainLoss * 1.0 / traintotal)
PlotTrainCorrect.append(trainCorrect * 1.0 / traintotal)
#在测试数据集上进行测试
testTotal=0
testCorrect=0
testLoss=0
#测试集上不需要梯度更新
modelResNet50.eval()
with torch.no_grad():
for data in testDataLoader:
imgs,targets=data
# 输入模型,进行训练
output = modelResNet50(imgs)
# 计算损失值
loss = lossCIFAR10(output, targets)
# 获取预测概率最大值索引(按行计算最大)
output = torch.argmax(input=output, dim=1)
# 计算准确率
testCorrect += (output == targets).sum().item()
testTotal += imgs.shape[0]
# 计算总的损失
testLoss += loss.item()
print('-----------test:--------loss: {:.6f}---------correct: {:.6f}'.format(testLoss * 1.0 / testTotal,
testCorrect * 1.0 / testTotal))
writer.add_scalar(tag='testLoss', scalar_value=testLoss * 1.0 / testTotal, global_step=i + 1)
writer.add_image(tag='test----{}.{:.6f}'.format(classes[output[0].item()], testCorrect / testTotal),
img_tensor=imgs[0], global_step=i + 1)
PlotTestLoss.append(testLoss * 1.0 / testTotal)
PlotTestCorrect.append(testCorrect * 1.0 / testTotal)
#保运模型
torch.save(modelResNet50,'models/modelResNet50_{}.pth'.format(i))
#使用matplotlib绘制图形
plt.plot(range(1,epoches+1),PlotTestLoss,label='trainLoss')
plt.plot(range(1, epoches + 1), PlotTestLoss, label='testLoss')
plt.legend()
plt.show()
plt.plot(range(1, epoches + 1), PlotTrainCorrect, label='trainAcc')
plt.plot(range(1, epoches + 1), PlotTestCorrect, label='testAcc')
plt.legend()
plt.show()
writer.close()


(12)加载模型预测

import os
import cv2
import time
import torch
import numpy as np
from PIL import Image
from torchvision import datasets
from torchvision import transforms
from torch.utils.data import DataLoader,Dataset
# CIFAR10数据集的类别名
classes = ['airplane', 'automobile', 'bird', 'cat', 'deer', 'dog', 'frog', 'horse', 'ship', 'truck']
classToIdx = {'airplane': 0, 'automobile': 1, 'bird': 2, 'cat': 3, 'deer': 4, 'dog': 5, 'frog': 6, 'horse': 7,
'ship': 8, 'truck': 9}
# 数据变换
transform = transforms.Compose([
transforms.Resize(size=(232, 232), interpolation=transforms.InterpolationMode.BILINEAR),
transforms.CenterCrop(size=(224, 224)),
transforms.ToTensor(),
transforms.Normalize(mean=[0.485, 0.456, 0.406], std=[0.229, 0.224, 0.225])
])
def predictImage(img_path):
"""
:param img_path: 图片的路径
:return:
"""
#读取图片
img=Image.open(img_path)
#图像处理
img_Transform=transform(img)
#对图像进行升维
img_Transform=torch.unsqueeze(input=img_Transform,dim=0)
#加载模型
modelResNet50=torch.load('modelResNet50_0.pth')
# print(modelResNet50)
#预测图片
predicts=modelResNet50(img_Transform)
#获取类别概率值
predicts=torch.nn.functional.softmax(predicts,dim=1)[0]
class_id=predicts.argmax()
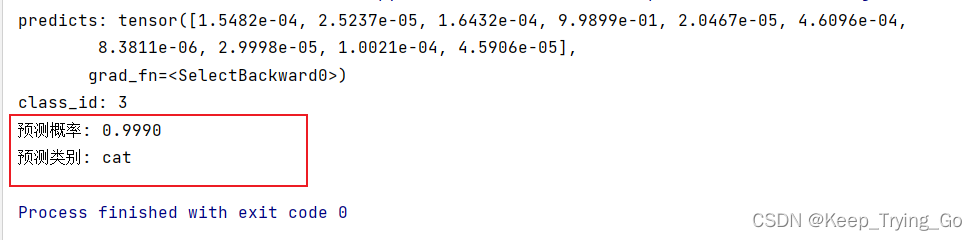
print('predicts: {}'.format(predicts))
print('class_id: {}'.format(class_id))
print('预测概率: {:.4f}'.format(predicts[class_id].item()))
print('预测类别: {}'.format(classes[class_id]))
def timeDetect():
"""
:return:
"""
# 加载模型
modelResNet50 = torch.load('modelResNet50_0.pth')
img1=cv2.imread('tempData/cat.64.jpg')
print('img1.shape: {}'.format(img1.shape))
print('img1.type: {}'.format(type(img1)))
img2=Image.open('tempData/cat.64.jpg')
print('img2.shape: {}'.format(np.shape(img2)))
print('img3.type: {}'.format(type(img2)))
#计算开始时间
start_time=time.time()
#计算帧率
countFPS=0
#开启摄像头
cap = cv2.VideoCapture(0)
while cap.isOpened():
ret, frame = cap.read()
frame = cv2.resize(src=frame, dsize=(520, 520))
frame = cv2.flip(src=frame, flipCode=2)
frame_PIL=Image.fromarray(frame)
img_transform=transform(frame_PIL)
# 对图像进行升维
img_Transform = torch.unsqueeze(input=img_transform, dim=0)
# 预测图片
predicts = modelResNet50(img_Transform)
# 获取类别概率值
predicts = torch.nn.functional.softmax(predicts, dim=1)[0]
class_id = predicts.argmax()
end_time=time.time()
countFPS+=1
FPS=round(countFPS/(end_time-start_time),0)
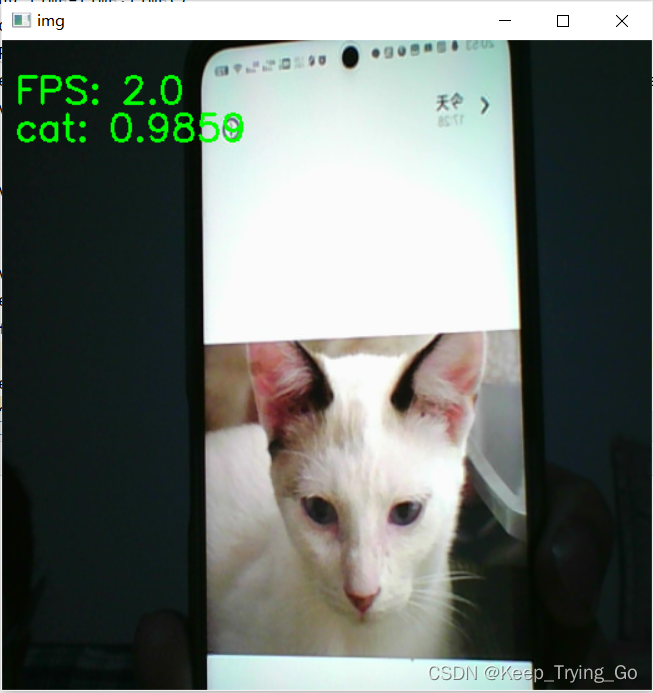
text = classes[class_id] + ': ' + str('{:.4f}'.format(predicts[class_id].item())) + '%'
cv2.putText(img=frame, text='FPS: '+str(FPS), org=(10, 50),
fontFace=cv2.FONT_HERSHEY_SIMPLEX,
fontScale=1.0, color=(0, 255, 0), thickness=2)
cv2.putText(img=frame, text=text, org=(10, 80),
fontFace=cv2.FONT_HERSHEY_SIMPLEX,
fontScale=1.0, color=(0, 255, 0), thickness=2)
cv2.imshow('img', frame)
key = cv2.waitKey(1)
if key == 27:
break
cap.release()
cv2.destroyAllWindows()
if __name__ == '__main__':
# predictImage(img_path='tempData/cat.64.jpg')
timeDetect()
实时检测:
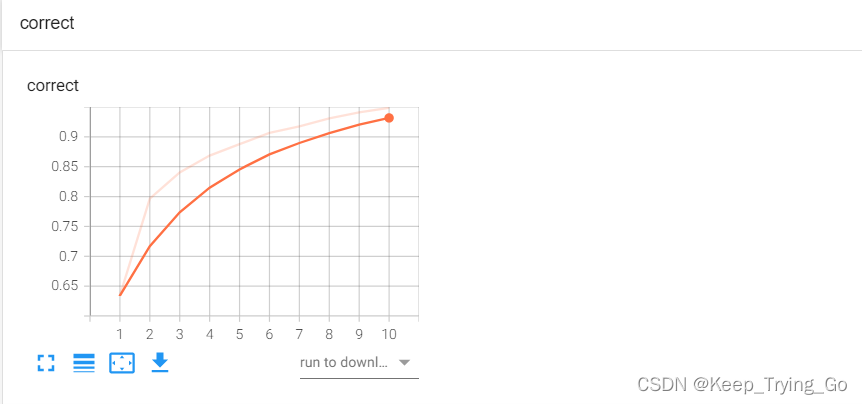
(13)打开tensorboard查看训练的过程
在pycharm的terminal命令行窗口输入:tensorboard --logdir=logs --host=127.0.0.1 --port=8008。

(14)训练好的模型下载
提示:由于我把训练的每一代模型都保存了,但是我这里只给出第一代,第五代和第十代训练的结果模型。
下载地址如下:读者自行使用上面的代码尝试一下下面训练的这个几个模型效果如何:
链接:modelResNet50_0.pth
提取码:e375
链接:modelResNet50_4.pth
提取码:nwh0
链接:modelResNet50_9.pth
提取码:sthx
提示:由于训练的时间非常的长(CPU上差不多训练两天),读者也可以使用Google Colab上的GPU进行训练:
https://mydreamambitious.blog.csdn.net/article/details/125774545
3.完整迁移学习实例2
由于我们在pytorch中加载数据集的时候 ,比如下面:
trainDataset = datasets.CIFAR10(root='tempData/CIFAR10', train=True, transform=transform, download=False)
testDataset=datasets.CIFAR10(root='tempData/CIFAR10',train=False,transform=transform,download=False)
但是这里img,label=trainDataset[0],也就是说我们加载的训练数据集和测试数据集已将得到了对应的图片和标签, 可是如果我们要使用pytorch来训练我们自己处理的数据集,该怎么处理呢?比如下面这种数据集文件格式:

该数据集包含测试集,训练集和验证集,其中测试集,训练集和验证集文件夹下面分别对应的数据集包含:Mask(有口罩)和Non Mask(无口罩)两种类别的数据集。其实使用pytorch框架和使用tensorflow框架导入该数据集差不多一样:
使用Tensorflow训练检测口罩模型完整实例
下面我们使用pytorch框架训练检测口罩的模型,并使用训练的模型进行检测:
导入相关的包
"""
@Author : Keep_Trying_Go
@Major  : Computer Science and Technology
@Hobby  : Computer Vision
@Time   : 2023-01-07 20:50
"""

import os
import cv2
import torch
import numpy as np
from PIL import Image
import matplotlib.pyplot as plt
from torchvision.models import resnet50
from torchvision import datasets,transforms
from torch.utils.data import Dataset,DataLoader
from torchstat import stat,stat_tree,statistics
from torch.utils.tensorboard import SummaryWriter
(1)加载数据集
- 数据集下载
- 下载方式一:
- https://www.kaggle.com/datasets/prithwirajmitra/covid-face-mask-detection-dataset/download?datasetVersionNumber=1
- 下载方式二:
- 链接:https://pan.baidu.com/s/1oMj7_0nvqm3vCoIWas-ygA
- 提取码:a7xu
定义数据集路径
#训练集数据集路径
trainDataPath='myDataset/New Masks Dataset/Train'
#测试集数据集路径
testDataPath='myDataset/New Masks Dataset/Test'

#数据集对应的类别
classes=['Mask', 'Non Mask']
class_to_idx={'Mask': 0, 'Non Mask': 1}
对数据集进行变换
#对数据集进行变换
# 数据变换
transform = transforms.Compose([
    transforms.Resize(size=(232, 232), interpolation=transforms.InterpolationMode.BILINEAR),
    transforms.CenterCrop(size=(224, 224)),
    transforms.ToTensor(),
    transforms.Normalize(mean=[0.485, 0.456, 0.406], std=[0.229, 0.224, 0.225])
])
查看数据集相关属性
#载入训练和测试集数据集
trainDataset=datasets.ImageFolder(root=trainDataPath,transform=transform)
testDataset=datasets.ImageFolder(root=testDataPath,transform=transform)

#查看数据集的属性
print('trainSize: {}'.format(len(trainDataset)))
print('testSize: {}'.format(len(testDataset)))
print('train.class: {}'.format(trainDataset.classes))
print('class:index: {}'.format(trainDataset.class_to_idx))
#类别索引
class_to_idxs={y:x for x,y in trainDataset.class_to_idx.items()}
print(class_to_idxs)
 显示图片
显示图片
img,target=trainDataset[0]
print('trainDataset[0].shape: {}'.format(img.shape))
print('type(trainDataset[0]): {}'.format(type(img)))

#将tensor=>numpy
img=np.array(img)
#对于opencv读取的图像格式为[H,W,C],所以需要将img:[C,H,W]=>[H,W,C]
img=np.transpose(img,(1,2,0))
cv2.imshow('img',img)
cv2.waitKey(0)
cv2.destroyAllWindows()

加载数据集
#加载数据集
batch_size=4
trainDataLoader=DataLoader(
    dataset=trainDataset,
    batch_size=batch_size,
    shuffle=True,
    num_workers=0
)
testDataLoader=DataLoader(
    dataset=testDataset,
    batch_size=batch_size,
    shuffle=True,
    num_workers=0
)
(2)加载预训练模型
modelResNet50 = resnet50(pretrained=True, progress=True)
# 查看网络模型的结构
# print(modelResNet50)
# #查看模型的参数量
# print('modelParameters: {}'.format(stat(modelResNet50,(3,224,224))))
(3)模型修改
# 由于检测口罩数据集是2分类的,所以需要对网络输出进行修改(resnet50网络的输出为1000分类)
# 方式一:
fc_in_features = modelResNet50.fc.in_features
fc_out_features = modelResNet50.fc.out_features
# PyTorch中nn.ReLU(inplace=True)中inplace的作用:https://blog.csdn.net/AugustMe/article/details/92589979
modelResNet50.add_module(name='fc', module=torch.nn.Sequential(
    torch.nn.Linear(in_features=fc_in_features, out_features=fc_out_features, bias=True),
    torch.nn.ReLU(inplace=False),
    torch.nn.Dropout(p=0.5, inplace=False),
    torch.nn.Linear(in_features=fc_out_features, out_features=2, bias=True)
))
# 方式二:或者修改最后的全连接的输出特征个数为2
# fc_features=modelResNet50.fc.in_features
# modelResNet50.fc=torch.nn.Linear(fc_features,2)
# print(modelResNet50)
(4)模型冻结
# 提取模型的layer4,avgpool,fc,Classifer层的参数,其他层冻结
    #https://blog.csdn.net/Wind_2028/article/details/120541017
    for name,child in modelResNet50.named_children():
        if name in ['layer4','avgpool','fc']:
            for param in child.parameters():
                param.requires_grad=True
        else:
            for param in child.parameters():
                param.requires_grad=True
    # print(modelResNet50)

 #查看冻结的层
    for name,param in modelResNet50.named_parameters():
        if param.requires_grad==False:
            print(name)
(5)定义损失函数
 # #损失函数的定义
    lossCIFAR10=torch.nn.CrossEntropyLoss()
(6)定义优化器
# #定义优化器 https://blog.csdn.net/Wind_2028/article/details/120541017
    learing_rate=0.001
    optimizer=torch.optim.SGD([
        {'params':modelResNet50.layer4.parameters(),'lr':learing_rate},
        {'params':modelResNet50.avgpool.parameters(),'lr':learing_rate},
        {'params':modelResNet50.fc.parameters(),'lr':learing_rate}
    ],lr=learing_rate)
(7)模型保存和加载
- 模型的保存方式:
- 方式一:模型的结构+模型的参数
- torch.save(modelResNet50,'modelName.pth');
- 方式二:模型的参数
- torch.save(modelResNet50.state_dict(),'modelName.pth');
- 对应的模型加载方式:
- 对应模型保存方式一:
- model=torch.load('modeName.pth');
- 对应模型保存方式二:
- modelResNet50=torchvision.models.resnet50(pretrained=False);
modelResNet50.load_state_dict(torch.load('modeName.pth'));
(8)训练开始
# #迭代的次数
    epoches=10

    #使用tensorboard显示训练过程
    writer=SummaryWriter('logs')
    #将损失值和准确率保存起来,用于最后画出图形
    PlotTestLoss=[]
    PlotTestCorrect=[]
    PlotTrainLoss=[]
    PlotTrainCorrect=[]

    for i in range(epoches):
        # 训练的次数
        trainStep = 0
        #训练集上的准确率
        trainCorrect=0
        #训练集上的损失
        trainLoss=0
        traintotal=0
        print('-----------------------第{}轮的训练--------------------------'.format(i+1))
        #每一次迭代的训练
        modelResNet50.train()
        for traindata in trainDataLoader:
            imgs,targets=traindata
            # print(type(imgs)) =><class 'torch.Tensor'>
            #输入模型,进行训练
            output=modelResNet50(imgs)
            # print(output)
            # print(output.shape)
            # 计算损失值
            loss=lossCIFAR10(output,targets)
            #优化器清零
            optimizer.zero_grad()
            #反向传播
            loss.backward()
            #梯度更新
            optimizer.step()
            #步数加一
            trainStep=trainStep+1
            with torch.no_grad():
                #获取预测概率最大值索引(按行计算最大)
                output=torch.argmax(input=output,dim=1)
                # print(output)=>tensor([2, 9, 6, 0])
                # print(output[0].item())=>2
                #计算准确率
                trainCorrect+=(output==targets).sum().item()
                traintotal+=imgs.shape[0]
                #计算总的损失
                trainLoss+=loss.item()
                if trainStep%50==0:
                    print('-----------step: {}--------loss: {:.6f}---------correct: {:.6f}'.format(trainStep,trainLoss*1.0/traintotal,trainCorrect*1.0/traintotal))
        writer.add_scalar(tag='trainLoss',scalar_value=trainLoss*1.0/traintotal,global_step=i+1)
        writer.add_scalar(tag='correct',scalar_value=trainCorrect*1.0/traintotal,global_step=i+1)
        #在tensorboard中绘制预测最优一步训练的output[0]结果图
        writer.add_image(tag='train----{}.{:.4f}'.format(classes[output[0].item()],trainCorrect/traintotal),img_tensor=imgs[0],global_step=i+1)

        PlotTrainLoss.append(trainLoss * 1.0 / traintotal)
        PlotTrainCorrect.append(trainCorrect * 1.0 / traintotal)
        #在测试数据集上进行测试
        testTotal=0
        testCorrect=0
        testLoss=0
        #测试集上不需要梯度更新
        modelResNet50.eval()
        with torch.no_grad():
            for data in testDataLoader:
                imgs,targets=data
                # 输入模型,进行训练
                output = modelResNet50(imgs)
                # 计算损失值
                loss = lossCIFAR10(output, targets)
                # 获取预测概率最大值索引(按行计算最大)
                output = torch.argmax(input=output, dim=1)
                # 计算准确率
                testCorrect += (output == targets).sum().item()
                testTotal += imgs.shape[0]
                # 计算总的损失
                testLoss += loss.item()
            print('-----------test:--------loss: {:.6f}---------correct: {:.6f}'.format(testLoss * 1.0 / testTotal,
                                                         testCorrect * 1.0 / testTotal))
        writer.add_scalar(tag='testLoss', scalar_value=testLoss * 1.0 / testTotal, global_step=i + 1)
        writer.add_image(tag='test----{}.{:.6f}'.format(classes[output[0].item()], testCorrect / testTotal),
                         img_tensor=imgs[0], global_step=i + 1)

        PlotTestLoss.append(testLoss * 1.0 / testTotal)
        PlotTestCorrect.append(testCorrect * 1.0 / testTotal)
        #保运模型
        torch.save(modelResNet50,'model/modelResNet50_{}.pth'.format(i))

    #使用matplotlib绘制图形
    plt.plot(range(1,epoches+1),PlotTestLoss,label='trainLoss')
    plt.plot(range(1, epoches + 1), PlotTestLoss, label='testLoss')
    plt.legend()
    plt.show()

    plt.plot(range(1, epoches + 1), PlotTrainCorrect, label='trainAcc')
    plt.plot(range(1, epoches + 1), PlotTestCorrect, label='testAcc')
    plt.legend()
    plt.show()
    writer.close()


(9)预测图片和实时检测

"""
@Author : Keep_Trying_Go
@Major  : Computer Science and Technology
@Hobby  : Computer Vision
@Time   : 2023-01-08 10:18
"""

import os
import cv2
import time
import torch
import numpy as np
from PIL import Image
from torchvision import datasets
from torchvision import transforms
from torch.utils.data import DataLoader,Dataset


# 口罩数据集的类别名
classes=['Mask', 'Non Mask']
class_to_idx={'Mask': 0, 'Non Mask': 1}

# 数据变换
transform = transforms.Compose([
    transforms.Resize(size=(232, 232), interpolation=transforms.InterpolationMode.BILINEAR),
    transforms.CenterCrop(size=(224, 224)),
    transforms.ToTensor(),
    transforms.Normalize(mean=[0.485, 0.456, 0.406], std=[0.229, 0.224, 0.225])
])

def predictImage(img_path):
    """
    :param img_path: 图片的路径
    :return:
    """
    #读取图片
    img=Image.open(img_path)
    #图像处理
    img_Transform=transform(img)
    #对图像进行升维
    img_Transform=torch.unsqueeze(input=img_Transform,dim=0)
    #加载模型
    modelResNet50=torch.load('model/modelResNet50_0.pth')
    # print(modelResNet50)
    #预测图片
    predicts=modelResNet50(img_Transform)
    #获取类别概率值
    predicts=torch.nn.functional.softmax(predicts,dim=1)[0]
    class_id=predicts.argmax()
    print('predicts: {}'.format(predicts))
    print('class_id: {}'.format(class_id))
    print('预测概率: {:.4f}'.format(predicts[class_id].item()))
    print('预测类别: {}'.format(classes[class_id]))

def timeDetect():
    """
    :return:
    """
    # 加载模型
    modelResNet50 = torch.load('model/modelResNet50_0.pth')

    img1=cv2.imread('myDataset/real_00018.jpg')
    print('img1.shape: {}'.format(img1.shape))
    print('img1.type: {}'.format(type(img1)))
    img2=Image.open('myDataset/real_00018.jpg')
    print('img2.shape: {}'.format(np.shape(img2)))
    print('img3.type: {}'.format(type(img2)))

    #计算开始时间
    start_time=time.time()
    #计算帧率
    countFPS=0
    #开启摄像头
    cap = cv2.VideoCapture(0)
    while cap.isOpened():
        ret, frame = cap.read()
        frame = cv2.resize(src=frame, dsize=(520, 520))
        frame = cv2.flip(src=frame, flipCode=2)
        frame_PIL=Image.fromarray(frame)
        img_transform=transform(frame_PIL)
        # 对图像进行升维
        img_Transform = torch.unsqueeze(input=img_transform, dim=0)
        # 预测图片
        predicts = modelResNet50(img_Transform)
        # 获取类别概率值
        predicts = torch.nn.functional.softmax(predicts, dim=1)[0]
        class_id = predicts.argmax()
        end_time=time.time()
        countFPS+=1
        FPS=round(countFPS/(end_time-start_time),0)
        text = classes[class_id] + ': ' + str('{:.4f}'.format(predicts[class_id].item()))
        cv2.putText(img=frame, text='FPS: '+str(FPS), org=(10, 50),
                    fontFace=cv2.FONT_HERSHEY_SIMPLEX,
                    fontScale=1.0, color=(0, 255, 0), thickness=2)
        cv2.putText(img=frame, text=text, org=(10, 80),
                    fontFace=cv2.FONT_HERSHEY_SIMPLEX,
                    fontScale=1.0, color=(0, 255, 0), thickness=2)
        cv2.imshow('img', frame)
        key = cv2.waitKey(1)
        if key == 27:
            break
    cap.release()
    cv2.destroyAllWindows()


if __name__ == '__main__':
    predictImage(img_path='myDataset/real_00018.jpg')
    # timeDetect()


(10)打开tensorboard查看训练的过程


(11)训练好的模型下载
提示:以下三个模型是训练好的口罩检测的模型,读者可以自行下载模型,并使用上面给出的预测代码进行测试:
链接:modelResNet50_0.pth
提取码:uyu9
链接:modelResNet50_4.pth
提取码:8cnz
链接:modelResNet50_9.pth
提取码:p6wp
本文内容由网友自发贡献,版权归原作者所有,本站不承担相应法律责任。如您发现有涉嫌抄袭侵权的内容,请联系:hwhale#tublm.com(使用前将#替换为@)