零散小知识
先参考这个博客。
再参考这个博客总结的知识点
rostopic list
- //让ros一直调用回调函数,ros::spin如下的代码无效函数
ros::spin();
- //让ros调用回调函数的同时还能够继续执行如下的代码
ros::spinOnce();
一. launch文件的书写
1.1 将自己写的节点node写成luanch文件
<launch>
   <nodepkg="turtlesim"name="sim1" type="turtlesim_node"/>
   <nodepkg="turtlesim"name="sim2" type="turtlesim_node"/>
</launch>
将一个节点函数书写成一个可以用launch文件启动的节点,只需要关注三个参数,分别是
- pkg
- name
- type
pkg为节点启动的功能包名称(package名称)
name是用来定义节点运行的名称,它会覆盖节点init()赋予节点的名称
type为节点的可执行文件的名称,执行文件如果是python就填写 xx.py,若是xx.cpp就填写编译生成的可执行文件
<node pkg="package-name"type=“executable-name” name=“node-name” />
在上面的三个参数中,name是可以随便命名的,也就是说,这个name是launch文集爱你运行节点时,给这个函数起的别名。
还有一些其他属性
·  output = "screen":将节点的标准输出打印到终端屏幕,默认输出为日志文档;
·  respawn = "true":复位属性,该节点停止时,会自动重启,默认为false;
·  required = "true":必要节点,当该节点终止时,launch文件中的其他节点也被终止;
·  ns = "namespace":命名空间,为节点内的相对名称添加命名空间前缀;
·  args = "arguments":节点需要的输入参数。
1.2 将其他luanch文件写到一个新的launch文件
<include file="$(find demo)/launch/demo.launch" ns="demo_namespace"/>
这个很好解释,find后面的demo是工作空间下功能包的名称,因为我们的launch文件是放在功能包下面的。demo.launch是launch文件夹下面你要启动的文件夹的名字。ns可以不写
二. image_transport
image_transport应该总被用在image订阅和发布上。它为低带宽压缩格式(compressed formats)image传输提供透明支持。例如:为JPEG/PNG压缩和视频流提供单独插件,为此类image提供传输(订阅和发布)。
当我们基于Image工作时,我们常希望指定传输策略。例如使用压缩Image或视频流编码。 image_transport提供class和node提供支持位随意格式的各类传输。抽离了格式等复杂信息,所以用户只看到sensor_msgs/Image这个message.
指定格式的传输由插件提供,image_transport自身只提供“raw”传输。其它的格式支持依赖于其它子package. image_transport_plugins.
image_transport可以使用C++或Python接口
在自己写代码或者看别人代码的时候,只需要关注一个关键词 it就可以了。
先看一下ROS中标准的消息订阅和发布方式
#include <ros/ros.h>
void imageCallback(const sensor_msgs::ImageConstPtr& msg)
{
}
ros::NodeHandle nh;
ros::Subscriber sub = nh.subscribe("in_image_topic", 1, imageCallback);
ros::Publisher pub = nh.advertise<sensor_msgs::Image>("out_image_topic", 1);
使用image_transport的方式
主要看一下:image_transport::ImageTransport it(nh);
#include <ros/ros.h>
#include <image_transport/image_transport.h>
void imageCallback(const sensor_msgs::ImageConstPtr& msg)
{
}
ros::NodeHandle nh;
image_transport::ImageTransport it(nh);
image_transport::Subscriber sub = it.subscribe("in_image_base_topic", 1, imageCallback);
image_transport::Publisher pub = it.advertise("out_image_base_topic", 1);
三. ROS中的回调函数
提到回调函数,就必须先提到订阅函数。
打个比方,订阅函数就是一个人在定报纸。话题名就是报纸的名字,而回调函数就是这个定报纸的人。回调函数负责实现该程序的主要功能,相当于这个人是负责看报纸的。
一般来说这个回调函数会用一些比较显著且比较统一的名字:**Callback(如ScanCallback或者CameraCallback),它是在订阅话题的时候使用的。当然了,你可以用任何你所喜欢的名字来命名。
所以在使用时,我们需要声明订阅话题的名称,然后选择话题,最后调用Callback函数。废话不多说,举个例子(突然想吃举个栗子了啊-------):
ros::Subscriber sub_raw_image = n.subscribe('topic_name', 2000, Callbackfunctionname);
上面的topic_name是你一经发布的话题的名字,挂于查看话题名可以用rostopic list直接在终端查看。
后面的200是当前话题所保留的队列信息的长度。如果当前信息队列中超过2000的话,ROS会删除旧的,保留最新的2000个。
一般来讲,我设置为1
后面的Callbackfunctionname就是回调函数的名字。
这个订阅函数的目的就是订阅那个话题里面的内容。一般来将可以和是图像,等各种数据。
一般来说,程序的主要功能也都是在回调函数中实现的。你需要的数据,都是要通过话题订阅的,而订阅了就肯定有回调函数。你可以把一个个回调函数看成是一个个单独的线程。只要你订阅的消息一更新,回调函数就会被调用,对新的数据进行处理,程序就这么不断的进行下去了。
下面在具体举例子
#include <ros/ros.h>
#include <topic_demo/gps.h>
#include <std_msgs/Float32.h>
void gpsCallback(const topic_demo::gps::ConstPtr &msg)
{
std_msgs::Float32 distance;
distance.data = sqrt(pow(msg->x,2)+pow(msg->y,2));
ROS_INFO("Listener: Distance to origin = %f, state: %s",distance.data,msg->state.c_str());
}
int main(int argc, char **argv)
{
ros::init(argc, argv, "listener");
ros::NodeHandle n;
ros::Subscriber sub = n.subscribe("gps_info", 1, gpsCallback);
ros::spin();
return 0;
}
在topic接收方, 有一个比较重要的概念, 就是回调(CallBack), 在本例中, 回调就是预先给 gps_info 话题传来的消息准备一个回调函数, 你事先定义好回调函数的操作, 本例中是计算到原点的距离。 只有当有消息来时, 回调函数才会被触发执行。 具体去触发的命令就是 ros::spin() , 它会反复的查看有没有消息来, 如果有就会让回调函数去处理。
因此千万不要认为, 只要指定了回调函数, 系统就回去自动触发, 你必须 ros::spin() 或者 ros::spinOnce() 才能真正使回调函数生效。
回调函数作为参数被传入到了另一个函数中( 在本例中传递的是函数指针) , 在未来某个时刻( 当有新的message到达) , 就会立即执行。 Subscriber接收到消息, 实际上是先把消息放到一个队列中去, 如下图所示。 队列的长度在Subscriber构建的时候设置好了。 当有spin函数执行, 就会去处理消息队列中队首的消息。
 消息订阅器一旦知道话题里面有消息到达,就会将这消息作为参数传入callback函数中,但是此时还没有执行callback函数,而是把callback函数放到了回调函数队列中。所以当发布器不断发送消息到话题上面时,就会有相应的callback函数进入队列中,它们函数名一样,只是实参不一样。
那么什么时候才会执行callback函数呢?就是ros::spin()和ros::spinOnce()的事了。
当spinOnce函数被调用时,spinOnce就会调用回调函数队列中第一个callback函数,此时callback函数才被执行,然后等到下次spinOnce函数又被调用时,回调函数队列中第二个callback函数就会被调用,以此类推。
所以,这会有一个问题。因为回调函数队列的长度是有限的,如果发布器发送数据的速度太快,spinOnce函数调用的频率太少,就会导致队列溢出,一些callback函数就会被挤掉,导致没被执行到。
而对于spin函数,一旦进入spin函数,它就不会返回了,相当于它在自己的函数里面死循环了。只要回调函数队列里面有callback函数在,它就会马上去执行callback函数。如果没有的话,它就会阻塞,不会占用CPU。
四. void函数没有返回值return,如何调用
刚接触ROS或者C++时,不免会先看别人的代码。然后看到不管是void函数,还是一个类class下面的void函数,都是没有return的。但是大佬们还能很快的调用这些函数。
void 中文翻译为"无类型",有的也叫"空类型"。常用在程序中对定义函数的参数类型、返回值、函数中指针类型进行声明。
这是大家不免会问,这个函数没有返回值,我该怎么调用它计算出来的数值呢?
4.1 void函数的定义
不带返回值的return语句只能用于返回类型为void的函数。在返回类型为void的函数中,return返回语句不是必需的,隐式的return发生在函数的最后一个语句完成时。
一般情况下,返回类型是void的函数使用return语句是为了引起函数的强制结束,这种return的用法类似于循环结构中的break语句的作用。
其实大家关注void函数没有return,主要是想知道如何使用这个函数的返回值和在调用这个函数的时候,是如何获取这个函数的值的/
看例子
示例一:交换两个整型变量数值的函数
#include <iostream>
using namespace std;
void swap(int& a, int&b)
{
if(a == b)
{
return;
}
int temp;
temp = a;
a = b;
b = temp;
}
int main()
{
int a=3, b=4;
cout<<"交换前a=3, b=4"<<endl;
swap(a,b);
cout<<"交换后a="<<a<<", b="<<b<<endl;
system("pause");
return 0;
}
=>交换前a=3, b=4
交换后a=4, b=3
这个函数首先检查两个值是否相等,如果相等则退出函数;
如果不相等,则交换这两个值,隐式的return发生在最后一个赋值语句后。
个人分析:
void 不返回值并不代表函数没用。它可以输出信息,读写文件等干很多别的事情。在 C 语言中,也可以给函数传递指针参数,让函数修改相应的内存空间数据,这样函数返回后,传入指针所指向的数据已经改变了,变相达到返回结果的目的(这在 C 中很常见)。
示例二:void 的函数,可以返回另一个返回类型同样是void的函数的调用结果
#include <iostream>
using namespace std;
void do_swap(int &a, int &b)
{
int temp = a;
a = b;
b = temp;
}
void swap(int& a, int&b)
{
if(a == b)
{
return;
}
return do_swap(a, b);
}
int main()
{
int a=3, b=4;
cout<<"交换前a=3, b=4"<<endl;
swap(a,b);
cout<<"交换后a="<<a<<", b="<<b<<endl;
system("pause");
return 0;
}
=>交换前a=3, b=4
交换后a=4, b=3
返回任何其他表达式的尝试都会导致编译时的错误。
下面在来看一个复杂的例子,这个例子有面有个类,这个类里面的每个方法都是
对应的cpp文件,下面还有对应的h文件
#include "probot_grasping/vision_manager.h"
VisionManager::VisionManager(float length, float breadth)
{
this->table_length = length;
this->table_breadth = breadth;
}
void VisionManager::get2DLocation(cv::Mat img, float &x, float &y)
{
	this->curr_img = img;
	img_centre_x_ = img.rows / 2;
	img_centre_y_ = img.cols / 2;

	cv::Rect tablePos;

	detectTable(tablePos);

	detect2DObject(x, y, tablePos);
	convertToMM(x, y);
}
void VisionManager::detectTable(cv::Rect &tablePos)
{
cv::Mat BGR[3];
cv::Mat image = curr_img.clone();
split(image, BGR);
cv::Mat gray_image_red = BGR[2];
cv::Mat gray_image_green = BGR[1];
cv::Mat denoiseImage;
cv::medianBlur(gray_image_red, denoiseImage, 3);
cv::Mat binaryImage = denoiseImage;
for (int i = 0; i < binaryImage.rows; i++)
{
for (int j = 0; j < binaryImage.cols; j++)
{
int editValue = binaryImage.at<uchar>(i, j);
int editValue2 = gray_image_green.at<uchar>(i, j);
if ((editValue >= 0) && (editValue < 20) && (editValue2 >= 0) && (editValue2 < 20))
{
binaryImage.at<uchar>(i, j) = 255;
}
else
{
binaryImage.at<uchar>(i, j) = 0;
}
}
}
dilate(binaryImage, binaryImage, cv::Mat());
std::vector<cv::Point> nonZeroPoints;
cv::findNonZero(binaryImage, nonZeroPoints);
cv::Rect bbox = cv::boundingRect(nonZeroPoints);
cv::Point pt;
pt.x = bbox.x + bbox.width / 2;
pt.y = bbox.y + bbox.height / 2;
cv::circle(image, pt, 2, cv::Scalar(0, 0, 255), -1, 8);
pixels_permm_y = bbox.height / table_length;
pixels_permm_x = bbox.width / table_breadth;
tablePos = bbox;
std::cout << "Pixels in y" << pixels_permm_y << std::endl;
std::cout << "Pixels in x" << pixels_permm_x << std::endl;
std::vector<std::vector<cv::Point>> contours;
std::vector<cv::Vec4i> hierarchy;
cv::findContours(binaryImage, contours, hierarchy, CV_RETR_TREE, CV_CHAIN_APPROX_SIMPLE, cv::Point(0, 0));
for (int i = 0; i < contours.size(); i++)
{
cv::Scalar color = cv::Scalar(255, 0, 0);
cv::drawContours(image, contours, i, color, 1, 8, hierarchy, 0, cv::Point());
}
}
void VisionManager::detect2DObject(float &pixel_x, float &pixel_y, cv::Rect &tablePos)
{
cv::Mat image, gray_image_green;
cv::Mat BGR[3];
image = curr_img.clone();
cv::split(image, BGR);
gray_image_green = BGR[1];
cv::Mat denoiseImage;
cv::medianBlur(gray_image_green, denoiseImage, 3);
cv::Mat binaryImage = denoiseImage;
for (int i = 0; i < binaryImage.rows; i++)
{
for (int j = 0; j < binaryImage.cols; j++)
{
if((j<tablePos.x+3) || j>(tablePos.x+tablePos.width-3) || (i<tablePos.y+3) || i>(tablePos.y + tablePos.height-3))
{
binaryImage.at<uchar>(i, j) = 0;
}
else
{
int editValue = binaryImage.at<uchar>(i, j);
if ((editValue > 100) && (editValue <= 255))
{
binaryImage.at<uchar>(i, j) = 255;
}
else
{
binaryImage.at<uchar>(i, j) = 0;
}
}
}
}
dilate(binaryImage, binaryImage, cv::Mat());
std::vector<cv::Point> nonZeroPoints;
cv::findNonZero(binaryImage, nonZeroPoints);
cv::Rect bbox = cv::boundingRect(nonZeroPoints);
cv::Point pt;
pixel_x = bbox.x + bbox.width / 2;
pixel_y = bbox.y + bbox.height / 2;
std::cout << "pixel_x" << pixel_x << std::endl;
std::cout << "pixel_y" << pixel_y << std::endl;
pt.x = bbox.x + bbox.width / 2;
pt.y = bbox.y + bbox.height / 2;
cv::circle(image, pt, 2, cv::Scalar(0, 0, 255), -1, 8);
std::vector<std::vector<cv::Point>> contours;
std::vector<cv::Vec4i> hierarchy;
cv::findContours(binaryImage, contours, hierarchy, CV_RETR_TREE, CV_CHAIN_APPROX_SIMPLE, cv::Point(0, 0));
for (int i = 0; i < contours.size(); i++)
{
cv::Scalar color = cv::Scalar(255, 0, 0);
cv::drawContours(image, contours, i, color, 1, 8, hierarchy, 0, cv::Point());
}
}
void VisionManager::convertToMM(float &x, float &y)
{
x = (x - img_centre_x_) / pixels_permm_x;
y = (y - img_centre_y_) / pixels_permm_y;
}
自己分析一下给自己看
首先,这个函数调用了所有函数
void VisionManager::get2DLocation(cv::Mat img, float &x, float &y)
{
this->curr_img = img;
img_centre_x_ = img.rows / 2;
img_centre_y_ = img.cols / 2;
cv::Rect tablePos;
detectTable(tablePos);
detect2DObject(x, y, tablePos);
convertToMM(x, y);
}
void 一般来讲,void函数没有return的其中嗯一种情况是他们之间存在相互调用
下面再逐个分析这个例子中的其他函数
首先,detectTable(tablePos);的输入参数是tablePos。
void VisionManager::detectTable(cv::Rect &tablePos)
这个函数会计算一个关键的变量
tablePos = bbox;
这个函数的主要目的是检测视野中的桌面,下面的算法将在桌面的范围内检测其他的目标。
并且,该算法将使用该函数检测的在桌面长度与实际的长度作比例,计算出void detect2DObject函数检测到的目标的中心点在世界坐标系中的坐标。
然后另一个函数
void VisionManager::detect2DObject(float &pixel_x, float &pixel_y, cv::Rect &tablePos)
这个函数调用了detectTable中的tablePos
convertToMM函数也调用了 detectTable中计算的比例转换关系pixels_permm_x和pixels_permm_y
void VisionManager::convertToMM(float &x, float &y)
最后就是get2DLocation这个函数了
#ifndef PROBOT_VISION_MANAGER
#define PROBOT_VISION_MANAGER
#include <stdio.h>
#include <stdlib.h>
#include <iostream>
#include <opencv2/opencv.hpp>
#include "opencv2/highgui/highgui.hpp"
class VisionManager
{
public:
VisionManager(float length, float breadth);
void get2DLocation(cv::Mat img, float &x, float &y);
private:
void detect2DObject(float &pixel_x, float &pixel_y, cv::Rect &tablePos);
void convertToMM(float &pixel_mm_x, float &pixel_mm_y);
void detectTable(cv::Rect &tablePos);
float pixels_permm_x;
float pixels_permm_y;
float curr_pixel_centre_x;
float curr_pixel_centre_y;
float table_length;
float table_breadth;
float img_centre_x_;
float img_centre_y_;
cv::Mat curr_img;
};
#endif
这边是重点
为什么上面的cpp文件中的几个函数可以任意调用每个函数中的那几个变量和函数?:
这是因为写这个类函数的时候,把这些函数和变量添加到private中,这样就可以随时传递这些变量,不需要return。
也就是说,类的每一个函数,都可以自由的访问类的每一个成员
具体原因可以参考T大的郑莉教授的课程。
五. ROS发布Float32MultiArray消息C++/Python
在ros下发布一个字符串消息或整数消息,有时就需要一次发送不止一个数据,这时候就得用到数组了
5.1. 首先查看有哪些消息
sun@sun-pc:~$ rosmsg show std_msgs/
std_msgs/Bool                 std_msgs/Int64
std_msgs/Byte                 std_msgs/Int64MultiArray
std_msgs/ByteMultiArray       std_msgs/Int8
std_msgs/Char                 std_msgs/Int8MultiArray
std_msgs/ColorRGBA            std_msgs/MultiArrayDimension
std_msgs/Duration             std_msgs/MultiArrayLayout
std_msgs/Empty                std_msgs/String
std_msgs/Float32              std_msgs/Time
std_msgs/Float32MultiArray    std_msgs/UInt16
std_msgs/Float64              std_msgs/UInt16MultiArray
std_msgs/Float64MultiArray    std_msgs/UInt32
std_msgs/Header               std_msgs/UInt32MultiArray
std_msgs/Int16                std_msgs/UInt64
std_msgs/Int16MultiArray      std_msgs/UInt64MultiArray
std_msgs/Int32                std_msgs/UInt8
std_msgs/Int32MultiArray      std_msgs/UInt8MultiArray
5.2. 查看数组描述,以Float32MultiArray为例
sun@sun-pc:~$ rosmsg show std_msgs/Float32MultiArray
std_msgs/MultiArrayLayout layout
  std_msgs/MultiArrayDimension[] dim
    string label
    uint32 size
    uint32 stride
  uint32 data_offset
float32[] data
5.3.C++实现publish 这里只需要数据data数据
#include "ros/ros.h"
#include "std_msgs/Float32MultiArray.h"
int main(int argc, char **argv)
{
ros::init(argc, argv, "Array_pub");
ros::NodeHandle nh;
ros::Publisher chatter_pub = nh.advertise<std_msgs::Float32MultiArray>("chatter", 1000);
ros::Rate loop_rate(10);
while (ros::ok())
{
std_msgs::Float32MultiArray msg;
msg.data.push_back(1.0);
msg.data.push_back(2.0);
msg.data.push_back(3.0);
msg.data.push_back(4.0);
chatter_pub.publish(msg);
ros::spinOnce();
loop_rate.sleep();
}
return 0;
}
#include "ros/ros.h"
#include "std_msgs/Float32MultiArray.h"
void chatterCallback(const std_msgs::Float32MultiArray::ConstPtr& msg)
{
ROS_INFO("I heard: [%f],[%f],[%f],[%f]", msg->data.at(0),msg->data.at(1),msg->data.at(2),msg->data.at(3));
}
int main(int argc, char **argv)
{
ros::init(argc, argv, "Array_sub");
ros::NodeHandle nh;
ros::Subscriber sub = nh.subscribe("chatter", 1000, chatterCallback);
ros::spin();
return 0;
}
六. ros::NodeHandle的用法
ros::NodeHandle是自动启动和停止的
ros::NodeHandle管理着一个内部引用数,使得开启和结束一个节点(node)可以简单地按照下面一行代码完成:
ros::NodeHandle nh;
6.1 命名空间(Nnamespaces)
NodeHandles可以指定一个命名空间给它的构造函数:
ros::NodeHandle nh("my_namespace");
这行代码将创建一个相对于NodeHandle的域名,<node_namespace>/my_namespace,而不是直接地表示为<node_namespace>。
你也可以指定一个父节点的NodeHandle和命名空间,后面可以跟子节点的NodeHandle和命名空间:
ros::NodeHandle nh1("ns1");
ros::NodeHandle nh2(nh1, "ns2");
这将会把nh2放在<node_namespace>/ns1/ns2的命名空间下。
全局域名(Global Names)
如果确实需要,你可以指定一个全局域名:
ros::NodeHandle nh("/my_global_namespace");
这样的方式通常不是很推荐,因为它会阻止节点被放进命名空间(如使用roslaunch)。但是,有时候,在代码中使用全局命名空间也会很有用。
私有域名(Private Names)
使用私有域名比起直接调用一个带有私有域名("~name")的NodeHandle函数要麻烦一点。相反,你必须创建一个新的位于私有命名空间的NodeHandle:
ros::NodeHandle nh("~my_private_namespace");
ros::Subscriber sub = nh.subscribe("my_private_topic", ...);
上面这个例子将会订阅话题<node_name>/my_private_namespace/my_private_topic。
6.2 ros::NodeHandle nh(“~“)
句柄NodeHandle nh("~")和句柄NodeHandle nh()是有区别的。
1、句柄NodeHandle nh("~")
    ros::init (argc, argv, "ply_load");
    ros::NodeHandle nh("~");
    ros::console::set_logger_level(ROSCONSOLE_DEFAULT_NAME, ros::console::levels::Info);
    readParameters(nh);
    ros::Publisher pcl_pub = nh.advertise<sensor_msgs::PointCloud2> ("pcl_output", 1);
使用该句柄,则发布话题节点为/ply_load/pcl_output。
话题形式为:节点名字+话题名字。
2、句柄NodeHandle nh
    ros::init (argc, argv, "ply_load");
    ros::NodeHandle nh;
    ros::console::set_logger_level(ROSCONSOLE_DEFAULT_NAME, ros::console::levels::Info);
    readParameters(nh);
    ros::Publisher pcl_pub = nh.advertise<sensor_msgs::PointCloud2> ("pcl_output", 1);
使用该句柄,则发布话题节点为/pcl_output。
话题形式为:话题名字。
6.3 NodeHandle 命名空间 参数读取
全局命名空间,就是默认路径为全局的命名空间,和绝对路径的概念相仿。定义时需要注意下面的几点。
1.node不带任何命名空间
ros::NodeHandle node;

2.此时参数路径均为"imu_mti/imu_mti_sequence"
node.param<int>("imu_mti/imu_mti_sequence", sequence, 100);
ros::param::param<int>("imu_mti/imu_mti_sequence", sequence, 100);

3.此时订阅的topic为"imu"
sub =new message_filters::Subscriber<sensor_msgs::Imu>(node, “imu”, 100);
局部命名空间,就是默认路径为局部的命名空间,和相对路径的概念相仿。定义时需要注意下面的几点。
1.node带有命名空间
ros::NodeHandle node("/myname");

2.此时参数路径为"/myname"+"imu_mti/imu_mti_sequence"-> "/myname/imu_mti/imu_mti_sequence"
node.param<int>("imu_mti/imu_mti_sequence", sequence, 100);

3.此时参数路径为"imu_mti/imu_mti_sequence",不受node影响
ros::param::param<int>("imu_mti/imu_mti_sequence", sequence, 100);

3.此时订阅的topic为"/myname"+"imu"->"/myname/imu"
sub =new message_filters::Subscriber<sensor_msgs::Imu>(node, “imu”, 100);
特别地,下面的 ~ 表示当前节点的命名空间
1.node带有命名空间"~"= 当前节点的命名空间,以节点命名,类似于"linux下面的~"
ros::NodeHandle node("~");

2.此时参数路径为"~"+"imu_mti/imu_mti_sequence"-> "~/imu_mti/imu_mti_sequence"
node.param<int>("imu_mti/imu_mti_sequence", sequence, 100);

3.此时参数路径为"imu_mti/imu_mti_sequence",不受node影响
ros::param::param<int>("imu_mti/imu_mti_sequence", sequence, 100);

4.此时参数路径为"~imu_mti/imu_mti_sequence",不受node影响
ros::param::param<int>("~imu_mti/imu_mti_sequence", sequence, 100);

5.此时订阅的topic为"~"+"imu"->"~/imu"
sub =new message_filters::Subscriber<sensor_msgs::Imu>(node, “imu”, 100);
测试
可以使用下面的代码获取当前node所使用的的命名空间,
	ros::NodeHandle node;
	ROS_INFO("%s",node.getNamespace().c_str());
不同情况下输出为
ros::NodeHandle node;
ROS_INFO("%s",node.getNamespace().c_str());
ros::NodeHandle node1("~");
ROS_INFO("%s",node1.getNamespace().c_str());
ros::NodeHandle node2("/myname");
ROS_INFO("%s",node2.getNamespace().c_str());
对应输出为
[ INFO] [1595406961.125790392]: /
[ INFO] [1595406961.125846145]: /nlink_sub
[ INFO] [1595406961.125868992]: /myname
参数读取
首先明确,ROS下的参数服务器的参数都是有具体的路径,如果路径不对,是不能准确找到参数的,例如下面,在使用时,一定要确保参数目录一致,才能正确读取参数。
 * /sbg_ellipseN/aidingAssignment/gnss1ModulePortAssignment: 5
 * /sbg_ellipseN/aidingAssignment/gnss1ModuleSyncAssignment: 5
 * /sbg_ellipseN/aidingAssignment/odometerPinAssignment: 0
 * /sbg_ellipseN/aidingAssignment/rtcmPortAssignment: 255
 * /sbg_ellipseN/confWithRos: True
 * /sbg_ellipseN/gnss/gnss_model_id: 101
 * /sbg_ellipseN/gnss/hdtRejectMode: 1
 * /sbg_ellipseN/gnss/posRejectMode: 1
通常使用的参数获取方法有,这里列举两个可以设置默认值的,使用比较安全。
ros::param::param
这种获取参数的方式与当前的node无关,可以自己设定具体的路jin。
template<typename T>
bool param(const std::string& param_name, T& param_val, const T& default_val)
{
if (has(param_name))
{
if (get(param_name, param_val))
{
return true;
}
}
param_val = default_val;
return false;
}
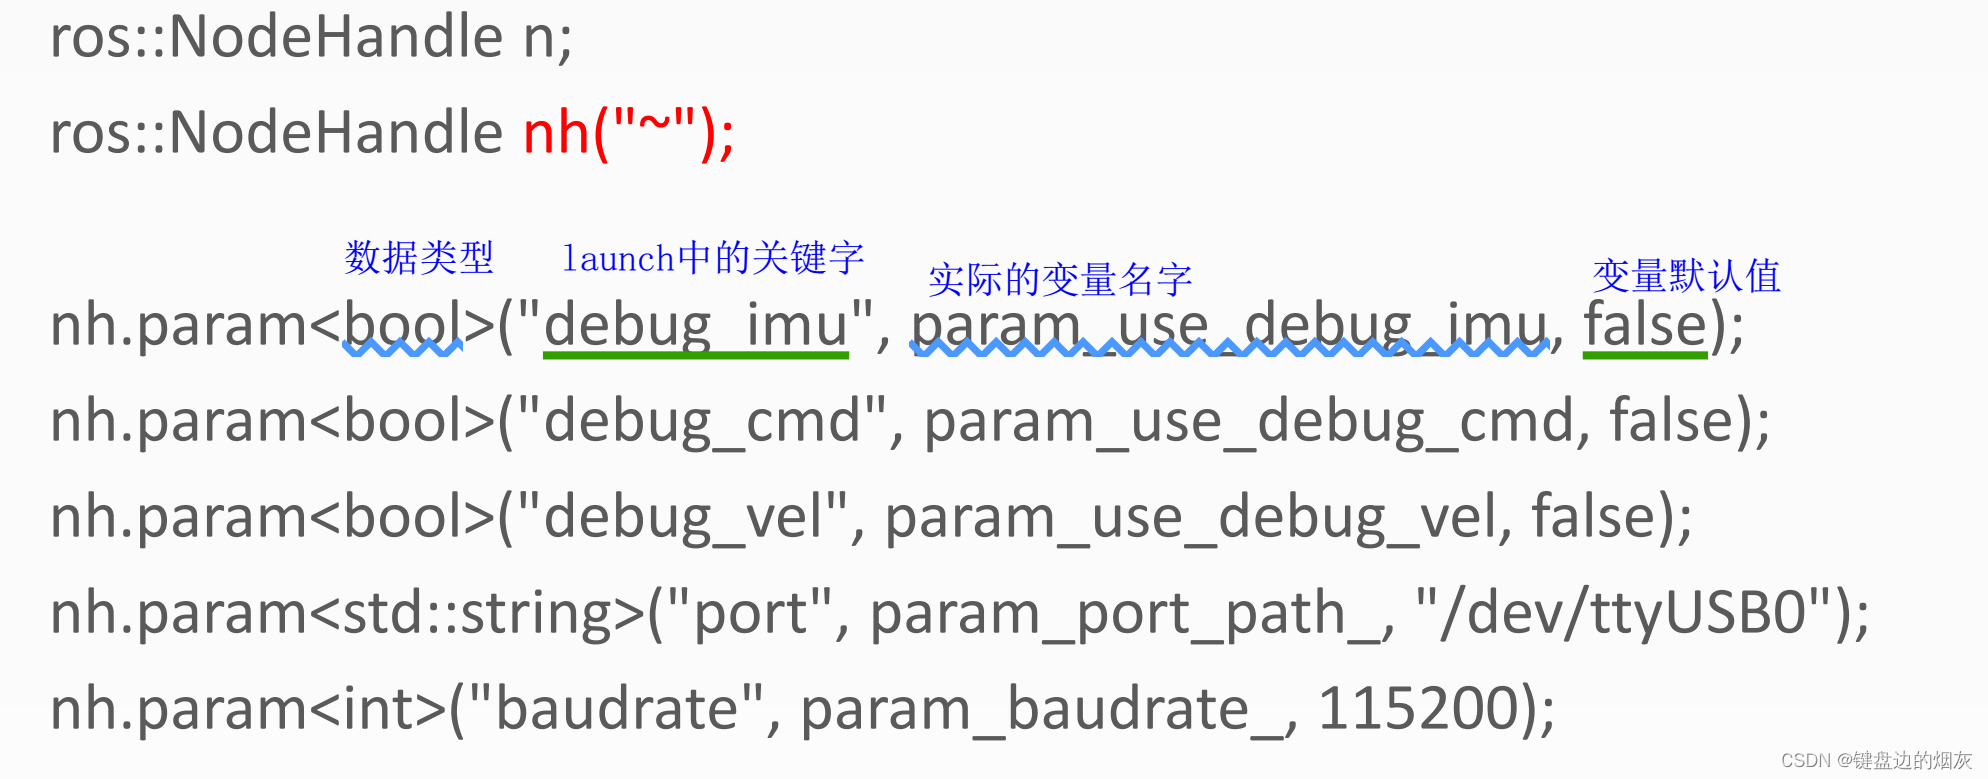
具体使用时,这里的“~”表示当前节点默认命名空间,在参数服务器上获取参数时实际的目录里为node_name/port/mti_port。
三个参数,第一个表示参数路jin,第二个表示赋值变量,第三个表示默认参数值。
ros::param::param<std::string>("~port/mti_port", port_name_.mti_port, "mti");
nh_.param
这种获取参数与当前的node有关,具体的路jin需要加上node已有的路jin形成最终的路jin。
template<typename T>
bool param(const std::string& param_name, T& param_val, const T& default_val) const
{
if (hasParam(param_name))
{
if (getParam(param_name, param_val))
{
return true;
}
}
param_val = default_val;
return false;
}
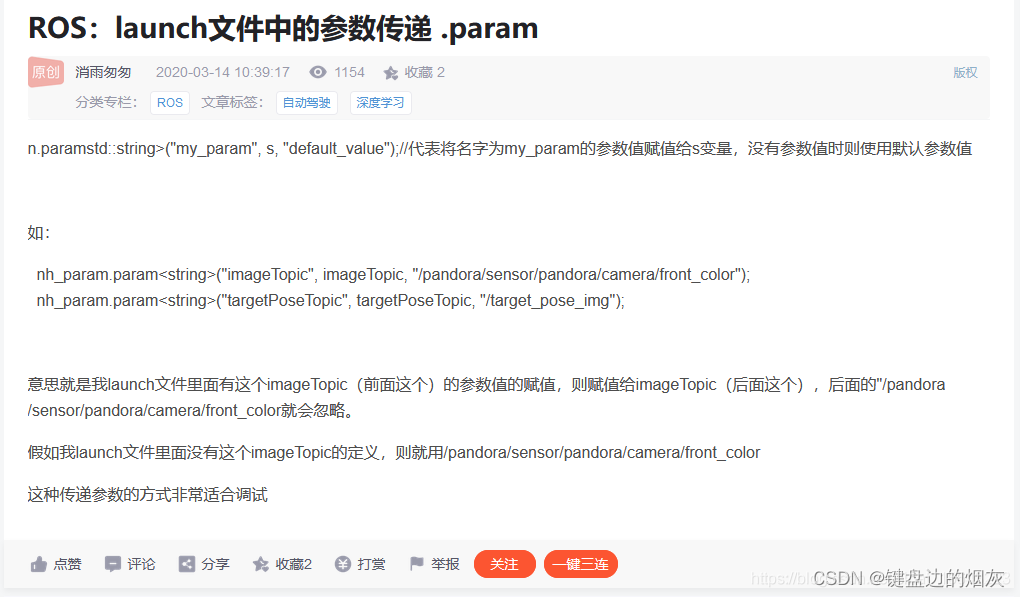
具体使用如下,这里的路jin实际为定义nh_时的命名空间加上port/MdVn_port,是一个相对的路径。
三个参数,第一个表示参数路径,第二个表示赋值变量,第三个表示默认参数值。
nh_.param<std::string>("port/MdVn_port", port_name_.MdVn_port, "MdVn");
如果定义下面的形式,
ros::NodeHandle nh_("myname");
那么参数目录为
"myname"+"port/MdVn_port" -> "myname/port/MdVn_port"
如果定义了nh_的命名空间,后面的sub以及pub都会受到影响,或者说与nh_有关的都会受到影响,例如
sub =new message_filters::Subscriber<sensor_msgs::Imu>(nh_, “imu”, 100);
6.4 小结
使用参数、订阅Topic时一定要注意命名空间
一般使用形式如下
1.node不带任何命名空间
ros::NodeHandle node;

2.将参数路jin设置为默认命名空间"~imu_mti_sequence",使用ros::param::param,这个时候与node无关
ros::param::param<int>("~imu_mti_sequence", sequence, 100);

3.由于node不带任何命名空间,因此可以将订阅的topic设置为绝对路jin为"/imu"
sub =new message_filters::Subscriber<sensor_msgs::Imu>(node, “imu”, 100);
ROS中有如下3种获取参数的方式。
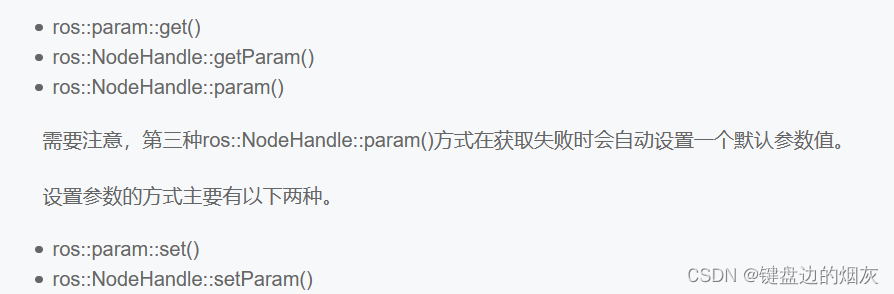
ROS param与launch
param_demo.cpp
#include<ros/ros.h>
int main(int argc, char **argv){
ros::init(argc, argv, "param_demo");
ros::NodeHandle nh;
int parameter1, parameter2, parameter3, parameter4, parameter5;
bool ifget1 = ros::param::get("param1", parameter1);
bool ifget2 = nh.getParam("param2",parameter2);
nh.param("param3", parameter3, 33333);
if(ifget1)
ROS_INFO("Get param1 = %d", parameter1);
else
ROS_WARN("Didn't retrieve param1");
if(ifget2)
ROS_INFO("Get param2 = %d", parameter2);
else
ROS_WARN("Didn't retrieve param2");
if(nh.hasParam("param3"))
ROS_INFO("Get param3 = %d", parameter3);
else
ROS_WARN("Didn't retrieve param3");
parameter4 = 4;
ros::param::set("param4", parameter4);
parameter5 = 5;
nh.setParam("param5",parameter5);
ROS_INFO("Param4 is set to be %d", parameter4);
ROS_INFO("Param5 is set to be %d", parameter5);
bool ifparam5 = nh.hasParam("param5");
bool ifparam6 = ros::param::has("param6");
if(ifparam5)
ROS_INFO("Param5 exists");
else
ROS_INFO("Param5 doesn't exist");
if(ifparam6)
ROS_INFO("Param6 exists");
else
ROS_INFO("Param6 doesn't exist");
bool ifdeleted5 = nh.deleteParam("param5");
bool ifdeleted6 = ros::param::del("param6");
if(ifdeleted5)
ROS_INFO("Param5 deleted");
else
ROS_INFO("Param5 not deleted");
if(ifdeleted6)
ROS_INFO("Param6 deleted");
else
ROS_INFO("Param6 not deleted");
ros::Rate rate(0.3);
while(ros::ok()){
int parameter = 0;
ROS_INFO("=============Loop==============");
if(ros::param::get("param1", parameter))
ROS_INFO("parameter param1 = %d", parameter);
if(ros::param::get("param2", parameter))
ROS_INFO("parameter param2 = %d", parameter);
if(ros::param::get("param3", parameter))
ROS_INFO("parameter param3 = %d", parameter);
if(ros::param::get("param4", parameter))
ROS_INFO("parameter param4 = %d", parameter);
if(ros::param::get("param5", parameter))
ROS_INFO("parameter param5 = %d", parameter);
if(ros::param::get("param6", parameter))
ROS_INFO("parameter param6 = %d", parameter);
rate.sleep();
}
}
param_demo_cpp.launch
<launch>
<param name="param1" value="1" />
<param name="param2" value="2" />
<rosparam>
param3: 3
param4: 4
param5: 5
</rosparam>
<node pkg="param_demo" type="param_demo" name="param_demo" output="screen" />
</launch>
本文内容由网友自发贡献,版权归原作者所有,本站不承担相应法律责任。如您发现有涉嫌抄袭侵权的内容,请联系:hwhale#tublm.com(使用前将#替换为@)